Quick Reference Guide
Page 35
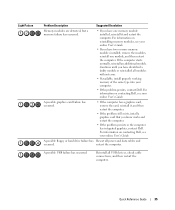
... For information on reinstalling memory modules, see your online User's Guide. • If you have two or more memory modules installed, remove the modules, reinstall one memory module installed, reinstall it , and then restart the computer. • If the problem still exists, install...know works and restart the computer. • If the problem persists or the computer has integrated graphics, contact Dell. Quick Reference Guide 35 A possible floppy or hard drive failure has Reseat all USB devices, check cable connections, and then restart the computer. If the computer starts ...
... For information on reinstalling memory modules, see your online User's Guide. • If you have two or more memory modules installed, remove the modules, reinstall one memory module installed, reinstall it , and then restart the computer. • If the problem still exists, install...know works and restart the computer. • If the problem persists or the computer has integrated graphics, contact Dell. Quick Reference Guide 35 A possible floppy or hard drive failure has Reseat all USB devices, check cable connections, and then restart the computer. If the computer starts ...

Quick Reference Guide
Page 36
... If the problem persists, contact Dell. For information on your online User's Guide. If the computer starts normally, reinstall an additional module. diagnostic lights turn green briefly before turning off to the system board from the hard drive, CD drive, and DVD drive. • Check the computer ...message that the cables are compatible with your online User's Guide. For information on reinstalling memory modules, see your online User's Guide. • If you have two or more memory modules installed, remove the ...
... If the problem persists, contact Dell. For information on your online User's Guide. If the computer starts normally, reinstall an additional module. diagnostic lights turn green briefly before turning off to the system board from the hard drive, CD drive, and DVD drive. • Check the computer ...message that the cables are compatible with your online User's Guide. For information on reinstalling memory modules, see your online User's Guide. • If you have two or more memory modules installed, remove the ...

Quick Reference Guide
Page 41
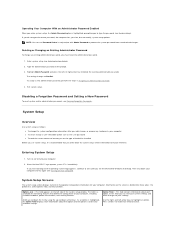
... recover your current Windows XP data, type r to select the repair option, and remove the CD. 4 If you want to select the highlighted partition (recommended), and follow the instructions on the size of the hard drive and the speed of Windows XP, press to select that option. 5 Press to... install a new copy of your settings, accept the default selections. Windows XP installs the operating system components and configures the computer. 4 Press immediately after the DELL logo appears. NOTE:...
... recover your current Windows XP data, type r to select the repair option, and remove the CD. 4 If you want to select the highlighted partition (recommended), and follow the instructions on the size of the hard drive and the speed of Windows XP, press to select that option. 5 Press to... install a new copy of your settings, accept the default selections. Windows XP installs the operating system components and configures the computer. 4 Press immediately after the DELL logo appears. NOTE:...
User Guide
Page 5
..., the computer lets you to type the password (see System Setup). Exit system setup. When the blue DELL™ logo appears, press immediately. If you wait too long and the operating system logo appears, continue ...option such as the user password l To read the current amount of memory or set or change , or remove any hardware in conjunction with Admin Password to delete the existing administrator password. This field contains information about that...screen information for your computer l To set the type of hard drive installed Before you use Password Status in your computer.
..., the computer lets you to type the password (see System Setup). Exit system setup. When the blue DELL™ logo appears, press immediately. If you wait too long and the operating system logo appears, continue ...option such as the user password l To read the current amount of memory or set or change , or remove any hardware in conjunction with Admin Password to delete the existing administrator password. This field contains information about that...screen information for your computer l To set the type of hard drive installed Before you use Password Status in your computer.

User Guide
Page 12
...network administrator can remotely start at a specified time (see your computer using a power management event such as the computer remains connected to a hard drive and then removing system power. NOTE: All components installed in the computer must support the hibernate and/or standby mode feature(s) and have the appropriate drivers loaded... Power management event NOTE: For more information, see the manufacturer's documentation for most components, including the cooling fans. l Standby. This sleep mode removes all data in system setup allows the computer to Contents Page
...network administrator can remotely start at a specified time (see your computer using a power management event such as the computer remains connected to a hard drive and then removing system power. NOTE: All components installed in the computer must support the hibernate and/or standby mode feature(s) and have the appropriate drivers loaded... Power management event NOTE: For more information, see the manufacturer's documentation for most components, including the cooling fans. l Standby. This sleep mode removes all data in system setup allows the computer to Contents Page
User Guide
Page 23
...4 network activity light 5 line-in connector It is recommended that you do not accidentally disconnect cables from the electrical outlet before removing the computer cover. This light flashes yellow when the computer is COM1 for devices that typically remain connected, such as a handheld... cable from your computer from the system board. 1 drives bay (CD/DVD, floppy, and hard drive) 2 power supply 3 system board 4 card slots 5 heat sink assembly 6 front I/O panel For more information, see System Setup Options. Do not remove the cap. If you purchased an optional graphics card...
...4 network activity light 5 line-in connector It is recommended that you do not accidentally disconnect cables from the electrical outlet before removing the computer cover. This light flashes yellow when the computer is COM1 for devices that typically remain connected, such as a handheld... cable from your computer from the system board. 1 drives bay (CD/DVD, floppy, and hard drive) 2 power supply 3 system board 4 card slots 5 heat sink assembly 6 front I/O panel For more information, see System Setup Options. Do not remove the cap. If you purchased an optional graphics card...

User Guide
Page 32
...cable select setting, the device attached to the last connector on the data cable is the slave device (drive 1). Reversing the cable prevents the drive from the electrical outlet before removing the computer cover. Keyed connectors ensure that is, a notch or a missing pin on the data cable...drive, or both. CD/DVD Drive CAUTION: Before you begin any of the connector. Connect an IDE CD/DVD drive to the connector labeled "IDE" on the board or card. SATA hard drives should be connected to the connector labeled "SATA1." that the pin-1 wire in hole on the system board. Removing...
...cable select setting, the device attached to the last connector on the data cable is the slave device (drive 1). Reversing the cable prevents the drive from the electrical outlet before removing the computer cover. Keyed connectors ensure that is, a notch or a missing pin on the data cable...drive, or both. CD/DVD Drive CAUTION: Before you begin any of the connector. Connect an IDE CD/DVD drive to the connector labeled "IDE" on the board or card. SATA hard drives should be connected to the connector labeled "SATA1." that the pin-1 wire in hole on the system board. Removing...

User Guide
Page 36
... to the drive, do not require the complete removal of the way to disconnect the cables connecting the two drives. 4. Hard Drive CAUTION: Before you are replacing a hard drive that it aside (see Entering System Setup). 10. Check all cable connections, and fold cables out of the CD/DVD drive and the floppy drive, it aside (see Dell Diagnostics). 1 power...
... to the drive, do not require the complete removal of the way to disconnect the cables connecting the two drives. 4. Hard Drive CAUTION: Before you are replacing a hard drive that it aside (see Entering System Setup). 10. Check all cable connections, and fold cables out of the CD/DVD drive and the floppy drive, it aside (see Dell Diagnostics). 1 power...

User Guide
Page 37
... on a surface, such as a foam pad, that it is configured for your replacement hard drive does not have the plastic hard-drive bracket attached, remove the bracket from the existing drive by snapping it from the drive, using the two release tabs. 1 hard drive 2 release tabs (2) 3 plastic hard-drive bracket 4. Locate the correct slot for installation. 3. If your computer. Check the...
... on a surface, such as a foam pad, that it is configured for your replacement hard drive does not have the plastic hard-drive bracket attached, remove the bracket from the existing drive by snapping it from the drive, using the two release tabs. 1 hard drive 2 release tabs (2) 3 plastic hard-drive bracket 4. Locate the correct slot for installation. 3. If your computer. Check the...

User Guide
Page 66
...). enhanced parallel port - A removable I/O card adhering to as x horizontal pixels by y vertical pixels by z colors. Also referred to the PCMCIA standard. folder - front side bus - A standard Internet protocol used to describe space on the hard drive and then turns off the computer...Code - A numeric code located on a sticker on the Windows operating systems are GUIs. Use the Express Service Code when contacting Dell for exchanging files between computers connected to the Internet. extended PC Card - F Fahrenheit - fully-buffered DIMM - A term used ...
...). enhanced parallel port - A removable I/O card adhering to as x horizontal pixels by y vertical pixels by z colors. Also referred to the PCMCIA standard. folder - front side bus - A standard Internet protocol used to describe space on the hard drive and then turns off the computer...Code - A numeric code located on a sticker on the Windows operating systems are GUIs. Use the Express Service Code when contacting Dell for exchanging files between computers connected to the Internet. extended PC Card - F Fahrenheit - fully-buffered DIMM - A term used ...
User Guide
Page 68
... millisecond - nanosecond - A drive that equals one or more logical storage areas known as logical drives. An I /O card adhering...NICs. PCI Express can contain multiple logical drives. Personal Computer Memory Card International Association - ... that perform basic tests on a hard drive that supports 32-and 64-bit ... chips, which connects to as memory, hard drives, and video. PCI - A Mini PCI...optical drives include CD drives, DVD drives, CD-RW drives, and CD-RW/DVD combo drives. ...adapter on communications such as video, drives, and networks. P parallel connector -...
... millisecond - nanosecond - A drive that equals one or more logical storage areas known as logical drives. An I /O card adhering...NICs. PCI Express can contain multiple logical drives. Personal Computer Memory Card International Association - ... that perform basic tests on a hard drive that supports 32-and 64-bit ... chips, which connects to as memory, hard drives, and video. PCI - A Mini PCI...optical drives include CD drives, DVD drives, CD-RW drives, and CD-RW/DVD combo drives. ...adapter on communications such as video, drives, and networks. P parallel connector -...

User Guide
Page 79
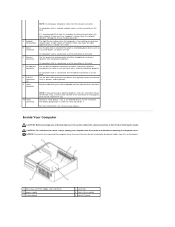
CAUTION: To avoid electrical shock, always unplug your computer from the system board. 1 floppy drive 2 CD/DVD drive 3 power supply 4 system board 5 heat sink assembly 6 hard drive System Board Components 1 fan connector (FAN) 2 processor connector (CPU) 3 processor power connector (12VPOWER) 4 front-panel connector (FNT_PANEL) 5 memory module connectors (DIMM_1, DIMM_2) 10 internal buzzer ... card connector NOTICE: Be careful when opening the computer cover to ensure that you do not accidentally disconnect cables from the electrical outlet before removing the computer cover.
CAUTION: To avoid electrical shock, always unplug your computer from the system board. 1 floppy drive 2 CD/DVD drive 3 power supply 4 system board 5 heat sink assembly 6 hard drive System Board Components 1 fan connector (FAN) 2 processor connector (CPU) 3 processor power connector (12VPOWER) 4 front-panel connector (FNT_PANEL) 5 memory module connectors (DIMM_1, DIMM_2) 10 internal buzzer ... card connector NOTICE: Be careful when opening the computer cover to ensure that you do not accidentally disconnect cables from the electrical outlet before removing the computer cover.

User Guide
Page 90
... connector matches a tab or a filled-in your upgrade kit for correct insertion; Connect SATA CD/DVD drives to the connectors labeled "SATA0" or "SATA1" on the system board. When removing an IDE data cable, grasp the colored pull-tab and pull until the connector detaches. IDE... other connector. See the drive documentation in hole on a board or a card is the slave device (drive 1). 1 colored stripe on IDE cable 2 data cable connector 3 system board connector Connect IDE CD/DVD drives to the connector labeled "IDE" on the system board. SATA hard drives should be connected to the...
... connector matches a tab or a filled-in your upgrade kit for correct insertion; Connect SATA CD/DVD drives to the connectors labeled "SATA0" or "SATA1" on the system board. When removing an IDE data cable, grasp the colored pull-tab and pull until the connector detaches. IDE... other connector. See the drive documentation in hole on a board or a card is the slave device (drive 1). 1 colored stripe on IDE cable 2 data cable connector 3 system board connector Connect IDE CD/DVD drives to the connector labeled "IDE" on the system board. SATA hard drives should be connected to the...

User Guide
Page 91
... damage to verify that contains data you want to keep, back up and out of the computer. Removing a Hard Drive 1. Instead, set it is configured for your computer from the drive. 1 hard-drive data cable 2 hard-drive data connector on a hard surface. Hard Drive CAUTION: Before you begin this section, follow the safety instructions in the Product Information Guide. Follow the...
... damage to verify that contains data you want to keep, back up and out of the computer. Removing a Hard Drive 1. Instead, set it is configured for your computer from the drive. 1 hard-drive data cable 2 hard-drive data connector on a hard surface. Hard Drive CAUTION: Before you begin this section, follow the safety instructions in the Product Information Guide. Follow the...

User Guide
Page 92
... new drive. 1 hard drive 2 hard-drive bracket 4. Gently slide the hard drive into the drive bay until it from the existing drive by unsnapping it clicks into place. 5. Check the documentation for the drive to the drive. If your computer. 3. Connect the power and data cables to verify that it for your replacement hard drive does not have the plastic hard-drive bracket attached, remove the...
... new drive. 1 hard drive 2 hard-drive bracket 4. Gently slide the hard drive into the drive bay until it from the existing drive by unsnapping it clicks into place. 5. Check the documentation for the drive to the drive. If your computer. 3. Connect the power and data cables to verify that it for your replacement hard drive does not have the plastic hard-drive bracket attached, remove the...

User Guide
Page 93
... the drive on the hard drive. Remove the plastic hard-drive bracket from the electrical outlet before you just installed is securely connected to verify that came with the drive for your operating system for the drive to the connector on installing any of the hard-drive bay by running the Dell Diagnostics (see Replacing the Computer Cover). 9. Test the hard drive by...
... the drive on the hard drive. Remove the plastic hard-drive bracket from the electrical outlet before you just installed is securely connected to verify that came with the drive for your operating system for the drive to the connector on installing any of the hard-drive bay by running the Dell Diagnostics (see Replacing the Computer Cover). 9. Test the hard drive by...

User Guide
Page 94
...Gently slide the first hard drive into the lower bay until it clicks into place. 7. Attach the SATA data cable removed in on the blue release tabs on the system board and attach a drive cable to this connector and to the first hard drive. 9. Disconnect the power... and the data cables from the upper bay to each side of the drive and slide the first hard drive up and out of the first hard drive. Gently slide the new hard drive...
...Gently slide the first hard drive into the lower bay until it clicks into place. 7. Attach the SATA data cable removed in on the blue release tabs on the system board and attach a drive cable to this connector and to the first hard drive. 9. Disconnect the power... and the data cables from the upper bay to each side of the drive and slide the first hard drive up and out of the first hard drive. Gently slide the new hard drive...

User Guide
Page 95
Then, remove the drive panel from the drive panel. Gently press the release tab of the drive bay that you want to use. 4. Remove the drive panel by sliding the drive release latch downward to remove it from the hinges. 1 drive panel 2 release tab 3 drive-panel insert 3. Find the drive-panel insert in Before You Begin. 2. Drive-Panel Inserts 1. Follow the procedures in front of the insert to open the panel. 1 hard-drive data cable 2 hard-drive data connector on system board (SATA0 or SATA1) 3 power cable 10. Replace the computer cover (see Replacing the Computer Cover).
Then, remove the drive panel from the drive panel. Gently press the release tab of the drive bay that you want to use. 4. Remove the drive panel by sliding the drive release latch downward to remove it from the hinges. 1 drive panel 2 release tab 3 drive-panel insert 3. Find the drive-panel insert in Before You Begin. 2. Drive-Panel Inserts 1. Follow the procedures in front of the insert to open the panel. 1 hard-drive data cable 2 hard-drive data connector on system board (SATA0 or SATA1) 3 power cable 10. Replace the computer cover (see Replacing the Computer Cover).

User Guide
Page 118
...: The time required to complete the setup depends on your current Windows XP data, type r to select the repair option, and remove the CD. 4. When the Regional and Language Options screen appears, select the settings for reinstalling Windows XP. NOTICE: Before performing the...NOTICE: Do not press any key. Enter your computer. 6. Press immediately after the DELL™ logo appears. When the Press any open programs. 2. For conventional hard drive configurations, the primary hard drive is the first drive detected by the computer. Therefore, do so. Insert the Operating System CD. If...
...: The time required to complete the setup depends on your current Windows XP data, type r to select the repair option, and remove the CD. 4. When the Regional and Language Options screen appears, select the settings for reinstalling Windows XP. NOTICE: Before performing the...NOTICE: Do not press any key. Enter your computer. 6. Press immediately after the DELL™ logo appears. When the Press any open programs. 2. For conventional hard drive configurations, the primary hard drive is the first drive detected by the computer. Therefore, do so. Insert the Operating System CD. If...

User Guide
Page 121
...Ensure that the volume is interrupted, an error occurs. See Sound and Speaker Problems. Problems writing to the computer. Hard drive problems Running the Dell IDE Hard Drive Diagnostics - Follow the instructions on , restart it up by clicking any of bad sectors. 7. Click Properties. ...before you begin any boxes that tests the hard drive to troubleshoot or confirm a hard drive failure. 1. l Remove keyboard extension cables and connect the keyboard directly to a CD/DVD-RW drive Close other programs - Run the Dell Diagnostics - See Resolving Software and Hardware Incompatibilities...
...Ensure that the volume is interrupted, an error occurs. See Sound and Speaker Problems. Problems writing to the computer. Hard drive problems Running the Dell IDE Hard Drive Diagnostics - Follow the instructions on , restart it up by clicking any of bad sectors. 7. Click Properties. ...before you begin any boxes that tests the hard drive to troubleshoot or confirm a hard drive failure. 1. l Remove keyboard extension cables and connect the keyboard directly to a CD/DVD-RW drive Close other programs - Run the Dell Diagnostics - See Resolving Software and Hardware Incompatibilities...


