Service Manual
Page 4
Dell™ Latitude™ XT2 XFR Service Manual 4.10 COIN-CELL BATTERY ...48 4.10.1 Removing the Coin-Cell Battery 48 4.10.2 Installing the Coin-Cell Battery 49 4.11 USB INTERFACE BOARD ...... 69 4.22 USB MODULE BAY COVER...69 4.22.1 Removing the USB Module Cover 70 4.23 GPS MODULE (OPTIONAL) ...70 4.23.1 Removing the GPS Module ...71 4.24 CAMERA MODULE (OPTIONAL) ...72 4.24.1 Removing the Camera Module 72 5 SPECIFICATIONS ...73 6 DELL DIAGNOSTICS...74 6.1.1 Error Messages ...77 6.2 SOLVING PROBLEMS...78 6.2.1 Battery Problems ...78 6.2.2 Drive Problems ...78...
Dell™ Latitude™ XT2 XFR Service Manual 4.10 COIN-CELL BATTERY ...48 4.10.1 Removing the Coin-Cell Battery 48 4.10.2 Installing the Coin-Cell Battery 49 4.11 USB INTERFACE BOARD ...... 69 4.22 USB MODULE BAY COVER...69 4.22.1 Removing the USB Module Cover 70 4.23 GPS MODULE (OPTIONAL) ...70 4.23.1 Removing the GPS Module ...71 4.24 CAMERA MODULE (OPTIONAL) ...72 4.24.1 Removing the Camera Module 72 5 SPECIFICATIONS ...73 6 DELL DIAGNOSTICS...74 6.1.1 Error Messages ...77 6.2 SOLVING PROBLEMS...78 6.2.1 Battery Problems ...78 6.2.2 Drive Problems ...78...

Service Manual
Page 5
Dell™ Latitude™ XT2 XFR Service Manual 6.2.8 Video and Display Problems ...83 6.3 DELL TECHNICAL UPDATE SERVICE...83 6.4 DELL SUPPORT UTILITY ...84 6.4.1 Clicking the Dell Support Icon ...84 6.4.2 Double-Clicking the Dell Support Icon 84 6.5 GPS DEVICE ...85 6.5.1 GPS Hardware Configuration ...85 6.5.2 Software Configuration...87 6.5.3 Diagnostics ...87 6.6 CAMERA ...88 6.6.1 Camera Configuration Verification 88 6.6.2 Diagnostics ...89 6.7 DEVICE STATUS LEDS...90 6.8 KEYBOARD STATUS...
Dell™ Latitude™ XT2 XFR Service Manual 6.2.8 Video and Display Problems ...83 6.3 DELL TECHNICAL UPDATE SERVICE...83 6.4 DELL SUPPORT UTILITY ...84 6.4.1 Clicking the Dell Support Icon ...84 6.4.2 Double-Clicking the Dell Support Icon 84 6.5 GPS DEVICE ...85 6.5.1 GPS Hardware Configuration ...85 6.5.2 Software Configuration...87 6.5.3 Diagnostics ...87 6.6 CAMERA ...88 6.6.1 Camera Configuration Verification 88 6.6.2 Diagnostics ...89 6.7 DEVICE STATUS LEDS...90 6.8 KEYBOARD STATUS...

Service Manual
Page 64
...x 3-mm) screws for the docking door bracket. 4. Route the black and grey cable from the front end of 94 Version A00-01 Dell™ Latitude™ XT2 XFR Service Manual 1 2 3 4 5 ID PCB Reference Wiring Color 1 WWAN - Route the three cables under the retention tab and lay ...within the memory door opening. Back Black / Grey 2 GPS - Front Black 3. Place the RF Passthru board into place and tighten the two screws (M2 x 3-...
...x 3-mm) screws for the docking door bracket. 4. Route the black and grey cable from the front end of 94 Version A00-01 Dell™ Latitude™ XT2 XFR Service Manual 1 2 3 4 5 ID PCB Reference Wiring Color 1 WWAN - Route the three cables under the retention tab and lay ...within the memory door opening. Back Black / Grey 2 GPS - Front Black 3. Place the RF Passthru board into place and tighten the two screws (M2 x 3-...

Service Manual
Page 67
Back Black 4 WWAN - Insert the rocker switch onto the rocker pin. 2. Front Grey 5 WLAN - Page 67 of the rocker switch. 2. Back Black / Grey 2 GPS - Dell™ Latitude™ XT2 XFR Service Manual 1 2 3 4 5 ID PCB Reference Wiring Color 1 WWAN - Set the RF Passthru board on the opposite side and run them under the retainer tab. 4.20 ...
Back Black 4 WWAN - Insert the rocker switch onto the rocker pin. 2. Front Grey 5 WLAN - Page 67 of the rocker switch. 2. Back Black / Grey 2 GPS - Dell™ Latitude™ XT2 XFR Service Manual 1 2 3 4 5 ID PCB Reference Wiring Color 1 WWAN - Set the RF Passthru board on the opposite side and run them under the retainer tab. 4.20 ...

Service Manual
Page 70
... Follow the procedures in Before Working Inside Your XT2 XFR. 2. Remove the cover from the XT2 XFR. 3. Unlock the cover from the LCD bezel. 4. For additional safety best practices information, see the Regulatory Compliance Homepage at www.dell.com/regulatory_compliance. 4.22.1 Removing the USB Module Cover 1. Dell™ Latitude™ XT2 XFR Service Manual Unlock Position WARNING: Before working...
... Follow the procedures in Before Working Inside Your XT2 XFR. 2. Remove the cover from the XT2 XFR. 3. Unlock the cover from the LCD bezel. 4. For additional safety best practices information, see the Regulatory Compliance Homepage at www.dell.com/regulatory_compliance. 4.22.1 Removing the USB Module Cover 1. Dell™ Latitude™ XT2 XFR Service Manual Unlock Position WARNING: Before working...

Service Manual
Page 71
Page 71 of 94 Version A00-01 Remove the battery from the LCD bezel. 4. Unlock the GPS from the XT2 XFR. 3. For additional safety best practices information, see the Regulatory Compliance Homepage at www.dell.com/regulatory_compliance. 4.23.1 Removing the GPS Module 1. Remove the GPS module from the Hot Swappable Module bay. Follow the procedures in Before Working Inside Your XT2 XFR. 2. Dell™ Latitude™ XT2 XFR Service Manual Unlock Position WARNING: Before working inside your XT2 XFR, read the safety information that shipped with your XT2 XFR.
Page 71 of 94 Version A00-01 Remove the battery from the LCD bezel. 4. Unlock the GPS from the XT2 XFR. 3. For additional safety best practices information, see the Regulatory Compliance Homepage at www.dell.com/regulatory_compliance. 4.23.1 Removing the GPS Module 1. Remove the GPS module from the Hot Swappable Module bay. Follow the procedures in Before Working Inside Your XT2 XFR. 2. Dell™ Latitude™ XT2 XFR Service Manual Unlock Position WARNING: Before working inside your XT2 XFR, read the safety information that shipped with your XT2 XFR.

Service Manual
Page 72
Dell™ Latitude™ XT2 XFR Service Manual 4.24 Camera Module (OPTIONAL) Unlock Position WARNING: Before working inside your XT2 XFR, read the safety information that shipped with your XT2 XFR. Follow the procedures in Before Working Inside Your XT2 XFR. 2. Remove the GPS module from the XT2 XFR. 3. Page 72 of 94 Version A00-01 Remove the battery from the Hot Swappable Module...
Dell™ Latitude™ XT2 XFR Service Manual 4.24 Camera Module (OPTIONAL) Unlock Position WARNING: Before working inside your XT2 XFR, read the safety information that shipped with your XT2 XFR. Follow the procedures in Before Working Inside Your XT2 XFR. 2. Remove the GPS module from the XT2 XFR. 3. Page 72 of 94 Version A00-01 Remove the battery from the Hot Swappable Module...
Service Manual
Page 73
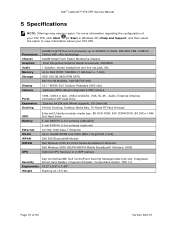
Dell™ Latitude™ XT2 XFR Service Manual 5 Specifications NOTE: Offerings may vary by region. Processors Chipset Graphics Audio Memory Storage Display Camera Intel® Core™2 Duo ULV processor up ...) Express 54 (34 and 54mm support), SD Card slot Vehicle Docking, Desktop Media Bay, Tri-Mode RF Pass-through ODD Battery Ethernet WLAN WPAN WWAN GPS External E-Family modular media bay: 8X DVD-ROM, 24X CDRW/DVD, 8X DVD+/-RW, 2nd Hard Drive 4-cell 28W/Hr Li-Ion primary (standard) 6-cell...
Dell™ Latitude™ XT2 XFR Service Manual 5 Specifications NOTE: Offerings may vary by region. Processors Chipset Graphics Audio Memory Storage Display Camera Intel® Core™2 Duo ULV processor up ...) Express 54 (34 and 54mm support), SD Card slot Vehicle Docking, Desktop Media Bay, Tri-Mode RF Pass-through ODD Battery Ethernet WLAN WPAN WWAN GPS External E-Family modular media bay: 8X DVD-ROM, 24X CDRW/DVD, 8X DVD+/-RW, 2nd Hard Drive 4-cell 28W/Hr Li-Ion primary (standard) 6-cell...

Service Manual
Page 85
... to configuring a communications port for the GPS to operate in the locked position. 6.5.1 GPS Hardware Configuration It is in . 1. Click on Properties. 2. Page 85 of 94 Version A00-01 then click on Device Manager. Ensure the GPS device is properly seated and the lock ...important that you configure your computer's hardware settings properly to allow the GPS device to install the GPS device. Click on the Start button and right-click on Computer; Dell™ Latitude™ XT2 XFR Service Manual 6.5 GPS Device Follow the directions in the hot swappable modules section above to...
... to configuring a communications port for the GPS to operate in the locked position. 6.5.1 GPS Hardware Configuration It is in . 1. Click on Properties. 2. Page 85 of 94 Version A00-01 then click on Device Manager. Ensure the GPS device is properly seated and the lock ...important that you configure your computer's hardware settings properly to allow the GPS device to install the GPS device. Click on the Start button and right-click on Computer; Dell™ Latitude™ XT2 XFR Service Manual 6.5 GPS Device Follow the directions in the hot swappable modules section above to...

Service Manual
Page 87
... Please follow the instructions provided by your software manufacturer. 6.5.3 Diagnostics Performing Dell Diagnostics on USB devices will locate the GPS as a connected device and run a ping test on the GPS installed. If the USB device test fails the GPS only, replace the GPS module. Select the Port Settings tab. If the ping test does not... Stop bits: 1 Flow control: None 6.5.2 Software Configuration There are many off the shelf and usage specific applications available that are present, replace the system board. Dell™ Latitude™ XT2 XFR Service Manual 4.
... Please follow the instructions provided by your software manufacturer. 6.5.3 Diagnostics Performing Dell Diagnostics on USB devices will locate the GPS as a connected device and run a ping test on the GPS installed. If the USB device test fails the GPS only, replace the GPS module. Select the Port Settings tab. If the ping test does not... Stop bits: 1 Flow control: None 6.5.2 Software Configuration There are many off the shelf and usage specific applications available that are present, replace the system board. Dell™ Latitude™ XT2 XFR Service Manual 4.

Setup and Features Information
Page 2
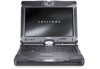
Dell™ Latitude™ XT2 XFR Setup and Features Information 1 Display 2 Ambient light sensor 3 Device status lights 4 Digital array microphone 5 Biometric reader 6 Microphone connector 7 Headphones connector 8 ExpressCard slot 9 Secure digital (SD...Track stick 16 Keyboard 17 Digital array microphone 18 Power button 19 Windows security button 20 Screen rotate button 21 Dell Control Point (DCP) button 22 Hot Swappable Modules: Camera or GPS (optional) NOTE: Press to toggle between WLAN and WWAN. Latitude XT2 XFR does not support simultaneous operation of WLAN and WWAN modes. Page 2
Dell™ Latitude™ XT2 XFR Setup and Features Information 1 Display 2 Ambient light sensor 3 Device status lights 4 Digital array microphone 5 Biometric reader 6 Microphone connector 7 Headphones connector 8 ExpressCard slot 9 Secure digital (SD...Track stick 16 Keyboard 17 Digital array microphone 18 Power button 19 Windows security button 20 Screen rotate button 21 Dell Control Point (DCP) button 22 Hot Swappable Modules: Camera or GPS (optional) NOTE: Press to toggle between WLAN and WWAN. Latitude XT2 XFR does not support simultaneous operation of WLAN and WWAN modes. Page 2

Setup and Features Information
Page 15
To install a hot swappable module Camera or GPS device, use the following procedure. 1. Locate the area above shows the lock in either notebook or tablet mode. Page 15 The pen is released. Move .... Hot Swappable Modules Either an optional Camera or GPS device can then be installed. Image above shows the lock in the locked position Image above the display where the hot swappable module device will be removed from the pen garage. Dell™ Latitude™ XT2 XFR Setup and Features Information The pen is stored by...
To install a hot swappable module Camera or GPS device, use the following procedure. 1. Locate the area above shows the lock in either notebook or tablet mode. Page 15 The pen is released. Move .... Hot Swappable Modules Either an optional Camera or GPS device can then be installed. Image above shows the lock in the locked position Image above the display where the hot swappable module device will be removed from the pen garage. Dell™ Latitude™ XT2 XFR Setup and Features Information The pen is stored by...

Setup and Features Information
Page 16
Insert the hot swappable module (either camera or GPS). Dell™ Latitude™ XT2 XFR Setup and Features Information 3. Lock the hot swappable module device into place by sliding the lock to the locked position. Ensure the device is properly seated. 4. Page 16
Insert the hot swappable module (either camera or GPS). Dell™ Latitude™ XT2 XFR Setup and Features Information 3. Lock the hot swappable module device into place by sliding the lock to the locked position. Ensure the device is properly seated. 4. Page 16

Setup and Features Information
Page 18
... process to configuring a communications port for the GPS to operate in the hot swappable modules section above to operate. Click on the Start button and right-click on Properties. 2. Dell™ Latitude™ XT2 XFR Setup and Features Information GPS Device Follow the directions in . 1. then ...click on Computer; Page 18 Click on Device Manager. Ensure the GPS device is properly seated and the lock is important ...
... process to configuring a communications port for the GPS to operate in the hot swappable modules section above to operate. Click on the Start button and right-click on Properties. 2. Dell™ Latitude™ XT2 XFR Setup and Features Information GPS Device Follow the directions in . 1. then ...click on Computer; Page 18 Click on Device Manager. Ensure the GPS device is properly seated and the lock is important ...

Setup and Features Information
Page 20
Dell™ Latitude™ XT2 XFR Setup and Features Information 4. Confirm that are compatible with the GPS module. Additional configuration may be required to allow the software to function with this GPS module. Camera Follow the directions in the locked position. Select the Port Settings tab. Please follow the instructions provided by your software manufacturer. Page 20...
Dell™ Latitude™ XT2 XFR Setup and Features Information 4. Confirm that are compatible with the GPS module. Additional configuration may be required to allow the software to function with this GPS module. Camera Follow the directions in the locked position. Select the Port Settings tab. Please follow the instructions provided by your software manufacturer. Page 20...

Setup and Features Information
Page 23
Dell™ Latitude™ XT2 XFR Setup and Features Information Specifications NOTE: Offerings may vary by region. For more information regarding the configuration of your computer, click Start -> Help and Support and select the option to Intel® WiFi® Link 5300 (802.11a/g/Draft n 3x3) WPAN Dell 365 Bluetooth® Module WWAN Dell Wireless 5720 EV...
Dell™ Latitude™ XT2 XFR Setup and Features Information Specifications NOTE: Offerings may vary by region. For more information regarding the configuration of your computer, click Start -> Help and Support and select the option to Intel® WiFi® Link 5300 (802.11a/g/Draft n 3x3) WPAN Dell 365 Bluetooth® Module WWAN Dell Wireless 5720 EV...


