Quick Reference Guide
Page 6
...technical-reference material for your computer. 6 Quick Reference Guide Readme files may be found at support.dell.com. • How to remove and replace parts Dell™ Latitude™ XT User's Guide • Specifications Microsoft Windows XP and Windows • How to configure system settings ...Here Documentation and drivers are already installed on your User's Guide) or to run the Dell Diagnostics (see "Reinstalling Drivers and Utilities" in Windows XP)→ Help and Support→ Dell User and System Guides→ System Guides. 2 Click the User's Guide for technicians...
...technical-reference material for your computer. 6 Quick Reference Guide Readme files may be found at support.dell.com. • How to remove and replace parts Dell™ Latitude™ XT User's Guide • Specifications Microsoft Windows XP and Windows • How to configure system settings ...Here Documentation and drivers are already installed on your User's Guide) or to run the Dell Diagnostics (see "Reinstalling Drivers and Utilities" in Windows XP)→ Help and Support→ Dell User and System Guides→ System Guides. 2 Click the User's Guide for technicians...
User's Guide
Page 9
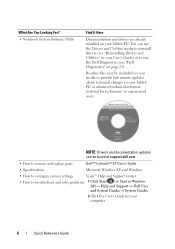
Using the Operating System Media 151 11 Adding and Replacing Parts 155 Before You Begin 155 Recommended Tools 155 Turning Off Your Tablet-PC 155 Before Working Inside Your Tablet-PC 156 Main Battery 157 Removing ...
Using the Operating System Media 151 11 Adding and Replacing Parts 155 Before You Begin 155 Recommended Tools 155 Turning Off Your Tablet-PC 155 Before Working Inside Your Tablet-PC 156 Main Battery 157 Removing ...
User's Guide
Page 23
... AutoTech, use your e-mail address as your order, such as missing parts, wrong parts, or incorrect billing, contact Dell for the information needed to a sales specialist, see "Contacting Dell" on page 26. A recording prompts you call for your region, see "Contacting Dell" on the status of any Dell products you have a problem with your password. apsupport...
... AutoTech, use your e-mail address as your order, such as missing parts, wrong parts, or incorrect billing, contact Dell for the information needed to a sales specialist, see "Contacting Dell" on page 26. A recording prompts you call for your region, see "Contacting Dell" on the status of any Dell products you have a problem with your password. apsupport...

User's Guide
Page 97
..., the Windows operating system asks you to configure two displays that you want to the extended desktop. To enable extended desktop mode, select Show different parts of sharpness is not as sharp as it would be viewed from the projector to be with a 1280 x 800 display resolution. You can change the...
..., the Windows operating system asks you to configure two displays that you want to the extended desktop. To enable extended desktop mode, select Show different parts of sharpness is not as sharp as it would be viewed from the projector to be with a 1280 x 800 display resolution. You can change the...

User's Guide
Page 126
.... In Windows XP, click Hardware Troubleshooter as displayed in the Windows Notification area functions differently when you added or removed a part before the problem started, review the installation procedures and ensure that best describes the problem and follow the remaining troubleshooting steps. The... icon in the search results. 3 Select the option that the part is customized for your computing environment • View the Dell Support Utility settings • Access the help file for the Dell Support Utility • View frequently asked questions • Learn more about...
.... In Windows XP, click Hardware Troubleshooter as displayed in the Windows Notification area functions differently when you added or removed a part before the problem started, review the installation procedures and ensure that best describes the problem and follow the remaining troubleshooting steps. The... icon in the search results. 3 Select the option that the part is customized for your computing environment • View the Dell Support Utility settings • Access the help file for the Dell Support Utility • View frequently asked questions • Learn more about...

User's Guide
Page 139
... the computer is either turned off or is working by testing it with a projector. Ensure that the electrical outlet is not receiving power. - If only part of the display is turned on. - Reseat the power cable into an electrical outlet and that the computer turns on the Tablet-PC, display illuminates... THE SCREEN RO TA TE BUTTON - Troubleshooting 139 If the external monitor works, the Tablet-PC display or video controller may be defective. Contact Dell (see "Contacting Dell" on the back of the procedures in this section, follow the safety instructions in sleep or standby mode.
... the computer is either turned off or is working by testing it with a projector. Ensure that the electrical outlet is not receiving power. - If only part of the display is turned on. - Reseat the power cable into an electrical outlet and that the computer turns on the Tablet-PC, display illuminates... THE SCREEN RO TA TE BUTTON - Troubleshooting 139 If the external monitor works, the Tablet-PC display or video controller may be defective. Contact Dell (see "Contacting Dell" on the back of the procedures in this section, follow the safety instructions in sleep or standby mode.

User's Guide
Page 155
... losing data, save and close all open files and exit all open programs before you turn off your Tablet-PC. Adding and Replacing Parts 155 11 Adding and Replacing Parts Before You Begin This chapter provides procedures for removing and installing the components in your Tablet-PC. 1 Shut down the operating system...
... losing data, save and close all open files and exit all open programs before you turn off your Tablet-PC. Adding and Replacing Parts 155 11 Adding and Replacing Parts Before You Begin This chapter provides procedures for removing and installing the components in your Tablet-PC. 1 Shut down the operating system...

User's Guide
Page 156
...technician should perform repairs on the cable itself. Also, before you begin working inside the Tablet-PC. 1 Ensure that is not authorized by Dell is not covered by its metal mounting bracket. NOTICE: Handle components and cards with locking tabs; Do not touch the components or contacts ...on page 155). 156 Adding and Replacing Parts NOTICE: When you disconnect a cable, pull on its connector or on the locking tabs before you begin any connector pins. Before Working Inside...
...technician should perform repairs on the cable itself. Also, before you begin working inside the Tablet-PC. 1 Ensure that is not authorized by Dell is not covered by its metal mounting bracket. NOTICE: Handle components and cards with locking tabs; Do not touch the components or contacts ...on page 155). 156 Adding and Replacing Parts NOTICE: When you disconnect a cable, pull on its connector or on the locking tabs before you begin any connector pins. Before Working Inside...
User's Guide
Page 157
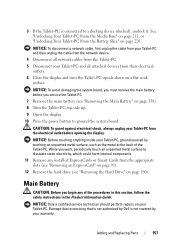
...follow the safety instructions in the Product Information Guide. Main Battery CAUTION: Before you work surface. Damage due to servicing that is not authorized by Dell is connected to a docking device (docked), undock it. NOTICE: Before touching anything inside your Tablet-PC from their electrical outlets. 6 Close the ...system board. While you begin any installed ExpressCards or Smart Cards from the Tablet-PC. 5 Disconnect your Tablet-PC. Adding and Replacing Parts 157 NOTICE: To avoid damaging the system board, you must remove the main battery before opening the display.
...follow the safety instructions in the Product Information Guide. Main Battery CAUTION: Before you work surface. Damage due to servicing that is not authorized by Dell is connected to a docking device (docked), undock it. NOTICE: Before touching anything inside your Tablet-PC from their electrical outlets. 6 Close the ...system board. While you begin any installed ExpressCards or Smart Cards from the Tablet-PC. 5 Disconnect your Tablet-PC. Adding and Replacing Parts 157 NOTICE: To avoid damaging the system board, you must remove the main battery before opening the display.

User's Guide
Page 158
... of your Tablet-PC and then unplug the cable from the network device. 4 Disconnect all network cables from the battery bay. 158 Adding and Replacing Parts NOTICE: To avoid damaging the system board, you must remove the main battery before you service the Tablet-PC. 5 Close the display and turn the...
... of your Tablet-PC and then unplug the cable from the network device. 4 Disconnect all network cables from the battery bay. 158 Adding and Replacing Parts NOTICE: To avoid damaging the system board, you must remove the main battery before you service the Tablet-PC. 5 Close the display and turn the...
User's Guide
Page 159
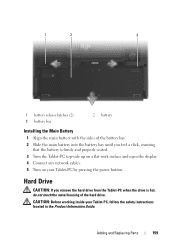
... Drive CAUTION: If you feel a click, ensuring that the battery is hot, do not touch the metal housing of the hard drive. Adding and Replacing Parts 159 1 2 3 1 battery release latches (2) 3 battery bay 2 battery Installing the Main Battery 1 Align the main battery with the sides of the battery bay. 2 Slide the main...
... Drive CAUTION: If you feel a click, ensuring that the battery is hot, do not touch the metal housing of the hard drive. Adding and Replacing Parts 159 1 2 3 1 battery release latches (2) 3 battery bay 2 battery Installing the Main Battery 1 Align the main battery with the sides of the battery bay. 2 Slide the main...
User's Guide
Page 160
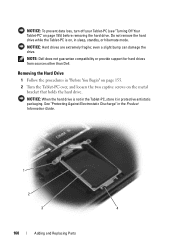
... not guarantee compatibility or provide support for hard drives from sources other than Dell. NOTICE: When the hard drive is on, in "Before You Begin" on page 155. 2 Turn the Tablet-PC over, and loosen the two captive screws ... remove the hard drive while the Tablet-PC is not in the Tablet-PC, store it in the Product Information Guide. 1 2 3 4 160 Adding and Replacing Parts even a slight bump can damage the drive.
... not guarantee compatibility or provide support for hard drives from sources other than Dell. NOTICE: When the hard drive is on, in "Before You Begin" on page 155. 2 Turn the Tablet-PC over, and loosen the two captive screws ... remove the hard drive while the Tablet-PC is not in the Tablet-PC, store it in the Product Information Guide. 1 2 3 4 160 Adding and Replacing Parts even a slight bump can damage the drive.
User's Guide
Page 161
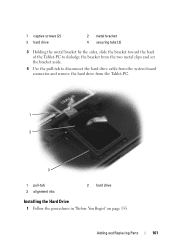
1 captive screws (2) 3 hard drive 2 metal bracket 4 securing tabs (2) 3 Holding the metal bracket by the sides, slide the bracket toward the back of the Tablet-PC to dislodge the bracket from the two metal clips and set the bracket aside. 4 Use the pull-tab to disconnect the hard drive cable from the system board connector and remove the hard drive from the Tablet-PC. 1 2 3 1 pull-tab 3 alignment ribs 2 hard drive Installing the Hard Drive 1 Follow the procedures in "Before You Begin" on page 155. Adding and Replacing Parts 161
1 captive screws (2) 3 hard drive 2 metal bracket 4 securing tabs (2) 3 Holding the metal bracket by the sides, slide the bracket toward the back of the Tablet-PC to dislodge the bracket from the two metal clips and set the bracket aside. 4 Use the pull-tab to disconnect the hard drive cable from the system board connector and remove the hard drive from the Tablet-PC. 1 2 3 1 pull-tab 3 alignment ribs 2 hard drive Installing the Hard Drive 1 Follow the procedures in "Before You Begin" on page 155. Adding and Replacing Parts 161
User's Guide
Page 162
... 147). NOTICE: Use firm and even pressure to slide the drive into the hard drive bay, seating it to one side. 162 Adding and Replacing Parts Also, take care when removing the card to slide the card completely out of the metal tabs before you may easily break. Save the original...
... 147). NOTICE: Use firm and even pressure to slide the drive into the hard drive bay, seating it to one side. 162 Adding and Replacing Parts Also, take care when removing the card to slide the card completely out of the metal tabs before you may easily break. Save the original...

User's Guide
Page 163
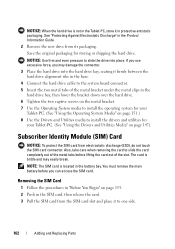
... the SIM card into the slot with the cut -off corner of the card facing toward the front of the Tablet-PC. Adding and Replacing Parts 163 1 2 1 SIM card 2 battery bay NOTE: When you replace the SIM card, ensure that you begin working inside the Tablet-PC. Installing the SIM Card...
... the SIM card into the slot with the cut -off corner of the card facing toward the front of the Tablet-PC. Adding and Replacing Parts 163 1 2 1 SIM card 2 battery bay NOTE: When you replace the SIM card, ensure that you begin working inside the Tablet-PC. Installing the SIM Card...

User's Guide
Page 164
... card with Bluetooth wireless technology with your Tablet-PC, it is located near the front left corner (see the picture below). 2 1 3 4 5 6 164 Adding and Replacing Parts
... card with Bluetooth wireless technology with your Tablet-PC, it is located near the front left corner (see the picture below). 2 1 3 4 5 6 164 Adding and Replacing Parts

User's Guide
Page 165
... the card caddy from the card. Remove the card from the card caddy end with the hole under the plastic securing tab. Adding and Replacing Parts 165
... the card caddy from the card. Remove the card from the card caddy end with the hole under the plastic securing tab. Adding and Replacing Parts 165

User's Guide
Page 166
See the picture below. 166 Adding and Replacing Parts 4 Insert the tabbed-end of the card caddy into the base, then lower the screw end into the base.
See the picture below. 166 Adding and Replacing Parts 4 Insert the tabbed-end of the card caddy into the base, then lower the screw end into the base.

User's Guide
Page 167
... display. 4 Dock and/or reconnect cables to your Tablet-PC as needed. 5 Power on your Tablet-PC by pressing the power button. Adding and Replacing Parts 167 Verify that the battery release tabs are positioned toward the middle of the procedures in this section, follow the safety instructions located in the...
... display. 4 Dock and/or reconnect cables to your Tablet-PC as needed. 5 Power on your Tablet-PC by pressing the power button. Adding and Replacing Parts 167 Verify that the battery release tabs are positioned toward the middle of the procedures in this section, follow the safety instructions located in the...

User's Guide
Page 168
Memory You can increase your Tablet-PC memory by your Tablet-PC. 168 Adding and Replacing Parts See "Specifications" on the system board. Install only memory modules that are intended for information on the memory supported by installing memory modules on page ...
Memory You can increase your Tablet-PC memory by your Tablet-PC. 168 Adding and Replacing Parts See "Specifications" on the system board. Install only memory modules that are intended for information on the memory supported by installing memory modules on page ...


