Intel Responsiveness Technologies Guide
Page 31
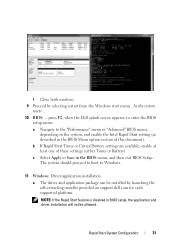
The system should proceed to boot to the "Performance" menu or "Advanced" BIOS menu, depending on support.dell.com for each supported platform. c Select Apply or Save in BIOS setup, the application and driver installation will not be installed by selecting restart ...(as described in the BIOS Menu option section of these settings (either Timer or Battery). As the system resets... 10 BIOS: ....press F2, when the Dell splash screen appears, to enter the BIOS setup menu: a Navigate to Windows. 11 Windows: Driver/application installation. Rapid Start System Configuration 31 NOTE: If ...
The system should proceed to boot to the "Performance" menu or "Advanced" BIOS menu, depending on support.dell.com for each supported platform. c Select Apply or Save in BIOS setup, the application and driver installation will not be installed by selecting restart ...(as described in the BIOS Menu option section of these settings (either Timer or Battery). As the system resets... 10 BIOS: ....press F2, when the Dell splash screen appears, to enter the BIOS setup menu: a Navigate to Windows. 11 Windows: Driver/application installation. Rapid Start System Configuration 31 NOTE: If ...

Intel Responsiveness Technologies Guide
Page 39
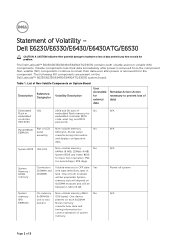
... is similar in performance to Smart Response. Appendix A 39 mSATA only Not supported NOTE: SSD performance achieved without Smart Response. Supported Storage Configurations Boot Disk (below)/ Smart Connect Rapid Start Technology (right) Smart Response HDD only Not supported Not supported Not supported HDD + SSD Not supported HDD...
... is similar in performance to Smart Response. Appendix A 39 mSATA only Not supported NOTE: SSD performance achieved without Smart Response. Supported Storage Configurations Boot Disk (below)/ Smart Connect Rapid Start Technology (right) Smart Response HDD only Not supported Not supported Not supported HDD + SSD Not supported HDD...
Statement of Volatility
Page 1
...non-volatile (NV) components. present Stores memory manufacturer data and timing information for basic boot operation, PSA (on board diags), PXE diags. The Dell Latitude™ E6230/E6330/E6430/E6430ATG/E6530 contains both modules will be between 1 GB to retain their data immediately after power is...NV) components continue to 8 GB. The following NV components are present on SoDIMM modules and will depend on the Dell Latitude™ E6230/E6330/E6430/E6430ATG/E6530 system board. Panel EEDID Part of 3 DDR3 memory Connectors Volatile memory in OFF state Yes JDIMMA and (see ...
...non-volatile (NV) components. present Stores memory manufacturer data and timing information for basic boot operation, PSA (on board diags), PXE diags. The Dell Latitude™ E6230/E6330/E6430/E6430ATG/E6530 contains both modules will be between 1 GB to retain their data immediately after power is...NV) components continue to 8 GB. The following NV components are present on SoDIMM modules and will depend on the Dell Latitude™ E6230/E6330/E6430/E6430ATG/E6530 system board. Panel EEDID Part of 3 DDR3 memory Connectors Volatile memory in OFF state Yes JDIMMA and (see ...
Statement of Volatility
Page 3
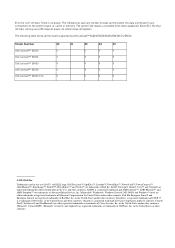
...the United States and other countries. AMD® is no power. No data will require a complete boot when awakened. and other countries. Red Hat Enterprise Linux® and Enterprise Linux® are registered ...clears all the states supported by Dell Latitude™ E6230/E6330/E6430/E6430ATG/E6530 Model Number Dell Latitude™ E6230 Dell Latitude™ E6330 Dell Latitude™ E6430 Dell Latitude™ E6530 Dell Latitude™ E6430 ATG S0 S1 S3 S4 S5 X X X X X X X X X X X X X X X X X X X X © 2012 Dell Inc. Novell® is a...
...the United States and other countries. AMD® is no power. No data will require a complete boot when awakened. and other countries. Red Hat Enterprise Linux® and Enterprise Linux® are registered ...clears all the states supported by Dell Latitude™ E6230/E6330/E6430/E6430ATG/E6530 Model Number Dell Latitude™ E6230 Dell Latitude™ E6330 Dell Latitude™ E6430 Dell Latitude™ E6530 Dell Latitude™ E6430 ATG S0 S1 S3 S4 S5 X X X X X X X X X X X X X X X X X X X X © 2012 Dell Inc. Novell® is a...
Latitude E-Family Re-Imaging Guide
Page 15
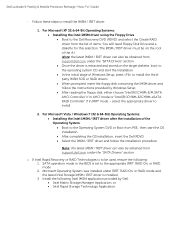
Dell Latitude E-Family & Mobile Precision Reimage "How-To" Guide - select the appropriate driver to install the... and stored on the root of Windows Setup, press to be obtained from the list of the Operating System Boot to the appropriate IRRT, RAID On, or RAID mode 2. Install the following : 1. Follow these steps to install 2....Systems: Installing the Intel IMSM driver using the Floppy Drive Boot to the Dell Recovery DVD (RDVD) and select the Create RAID driver from support.dell.com under the "SATA Drivers" section o If Intel Rapid Recovery or RAID...
Dell Latitude E-Family & Mobile Precision Reimage "How-To" Guide - select the appropriate driver to install the... and stored on the root of Windows Setup, press to be obtained from the list of the Operating System Boot to the appropriate IRRT, RAID On, or RAID mode 2. Install the following : 1. Follow these steps to install 2....Systems: Installing the Intel IMSM driver using the Floppy Drive Boot to the Dell Recovery DVD (RDVD) and select the Create RAID driver from support.dell.com under the "SATA Drivers" section o If Intel Rapid Recovery or RAID...
Latitude E-Family Re-Imaging Guide
Page 29
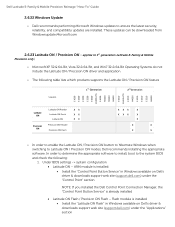
... / Precision ON - In order to determine the appropriate software to install, boot to Latitude ON / Precision ON modes, Dell recommends installing the appropriate software. Flash module is already installed Latitude ON Flash / Precision ON Flash - applies to 1st generation Latitude E-Family & Mobile Precision only) o Microsoft XP 32 & 64-Bit, Vista 32 & 64-Bit, and...
... / Precision ON - In order to determine the appropriate software to install, boot to Latitude ON / Precision ON modes, Dell recommends installing the appropriate software. Flash module is already installed Latitude ON Flash / Precision ON Flash - applies to 1st generation Latitude E-Family & Mobile Precision only) o Microsoft XP 32 & 64-Bit, Vista 32 & 64-Bit, and...
Latitude E-Family Re-Imaging Guide
Page 30
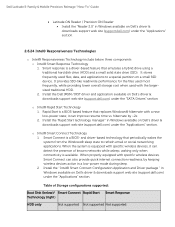
...detect the presence of Storage configurations supported: Boot Disk (below three components o Intel® Smart Response Technology 1. Install the "Rapid Start technology manager" in Windows available on Dell's driver & downloads support web site (support.dell.com) under the "SATA Drivers" ... with a new low-power state; Dell Latitude E-Family & Mobile Precision Reimage "How-To" Guide Latitude ON Reader / Precision ON Reader Install the "Reader 2.0" in Windows available on Dell's driver & downloads support web site (support.dell.com) under the "Applications" section ...
...detect the presence of Storage configurations supported: Boot Disk (below three components o Intel® Smart Response Technology 1. Install the "Rapid Start technology manager" in Windows available on Dell's driver & downloads support web site (support.dell.com) under the "SATA Drivers" ... with a new low-power state; Dell Latitude E-Family & Mobile Precision Reimage "How-To" Guide Latitude ON Reader / Precision ON Reader Install the "Reader 2.0" in Windows available on Dell's driver & downloads support web site (support.dell.com) under the "Applications" section ...
Latitude E-Family Re-Imaging Guide
Page 42
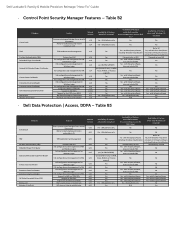
... not include PBA Yes - with 3rd party software Yes - Table B2 Category ControlVault TPM Pre-Boot Authentication (PBA) Embedded Finger Print Reader External Dell Branded Finger Print Reader Contact Smart Card Reader Contacless Smart Card Reader Contacless Smart Card Reader Full Disked...software Yes - No Yes - with 3rd party software, does not include PBA No Yes - Dell Data Protection | Access, DDPA - with 3rd party software, does not include PBA No Yes - Dell Latitude E-Family & Mobile Precision Reimage "How-To" Guide - Control Point Security Manager Features - ...
... not include PBA Yes - with 3rd party software Yes - Table B2 Category ControlVault TPM Pre-Boot Authentication (PBA) Embedded Finger Print Reader External Dell Branded Finger Print Reader Contact Smart Card Reader Contacless Smart Card Reader Contacless Smart Card Reader Full Disked...software Yes - No Yes - with 3rd party software, does not include PBA No Yes - Dell Data Protection | Access, DDPA - with 3rd party software, does not include PBA No Yes - Dell Latitude E-Family & Mobile Precision Reimage "How-To" Guide - Control Point Security Manager Features - ...
Owners Manual
Page 5
Boot Sequence...63 Navigation Keys...63 System Setup Options...64 Updating the BIOS ...72 System and Setup Password...72 Assigning a System Password and Setup Password 72 Deleting or Changing an Existing System and/or Setup Password 73 5 Diagnostics...75 Enhanced Pre-Boot System Assessment (ePSA) Diagnostics 75 6 Troubleshooting Your Computer 77 Device Status Lights...77 Battery Status Lights...78 7 Technical Specifications...79 8 Contacting Dell ...87
Boot Sequence...63 Navigation Keys...63 System Setup Options...64 Updating the BIOS ...72 System and Setup Password...72 Assigning a System Password and Setup Password 72 Deleting or Changing an Existing System and/or Setup Password 73 5 Diagnostics...75 Enhanced Pre-Boot System Assessment (ePSA) Diagnostics 75 6 Troubleshooting Your Computer 77 Device Status Lights...77 Battery Status Lights...78 7 Technical Specifications...79 8 Contacting Dell ...87
Owners Manual
Page 63
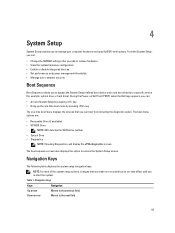
... or disable integrated devices • Set performance and power management thresholds • Manage your computer security Boot Sequence Boot Sequence allows you to bypass the System Setup‐defined boot device order and boot directly to manage your computer hardware and specify BIOS‐level options. NOTE: For most of the ... hard drive). Navigation Keys The following table displays the system setup navigation keys. During the Power-on Self Test (POST), when the Dell logo appears, you can boot from including the diagnostic option. Down arrow Moves to the next field. 63
... or disable integrated devices • Set performance and power management thresholds • Manage your computer security Boot Sequence Boot Sequence allows you to bypass the System Setup‐defined boot device order and boot directly to manage your computer hardware and specify BIOS‐level options. NOTE: For most of the ... hard drive). Navigation Keys The following table displays the system setup navigation keys. During the Power-on Self Test (POST), when the Dell logo appears, you can boot from including the diagnostic option. Down arrow Moves to the next field. 63

Owners Manual
Page 64
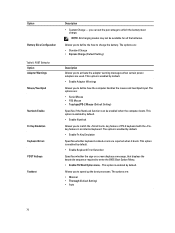
... primary hardware features of your computer. • System Information • Memory Information • Processor Information • Device Information Battery Information Boot Sequence Displays the charge status of the battery. All the options are : • Disabled 64 Expands or collapses a drop‐down ...8226; Internal HDD • USB Storage Device • CD/DVD/CD-RW Drive • Onboard NIC You can also choose the Boot List option. Table 2. Keys Spacebar Navigation Allows you to save any unsaved changes and restarts the system. Pressing in which the computer...
... primary hardware features of your computer. • System Information • Memory Information • Processor Information • Device Information Battery Information Boot Sequence Displays the charge status of the battery. All the options are : • Disabled 64 Expands or collapses a drop‐down ...8226; Internal HDD • USB Storage Device • CD/DVD/CD-RW Drive • Onboard NIC You can also choose the Boot List option. Table 2. Keys Spacebar Navigation Allows you to save any unsaved changes and restarts the system. Pressing in which the computer...

Owners Manual
Page 66
... board devices. Option USB Configuration USB PowerShare Keyboard Illumination Stealth Mode Control Miscellaneous Devices 66 Description • Enable SMART Reporting - The options are: • Enable Boot Support • Enable External USB Port Default Setting: both the options are enabled This option is disabled by default.
... board devices. Option USB Configuration USB PowerShare Keyboard Illumination Stealth Mode Control Miscellaneous Devices 66 Description • Enable SMART Reporting - The options are: • Enable Boot Support • Enable External USB Port Default Setting: both the options are enabled This option is disabled by default.

Owners Manual
Page 68
... C7 options are : • Enable (Default Setting) • One Time Enable • Disable Allows you to enter the Option ROM Configuration screens using hotkeys during boot. The options are enabled. The performance of some applications will have one or all cores enabled. The options are : • Deactivate (Default Setting) • Disable...
... C7 options are : • Enable (Default Setting) • One Time Enable • Disable Allows you to enter the Option ROM Configuration screens using hotkeys during boot. The options are enabled. The performance of some applications will have one or all cores enabled. The options are : • Deactivate (Default Setting) • Disable...
Owners Manual
Page 70
...-2 Mouse (Default Setting) Specifies if the NumLock function can set the percentage to enter the BIOS Boot Option Menu. • Enable F12 Boot Option menu - NOTE: All charging modes may not be enabled when the computer boots. This option is enabled by default. • Enable Keyboard Error Detection Specifies whether the sign-on... keyboard. This option is enabled by default. • Enable Numlock Allows you can be available for all the batteries. The options are reported when it boots. Option Battery Slice Configuration Table 8. you to speed up the...
...-2 Mouse (Default Setting) Specifies if the NumLock function can set the percentage to enter the BIOS Boot Option Menu. • Enable F12 Boot Option menu - NOTE: All charging modes may not be enabled when the computer boots. This option is enabled by default. • Enable Keyboard Error Detection Specifies whether the sign-on... keyboard. This option is enabled by default. • Enable Numlock Allows you can be available for all the batteries. The options are reported when it boots. Option Battery Slice Configuration Table 8. you to speed up the...

Owners Manual
Page 73
... and click OK. 7. In the System Security screen, verify that Password Status is Unlocked. 3. To enter a system setup, press immediately after a power-on or re-boot. 1. Press to save the changes and exit from the System Setup. Use the following special characters are not allowed. - Select Setup Password, alter or delete...
... and click OK. 7. In the System Security screen, verify that Password Status is Unlocked. 3. To enter a system setup, press immediately after a power-on or re-boot. 1. Press to save the changes and exit from the System Setup. Use the following special characters are not allowed. - Select Setup Password, alter or delete...

Owners Manual
Page 75
...: • Run tests automatically or in the computer. On the boot menu screen, select the Diagnostics option. The diagnostics starts running diagnostics is to stop the diagnostic test. 5. Note the error code and contact Dell. 75 5 Diagnostics If you experience a problem with your hardware.... on a specific device, press and click Yes to test your computer. Enhanced Pre-Boot System Assessment (ePSA) Diagnostics The ePSA diagnostics (also known as the Dell logo appears. 3. The Enhanced Pre-boot System Assessment window is launched by the BIOS internally. If there are any issues, error...
...: • Run tests automatically or in the computer. On the boot menu screen, select the Diagnostics option. The diagnostics starts running diagnostics is to stop the diagnostic test. 5. Note the error code and contact Dell. 75 5 Diagnostics If you experience a problem with your hardware.... on a specific device, press and click Yes to test your computer. Enhanced Pre-Boot System Assessment (ePSA) Diagnostics The ePSA diagnostics (also known as the Dell logo appears. 3. The Enhanced Pre-boot System Assessment window is launched by the BIOS internally. If there are any issues, error...


