Owner's Manual
Page 3
... 13 Removing the Base Cover...13 Installing the Base Cover...14 Removing the Bluetooth Module...14 Installing the Bluetooth Module...15 Removing the Hard Drive...15 Installing the Hard Drive...17 Removing the Memory...17 Installing the Memory...18 Removing The Palmrest...18 Installing the Palmrest...20 Removing the Keyboard...21 Installing the Keyboard...
... 13 Removing the Base Cover...13 Installing the Base Cover...14 Removing the Bluetooth Module...14 Installing the Bluetooth Module...15 Removing the Hard Drive...15 Installing the Hard Drive...17 Removing the Memory...17 Installing the Memory...18 Removing The Palmrest...18 Installing the Palmrest...20 Removing the Keyboard...21 Installing the Keyboard...

Owner's Manual
Page 15
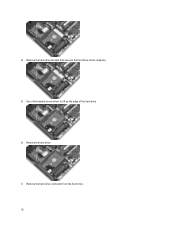
... cover b) battery c) ExpressCard d) SD card 4. Follow the procedures in After Working Inside Your Computer. Removing the Hard Drive 1. Connect the bluetooth cable to the computer. 3. Remove the: a) battery b) base cover 3. Remove the screw that secure the hard drive to the computer. 5. Remove the screws that secures the bluetooth module to the computer. 15 Installing...
... cover b) battery c) ExpressCard d) SD card 4. Follow the procedures in After Working Inside Your Computer. Removing the Hard Drive 1. Connect the bluetooth cable to the computer. 3. Remove the: a) battery b) base cover 3. Remove the screw that secure the hard drive to the computer. 5. Remove the screws that secures the bluetooth module to the computer. 15 Installing...
Owner's Manual
Page 16
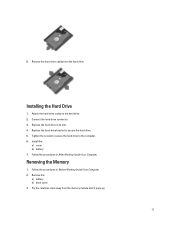
Remove the hard-drive bracket that secures the hard drive to lift up the edge of the hard drive. 6. Remove the hard-drive connector from the hard drive. 16 Remove the hard drive. 7. Use a flat-headed screw driver to the computer. 5. 4.
Remove the hard-drive bracket that secures the hard drive to lift up the edge of the hard drive. 6. Remove the hard-drive connector from the hard drive. 16 Remove the hard drive. 7. Use a flat-headed screw driver to the computer. 5. 4.
Owner's Manual
Page 17
... hard-drive bracket to the hard drive. 2. Install the: a) cover b) battery 7. Removing the Memory 1. Attach the hard-drive caddy to secure the hard drive. 5. Remove the: a) battery b) base cover 3. Installing the Hard Drive 1. Follow the procedures in Before Working Inside Your Computer. 2. Remove the hard-drive caddy from the memory module until it pops-up. 17 Tighten the screws to secure the hard drive...
... hard-drive bracket to the hard drive. 2. Install the: a) cover b) battery 7. Removing the Memory 1. Attach the hard-drive caddy to secure the hard drive. 5. Remove the: a) battery b) base cover 3. Installing the Hard Drive 1. Follow the procedures in Before Working Inside Your Computer. 2. Remove the hard-drive caddy from the memory module until it pops-up. 17 Tighten the screws to secure the hard drive...
Owner's Manual
Page 51
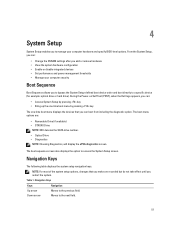
...Dell logo appears, you can: • Access System Setup by pressing key • Bring up the one-time boot menu by pressing key The one-time boot menu displays the devices that you make are : • Removable Drive (if available) • STXXXX Drive... NOTE: XXX denotes the SATA drive number. • Optical Drive • Diagnostics NOTE: Choosing Diagnostics, will display the ePSA diagnostics ... and boot directly to a specific device (for example: optical drive or hard drive).
...Dell logo appears, you can: • Access System Setup by pressing key • Bring up the one-time boot menu by pressing key The one-time boot menu displays the devices that you make are : • Removable Drive (if available) • STXXXX Drive... NOTE: XXX denotes the SATA drive number. • Optical Drive • Diagnostics NOTE: Choosing Diagnostics, will display the ePSA diagnostics ... and boot directly to a specific device (for example: optical drive or hard drive).

Owner's Manual
Page 53
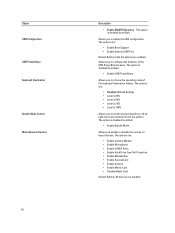
... station operates. This field controls if the hard drive errors for the integrated drives are enabled. Allows you to configure the internal SATA hard-drive controller. The options are: • SATA-0 • SATA-1 • SATA-4 • SATA-5 Default Setting: All drives are reported during system startup. The options... may allocate resources even if the setting is configured to support RAID mode. Option Parallel Port Serial Port SATA Operation Drives SMART Reporting Description • Disabled • Enabled • Enabled w/PXE (Default Setting) Allows you to define and set ...
... station operates. This field controls if the hard drive errors for the integrated drives are enabled. Allows you to configure the internal SATA hard-drive controller. The options are: • SATA-0 • SATA-1 • SATA-4 • SATA-5 Default Setting: All drives are reported during system startup. The options... may allocate resources even if the setting is configured to support RAID mode. Option Parallel Port Serial Port SATA Operation Drives SMART Reporting Description • Disabled • Enabled • Enabled w/PXE (Default Setting) Allows you to define and set ...
Owner's Manual
Page 54
... to configure the behavior of the keyboard illumination feature. The options are: • Enable Internal Modem • Enable Microphone • Enable eSATA Ports • Enable Hard Drive Free Fall Protection • Enable Module Bay • Enable ExpressCard • Enable Camera • Enable Media Card • Disable Media Card Default Setting: All devices...
... to configure the behavior of the keyboard illumination feature. The options are: • Enable Internal Modem • Enable Microphone • Enable eSATA Ports • Enable Hard Drive Free Fall Protection • Enable Module Bay • Enable ExpressCard • Enable Camera • Enable Media Card • Disable Media Card Default Setting: All devices...

Owner's Manual
Page 55
Allows you to set . NOTE: Deleting the admin password automatically deletes the system password and the hard drive password. Default Setting: Not set Allows you to set, change or delete the administrator password. Default Setting: Not set Allows you to...8226; Enable Optimus - Default Setting: Enable Strong Password is disabled. Default Setting: The option is not selected. Allows you to the System and Hard Drive passwords when the admin password is disabled by default. You can define the length of the processor. 55 The option is Off. NOTE: Successful password...
Allows you to set . NOTE: Deleting the admin password automatically deletes the system password and the hard drive password. Default Setting: Not set Allows you to set, change or delete the administrator password. Default Setting: Not set Allows you to...8226; Enable Optimus - Default Setting: Enable Strong Password is disabled. Default Setting: The option is not selected. Allows you to the System and Hard Drive passwords when the admin password is disabled by default. You can define the length of the processor. 55 The option is Off. NOTE: Successful password...
Owner's Manual
Page 65
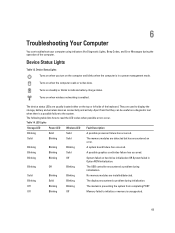
Turns on hard drive initialization OR System failed in a power management mode. The device status LEDs are used to indicate battery charge status. Table 14. Blinking Off Blinking The ...
Turns on hard drive initialization OR System failed in a power management mode. The device status LEDs are used to indicate battery charge status. Table 14. Blinking Off Blinking The ...
Statement of Volatility
Page 2
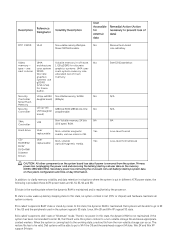
...No Controller daughter board) (2Mbyte). Serial Flash Memory Security Controller U2 (up -sell 128K byte ROM, 128K bit one-time No USH daughter programmable. Hard drive User Non-volatile magnetic Yes replaceable media, various sizes in off state. N/A N/A NA Low-level format Low-level format/erase CAUTION: All other ... system data on the memory (DDR3, 1333/1600 MHz). S1 state is called "suspend to RAM" state or stand-by the processor. Dell systems will be able to go to a non-volatile storage file and leave appropriate context markers. When the system is read/write by mode...
...No Controller daughter board) (2Mbyte). Serial Flash Memory Security Controller U2 (up -sell 128K byte ROM, 128K bit one-time No USH daughter programmable. Hard drive User Non-volatile magnetic Yes replaceable media, various sizes in off state. N/A N/A NA Low-level format Low-level format/erase CAUTION: All other ... system data on the memory (DDR3, 1333/1600 MHz). S1 state is called "suspend to RAM" state or stand-by the processor. Dell systems will be able to go to a non-volatile storage file and leave appropriate context markers. When the system is read/write by mode...


