
Setup and Features Information Tech Sheet
Page 8
...United States and/or other countries. and other than its own. 8 is a registered trademark of such mark by the Bluetooth® SIG, Inc. The Bluetooth® word mark is a trademark owned by the Blu-ray Disc Association (BDA) and licensed for use of Wireless ...174;, the Windows Vista start button, and Office Outlook® are trademarks of Dell Inc. Trademarks used in this text: Dell™, the DELL logo, Dell Precision™, Precision ON™, ExpressCharge™, Latitude™, Latitude ON™, OptiPlex™, Vostro™, and Wi-Fi Catcher™ are ...
...United States and/or other countries. and other than its own. 8 is a registered trademark of such mark by the Bluetooth® SIG, Inc. The Bluetooth® word mark is a trademark owned by the Blu-ray Disc Association (BDA) and licensed for use of Wireless ...174;, the Windows Vista start button, and Office Outlook® are trademarks of Dell Inc. Trademarks used in this text: Dell™, the DELL logo, Dell Precision™, Precision ON™, ExpressCharge™, Latitude™, Latitude ON™, OptiPlex™, Vostro™, and Wi-Fi Catcher™ are ...
User Manual
Page 3
......27 Removing the Palmrest...27 Installing the Palmrest...30 Removing the ExpressCard Reader Cage...30 Installing the ExpressCard Reader Cage...31 Removing the Bluetooth Module...31 Installing the Bluetooth module...32 Removing the Audio Board...32 Installing the Audio Board...33 Removing the Display Assembly...33 Installing the Display Assembly...36 Removing...
......27 Removing the Palmrest...27 Installing the Palmrest...30 Removing the ExpressCard Reader Cage...30 Installing the ExpressCard Reader Cage...31 Removing the Bluetooth Module...31 Installing the Bluetooth module...32 Removing the Audio Board...32 Installing the Audio Board...33 Removing the Display Assembly...33 Installing the Display Assembly...36 Removing...
User Manual
Page 31
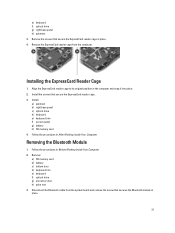
... f) optical drive g) processor door h) palm rest 3. Align the ExpressCard reader cage to its original position in place. 4. Disconnect the Bluetooth cable from the computer. Removing the Bluetooth Module 1. Install the screws that secures the Bluetooth module in place. 31 Install: a) palmrest b) right base panel c) optical drive d) keyboard e) keyboard trim f) access panel g) battery h) SD...
... f) optical drive g) processor door h) palm rest 3. Align the ExpressCard reader cage to its original position in place. 4. Disconnect the Bluetooth cable from the computer. Removing the Bluetooth Module 1. Install the screws that secures the Bluetooth module in place. 31 Install: a) palmrest b) right base panel c) optical drive d) keyboard e) keyboard trim f) access panel g) battery h) SD...
User Manual
Page 32
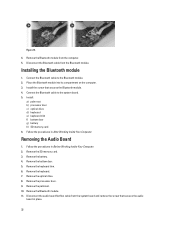
... into its compartment on the computer. 3. Remove the keyboard trim. 6. Disconnect the Bluetooth cable from the computer. 5. Connect the Bluetooth cable to the Bluetooth module. 2. Remove the bottom door. 5. Remove the Bluetooth module from the Bluetooth module. Install the screw that secures the audio board in place. 32 Removing the Audio ... 3. Remove the battery. 4. Disconnect the audio board flat flex cable from the system board and remove the screw that secures the Bluetooth module. 4. Remove the optical drive. 8. Remove the palmrest. 10. Figure 31. 4. Remove the...
... into its compartment on the computer. 3. Remove the keyboard trim. 6. Disconnect the Bluetooth cable from the computer. 5. Connect the Bluetooth cable to the Bluetooth module. 2. Remove the bottom door. 5. Remove the Bluetooth module from the Bluetooth module. Install the screw that secures the audio board in place. 32 Removing the Audio ... 3. Remove the battery. 4. Disconnect the audio board flat flex cable from the system board and remove the screw that secures the Bluetooth module. 4. Remove the optical drive. 8. Remove the palmrest. 10. Figure 31. 4. Remove the...

User Manual
Page 33
.... 3. Installing the Audio Board 1. Remove: a) SD memory card b) battery c) access panel d) keyboard trim e) keyboard f) optical drive g) hard drive h) processor door i) palmrest 3. Figure 32. 12. Install: a) Bluetooth module b) palmrest c) processor door d) optical drive e) keyboard f) keyboard trim g) bottom door h) battery i) SD memory card 5. Removing the Display Assembly 1. Remove the audio board from the...
.... 3. Installing the Audio Board 1. Remove: a) SD memory card b) battery c) access panel d) keyboard trim e) keyboard f) optical drive g) hard drive h) processor door i) palmrest 3. Figure 32. 12. Install: a) Bluetooth module b) palmrest c) processor door d) optical drive e) keyboard f) keyboard trim g) bottom door h) battery i) SD memory card 5. Removing the Display Assembly 1. Remove the audio board from the...

User Manual
Page 40
Disconnect the speaker cable and the audio board flex cable from the system board. Figure 39. 5. Disconnect the : a) thermal fan cable b) DC-in cable c) Bluetooth cable Figure 38. 4. k) palmrest l) ExpressCard reader cage m) display assembly n) left support frame o) thermal fan cable 3. Remove the screws that secure the system board. 40
Disconnect the speaker cable and the audio board flex cable from the system board. Figure 39. 5. Disconnect the : a) thermal fan cable b) DC-in cable c) Bluetooth cable Figure 38. 4. k) palmrest l) ExpressCard reader cage m) display assembly n) left support frame o) thermal fan cable 3. Remove the screws that secure the system board. 40
User Manual
Page 42
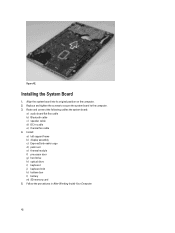
Installing the System Board 1. Route and connect the following cables the system board: a) audio board flat flex cable b) Bluetooth cable c) speaker cable d) DC-in After Working Inside Your Computer. 42 Replace and tighten the screws to secure the system board to the computer. 3. Follow ...
Installing the System Board 1. Route and connect the following cables the system board: a) audio board flat flex cable b) Bluetooth cable c) speaker cable d) DC-in After Working Inside Your Computer. 42 Replace and tighten the screws to secure the system board to the computer. 3. Follow ...

User Manual
Page 50
... n) audio board o) display assembly p) left support frame c) display assembly d) audio board e) Bluetooth module f) ExpressCard reader cage g) palmrest h) thermal module i) processor door 50 Installing the Speakers 1. Place the speakers in the routing channels. 4. Tighten the screws to secure ...
... n) audio board o) display assembly p) left support frame c) display assembly d) audio board e) Bluetooth module f) ExpressCard reader cage g) palmrest h) thermal module i) processor door 50 Installing the Speakers 1. Place the speakers in the routing channels. 4. Tighten the screws to secure ...
User Manual
Page 61
.... Entering System Setup 1. If you wait too long and the operating system logo appears, continue to work incorrectly. When the blue DELL logo is displayed, you must watch for this keystroke will be lost. 4. If you press before you are an expert computer user... Address, Video Controller, Video BIOS Version, Video Memory, Panel Type, Native Resolution, Audio Controller, Modem Controller, Wi-Fi Device, Cellular Device, Bluetooth Device. Once the F2 prompt appears, press immediately. Turn on the computer and its installed devices, the items listed in your computer. •...
.... Entering System Setup 1. If you wait too long and the operating system logo appears, continue to work incorrectly. When the blue DELL logo is displayed, you must watch for this keystroke will be lost. 4. If you press before you are an expert computer user... Address, Video Controller, Video BIOS Version, Video Memory, Panel Type, Native Resolution, Audio Controller, Modem Controller, Wi-Fi Device, Cellular Device, Bluetooth Device. Once the F2 prompt appears, press immediately. Turn on the computer and its installed devices, the items listed in your computer. •...
User Manual
Page 68
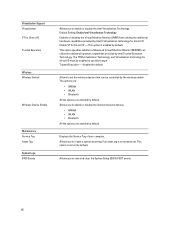
...Tag of your computer. Allows you to enable or disable the internal wireless devices. • WWAN • WLAN • Bluetooth All the options are enabled by default. This option is not set the wireless devices that can utilize the additional hardware capabilities... provided by the wireless switch. The options are: • WWAN • WLAN • Bluetooth All the options are enabled by default. Virtualization Support Virtualization VT for direct I/O must be controlled by Intel Trusted Execution Technology. ...
...Tag of your computer. Allows you to enable or disable the internal wireless devices. • WWAN • WLAN • Bluetooth All the options are enabled by default. This option is not set the wireless devices that can utilize the additional hardware capabilities... provided by the wireless switch. The options are: • WWAN • WLAN • Bluetooth All the options are enabled by default. Virtualization Support Virtualization VT for direct I/O must be controlled by Intel Trusted Execution Technology. ...

