Setup and Features Information Tech Sheet
Page 5
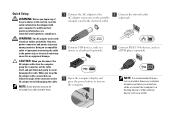
For additional best practices information, see www.dell.com/regulatory_compliance. However, power connectors and power strips vary among countries. When you wrap the AC adapter cable, ensure that you follow the angle of ... your computer. NOTE: It is recommended that shipped with electrical outlets worldwide. NOTE: Some devices may cause fire or equipment damage. WARNING: The AC adapter works with your computer at least once before you install any of the connector on the computer. 2 Connect the network cable (optional). 4 Connect IEEE 1394a devices...
For additional best practices information, see www.dell.com/regulatory_compliance. However, power connectors and power strips vary among countries. When you wrap the AC adapter cable, ensure that you follow the angle of ... your computer. NOTE: It is recommended that shipped with electrical outlets worldwide. NOTE: Some devices may cause fire or equipment damage. WARNING: The AC adapter works with your computer at least once before you install any of the connector on the computer. 2 Connect the network cable (optional). 4 Connect IEEE 1394a devices...
Service Manual
Page 1
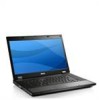
... this document to refer to change without the written permission of your computer. Dell Inc. If you make better use of Dell Inc. disclaims any proprietary interest in trademarks and trade names other countries. Dell™ Latitude™ E5510 Discrete Service Manual Working on Your Computer Adding and Replacing Parts Specifications Diagnostics System Setup Notes, Cautions...
... this document to refer to change without the written permission of your computer. Dell Inc. If you make better use of Dell Inc. disclaims any proprietary interest in trademarks and trade names other countries. Dell™ Latitude™ E5510 Discrete Service Manual Working on Your Computer Adding and Replacing Parts Specifications Diagnostics System Setup Notes, Cautions...
Service Manual
Page 2
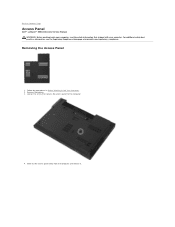
Back to the computer. 4. Follow the procedures in Before Working Inside Your Computer. 2. For additional safety best practices information, see the Regulatory Compliance Homepage at www.dell.com/regulatory_compliance. Loosen the screw that secures the access panel to Contents Page Access Panel Dell™ Latitude™ E5510 Discrete Service Manual WARNING: Before working inside your computer, read the safety information that shipped with your computer. Remove the battery. 3. Slide out the access panel away from the computer and remove it. Removing the Access Panel 1.
Back to the computer. 4. Follow the procedures in Before Working Inside Your Computer. 2. For additional safety best practices information, see the Regulatory Compliance Homepage at www.dell.com/regulatory_compliance. Loosen the screw that secures the access panel to Contents Page Access Panel Dell™ Latitude™ E5510 Discrete Service Manual WARNING: Before working inside your computer, read the safety information that shipped with your computer. Remove the battery. 3. Slide out the access panel away from the computer and remove it. Removing the Access Panel 1.
Service Manual
Page 4
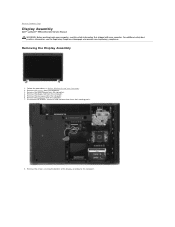
.... 7. Remove the keyboard from the computer. 4. Remove the screws securing the bottom of the display assembly to Contents Page Display Assembly Dell™ Latitude™ E5510 Discrete Service Manual WARNING: Before working inside your computer, read the safety information that shipped with your computer. Disconnect the wireless antennas and remove them from the computer...
.... 7. Remove the keyboard from the computer. 4. Remove the screws securing the bottom of the display assembly to Contents Page Display Assembly Dell™ Latitude™ E5510 Discrete Service Manual WARNING: Before working inside your computer, read the safety information that shipped with your computer. Disconnect the wireless antennas and remove them from the computer...
Service Manual
Page 8
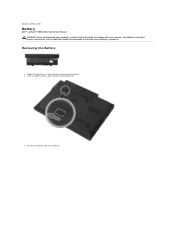
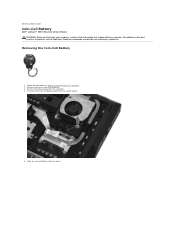
Slide the battery release latch into the unlocked position. 3. For additional safety best practices information, see the Regulatory Compliance Homepage at www.dell.com/regulatory_compliance. Back to Contents Page Battery Dell™ Latitude™ E5510 Discrete Service Manual WARNING: Before working inside your computer, read the safety information that shipped with your computer. Remove the battery from the computer. Follow the procedures in Before Working Inside Your Computer. 2. Removing the Battery 1.
Slide the battery release latch into the unlocked position. 3. For additional safety best practices information, see the Regulatory Compliance Homepage at www.dell.com/regulatory_compliance. Back to Contents Page Battery Dell™ Latitude™ E5510 Discrete Service Manual WARNING: Before working inside your computer, read the safety information that shipped with your computer. Remove the battery from the computer. Follow the procedures in Before Working Inside Your Computer. 2. Removing the Battery 1.
Service Manual
Page 10
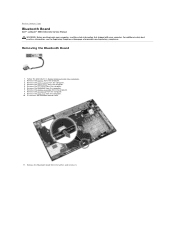
...Bluetooth board cable. 11. Removing the Bluetooth Board 1. Follow the procedures in Before Working Inside Your Computer. 2. Remove the LED cover from the computer. 4. Back to Contents Page Bluetooth Board Dell™ Latitude™ E5510 Discrete Service Manual WARNING: Before working inside your computer, read the safety information that shipped with your computer. Remove the... board from the computer. 8. Remove the optical drive from the computer. 5. For additional safety best practices information, see the Regulatory Compliance Homepage at www.dell.com/regulatory_compliance.
...Bluetooth board cable. 11. Removing the Bluetooth Board 1. Follow the procedures in Before Working Inside Your Computer. 2. Remove the LED cover from the computer. 4. Back to Contents Page Bluetooth Board Dell™ Latitude™ E5510 Discrete Service Manual WARNING: Before working inside your computer, read the safety information that shipped with your computer. Remove the... board from the computer. 8. Remove the optical drive from the computer. 5. For additional safety best practices information, see the Regulatory Compliance Homepage at www.dell.com/regulatory_compliance.
Service Manual
Page 15
...if you are running a DOS). l Minimal - The factory default setting is Enabled. Use the checkbox to enable/disable this works only when the operating system supports Simple Boot Flag). Wake-up the boot process by bypassing some compatibility steps. Allows the ... boots. l PS/2 Mouse - The factory default setting is Fn Key Only. Keypad (Embedded) l Fn Key Only - ExpressCharge™ = Dell fast charging technology (not available for Direct I /O Virtualization Support Description This field specifies whether a Virtual Machine Monitor (VMM) can utilize the additional...
...if you are running a DOS). l Minimal - The factory default setting is Enabled. Use the checkbox to enable/disable this works only when the operating system supports Simple Boot Flag). Wake-up the boot process by bypassing some compatibility steps. Allows the ... boots. l PS/2 Mouse - The factory default setting is Fn Key Only. Keypad (Embedded) l Fn Key Only - ExpressCharge™ = Dell fast charging technology (not available for Direct I /O Virtualization Support Description This field specifies whether a Virtual Machine Monitor (VMM) can utilize the additional...
Service Manual
Page 17
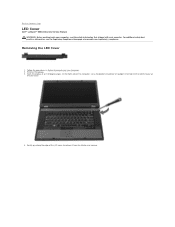
... along the edge of the computer, use a flat-bladed screwdriver or spudger (inserted into the notch) to Contents Page LED Cover Dell™ Latitude™ E5510 Discrete Service Manual WARNING: Before working inside your computer, read the safety information that shipped with your computer. For additional safety best practices information, see the Regulatory Compliance...
... along the edge of the computer, use a flat-bladed screwdriver or spudger (inserted into the notch) to Contents Page LED Cover Dell™ Latitude™ E5510 Discrete Service Manual WARNING: Before working inside your computer, read the safety information that shipped with your computer. For additional safety best practices information, see the Regulatory Compliance...
Service Manual
Page 19
Follow the procedures in Before Working Inside Your Computer. 2. Disconnect the coin-cell battery cable from the computer. 3. Remove the battery from the system board. 5. Remove the access panel from... from the computer. 4. Removing the Coin-Cell Battery 1. For additional safety best practices information, see the Regulatory Compliance Homepage at www.dell.com/regulatory_compliance. Back to Contents Page Coin-Cell Battery Dell™ Latitude™ E5510 Discrete Service Manual WARNING: Before working inside your computer, read the safety information that shipped with your computer.
Follow the procedures in Before Working Inside Your Computer. 2. Disconnect the coin-cell battery cable from the computer. 3. Remove the battery from the system board. 5. Remove the access panel from... from the computer. 4. Removing the Coin-Cell Battery 1. For additional safety best practices information, see the Regulatory Compliance Homepage at www.dell.com/regulatory_compliance. Back to Contents Page Coin-Cell Battery Dell™ Latitude™ E5510 Discrete Service Manual WARNING: Before working inside your computer, read the safety information that shipped with your computer.
Service Manual
Page 23
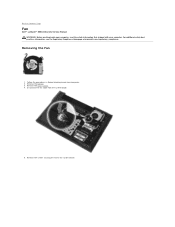
Remove the battery. 3. Disconnect the fan cable from the system board. 5. Remove the screws securing the fan to Contents Page Fan Dell™ Latitude™ E5510 Discrete Service Manual WARNING: Before working inside your computer, read the safety information that shipped with your computer. Follow the procedures in Before Working Inside Your Computer. 2. Back to the system board. For additional safety best practices information, see the Regulatory Compliance Homepage at www.dell.com/regulatory_compliance. Remove the access panel. 4. Removing the Fan 1.
Remove the battery. 3. Disconnect the fan cable from the system board. 5. Remove the screws securing the fan to Contents Page Fan Dell™ Latitude™ E5510 Discrete Service Manual WARNING: Before working inside your computer, read the safety information that shipped with your computer. Follow the procedures in Before Working Inside Your Computer. 2. Back to the system board. For additional safety best practices information, see the Regulatory Compliance Homepage at www.dell.com/regulatory_compliance. Remove the access panel. 4. Removing the Fan 1.
Service Manual
Page 25
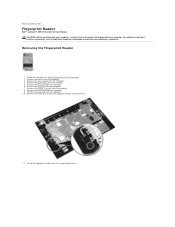
... computer. 3. Remove the battery from the computer. 10. Remove the screw that secures the fingerprint reader to Contents Page Fingerprint Reader Dell™ Latitude™ E5510 Discrete Service Manual WARNING: Before working inside your computer, read the safety information that shipped with your computer. For additional safety best practices information, see the Regulatory Compliance...
... computer. 3. Remove the battery from the computer. 10. Remove the screw that secures the fingerprint reader to Contents Page Fingerprint Reader Dell™ Latitude™ E5510 Discrete Service Manual WARNING: Before working inside your computer, read the safety information that shipped with your computer. For additional safety best practices information, see the Regulatory Compliance...
Service Manual
Page 28
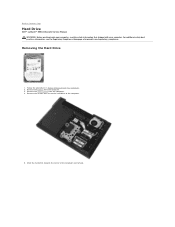
... safety best practices information, see the Regulatory Compliance Homepage at www.dell.com/regulatory_compliance. Remove the battery from the computer. 4. Remove the screws that secure the hard drive to Contents Page Hard Drive Dell™ Latitude™ E5510 Discrete Service Manual WARNING: Before working inside your computer, read the safety information that shipped with your...
... safety best practices information, see the Regulatory Compliance Homepage at www.dell.com/regulatory_compliance. Remove the battery from the computer. 4. Remove the screws that secure the hard drive to Contents Page Hard Drive Dell™ Latitude™ E5510 Discrete Service Manual WARNING: Before working inside your computer, read the safety information that shipped with your...

Service Manual
Page 31
Loosen the screws securing the heat sink to Contents Page Heat Sink Dell™ Latitude™ E5510 Discrete Service Manual WARNING: Before working inside your computer, read the safety information that shipped with your computer. Follow the procedures in Before Working Inside Your Computer. 2. Remove the battery from the computer. Lift up the heat sink at...
Loosen the screws securing the heat sink to Contents Page Heat Sink Dell™ Latitude™ E5510 Discrete Service Manual WARNING: Before working inside your computer, read the safety information that shipped with your computer. Follow the procedures in Before Working Inside Your Computer. 2. Remove the battery from the computer. Lift up the heat sink at...
Service Manual
Page 33
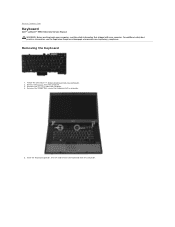
... cover from the computer. Follow the procedures in Before Working Inside Your Computer. 2. Remove the battery from the computer. 3. Remove the screws that shipped with your computer. Removing the Keyboard 1. Back to Contents Page Keyboard Dell™ Latitude™ E5510 Discrete Service Manual WARNING: Before working inside your computer, read the safety information that secure...
... cover from the computer. Follow the procedures in Before Working Inside Your Computer. 2. Remove the battery from the computer. 3. Remove the screws that shipped with your computer. Removing the Keyboard 1. Back to Contents Page Keyboard Dell™ Latitude™ E5510 Discrete Service Manual WARNING: Before working inside your computer, read the safety information that secure...
Service Manual
Page 35
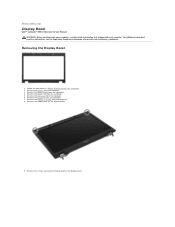
... the LED cover from the computer. 4. Remove the access panel from the computer. 6. Remove the screws securing the display bezel to Contents Page Display Bezel Dell™ Latitude™ E5510 Discrete Service Manual WARNING: Before working inside your computer, read the safety information that shipped with your computer. Follow the procedures in Before...
... the LED cover from the computer. 4. Remove the access panel from the computer. 6. Remove the screws securing the display bezel to Contents Page Display Bezel Dell™ Latitude™ E5510 Discrete Service Manual WARNING: Before working inside your computer, read the safety information that shipped with your computer. Follow the procedures in Before...

Service Manual
Page 36
10. Lift up and remove the display bezel from the display assembly by tucking your fingers under one edge of the bezel and working your way around the entire bezel until it is completely free. 11. Gently pry the display bezel from the computer.
10. Lift up and remove the display bezel from the display assembly by tucking your fingers under one edge of the bezel and working your way around the entire bezel until it is completely free. 11. Gently pry the display bezel from the computer.
Service Manual
Page 38
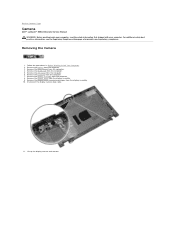
For additional safety best practices information, see the Regulatory Compliance Homepage at www.dell.com/regulatory_compliance. Removing the Camera 1. Remove the WLAN card from the computer. 7. Remove the keyboard from the computer. 5. Lift up the display camera and... from the display assembly. 9. Remove the display assembly from the computer. 4. Remove the access panel from the computer. 8. Back to Contents Page Camera Dell™ Latitude™ E5510 Discrete Service Manual WARNING: Before working inside your computer, read the safety information that shipped with your computer.
For additional safety best practices information, see the Regulatory Compliance Homepage at www.dell.com/regulatory_compliance. Removing the Camera 1. Remove the WLAN card from the computer. 7. Remove the keyboard from the computer. 5. Lift up the display camera and... from the display assembly. 9. Remove the display assembly from the computer. 4. Remove the access panel from the computer. 8. Back to Contents Page Camera Dell™ Latitude™ E5510 Discrete Service Manual WARNING: Before working inside your computer, read the safety information that shipped with your computer.
Service Manual
Page 40
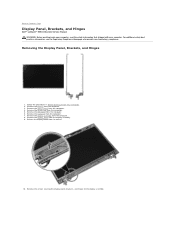
...the screws securing the display panel, brackets, and hinges to Contents Page Display Panel, Brackets, and Hinges Dell™ Latitude™ E5510 Discrete Service Manual WARNING: Before working inside your computer, read the safety information that shipped with your computer. Removing the Display Panel, Brackets...4. Remove the access panel from the computer. 6. Remove the display assembly from the computer. 5. Follow the procedures in Before Working Inside Your Computer. 2. Back to the display assembly. Remove the WLAN card from the computer. 8. For additional safety best practices...
...the screws securing the display panel, brackets, and hinges to Contents Page Display Panel, Brackets, and Hinges Dell™ Latitude™ E5510 Discrete Service Manual WARNING: Before working inside your computer, read the safety information that shipped with your computer. Removing the Display Panel, Brackets...4. Remove the access panel from the computer. 6. Remove the display assembly from the computer. 5. Follow the procedures in Before Working Inside Your Computer. 2. Back to the display assembly. Remove the WLAN card from the computer. 8. For additional safety best practices...
Service Manual
Page 44
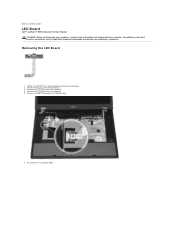
... LED Board cable. Removing the LED Board 1. Release the latch securing the LED Board cable. 6. Back to Contents Page LED Board Dell™ Latitude™ E5510 Discrete Service Manual WARNING: Before working inside your computer, read the safety information that shipped with your computer. For additional safety best practices information, see the Regulatory Compliance...
... LED Board cable. Removing the LED Board 1. Release the latch securing the LED Board cable. 6. Back to Contents Page LED Board Dell™ Latitude™ E5510 Discrete Service Manual WARNING: Before working inside your computer, read the safety information that shipped with your computer. For additional safety best practices information, see the Regulatory Compliance...
Service Manual
Page 46
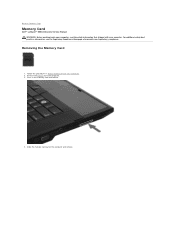
Removing the Memory Card 1. Follow the procedures in the memory card and release. 4. Remove the battery from the computer. 3. Slide the memory card out of the computer and remove. For additional safety best practices information, see the Regulatory Compliance Homepage at www.dell.com/regulatory_compliance. Press in Before Working Inside Your Computer. 2. Back to Contents Page Memory Card Dell™ Latitude™ E5510 Discrete Service Manual WARNING: Before working inside your computer, read the safety information that shipped with your computer.
Removing the Memory Card 1. Follow the procedures in the memory card and release. 4. Remove the battery from the computer. 3. Slide the memory card out of the computer and remove. For additional safety best practices information, see the Regulatory Compliance Homepage at www.dell.com/regulatory_compliance. Press in Before Working Inside Your Computer. 2. Back to Contents Page Memory Card Dell™ Latitude™ E5510 Discrete Service Manual WARNING: Before working inside your computer, read the safety information that shipped with your computer.


