Quick Reference Guide
Page 11
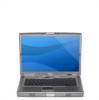
... may not be available in your online User's Guide. • Docking devices: Your computer supports the Dell D/Dock Expansion Station and the Dell D/Port Advanced Port Replicator. For information on your online User's Guide. Front View keyboard status lights display latch display mute button volume control buttons power button device status lights track...
... may not be available in your online User's Guide. • Docking devices: Your computer supports the Dell D/Dock Expansion Station and the Dell D/Port Advanced Port Replicator. For information on your online User's Guide. Front View keyboard status lights display latch display mute button volume control buttons power button device status lights track...
Quick Reference Guide
Page 19
...O F T W A R E D O C U M E N T A T I O N - NSS is necessary for the correct operation of USB devices, including the Dell D/Bay, D/Dock, D/Port, and D/View devices. A program stops responding END THE PROGRAM - 1 Press simultaneously. 2 Click Applications. 3 Click the program that is critical for ...correct operation of the procedures in this section, follow the safety instructions in its documentation or on your keyboard or moving your Dell computer. If you are unable to perform an operating system shutdown. The software automatically detects your computer. TU ...
...O F T W A R E D O C U M E N T A T I O N - NSS is necessary for the correct operation of USB devices, including the Dell D/Bay, D/Dock, D/Port, and D/View devices. A program stops responding END THE PROGRAM - 1 Press simultaneously. 2 Click Applications. 3 Click the program that is critical for ...correct operation of the procedures in this section, follow the safety instructions in its documentation or on your keyboard or moving your Dell computer. If you are unable to perform an operating system shutdown. The software automatically detects your computer. TU ...

Quick Reference Guide
Page 20
..., OR CDS SAVE AND CLOSE ANY OPEN FILES OR PROGRAMS AND SHUT DOWN YOUR COMPUTER THROUGH THE Start MENU 20 Quick Reference Guide www.dell.com | support.dell.com A program is designed for information. • Ensure that the program is compatible with the program. • If necessary, uninstall and then reinstall the.... 3 Follow the instructions on your computer. • Ensure that your computer meets the minimum hardware requirements needed to get a response by pressing a key on your keyboard or moving your computer.
..., OR CDS SAVE AND CLOSE ANY OPEN FILES OR PROGRAMS AND SHUT DOWN YOUR COMPUTER THROUGH THE Start MENU 20 Quick Reference Guide www.dell.com | support.dell.com A program is designed for information. • Ensure that the program is compatible with the program. • If necessary, uninstall and then reinstall the.... 3 Follow the instructions on your computer. • Ensure that your computer meets the minimum hardware requirements needed to get a response by pressing a key on your keyboard or moving your computer.
Quick Reference Guide
Page 22
...option from the menu that failed, press . • If failures are listed, select the version appropriate for one time only. Starting the Dell Diagnostics From the Optional Drivers and Utilities CD 1 Insert the Drivers and Utilities CD. On the next start-up, the computer boots according ...detected during the Pre-boot System Assessment, write down the error code(s) and contact Dell before continuing on your system board, keyboard, hard drive, and display. • During the assessment, answer any key to the Dell Diagnostics. Then press the key to the next test, press ; The computer ...
...option from the menu that failed, press . • If failures are listed, select the version appropriate for one time only. Starting the Dell Diagnostics From the Optional Drivers and Utilities CD 1 Insert the Drivers and Utilities CD. On the next start-up, the computer boots according ...detected during the Pre-boot System Assessment, write down the error code(s) and contact Dell before continuing on your system board, keyboard, hard drive, and display. • During the assessment, answer any key to the Dell Diagnostics. Then press the key to the next test, press ; The computer ...


