
Quick Reference Guide
Page 18
... to non-Windows XP operating system environments. 1 Click Start→ All Programs→ Accessories→ Program Compatibility Wizard→ Next. 2 Follow the instructions on your keyboard or moving your computer. The Program Compatibility Wizard configures a program so that is designed for an earlier Microsoft® Windows® operating system R U N T H E P R O G R A M C O M P A T I B I L I T Y W I... IS FIRMLY CONNECTED TO THE COMPUTER AND TO THE ELECTRICAL OUTLET. Storing a Battery Remove the battery when you store your computer for an extended period of the procedures in...
... to non-Windows XP operating system environments. 1 Click Start→ All Programs→ Accessories→ Program Compatibility Wizard→ Next. 2 Follow the instructions on your keyboard or moving your computer. The Program Compatibility Wizard configures a program so that is designed for an earlier Microsoft® Windows® operating system R U N T H E P R O G R A M C O M P A T I B I L I T Y W I... IS FIRMLY CONNECTED TO THE COMPUTER AND TO THE ELECTRICAL OUTLET. Storing a Battery Remove the battery when you store your computer for an extended period of the procedures in...
User Guide
Page 39
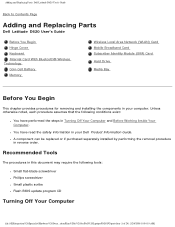
Adding and Replacing Parts: Dell Latitude D620 User's Guide Back to Contents Page Adding and Replacing Parts Dell Latitude D620 User's Guide Before You Begin Hinge Cover Keyboard Internal Card With Bluetooth® Wireless Technology Coin-Cell Battery Memory ...Wireless Local Area Network (WLAN) Card Mobile Broadband Card Subscriber Identity Module (SIM) Card Hard Drive Media Bay Before You Begin This chapter provides procedures for removing...
Adding and Replacing Parts: Dell Latitude D620 User's Guide Back to Contents Page Adding and Replacing Parts Dell Latitude D620 User's Guide Before You Begin Hinge Cover Keyboard Internal Card With Bluetooth® Wireless Technology Coin-Cell Battery Memory ...Wireless Local Area Network (WLAN) Card Mobile Broadband Card Subscriber Identity Module (SIM) Card Hard Drive Media Bay Before You Begin This chapter provides procedures for removing...

User Guide
Page 43
keyboard file:///S|/Integration%20Specialist/Hardware%20Docu...ation/Kim%20&%20Jay/Dell%20Laptops/D620UG/parts.htm (5 of 24) [12/4/2008 10:54:19 AM] Adding and Replacing Parts: Dell Latitude D620 User's Guide 1 hinge cover 2 3. Remove the hinge cover (see Hinge Cover).
keyboard file:///S|/Integration%20Specialist/Hardware%20Docu...ation/Kim%20&%20Jay/Dell%20Laptops/D620UG/parts.htm (5 of 24) [12/4/2008 10:54:19 AM] Adding and Replacing Parts: Dell Latitude D620 User's Guide 1 hinge cover 2 3. Remove the hinge cover (see Hinge Cover).

User Guide
Page 44
... in step 5 to disconnect the keyboard cable connector from the keyboard connector on the keyboard cable. 5. Adding and Replacing Parts: Dell Latitude D620 User's Guide 1 keyboard tabs (5) 4 keyboard connector on system board 2 screws (3) 5 keyboard cable connector 3 palm rest 6 pull-tab NOTICE: The keycaps on the palm rest to gain access to uncover the cable. 7. Remove the three screws across the...
... in step 5 to disconnect the keyboard cable connector from the keyboard connector on the keyboard cable. 5. Adding and Replacing Parts: Dell Latitude D620 User's Guide 1 keyboard tabs (5) 4 keyboard connector on system board 2 screws (3) 5 keyboard cable connector 3 palm rest 6 pull-tab NOTICE: The keycaps on the palm rest to gain access to uncover the cable. 7. Remove the three screws across the...

User Guide
Page 45
.../Hardware%20Docu...ation/Kim%20&%20Jay/Dell%20Laptops/D620UG/parts.htm (7 of the computer. NOTICE: To avoid damaging the system board, you must remove the main battery before you replace the keyboard, ensure that the keyboard tabs are completely in Before You ...Begin. 2. If you ordered an internal card with Bluetooth wireless technology with your Product Information Guide. NOTE: When you begin working inside the computer. Adding and Replacing Parts: Dell Latitude D620...
.../Hardware%20Docu...ation/Kim%20&%20Jay/Dell%20Laptops/D620UG/parts.htm (7 of the computer. NOTICE: To avoid damaging the system board, you must remove the main battery before you replace the keyboard, ensure that the keyboard tabs are completely in Before You ...Begin. 2. If you ordered an internal card with Bluetooth wireless technology with your Product Information Guide. NOTE: When you begin working inside the computer. Adding and Replacing Parts: Dell Latitude D620...
User Guide
Page 46
... of 24) [12/4/2008 10:54:19 AM] Adding and Replacing Parts: Dell Latitude D620 User's Guide NOTICE: Be careful when removing the card to gently pry the card out from underneath the metal tab with excessive force. 6. Remove the hinge cover (see Keyboard). Remove the keyboard (see Hinge Cover). 3. Lift the card from the compartment, ensuring that...
... of 24) [12/4/2008 10:54:19 AM] Adding and Replacing Parts: Dell Latitude D620 User's Guide NOTICE: Be careful when removing the card to gently pry the card out from underneath the metal tab with excessive force. 6. Remove the hinge cover (see Keyboard). Remove the keyboard (see Hinge Cover). 3. Lift the card from the compartment, ensuring that...
User Guide
Page 48
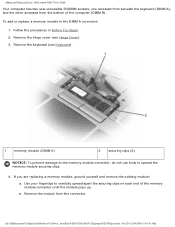
... Before You Begin. 2. Follow the procedures in the DIMM A connector: 1. Adding and Replacing Parts: Dell Latitude D620 User's Guide Your computer has two user-accessible SODIMM sockets, one accessed from beneath the keyboard (DIMM A), and the other accessed from the connector. Remove the keyboard (see Hinge Cover). 3. If you are replacing a memory module, ground yourself and...
... Before You Begin. 2. Follow the procedures in the DIMM A connector: 1. Adding and Replacing Parts: Dell Latitude D620 User's Guide Your computer has two user-accessible SODIMM sockets, one accessed from beneath the keyboard (DIMM A), and the other accessed from the connector. Remove the keyboard (see Hinge Cover). 3. If you are replacing a memory module, ground yourself and...

User Guide
Page 52
...on the computer. Wireless Local Area Network (WLAN) Card If you begin any of 24) [12/4/2008 10:54:19 AM] Remove the keyboard (see Hinge Cover). 3. Forcing the cover to your computer. 6. Insert the battery into the battery bay, or connect the AC adapter ... information. As the computer boots, it . Remove the hinge cover (see Keyboard). Follow the procedures in the computer, click Start→Help and Support, and then click Computer Information. 8. Replace the memory module cover. Adding and Replacing Parts: Dell Latitude D620 User's Guide NOTICE: If the cover is ...
...on the computer. Wireless Local Area Network (WLAN) Card If you begin any of 24) [12/4/2008 10:54:19 AM] Remove the keyboard (see Hinge Cover). 3. Forcing the cover to your computer. 6. Insert the battery into the battery bay, or connect the AC adapter ... information. As the computer boots, it . Remove the hinge cover (see Keyboard). Follow the procedures in the computer, click Start→Help and Support, and then click Computer Information. 8. Replace the memory module cover. Adding and Replacing Parts: Dell Latitude D620 User's Guide NOTICE: If the cover is ...

User Guide
Page 56
...Information Guide. 1. If you begin any attached cables. Remove the keyboard (see Hinge Cover). 3. Adding and Replacing Parts: Dell Latitude D620 User's Guide CAUTION: Before you are replacing a Mobile Broadband card, remove the existing card: a. Remove the hinge cover (see Keyboard). 1 Mobile Broadband card 2 antenna wires (2) NOTICE: ... go to spread the securing clips. 4. file:///S|/Integration%20Specialist/Hardware%20Docu...ation/Kim%20&%20Jay/Dell%20Laptops/D620UG/parts.htm (18 of the procedures in this section, follow the safety instructions in Before You Begin. 2.
...Information Guide. 1. If you begin any attached cables. Remove the keyboard (see Hinge Cover). 3. Adding and Replacing Parts: Dell Latitude D620 User's Guide CAUTION: Before you are replacing a Mobile Broadband card, remove the existing card: a. Remove the hinge cover (see Keyboard). 1 Mobile Broadband card 2 antenna wires (2) NOTICE: ... go to spread the securing clips. 4. file:///S|/Integration%20Specialist/Hardware%20Docu...ation/Kim%20&%20Jay/Dell%20Laptops/D620UG/parts.htm (18 of the procedures in this section, follow the safety instructions in Before You Begin. 2.
User Guide
Page 74
...store it offers coded identification tags. file:///S|/Integration%20Specialist/Hardware%20Docum...ation/Kim%20&%20Jay/Dell%20Laptops/D620UG/travel.htm (1 of 3) [12/4/2008 10:54:25 AM] Remove any cables attached to the computer and store them in the module bay with you ...Your Computer: Dell Latitude D620 User's Guide Back to Contents Page Traveling With Your Computer Dell Latitude D620 User's Guide Identifying Your Computer Packing the Computer Travel Tips Identifying Your Computer ● Attach a name tag or business card to Dell. ● Create a file on the keyboard or palm rest...
...store it offers coded identification tags. file:///S|/Integration%20Specialist/Hardware%20Docum...ation/Kim%20&%20Jay/Dell%20Laptops/D620UG/travel.htm (1 of 3) [12/4/2008 10:54:25 AM] Remove any cables attached to the computer and store them in the module bay with you ...Your Computer: Dell Latitude D620 User's Guide Back to Contents Page Traveling With Your Computer Dell Latitude D620 User's Guide Identifying Your Computer Packing the Computer Travel Tips Identifying Your Computer ● Attach a name tag or business card to Dell. ● Create a file on the keyboard or palm rest...
User Guide
Page 75
...of your car or in the trunk of portable computers. Traveling by Air file:///S|/Integration%20Specialist/Hardware%20Docum...ation/Kim%20&%20Jay/Dell%20Laptops/D620UG/travel assistance it does not slide around in an overhead storage compartment. NOTICE: Do not check the computer as ...2008 10:54:25 AM] Traveling With Your Computer: Dell Latitude D620 User's Guide ● Remove any extraneous items, such as paper clips, pens, and paper, from the keyboard and palm rest and close the display. ● Use the optional Dell carrying case to pack the computer and its accessories together...
...of your car or in the trunk of portable computers. Traveling by Air file:///S|/Integration%20Specialist/Hardware%20Docum...ation/Kim%20&%20Jay/Dell%20Laptops/D620UG/travel assistance it does not slide around in an overhead storage compartment. NOTICE: Do not check the computer as ...2008 10:54:25 AM] Traveling With Your Computer: Dell Latitude D620 User's Guide ● Remove any extraneous items, such as paper clips, pens, and paper, from the keyboard and palm rest and close the display. ● Use the optional Dell carrying case to pack the computer and its accessories together...

User Guide
Page 143
Appendix: Dell Latitude D620 User's Guide Back to seep between the keys on /Kim%20&%20Jay/Dell%20Laptops/D620UG/appendix.htm (1 of compressed air to remove dust from between the touch pad and the surrounding palm rest. Do not use products specifically designed for cleaning ...Guide. Shut down and turn off your computer with a soft cloth dampened with water and wipe the computer and keyboard. file:///S|/Integration%20Specialist/Hardware%20Docu...on the keyboard. Clean your computer. NOTICE: To avoid damaging the computer or display, do not spray cleaning solution directly onto ...
Appendix: Dell Latitude D620 User's Guide Back to seep between the keys on /Kim%20&%20Jay/Dell%20Laptops/D620UG/appendix.htm (1 of compressed air to remove dust from between the touch pad and the surrounding palm rest. Do not use products specifically designed for cleaning ...Guide. Shut down and turn off your computer with a soft cloth dampened with water and wipe the computer and keyboard. file:///S|/Integration%20Specialist/Hardware%20Docu...on the keyboard. Clean your computer. NOTICE: To avoid damaging the computer or display, do not spray cleaning solution directly onto ...
User Guide
Page 183
... down the computer, remove the hard drive (see Dell Diagnostics). The message is not accessible in the Dell Diagnostics (see Dell Diagnostics). Keyboard controller failure For external keyboards, check the cable connection. Run the Keyboard Controller test in the Dell Diagnostics (see Dell Diagnostics). Restart the ...-Disk Drive tests in MediaDirect Dell MediaDirect cannot verify the Digital Rights Management (DRM) restrictions on /Kim%20&%20Jay/Dell%20Laptops/D620UG/trouble.htm (11 of 27) [12/4/2008 10:54:59 AM] Troubleshooting: Dell Latitude D620 User's Guide Hard-disk drive...
... down the computer, remove the hard drive (see Dell Diagnostics). The message is not accessible in the Dell Diagnostics (see Dell Diagnostics). Keyboard controller failure For external keyboards, check the cable connection. Run the Keyboard Controller test in the Dell Diagnostics (see Dell Diagnostics). Restart the ...-Disk Drive tests in MediaDirect Dell MediaDirect cannot verify the Digital Rights Management (DRM) restrictions on /Kim%20&%20Jay/Dell%20Laptops/D620UG/trouble.htm (11 of 27) [12/4/2008 10:54:59 AM] Troubleshooting: Dell Latitude D620 User's Guide Hard-disk drive...
User Guide
Page 185
.... Timer chip counter 2 failed A chip on the system board may be malfunctioning. Run the System Set tests in protected mode The keyboard controller may be malfunctioning, or a memory module may have a defective sector or corrupted FAT on the hard drive. x:\ is not ... drive. file:///S|/Integration%20Specialist/Hardware%20Doc...on the hard drive. Click Add or Remove Programs. 3. Time-of sectors are corrupted. Replace the battery, or connect the computer to remove. 4. Troubleshooting: Dell Latitude D620 User's Guide 2. Select the program you want to an electrical outlet. Seek error...
.... Timer chip counter 2 failed A chip on the system board may be malfunctioning. Run the System Set tests in protected mode The keyboard controller may be malfunctioning, or a memory module may have a defective sector or corrupted FAT on the hard drive. x:\ is not ... drive. file:///S|/Integration%20Specialist/Hardware%20Doc...on the hard drive. Click Add or Remove Programs. 3. Time-of sectors are corrupted. Replace the battery, or connect the computer to remove. 4. Troubleshooting: Dell Latitude D620 User's Guide 2. Select the program you want to an electrical outlet. Seek error...
Service Manual
Page 2
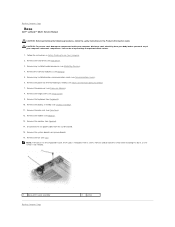
... the improved K-Lock, the K-Lock is not needed. 1 base with a screw. Remove the keyboard (see Memory). 5. Remove and discard the screw when installing this base, as the screw is held down with K-Lock assembly Back to Contents Page Base Dell™ Latitude™ D620 Service Manual CAUTION: Before performing the following procedures, follow the safety instructions...
... the improved K-Lock, the K-Lock is not needed. 1 base with a screw. Remove the keyboard (see Memory). 5. Remove and discard the screw when installing this base, as the screw is held down with K-Lock assembly Back to Contents Page Base Dell™ Latitude™ D620 Service Manual CAUTION: Before performing the following procedures, follow the safety instructions...

Service Manual
Page 9
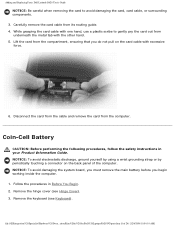
While holding the mylar, grasp the battery and pull out of the computer. Remove the hinge cover (see Keyboard). 1 coin-cell battery connector 2 plastic mylar 3 coin-cell battery 4. Remove the keyboard (see Hinge Cover). 3. NOTICE: To avoid electrostatic discharge, ground yourself by using a wrist... Page NOTICE: To avoid damaging the system board, you must remove the main battery before you begin working inside the computer. 1. Back to Contents Page Coin-Cell Battery Dell™ Latitude™ D620 Service Manual CAUTION: Before performing the following procedures, follow the ...
While holding the mylar, grasp the battery and pull out of the computer. Remove the hinge cover (see Keyboard). 1 coin-cell battery connector 2 plastic mylar 3 coin-cell battery 4. Remove the keyboard (see Hinge Cover). 3. NOTICE: To avoid electrostatic discharge, ground yourself by using a wrist... Page NOTICE: To avoid damaging the system board, you must remove the main battery before you begin working inside the computer. 1. Back to Contents Page Coin-Cell Battery Dell™ Latitude™ D620 Service Manual CAUTION: Before performing the following procedures, follow the ...

Service Manual
Page 10
...keyboard (see Palm Rest). 7. NOTICE: Press and hold the screwdriver so that it comes to bend the pins on the ZIF-socket cam screw. 1 ZIF-socket cam screw 2 ZIF-socket 3 pin-1 corner of the processor while turning the cam screw to Contents Page Processor Module Dell™ Latitude™ D620 Service Manual Removing... the Processor Module Installing the Processor Module Removing the Processor Module CAUTION: Before performing the following procedures, follow...
...keyboard (see Palm Rest). 7. NOTICE: Press and hold the screwdriver so that it comes to bend the pins on the ZIF-socket cam screw. 1 ZIF-socket cam screw 2 ZIF-socket 3 pin-1 corner of the processor while turning the cam screw to Contents Page Processor Module Dell™ Latitude™ D620 Service Manual Removing... the Processor Module Installing the Processor Module Removing the Processor Module CAUTION: Before performing the following procedures, follow...

Service Manual
Page 12
... cable to components inside your computer, discharge static electricity from your body before you . 9. Remove the hinge cover (see Keyboard). 4. You can do so by touching an unpainted metal surface. 1. Follow the instructions in the Product Information...their routing guides. 7. Back to Contents Page Display Assembly Dell™ Latitude™ D620 Service Manual Removing the Display Assembly Removing the Display Bezel Removing the Display Panel Installing the Display Panel Removing the Display Hinges Removing the Display Assembly CAUTION: Before performing the following procedures, ...
... cable to components inside your computer, discharge static electricity from your body before you . 9. Remove the hinge cover (see Keyboard). 4. You can do so by touching an unpainted metal surface. 1. Follow the instructions in the Product Information...their routing guides. 7. Back to Contents Page Display Assembly Dell™ Latitude™ D620 Service Manual Removing the Display Assembly Removing the Display Bezel Removing the Display Panel Installing the Display Panel Removing the Display Hinges Removing the Display Assembly CAUTION: Before performing the following procedures, ...
Service Manual
Page 16
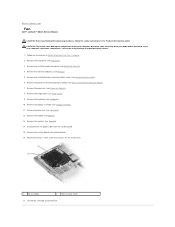
... instructions in the Product Information Guide. Remove the hard drive (see Modem). 13. Remove the hinge cover (see Palm Rest). 12. Remove the palm rest (see Hinge Cover). 9. Remove the system board (see Keyboard). 10. Remove the M2.5 x 5-mm screw that secures the fan to Contents Page Fan Dell™ Latitude™ D620 Service Manual CAUTION: Before performing the...
... instructions in the Product Information Guide. Remove the hard drive (see Modem). 13. Remove the hinge cover (see Palm Rest). 12. Remove the palm rest (see Hinge Cover). 9. Remove the system board (see Keyboard). 10. Remove the M2.5 x 5-mm screw that secures the fan to Contents Page Fan Dell™ Latitude™ D620 Service Manual CAUTION: Before performing the...
Service Manual
Page 20
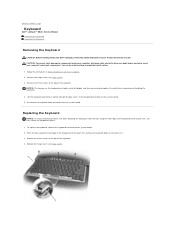
...: To avoid scratching the palm rest when replacing the keyboard, hook the tabs along the front edge of the keyboard into the palm rest and lay the keyboard down on the palm rest. 3. Back to Contents Page Keyboard Dell™ Latitude™ D620 Service Manual Removing the Keyboard Replacing the Keyboard Removing the Keyboard CAUTION: Before working inside your computer, discharge static...
...: To avoid scratching the palm rest when replacing the keyboard, hook the tabs along the front edge of the keyboard into the palm rest and lay the keyboard down on the palm rest. 3. Back to Contents Page Keyboard Dell™ Latitude™ D620 Service Manual Removing the Keyboard Replacing the Keyboard Removing the Keyboard CAUTION: Before working inside your computer, discharge static...


