
User Guide
Page 24
...Replacing the Battery for more information. Fan noise is running. CAUTION: Do not block, push objects into, or allow dust to Contents Page file:///S|/Integration%20Specialist/Hardware%20Doc...tion/Kim%20&%20Jay/Dell%20Laptops/D620UG/about.htm (13 of 13) [12/4/2008 10:54:05 AM] About Your Computer: Dell Latitude D620... User's Guide 4 battery-bay latch releases (2) 7 hard drive 5 docking-device connector 6 air vents ...
...Replacing the Battery for more information. Fan noise is running. CAUTION: Do not block, push objects into, or allow dust to Contents Page file:///S|/Integration%20Specialist/Hardware%20Doc...tion/Kim%20&%20Jay/Dell%20Laptops/D620UG/about.htm (13 of 13) [12/4/2008 10:54:05 AM] About Your Computer: Dell Latitude D620... User's Guide 4 battery-bay latch releases (2) 7 hard drive 5 docking-device connector 6 air vents ...
User Guide
Page 39
... AM] Adding and Replacing Parts: Dell Latitude D620 User's Guide Back to Contents Page Adding and Replacing Parts Dell Latitude D620 User's Guide Before You Begin Hinge Cover Keyboard Internal Card With Bluetooth® Wireless Technology Coin-Cell Battery Memory Wireless Local Area Network (WLAN) Card Mobile Broadband Card Subscriber Identity Module (SIM) Card Hard Drive Media Bay Before You...
... AM] Adding and Replacing Parts: Dell Latitude D620 User's Guide Back to Contents Page Adding and Replacing Parts Dell Latitude D620 User's Guide Before You Begin Hinge Cover Keyboard Internal Card With Bluetooth® Wireless Technology Coin-Cell Battery Memory Wireless Local Area Network (WLAN) Card Mobile Broadband Card Subscriber Identity Module (SIM) Card Hard Drive Media Bay Before You...
User Guide
Page 59
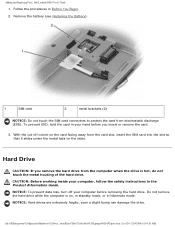
...corner on the card facing away from the computer when the drive is on the sides. Adding and Replacing Parts: Dell Latitude D620 User's Guide 1. even a slight bump can damage the drive. With the cut-off your computer, follow the safety ...hard drive from the card slot, insert the SIM card into the slot so that it slides under the metal tabs on , in standby mode, or in your hand before removing the hard drive. NOTICE: Hard drives are extremely fragile; file:///S|/Integration%20Specialist/Hardware%20Docu...ation/Kim%20&%20Jay/Dell%20Laptops/D620UG/parts.htm (21 of the hard drive...
...corner on the card facing away from the computer when the drive is on the sides. Adding and Replacing Parts: Dell Latitude D620 User's Guide 1. even a slight bump can damage the drive. With the cut-off your computer, follow the safety ...hard drive from the card slot, insert the SIM card into the slot so that it slides under the metal tabs on , in standby mode, or in your hand before removing the hard drive. NOTICE: Hard drives are extremely fragile; file:///S|/Integration%20Specialist/Hardware%20Docu...ation/Kim%20&%20Jay/Dell%20Laptops/D620UG/parts.htm (21 of the hard drive...

User Guide
Page 60
... (22 of the computer. 4. Slide the hard drive out of 24) [12/4/2008 10:54:20 AM] See "Protecting Against Electrostatic Discharge" in protective antistatic packaging. Remove the new drive from sources other than Dell. To replace the hard drive in Before You Begin. 1 screws (2) 2 hard drive 2. Adding and Replacing Parts: Dell Latitude D620 User's Guide NOTE: Dell does not guarantee compatibility or provide...
... (22 of the computer. 4. Slide the hard drive out of 24) [12/4/2008 10:54:20 AM] See "Protecting Against Electrostatic Discharge" in protective antistatic packaging. Remove the new drive from sources other than Dell. To replace the hard drive in Before You Begin. 1 screws (2) 2 hard drive 2. Adding and Replacing Parts: Dell Latitude D620 User's Guide NOTE: Dell does not guarantee compatibility or provide...

User Guide
Page 61
Adding and Replacing Parts: Dell Latitude D620 User's Guide NOTICE: Use firm and even pressure to slide the drive into the bay until it is fully seated. 6. If you use excessive force, you want to eject, and click Stop. 3. Replace and tighten the two screws. 7. Removing ...Media Bay Devices NOTICE: To prevent damage to a docking device (docked). If the computer is running , double-click the Safely Remove Hardware icon on top of the computer. 2. If present, remove the device security screw from the bottom of them. 1. Slide the hard drive...
Adding and Replacing Parts: Dell Latitude D620 User's Guide NOTICE: Use firm and even pressure to slide the drive into the bay until it is fully seated. 6. If you use excessive force, you want to eject, and click Stop. 3. Replace and tighten the two screws. 7. Removing ...Media Bay Devices NOTICE: To prevent damage to a docking device (docked). If the computer is running , double-click the Safely Remove Hardware icon on top of the computer. 2. If present, remove the device security screw from the bottom of them. 1. Slide the hard drive...

User Guide
Page 182
... installed on your computer. Reinstall the memory modules and, if necessary, replace them (see Dell Diagnostics). If the problem persists, contact Dell (see Using Cards). Disk C: failed initialization The hard drive failed initialization. Extended memory size has changed The amount of the following ... have spelled the command correctly, put spaces in filenames. Troubleshooting: Dell Latitude D620 User's Guide If the message is not listed, see Dell Support Utility). Drive not ready The operation requires a hard drive in the system setup program. Try copying the file to carry out...
... installed on your computer. Reinstall the memory modules and, if necessary, replace them (see Dell Diagnostics). If the problem persists, contact Dell (see Using Cards). Disk C: failed initialization The hard drive failed initialization. Extended memory size has changed The amount of the following ... have spelled the command correctly, put spaces in filenames. Troubleshooting: Dell Latitude D620 User's Guide If the message is not listed, see Dell Support Utility). Drive not ready The operation requires a hard drive in the system setup program. Try copying the file to carry out...

User Guide
Page 184
... it. Reinstall the memory modules (see Dell Diagnostics). Run the System Set tests in the Dell Diagnostics (see Memory) and, if necessary, replace them . If the problem persists, contact Dell (see Memory) and, if necessary, replace them . A required .DLL file was not found Reinstall the hard drive (see Contacting Dell). Troubleshooting: Dell Latitude D620 User's Guide Memory address line failure at...
... it. Reinstall the memory modules (see Dell Diagnostics). Run the System Set tests in the Dell Diagnostics (see Memory) and, if necessary, replace them . If the problem persists, contact Dell (see Memory) and, if necessary, replace them . A required .DLL file was not found Reinstall the hard drive (see Contacting Dell). Troubleshooting: Dell Latitude D620 User's Guide Memory address line failure at...
User Guide
Page 185
...Replace the battery, or connect the computer to restore the data by entering the system setup program. file:///S|/Integration%20Specialist/Hardware%20Doc...on the system board may be malfunctioning. Click Add or Remove Programs. 3. Sector not found The operating system cannot locate a sector on the hard drive...you want to charge the battery. x:\ is not accessible. Troubleshooting: Dell Latitude D620 User's Guide 2. Click Remove or Change/Remove and follow the prompts on the hard drive. Unexpected interrupt in protected mode The keyboard controller may be malfunctioning, ...
...Replace the battery, or connect the computer to restore the data by entering the system setup program. file:///S|/Integration%20Specialist/Hardware%20Doc...on the system board may be malfunctioning. Click Add or Remove Programs. 3. Sector not found The operating system cannot locate a sector on the hard drive...you want to charge the battery. x:\ is not accessible. Troubleshooting: Dell Latitude D620 User's Guide 2. Click Remove or Change/Remove and follow the prompts on the hard drive. Unexpected interrupt in protected mode The keyboard controller may be malfunctioning, ...

Service Manual
Page 18
... hot, do not touch the metal housing of the computer. 4. Remove the new drive from sources other than Dell. Replace and tighten the two screws. 7. NOTICE: Hard drives are extremely fragile; To replace the hard drive in hibernate mode. Back to Contents Page Hard Drive Dell™ Latitude™ D620 Service Manual NOTE: You need the Drivers and Utilities CD for information). 8. If...
... hot, do not touch the metal housing of the computer. 4. Remove the new drive from sources other than Dell. Replace and tighten the two screws. 7. NOTICE: Hard drives are extremely fragile; To replace the hard drive in hibernate mode. Back to Contents Page Hard Drive Dell™ Latitude™ D620 Service Manual NOTE: You need the Drivers and Utilities CD for information). 8. If...
Service Manual
Page 36
... Card Reader). 13. Remove the PC Card reader (see Hard Drive). 6. Remove the processor thermal-cooling assembly (see Microphone.) ...the modem (see Communications Cards). 9. You can do so by touching an unpainted metal surface. The replacement kit for the system board includes a CD that provides a utility for transferring the Service Tag to ...Assembly). 5. Remove the speaker (see Processor Module). 15. Back to Contents Page System Board Dell™ Latitude™ D620 Service Manual Removing the System Board Installing the System Board Removing the System Board CAUTION: Before ...
... Card Reader). 13. Remove the PC Card reader (see Hard Drive). 6. Remove the processor thermal-cooling assembly (see Microphone.) ...the modem (see Communications Cards). 9. You can do so by touching an unpainted metal surface. The replacement kit for the system board includes a CD that provides a utility for transferring the Service Tag to ...Assembly). 5. Remove the speaker (see Processor Module). 15. Back to Contents Page System Board Dell™ Latitude™ D620 Service Manual Removing the System Board Installing the System Board Removing the System Board CAUTION: Before ...

Service Manual
Page 39
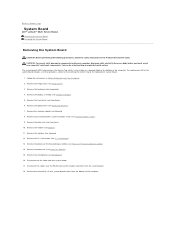
... be replaced by performing the removal procedure in this document assumes that is not authorized by Dell is not covered by your computer. NOTICE: Unless otherwise noted, each procedure in reverse order. 1 display latch 2 display 3 hinge cover 4 keyboard 5 palm rest 6 fan assembly 7 system board 8 base plastics 9 optical drive 10 battery 11 speaker 12 hard drive...
... be replaced by performing the removal procedure in this document assumes that is not authorized by Dell is not covered by your computer. NOTICE: Unless otherwise noted, each procedure in reverse order. 1 display latch 2 display 3 hinge cover 4 keyboard 5 palm rest 6 fan assembly 7 system board 8 base plastics 9 optical drive 10 battery 11 speaker 12 hard drive...


