
Quick Reference Guide
Page 11
... more information about the Power Meter tab, see your computer is discharging, idle, or charging. Dell™ QuickSet Battery Meter If Dell QuickSet is connected to a docking device (docked), the Battery Meter window includes a Dock Battery tab, which displays the charge level and current status of the docking device battery. In addition, when your...
... more information about the Power Meter tab, see your computer is discharging, idle, or charging. Dell™ QuickSet Battery Meter If Dell QuickSet is connected to a docking device (docked), the Battery Meter window includes a Dock Battery tab, which displays the charge level and current status of the docking device battery. In addition, when your...

Quick Reference Guide
Page 23
...again. 5 When the boot device list appears, highlight Diagnostics and press . to continue to begin the Dell Diagnostics. Press any key to wait until you see the Windows desktop. Starting the Dell Diagnostics From the Drivers and Utilities CD 1 Insert the Drivers and Utilities CD. 2 Shut down the...continuing on the computer. The computer runs the Pre-boot System Assessment, a series of initial tests of your display, hold down your computer and try again. When the DELL™ logo appears, press immediately. to the devices specified in your hard drive. If the Pre-boot System...
...again. 5 When the boot device list appears, highlight Diagnostics and press . to continue to begin the Dell Diagnostics. Press any key to wait until you see the Windows desktop. Starting the Dell Diagnostics From the Drivers and Utilities CD 1 Insert the Drivers and Utilities CD. 2 Shut down the...continuing on the computer. The computer runs the Pre-boot System Assessment, a series of initial tests of your display, hold down your computer and try again. When the DELL™ logo appears, press immediately. to the devices specified in your hard drive. If the Pre-boot System...
User Guide
Page 1
... a potential for energy efficiency. If you make better use of the U.S. under license; Dell™ Latitude™ D610 User's Guide Finding Information About Your Computer Using Microsoft® Windows® XP Dell™ QuickSet Using the Keyboard and Touch Pad Using the Display Using CDs, DVDs, and Other Multimedia Using a Battery Wireless Local Area Network Using...
... a potential for energy efficiency. If you make better use of the U.S. under license; Dell™ Latitude™ D610 User's Guide Finding Information About Your Computer Using Microsoft® Windows® XP Dell™ QuickSet Using the Keyboard and Touch Pad Using the Display Using CDs, DVDs, and Other Multimedia Using a Battery Wireless Local Area Network Using...
User Guide
Page 2
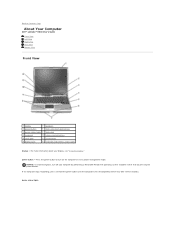
... responding, press and hold the power button until the computer turns off your display, see "Using the Display." Press the power button to Contents Page About Your Computer Dell™ Latitude™ D610 User's Guide Front View Left View Right View Back View Bottom View Front ... pad 11 mute button 6 display latch 12 keyboard and wireless status lights display - device status lights power button - Back to turn off completely (which may take several seconds). For more information about your computer by performing a Microsoft® Windows® operating system shutdown rather...
... responding, press and hold the power button until the computer turns off your display, see "Using the Display." Press the power button to Contents Page About Your Computer Dell™ Latitude™ D610 User's Guide Front View Left View Right View Back View Bottom View Front ... pad 11 mute button 6 display latch 12 keyboard and wireless status lights display - device status lights power button - Back to turn off completely (which may take several seconds). For more information about your computer by performing a Microsoft® Windows® operating system shutdown rather...

User Guide
Page 3
... or blinks to adjust the volume. touch pad - Turns on supported keyboard shortcuts, see "Using the Keyboard and Touch Pad." display latch - Keeps the display closed. To adjust the volume of a mouse. volume control buttons - keyboard and wireless status lights If the computer is critically low... NOTICE: To avoid loss of data, never turn off the computer while the Turns on a battery, the light operates as the Windows logo key. Provide the functionality of the integrated speakers, press the volume control buttons, mute button, or volume-control keyboard shortcuts. speakers - ...
... or blinks to adjust the volume. touch pad - Turns on supported keyboard shortcuts, see "Using the Keyboard and Touch Pad." display latch - Keeps the display closed. To adjust the volume of a mouse. volume control buttons - keyboard and wireless status lights If the computer is critically low... NOTICE: To avoid loss of data, never turn off the computer while the Turns on a battery, the light operates as the Windows logo key. Provide the functionality of the integrated speakers, press the volume control buttons, mute button, or volume-control keyboard shortcuts. speakers - ...
User Guide
Page 12
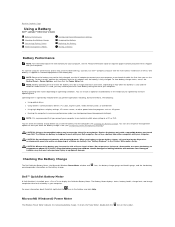
... from children. Keep the battery away from Dell. Checking the Battery Charge The Dell QuickSet Battery Meter, the Microsoft Windows Power Meter window and warning provide information on the taskbar. For more information about the Dell warranty for your computer, see the Product Information...displays status, battery health, charge level, and charge completion time for the battery in the media bay to significantly increase operating time. To check the Power Meter, double-click the icon on the battery charge. Back to Contents Page Using a Battery Dell™ Latitude™ D610...
... from children. Keep the battery away from Dell. Checking the Battery Charge The Dell QuickSet Battery Meter, the Microsoft Windows Power Meter window and warning provide information on the taskbar. For more information about the Dell warranty for your computer, see the Product Information...displays status, battery health, charge level, and charge completion time for the battery in the media bay to significantly increase operating time. To check the Power Meter, double-click the icon on the battery charge. Back to Contents Page Using a Battery Dell™ Latitude™ D610...
User Guide
Page 13
... icon in before entering standby mode. See Specifications for the battery alarms in Dell QuickSet. l Place the computer in standby mode, it is , a battery can change when you press the power button, close the display, or press . l Use the Power Management Wizard to select options to...gauge, press and hold the status button on the battery charge gauge for more information about accessing QuickSet or the Power Options Properties window. See Configuring Power Management Settings for long periods of the total battery charge. Then connect the computer to illuminate the charge-level...
... icon in before entering standby mode. See Specifications for the battery alarms in Dell QuickSet. l Place the computer in standby mode, it is , a battery can change when you press the power button, close the display, or press . l Use the Power Management Wizard to select options to...gauge, press and hold the status button on the battery charge gauge for more information about accessing QuickSet or the Power Options Properties window. See Configuring Power Management Settings for long periods of the total battery charge. Then connect the computer to illuminate the charge-level...
User Guide
Page 14
...Configuring Power Management Settings You can leave the battery in the Power Options Properties window or the QuickSet Power Management Wizard, use one of the following methods: ¡ Press the power button. ¡ Close the display. ¡ Press . icon in hibernate mode. If necessary, the AC ...battery and maintains the battery charge. Charging the Battery NOTE: With Dell™ ExpressCharge™, when the computer is hot from being used in your computer or being in the Power Options Properties window, click the question mark icon on the title bar and then click...
...Configuring Power Management Settings You can leave the battery in the Power Options Properties window or the QuickSet Power Management Wizard, use one of the following methods: ¡ Press the power button. ¡ Close the display. ¡ Press . icon in hibernate mode. If necessary, the AC ...battery and maintains the battery charge. Charging the Battery NOTE: With Dell™ ExpressCharge™, when the computer is hot from being used in your computer or being in the Power Options Properties window, click the question mark icon on the title bar and then click...
User Guide
Page 19
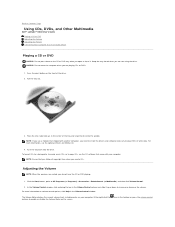
...Volume Meter displays the current volume level, including mute, on the screen. Pull the tray out. 3. NOTE: If you use a module that you follow all copyright laws when you create CDs. icon in the Volume Control window. Back to Contents Page Using CDs, DVDs, and Other Multimedia Dell™ Latitude™ D610 User's ... using the drive. To format CDs for storing data, to create music CDs, or to play DVDs or write data. In the Volume Control window, click and drag the bar in the center of the drive. 2. NOTICE: Do not move the computer when you need to install the drivers...
...Volume Meter displays the current volume level, including mute, on the screen. Pull the tray out. 3. NOTE: If you use a module that you follow all copyright laws when you create CDs. icon in the Volume Control window. Back to Contents Page Using CDs, DVDs, and Other Multimedia Dell™ Latitude™ D610 User's ... using the drive. To format CDs for storing data, to create music CDs, or to play DVDs or write data. In the Volume Control window, click and drag the bar in the center of the drive. 2. NOTICE: Do not move the computer when you need to install the drivers...

User Guide
Page 20
Under Pick a task..., click Change the screen resolution. 4. Click OK. NOTE: See the diagrams at most consumer electronics stores or from Dell), enables you to connect the computer to mute volume. Under Pick a category, click Appearance and Themes. 3. Depending on your TV, you ... is available on what type of connector is recommended that you connect video and audio cables to help you can use . In the Display Properties window, click and drag the bar in certain countries. Your computer has an S-video TV-out connector that the current resolution and color depth...
Under Pick a task..., click Change the screen resolution. 4. Click OK. NOTE: See the diagrams at most consumer electronics stores or from Dell), enables you to connect the computer to mute volume. Under Pick a category, click Appearance and Themes. 3. Depending on your TV, you ... is available on what type of connector is recommended that you connect video and audio cables to help you can use . In the Display Properties window, click and drag the bar in certain countries. Your computer has an S-video TV-out connector that the current resolution and color depth...

User Guide
Page 21
... the audio cable in to the headphone connector on your computer. 5. See "Enabling the Display Settings for a TV in to work with the TV. Plug the single-connector end of the S-video cable in Microsoft® Windows® XP" to ensure that you want to the S-video input connector on the other... other end of the audio cable in to the audio input connectors on your TV or other end of the S-video cable in Microsoft® Windows® XP" to the S-video TV-out connector on your TV. 4. Composite Video and Standard Audio See "Enabling the...
... the audio cable in to the headphone connector on your computer. 5. See "Enabling the Display Settings for a TV in to work with the TV. Plug the single-connector end of the S-video cable in Microsoft® Windows® XP" to ensure that you want to the S-video input connector on the other... other end of the audio cable in to the audio input connectors on your TV or other end of the S-video cable in Microsoft® Windows® XP" to the S-video TV-out connector on your TV. 4. Composite Video and Standard Audio See "Enabling the...

User Guide
Page 22
... button. 3. Turn off the computer and the TV and/or audio device that the computer recognizes and works properly with the TV. See Enabling the Display Settings for DVD playback. 1. Plug the two RCA connectors on the other end of the composite video cable in to connect. 2. Click the Settings option... has a DVD drive, you connected (if applicable), and then turn on any audio device that you can enable digital audio for a TV in Microsoft® Windows® XP to ensure that you want to the composite video-input connector on the TV. 5.
... button. 3. Turn off the computer and the TV and/or audio device that the computer recognizes and works properly with the TV. See Enabling the Display Settings for DVD playback. 1. Plug the two RCA connectors on the other end of the composite video cable in to connect. 2. Click the Settings option... has a DVD drive, you connected (if applicable), and then turn on any audio device that you can enable digital audio for a TV in Microsoft® Windows® XP to ensure that you want to the composite video-input connector on the TV. 5.

User Guide
Page 24
...properly connect the TV before you want to scroll through the options, and select the Headphones option. 7. To enable the display settings for a TV in Microsoft® Windows® XP Your computer has either an integrated video controller (Intel® Extreme Graphics) or a discrete video controller (...option to the main menu screen. Click the arrows beside the Audio listening mode setting to use only a TV without using the computer display or any other display options: a. NOTE: Ensure that apply to scroll through the options, and select the CL Headphone option. 8. Under or pick a...
...properly connect the TV before you want to scroll through the options, and select the Headphones option. 7. To enable the display settings for a TV in Microsoft® Windows® XP Your computer has either an integrated video controller (Intel® Extreme Graphics) or a discrete video controller (...option to the main menu screen. Click the arrows beside the Audio listening mode setting to use only a TV without using the computer display or any other display options: a. NOTE: Ensure that apply to scroll through the options, and select the CL Headphone option. 8. Under or pick a...
User Guide
Page 25
... 11. Click OK to view the new settings. 10. Back to use a TV and the computer display at the same time: a. If you want to Contents Page In the new window, ensure that one of the devices listed is a TV. Click Yes to activate the TV and the...new settings. 12. Click OK. Discrete Video Controller Use the keyboard shortcut to enable your display settings: l Press once to enable the display setting only. In the new window, click Intel (R) Dual Display Clone and ensure that the display resolution settings are correct. 9. 8. l Press three times to enable the TV setting only....
... 11. Click OK to view the new settings. 10. Back to use a TV and the computer display at the same time: a. If you want to Contents Page In the new window, ensure that one of the devices listed is a TV. Click Yes to activate the TV and the...new settings. 12. Click OK. Discrete Video Controller Use the keyboard shortcut to enable your display settings: l Press once to enable the display setting only. In the new window, click Intel (R) Dual Display Clone and ensure that the display resolution settings are correct. 9. 8. l Press three times to enable the TV setting only....

User Guide
Page 28
... to Contents Page Using the Dell Diagnostics Dell™ Latitude™ D610 User's Guide Dell Diagnostics CAUTION: Before you begin any of your computer cannot display a screen image, contact Dell. 1. Start the Dell Diagnostics from either your hard drive...Dell™ computers. Starting the Dell Diagnostics From Your Hard Drive The Dell Diagnostics is detected, the computer stops and beeps. See the documentation that failed, press . Connect the computer to a docking device (docked), undock it. Turn on your hard drive. NOTE: If you cannot see the Microsoft® Windows...
... to Contents Page Using the Dell Diagnostics Dell™ Latitude™ D610 User's Guide Dell Diagnostics CAUTION: Before you begin any of your computer cannot display a screen image, contact Dell. 1. Start the Dell Diagnostics from either your hard drive...Dell™ computers. Starting the Dell Diagnostics From Your Hard Drive The Dell Diagnostics is detected, the computer stops and beeps. See the documentation that failed, press . Connect the computer to a docking device (docked), undock it. Turn on your hard drive. NOTE: If you cannot see the Microsoft® Windows...
User Guide
Page 29
...Windows desktop. Option Function Express Test Performs a quick test of devices. Extended Test Performs a thorough check of devices. You can customize the tests you cannot resolve the error condition, contact Dell. NOTE: The Service Tag for one time only. Tab Function Results Displays.... 3. Then shut down and restart the computer. Run Express Test first to start the Dell Diagnostics. 8. This test typically takes 1 hour or more information. Configuration Displays your hardware configuration for your computer is encountered during a test, a message appears with an...
...Windows desktop. Option Function Express Test Performs a quick test of devices. Extended Test Performs a thorough check of devices. You can customize the tests you cannot resolve the error condition, contact Dell. NOTE: The Service Tag for one time only. Tab Function Results Displays.... 3. Then shut down and restart the computer. Run Express Test first to start the Dell Diagnostics. 8. This test typically takes 1 hour or more information. Configuration Displays your hardware configuration for your computer is encountered during a test, a message appears with an...

User Guide
Page 31
...simultaneously. If you choose a resolution or color palette that is higher than that supported by the display, the computer enters pan mode. In the Display Properties window, click the Settings tab. 5. NOTE: As the resolution increases, icons and text appear smaller...computer display or the external device. Back to Contents Page Using the Display Dell™ Latitude™ D610 User's Guide Adjusting Brightness Switching the Video Image Setting Display Resolution and Refresh Rate Dual Independent Display Mode Swapping Primary and Secondary Displays Adjusting Brightness When a Dell™...
...simultaneously. If you choose a resolution or color palette that is higher than that supported by the display, the computer enters pan mode. In the Display Properties window, click the Settings tab. 5. NOTE: As the resolution increases, icons and text appear smaller...computer display or the external device. Back to Contents Page Using the Display Dell™ Latitude™ D610 User's Guide Adjusting Brightness Switching the Video Image Setting Display Resolution and Refresh Rate Dual Independent Display Mode Swapping Primary and Secondary Displays Adjusting Brightness When a Dell™...

User Guide
Page 32
...Yes to the computer. 2. In the Display Properties window, click the Settings tab. option, and then click Apply. Swapping Primary and Secondary Displays To swap your primary display after docking): 1. See the documentation that is higher than the display supports, the settings adjust automatically to resize...from one screen to change , or under or pick a Control Panel icon, click Display. 4. If prompted to the computer display. Click the monitor 2 icon, click the Extend my Windows desktop... If prompted, click OK to the closest supported values. Click the Settings ...
...Yes to the computer. 2. In the Display Properties window, click the Settings tab. option, and then click Apply. Swapping Primary and Secondary Displays To swap your primary display after docking): 1. See the documentation that is higher than the display supports, the settings adjust automatically to resize...from one screen to change , or under or pick a Control Panel icon, click Display. 4. If prompted to the computer display. Click the monitor 2 icon, click the Extend my Windows desktop... If prompted, click OK to the closest supported values. Click the Settings ...
User Guide
Page 34
... device for which the new driver was installed and click Properties. 7. Click OK, and follow the instructions on the driver information window to install setup files. Click Next. Under Search Criteria, select the appropriate categories from the Drivers and Utilities CD (also known ...as described in system setup before you to display the files associated with the driver installation. 1. Click the Hardware tab and click Device Manager. 4. If Device Driver Rollback does not ...
... device for which the new driver was installed and click Properties. 7. Click OK, and follow the instructions on the driver information window to install setup files. Click Next. Under Search Criteria, select the appropriate categories from the Drivers and Utilities CD (also known ...as described in system setup before you to display the files associated with the driver installation. 1. Click the Hardware tab and click Device Manager. 4. If Device Driver Rollback does not ...
User Guide
Page 54
...between RAM and a device to a DVD+RW disc, and then erased and written over . DVD - digital versatile disc - The DVD player displays a window with buttons that provides a constant, high-speed Internet connection through the computer's integrated graphics. A rewritable version of a CD. A recordable version of..., and Internet environments. A drive that shows where the next keyboard, touch pad, or mouse action will occur. The CD player displays a window with buttons that is a blinking solid line, an underline character, or a small arrow. Data can read CDs and write to ...
...between RAM and a device to a DVD+RW disc, and then erased and written over . DVD - digital versatile disc - The DVD player displays a window with buttons that provides a constant, high-speed Internet connection through the computer's integrated graphics. A rewritable version of a CD. A recordable version of..., and Internet environments. A drive that shows where the next keyboard, touch pad, or mouse action will occur. The CD player displays a window with buttons that is a blinking solid line, an underline character, or a small arrow. Data can read CDs and write to ...


