

User's Guide
Page 5
... the Picture 62 Connecting Your Computer to a TV or Audio Device . . 62 S-Video and Standard Audio 65 S-Video and S/PDIF Digital Audio 66 Composite Video and Standard Audio 68 Composite Video and S/PDIF Digital Audio . . . . 70 Component Video and Standard Audio 72 Component Video and S/PDIF Digital Audio . . . . 74 Setting Up the Cyberlink (CL) Headphones . . . . 77...
... the Picture 62 Connecting Your Computer to a TV or Audio Device . . 62 S-Video and Standard Audio 65 S-Video and S/PDIF Digital Audio 66 Composite Video and Standard Audio 68 Composite Video and S/PDIF Digital Audio . . . . 70 Component Video and Standard Audio 72 Component Video and S/PDIF Digital Audio . . . . 74 Setting Up the Cyberlink (CL) Headphones . . . . 77...

User's Guide
Page 8
...Use the Dell Diagnostics 103 Starting the Dell Diagnostics From Your Hard Drive 103 Starting the Dell Diagnostics From the Optional Drivers and Utilities Media 104 Dell Diagnostics Main Menu 105 Dell Support Utility 107 Accessing the Dell Support Utility 107 Clicking the Dell Support Icon 107 Double-Clicking the Dell Support Icon... Problems 115 Power Problems 116 Printer Problems 117 Scanner Problems 118 Sound and Speaker Problems 118 Touch Pad or Mouse Problems 119 Video and Display Problems 120 If the display is blank 120 If the display is difficult to read 121 If only part of ...
...Use the Dell Diagnostics 103 Starting the Dell Diagnostics From Your Hard Drive 103 Starting the Dell Diagnostics From the Optional Drivers and Utilities Media 104 Dell Diagnostics Main Menu 105 Dell Support Utility 107 Accessing the Dell Support Utility 107 Clicking the Dell Support Icon 107 Double-Clicking the Dell Support Icon... Problems 115 Power Problems 116 Printer Problems 117 Scanner Problems 118 Sound and Speaker Problems 118 Touch Pad or Mouse Problems 119 Video and Display Problems 120 If the display is blank 120 If the display is difficult to read 121 If only part of ...

User's Guide
Page 26
I N F R A RE D S E N S O R - Supports one PC Card, such as some digital video cameras. The computer ships with a blank installed in the slot to enable the sensor. Stores software and data. 26 About Your Computer When you transfer ...
I N F R A RE D S E N S O R - Supports one PC Card, such as some digital video cameras. The computer ships with a blank installed in the slot to enable the sensor. Stores software and data. 26 About Your Computer When you transfer ...

User's Guide
Page 28
... computer, do not plug a telephone line into the network connector. 1 USB connectors (2) 2 3 network connector (RJ-45) 4 5 serial connector 6 7 AC adapter connector 8 modem connector (RJ-11) S-video TV-out connector video connector air vents USB CONNECTORS Connect USB devices, such as a mouse, keyboard, or printer.
... computer, do not plug a telephone line into the network connector. 1 USB connectors (2) 2 3 network connector (RJ-45) 4 5 serial connector 6 7 AC adapter connector 8 modem connector (RJ-11) S-video TV-out connector video connector air vents USB CONNECTORS Connect USB devices, such as a mouse, keyboard, or printer.

User's Guide
Page 29
AC ADAPTER CONNECTOR Connects an AC adapter to a TV. About Your Computer 29 SERIAL CONNECTOR Connects serial devices, such as a monitor. VIDEO CONNECTOR Connects video devices, such as a mouse or handheld device. S-VIDEO TV-OUT CONNECTOR Connects your computer to the computer. For more information, see "Connecting Your Computer to a TV or Audio Device" on page 62.
AC ADAPTER CONNECTOR Connects an AC adapter to a TV. About Your Computer 29 SERIAL CONNECTOR Connects serial devices, such as a monitor. VIDEO CONNECTOR Connects video devices, such as a mouse or handheld device. S-VIDEO TV-OUT CONNECTOR Connects your computer to the computer. For more information, see "Connecting Your Computer to a TV or Audio Device" on page 62.
User's Guide
Page 48
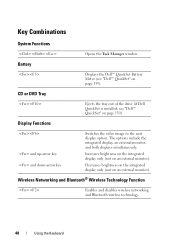
...arrow key and down-arrow key Switches the video image to the next display option. Decreases brightness on the integrated display only (not on page 139). CD or DVD Tray Displays the Dell™ QuickSet Battery Meter (see "Dell™ QuickSet" on an external monitor). Wireless... networking and Bluetooth wireless technology. 48 Using the Keyboard Increases brightness on the integrated display only (not on page 139). see "Dell™ QuickSet" on an external monitor). The options include the integrated display, an external monitor, and both displays simultaneously. Key ...
...arrow key and down-arrow key Switches the video image to the next display option. Decreases brightness on the integrated display only (not on page 139). CD or DVD Tray Displays the Dell™ QuickSet Battery Meter (see "Dell™ QuickSet" on an external monitor). Wireless... networking and Bluetooth wireless technology. 48 Using the Keyboard Increases brightness on the integrated display only (not on page 139). see "Dell™ QuickSet" on an external monitor). The options include the integrated display, an external monitor, and both displays simultaneously. Key ...

User's Guide
Page 53
... you can conserve power by setting the display brightness to the lowest comfortable setting by your computer and display. Press to switch the video image between the display only, the external device only, or the display and the external device simultaneously. Before you change any of ...decrease brightness on the integrated display only (not on an external monitor). Using the Display 53 6 Using the Display Adjusting Brightness When a Dell™ computer is connected to an external monitor and you try to change the brightness level, the Brightness Meter may appear on either the...
... you can conserve power by setting the display brightness to the lowest comfortable setting by your computer and display. Press to switch the video image between the display only, the external device only, or the display and the external device simultaneously. Before you change any of ...decrease brightness on the integrated display only (not on an external monitor). Using the Display 53 6 Using the Display Adjusting Brightness When a Dell™ computer is connected to an external monitor and you try to change the brightness level, the Brightness Meter may appear on either the...

User's Guide
Page 54
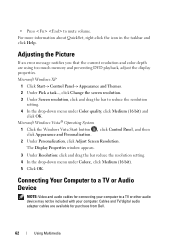
... for Color quality and Screen resolution. To set the display resolution and refresh rate for further instructions. In pan mode, the entire video image cannot be installed. You can benefit people with your computer is higher than the display supports, the settings adjust automatically to decrease... offer the best performance with vision impairments. If you increase resolution, items appear smaller on the screen. NOTE: Use only the Dell-installed video drivers, which are designed to appear larger and can enhance the legibility of text and change , or under Resolution, slide the ...
... for Color quality and Screen resolution. To set the display resolution and refresh rate for further instructions. In pan mode, the entire video image cannot be installed. You can benefit people with your computer is higher than the display supports, the settings adjust automatically to decrease... offer the best performance with vision impairments. If you increase resolution, items appear smaller on the screen. NOTE: Use only the Dell-installed video drivers, which are designed to appear larger and can enhance the legibility of text and change , or under Resolution, slide the ...

User's Guide
Page 55
... use extended desktop mode, perform the steps in the following section that corresponds to the operating system your display (known as an extension of the video image that is using an unsupported refresh rate. Microsoft® Windows® XP 1 Connect the external monitor, TV, or projector to the computer. 2 Click Start...
... use extended desktop mode, perform the steps in the following section that corresponds to the operating system your display (known as an extension of the video image that is using an unsupported refresh rate. Microsoft® Windows® XP 1 Connect the external monitor, TV, or projector to the computer. 2 Click Start...

User's Guide
Page 57
See the documentation that came with your video card for additional information. Using the Display 57 Windows Vista 1 Click the Windows Vista Start button , and click Control Panel. 2 Under Appearance and Personalization, click Adjust screen resolution. 3 In the Display Settings window, click the monitor 2 icon, click the This is my main monitor check box, and then click Apply. 4 Click OK to close the Display Settings window.
See the documentation that came with your video card for additional information. Using the Display 57 Windows Vista 1 Click the Windows Vista Start button , and click Control Panel. 2 Under Appearance and Personalization, click Adjust screen resolution. 3 In the Display Settings window, click the monitor 2 icon, click the This is my main monitor check box, and then click Apply. 4 Click OK to close the Display Settings window.
User's Guide
Page 62
... are using too much memory and preventing DVD playback, adjust the display properties. Connecting Your Computer to a TV or Audio Device NOTE: Video and audio cables for purchase from Dell. 62 Using Multimedia For more information about QuickSet, right-click the icon in the taskbar and click Help. The Display Properties window...
... are using too much memory and preventing DVD playback, adjust the display properties. Connecting Your Computer to a TV or Audio Device NOTE: Video and audio cables for purchase from Dell. 62 Using Multimedia For more information about QuickSet, right-click the icon in the taskbar and click Help. The Display Properties window...

User's Guide
Page 63
... connector that, together with a standard S-video cable, a composite video adapter cable, or a component video adapter cable (available from Dell), enable you can use a commercially available S-video cable, composite video cable, or component video cable to connect your computer to a TV. Your TV has either an S-video input connector, a composite video-input connector, or a component video-input connector. Depending on what...
... connector that, together with a standard S-video cable, a composite video adapter cable, or a component video adapter cable (available from Dell), enable you can use a commercially available S-video cable, composite video cable, or component video cable to connect your computer to a TV. Your TV has either an S-video input connector, a composite video-input connector, or a component video-input connector. Depending on what...

User's Guide
Page 64
... and your TV, you are using S/PDIF digital audio, see "Enabling S/PDIF Digital Audio" on page 78 to ensure that you connect video and audio cables to your computer to work with the TV. Additionally, if you must enable your computer in one of the following combinations.... • S-video and standard audio • Composite video and standard audio • Component-out video and standard audio NOTE: See the diagrams at the beginning of each subsection to help you determine which method...
... and your TV, you are using S/PDIF digital audio, see "Enabling S/PDIF Digital Audio" on page 78 to ensure that you connect video and audio cables to your computer to work with the TV. Additionally, if you must enable your computer in one of the following combinations.... • S-video and standard audio • Composite video and standard audio • Component-out video and standard audio NOTE: See the diagrams at the beginning of each subsection to help you determine which method...

User's Guide
Page 65
... TV/digital audio adapter cable). 2 Plug one end of the S-video cable into the S-video output connector on the computer. 3 Plug the other end of the S-video cable into the S-video input connector on your TV. S-Video and Standard Audio 1 2 1 audio connector 2 S-video TV-out connector 1 2 1 standard S-video cable 2 standard audio cable 1 Turn off the computer and...
... TV/digital audio adapter cable). 2 Plug one end of the S-video cable into the S-video output connector on the computer. 3 Plug the other end of the S-video cable into the S-video input connector on your TV. S-Video and Standard Audio 1 2 1 audio connector 2 S-video TV-out connector 1 2 1 standard S-video cable 2 standard audio cable 1 Turn off the computer and...

User's Guide
Page 66
S-Video and S/PDIF Digital Audio 1 2 1 S-video TV-out connector 2 composite video adapter 66 Using Multimedia 4 Plug the single-connector end of the audio cable into the headphone connector on your computer. 5 Plug the two RCA connectors on the other end of the audio cable into the audio input connectors on your TV or other audio device. 6 Turn on the TV and any audio device that you connected (if applicable), and then turn on the computer. 7 See "Enabling the Display Settings for a TV" on page 78 to ensure that the computer recognizes and works properly with the TV.
S-Video and S/PDIF Digital Audio 1 2 1 S-video TV-out connector 2 composite video adapter 66 Using Multimedia 4 Plug the single-connector end of the audio cable into the headphone connector on your computer. 5 Plug the two RCA connectors on the other end of the audio cable into the audio input connectors on your TV or other audio device. 6 Turn on the TV and any audio device that you connected (if applicable), and then turn on the computer. 7 See "Enabling the Display Settings for a TV" on page 78 to ensure that the computer recognizes and works properly with the TV.

User's Guide
Page 67
... that you want to connect. 2 Connect the composite video adapter to the S-video TV-out connector on your computer. 3 Plug one end of the S-video cable into the S-video output connector on the composite video adapter. 1 2 1 composite video adapter 2 S-video cable 4 Plug the other end of the S-video cable into the S-video input connector on the TV. 5 Plug one...
... that you want to connect. 2 Connect the composite video adapter to the S-video TV-out connector on your computer. 3 Plug one end of the S-video cable into the S-video output connector on the composite video adapter. 1 2 1 composite video adapter 2 S-video cable 4 Plug the other end of the S-video cable into the S-video input connector on the TV. 5 Plug one...

User's Guide
Page 68
1 2 1 composite video adapter 2 S/PDIF digital audio cable 6 Plug the other end of the S/PDIF digital audio cable into the audio input connector on your TV or audio device. 7 Turn on the TV, turn on any audio device that you connected (if applicable), and then turn on the computer. 8 See "Enabling the Display Settings for a TV" on page 78 to ensure that the computer recognizes and works properly with the TV. Composite Video and Standard Audio 1 2 3 1 audio input connector 3 composite video adapter 2 S-video TV-out connector 68 Using Multimedia
1 2 1 composite video adapter 2 S/PDIF digital audio cable 6 Plug the other end of the S/PDIF digital audio cable into the audio input connector on your TV or audio device. 7 Turn on the TV, turn on any audio device that you connected (if applicable), and then turn on the computer. 8 See "Enabling the Display Settings for a TV" on page 78 to ensure that the computer recognizes and works properly with the TV. Composite Video and Standard Audio 1 2 3 1 audio input connector 3 composite video adapter 2 S-video TV-out connector 68 Using Multimedia

User's Guide
Page 69
1 2 3 1 composite video adapter 3 standard audio cable 2 composite video cable 1 Turn off the computer and the TV and/or audio device that you want to connect. 2 Connect the composite video adapter to the S-video TV-out connector on your computer. 3 Plug one end of the composite video cable into the composite videooutput connector on the composite video adapter. 1 2 1 composite video adapter 2 composite video cable 4 Plug the other end of the composite video cable into the composite videoinput connector on the TV. Using Multimedia 69
1 2 3 1 composite video adapter 3 standard audio cable 2 composite video cable 1 Turn off the computer and the TV and/or audio device that you want to connect. 2 Connect the composite video adapter to the S-video TV-out connector on your computer. 3 Plug one end of the composite video cable into the composite videooutput connector on the composite video adapter. 1 2 1 composite video adapter 2 composite video cable 4 Plug the other end of the composite video cable into the composite videoinput connector on the TV. Using Multimedia 69

User's Guide
Page 70
5 Plug the single-connector end of the audio cable into the headphone connector on the computer. 6 Plug the two RCA connectors on the other end of the audio cable in to the audio input connectors on your TV or other audio device. 7 Turn on the TV, turn on any audio device that you connected (if applicable), and then turn on the computer. 8 See "Enabling the Display Settings for a TV" on page 78 to ensure that the computer recognizes and works properly with the TV. Composite Video and S/PDIF Digital Audio 1 2 1 S-video TV-out connector 2 composite video adapter 70 Using Multimedia
5 Plug the single-connector end of the audio cable into the headphone connector on the computer. 6 Plug the two RCA connectors on the other end of the audio cable in to the audio input connectors on your TV or other audio device. 7 Turn on the TV, turn on any audio device that you connected (if applicable), and then turn on the computer. 8 See "Enabling the Display Settings for a TV" on page 78 to ensure that the computer recognizes and works properly with the TV. Composite Video and S/PDIF Digital Audio 1 2 1 S-video TV-out connector 2 composite video adapter 70 Using Multimedia

User's Guide
Page 71
... you want to connect. 2 Connect the composite video adapter to the S-video TV-out connector on the computer. 3 Plug one end of the composite video cable into the composite video-input connector on the composite video adapter. 1 2 1 composite video adapter 2 composite video cable 4 Plug the other end of the composite video cable into the composite videoinput connector on...
... you want to connect. 2 Connect the composite video adapter to the S-video TV-out connector on the computer. 3 Plug one end of the composite video cable into the composite video-input connector on the composite video adapter. 1 2 1 composite video adapter 2 composite video cable 4 Plug the other end of the composite video cable into the composite videoinput connector on...


