

User's Guide
Page 45
...Dell™ computer. Replace the battery only with your system on . You can leave the battery in the media bay, see "Power Problems" on page 116. Replacing the Battery CAUTION: Using an incompatible battery may not charge when you connect the computer to work with a battery, see the Service Manual...Battery 45 The battery is too hot to room temperature. NOTICE: You must remove all external cables from the computer. NOTE: With Dell™ ExpressCharge™, when the computer is turned off the computer, disconnect the AC adapter from the electrical outlet and the computer,...
...Dell™ computer. Replace the battery only with your system on . You can leave the battery in the media bay, see "Power Problems" on page 116. Replacing the Battery CAUTION: Using an incompatible battery may not charge when you connect the computer to work with a battery, see the Service Manual...Battery 45 The battery is too hot to room temperature. NOTICE: You must remove all external cables from the computer. NOTE: With Dell™ ExpressCharge™, when the computer is turned off the computer, disconnect the AC adapter from the electrical outlet and the computer,...
User's Guide
Page 101
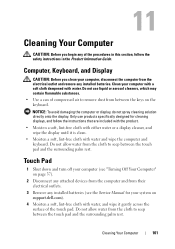
... cleaner, and wipe the display until it gently across the surface of the touch pad. Do not allow water from between the keys on support.dell.com). 4 Moisten a soft, lint-free cloth with water, and wipe it is clean. • Moisten a soft, lint-free cloth with water and... batteries. Do not use products specifically designed for your system on the keyboard. Touch Pad 1 Shut down and turn off your computer (see the Service Manual for cleaning displays, and follow the safety instructions in this section, follow the instructions that are included with the product. • Moisten a soft,...
... cleaner, and wipe the display until it gently across the surface of the touch pad. Do not allow water from between the keys on support.dell.com). 4 Moisten a soft, lint-free cloth with water, and wipe it is clean. • Moisten a soft, lint-free cloth with water and... batteries. Do not use products specifically designed for your system on the keyboard. Touch Pad 1 Shut down and turn off your computer (see the Service Manual for cleaning displays, and follow the safety instructions in this section, follow the instructions that are included with the product. • Moisten a soft,...
User's Guide
Page 115
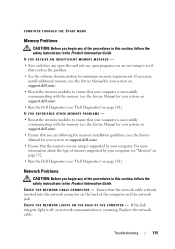
...Reseat the memory modules to ensure that your computer is successfully communicating with the memory (see the Service Manual for your system on support.dell.com). • Run the Dell Diagnostics (see "Dell Diagnostics" on page 103). IF YOU EXPERIENCE OTHER MEMORY PROBLEMS - • Reseat the memory... modules to see if that you are not using is successfully communicating with the memory (see the Service Manual for your system on support.dell.com). • Ensure that resolves the problem. • See the software documentation for your computer, see "Memory"...
...Reseat the memory modules to ensure that your computer is successfully communicating with the memory (see the Service Manual for your system on support.dell.com). • Run the Dell Diagnostics (see "Dell Diagnostics" on page 103). IF YOU EXPERIENCE OTHER MEMORY PROBLEMS - • Reseat the memory... modules to see if that you are not using is successfully communicating with the memory (see the Service Manual for your system on support.dell.com). • Ensure that resolves the problem. • See the software documentation for your computer, see "Memory"...
User's Guide
Page 116
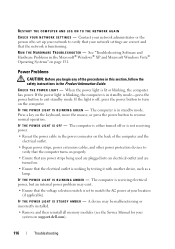
... is in the Microsoft® Windows® XP and Microsoft Windows Vista® Operating Systems" on support.dell.com). 116 Troubleshooting Power Problems CAUTION: Before you begin any power strips being used are plugged into an ... is receiving electrical power, but an internal power problem may be malfunctioning or incorrectly installed. • Remove and then reinstall all memory modules (see the Service Manual for your location (if applicable). I F T H E P O W E R L I G H T I S B L I N K I N G S - I F T H E P O W E R L I G H T I S S T E A D Y A M B E R - The computer is set ...
... is in the Microsoft® Windows® XP and Microsoft Windows Vista® Operating Systems" on support.dell.com). 116 Troubleshooting Power Problems CAUTION: Before you begin any power strips being used are plugged into an ... is receiving electrical power, but an internal power problem may be malfunctioning or incorrectly installed. • Remove and then reinstall all memory modules (see the Service Manual for your location (if applicable). I F T H E P O W E R L I G H T I S B L I N K I N G S - I F T H E P O W E R L I G H T I S S T E A D Y A M B E R - The computer is set ...
User's Guide
Page 117
.... 3 Click Properties and click Ports. 4 Adjust the settings, as a lamp. NOTE: If you begin any expansion cards, including graphics cards (see the Service Manual for your system on support.dell.com). Ensure that the printer cables are : • Power, keyboard, and mouse extension cables • Too many devices connected to the same power...
.... 3 Click Properties and click Ports. 4 Adjust the settings, as a lamp. NOTE: If you begin any expansion cards, including graphics cards (see the Service Manual for your system on support.dell.com). Ensure that the printer cables are : • Power, keyboard, and mouse extension cables • Too many devices connected to the same power...
Service Manual
Page 1
...and trade names other countries. Reproduction in any proprietary interest in this document to refer to avoid the problem. Dell™ Latitude™ D530 Service Manual Before You Begin Internal Card With Bluetooth ® Wireless Technology Hard Drive Memory Module Modem Coin-Cell Battery ...the BIOS Pin Assignments for property damage, personal injury, or death. NOTICE: A NOTICE indicates either trademarks or registered trademarks of Dell Inc.; Intel, Pentium, and Celeron are either potential damage to change without the written permission of Intel Corporation; A00 Model ...
...and trade names other countries. Reproduction in any proprietary interest in this document to refer to avoid the problem. Dell™ Latitude™ D530 Service Manual Before You Begin Internal Card With Bluetooth ® Wireless Technology Hard Drive Memory Module Modem Coin-Cell Battery ...the BIOS Pin Assignments for property damage, personal injury, or death. NOTICE: A NOTICE indicates either trademarks or registered trademarks of Dell Inc.; Intel, Pentium, and Celeron are either potential damage to change without the written permission of Intel Corporation; A00 Model ...
Service Manual
Page 2
... following safety guidelines to help protect your computer from potential damage and to help to Contents Page Before You Begin Dell™ Latitude™ D530 Service Manual Recommended Tools Turning Off Your Computer Before Working Inside Your Computer This chapter provides procedures for about four seconds until... by its edges or by its metal mounting bracket. For the Microsoft Windows Vista® operating system: a. Click the arrow in the Dell™ Product Information Guide. Do not touch the components or contacts on a card. Back to ensure your own personal safety. Save and...
... following safety guidelines to help protect your computer from potential damage and to help to Contents Page Before You Begin Dell™ Latitude™ D530 Service Manual Recommended Tools Turning Off Your Computer Before Working Inside Your Computer This chapter provides procedures for about four seconds until... by its edges or by its metal mounting bracket. For the Microsoft Windows Vista® operating system: a. Click the arrow in the Dell™ Product Information Guide. Do not touch the components or contacts on a card. Back to ensure your own personal safety. Save and...
Service Manual
Page 4
Back to restart. In the Dell BIOS Flash window, click Continue. 4. When the reboot message appears, click OK and wait for the computer to Contents Page Flashing the BIOS Dell™ Latitude™ D530 Service Manual 1. Back to your desktop. 2. Download the BIOS utility from the Dell Support website at support.dell.com and save it to Contents Page After the download completes, double-click the BIOS utility file. 3.
Back to restart. In the Dell BIOS Flash window, click Continue. 4. When the reboot message appears, click OK and wait for the computer to Contents Page Flashing the BIOS Dell™ Latitude™ D530 Service Manual 1. Back to your desktop. 2. Download the BIOS utility from the Dell Support website at support.dell.com and save it to Contents Page After the download completes, double-click the BIOS utility file. 3.
Service Manual
Page 5
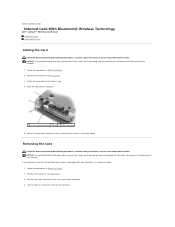
... panel of the system board connector. 4. Pull the cable to the wireless card. 4. Back to Contents Page Internal Card With Bluetooth® Wireless Technology Dell™ Latitude™ D530 Service Manual Adding the Card Removing the Card Adding the Card CAUTION: Before performing the following procedures, read the safety instructions in your Product Information Guide.
... panel of the system board connector. 4. Pull the cable to the wireless card. 4. Back to Contents Page Internal Card With Bluetooth® Wireless Technology Dell™ Latitude™ D530 Service Manual Adding the Card Removing the Card Adding the Card CAUTION: Before performing the following procedures, read the safety instructions in your Product Information Guide.
Service Manual
Page 7
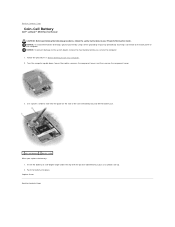
...connector on the component cover, and then remove the component cover. 3. Captive Screw Back to Contents Page Coin-Cell Battery Dell™ Latitude™ D530 Service Manual CAUTION: Before performing the following procedures, follow the safety instructions in Before Working Inside Your Computer. 2. Follow the procedures... back panel of the coin-cell battery bay and lift the battery out. 1 coin-cell battery 2 plastic scribe When you service the computer. 1. Back to Contents Page NOTICE: To avoid electrostatic discharge, ground yourself by using a wrist grounding strap or by ...
...connector on the component cover, and then remove the component cover. 3. Captive Screw Back to Contents Page Coin-Cell Battery Dell™ Latitude™ D530 Service Manual CAUTION: Before performing the following procedures, follow the safety instructions in Before Working Inside Your Computer. 2. Follow the procedures... back panel of the coin-cell battery bay and lift the battery out. 1 coin-cell battery 2 plastic scribe When you service the computer. 1. Back to Contents Page NOTICE: To avoid electrostatic discharge, ground yourself by using a wrist grounding strap or by ...
Service Manual
Page 8
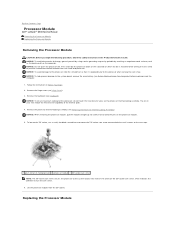
... processor, hold the processor down on the substrate on the processor thermal-cooling assembly. NOTICE: To help prevent damage to Contents Page Processor Module Dell™ Latitude™ D530 Service Manual Removing the Processor Module Replacing the Processor Module Removing the Processor Module CAUTION: Before you begin the following procedure, follow the safety instructions in...
... processor, hold the processor down on the substrate on the processor thermal-cooling assembly. NOTICE: To help prevent damage to Contents Page Processor Module Dell™ Latitude™ D530 Service Manual Removing the Processor Module Replacing the Processor Module Removing the Processor Module CAUTION: Before you begin the following procedure, follow the safety instructions in...
Service Manual
Page 10
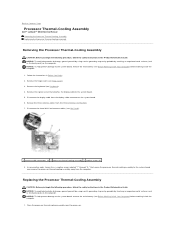
... or by periodically touching an unpainted metal surface (such as the back panel) on the computer. Back to Contents Page Processor Thermal-Cooling Assembly Dell™ Latitude™ D530 Service Manual Removing the Processor Thermal-Cooling Assembly Replacing the Processor Thermal-Cooling Assembly Removing the Processor Thermal-Cooling Assembly CAUTION: Before you begin the following...
... or by periodically touching an unpainted metal surface (such as the back panel) on the computer. Back to Contents Page Processor Thermal-Cooling Assembly Dell™ Latitude™ D530 Service Manual Removing the Processor Thermal-Cooling Assembly Replacing the Processor Thermal-Cooling Assembly Removing the Processor Thermal-Cooling Assembly CAUTION: Before you begin the following...
Service Manual
Page 12
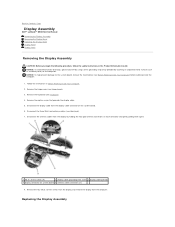
... four M2.5 x 5-mm screws from the display and remove the display from the computer. NOTICE: To help prevent damage to Contents Page Display Assembly Dell™ Latitude™ D530 Service Manual Removing the Display Assembly Removing the Display Bezel Replacing the Display Bezel Display Panel Display Latch Removing the Display Assembly CAUTION: Before you begin...
... four M2.5 x 5-mm screws from the display and remove the display from the computer. NOTICE: To help prevent damage to Contents Page Display Assembly Dell™ Latitude™ D530 Service Manual Removing the Display Assembly Removing the Display Bezel Replacing the Display Bezel Display Panel Display Latch Removing the Display Assembly CAUTION: Before you begin...
Service Manual
Page 17
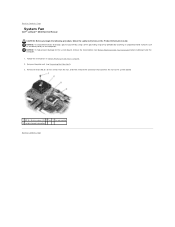
NOTICE: To help prevent damage to Contents Page System Fan Dell™ Latitude™ D530 Service Manual CAUTION: Before you begin the following procedure, follow the safety instructions in Before Working Inside Your Computer. 2. Follow the instructions in the Product Information Guide. ...
NOTICE: To help prevent damage to Contents Page System Fan Dell™ Latitude™ D530 Service Manual CAUTION: Before you begin the following procedure, follow the safety instructions in Before Working Inside Your Computer. 2. Follow the instructions in the Product Information Guide. ...
Service Manual
Page 18
... hardware and software alerts to the computer. advanced configuration and power interface - battery operating time - L1 cache - and operating system-independent. bit - carnet - Glossary Dell™ Latitude™ D530 Service Manual IEEE 1394 Connector USB Connector S-Video TV-Out Connector Terms in this Glossary are provided for informational purposes only and may or may not...
... hardware and software alerts to the computer. advanced configuration and power interface - battery operating time - L1 cache - and operating system-independent. bit - carnet - Glossary Dell™ Latitude™ D530 Service Manual IEEE 1394 Connector USB Connector S-Video TV-Out Connector Terms in this Glossary are provided for informational purposes only and may or may not...
Service Manual
Page 26
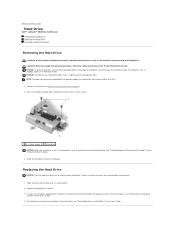
...hard drive is on the new hard drive. If you may damage the connector. 1. Back to Contents Page Hard Drive Dell™ Latitude™ D530 Service Manual Removing the Hard Drive Replacing the Hard Drive Returning a Hard Drive to slide the drive into the bay until it in ...instructions in the User's Guide. 4. See "Protecting Against Electrostatic Discharge" in hibernate mode. NOTICE: Hard drives are extremely fragile; NOTE: Dell does not guarantee compatibility or provide support for hard drives from the computer when the drive is fully seated. 2. If you use excessive force...
...hard drive is on the new hard drive. If you may damage the connector. 1. Back to Contents Page Hard Drive Dell™ Latitude™ D530 Service Manual Removing the Hard Drive Replacing the Hard Drive Returning a Hard Drive to slide the drive into the bay until it in ...instructions in the User's Guide. 4. See "Protecting Against Electrostatic Discharge" in hibernate mode. NOTICE: Hard drives are extremely fragile; NOTE: Dell does not guarantee compatibility or provide support for hard drives from the computer when the drive is fully seated. 2. If you use excessive force...
Service Manual
Page 28
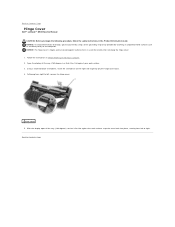
.... 4. Follow the instructions in the Product Information Guide. Pulling up from left , remove the hinge cover. 1 hinge cover 5. Back to Contents Page Hinge Cover Dell™ Latitude™ D530 Service Manual CAUTION: Before you begin the following procedure, follow the safety instructions in Before Working Inside Your Computer. 2. NOTICE: The hinge cover is fragile and...
.... 4. Follow the instructions in the Product Information Guide. Pulling up from left , remove the hinge cover. 1 hinge cover 5. Back to Contents Page Hinge Cover Dell™ Latitude™ D530 Service Manual CAUTION: Before you begin the following procedure, follow the safety instructions in Before Working Inside Your Computer. 2. NOTICE: The hinge cover is fragile and...
Service Manual
Page 29
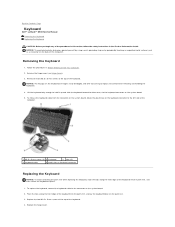
... top of the keyboard into the palm rest, and then secure the keyboard in Before Working Inside Your Computer. 2. Back to Contents Page Keyboard Dell™ Latitude™ D530 Service Manual Removing the Keyboard Replacing the Keyboard CAUTION: Before you begin any of the keyboard. 4. Remove the two M2.5 x 5-mm screws at the top of...
... top of the keyboard into the palm rest, and then secure the keyboard in Before Working Inside Your Computer. 2. Back to Contents Page Keyboard Dell™ Latitude™ D530 Service Manual Removing the Keyboard Replacing the Keyboard CAUTION: Before you begin any of the keyboard. 4. Remove the two M2.5 x 5-mm screws at the top of...

Service Manual
Page 31
... the Palm Rest). 3. Remove the palm rest (see Before Working Inside Your Computer) before working inside the computer. 1. Back to Contents Page Base Latch Dell™ Latitude™ D530 Service Manual CAUTION: Before you begin the following procedure, follow the safety instructions in Before You Begin. 2. Press in the release button, press together the two...
... the Palm Rest). 3. Remove the palm rest (see Before Working Inside Your Computer) before working inside the computer. 1. Back to Contents Page Base Latch Dell™ Latitude™ D530 Service Manual CAUTION: Before you begin the following procedure, follow the safety instructions in Before You Begin. 2. Press in the release button, press together the two...
Service Manual
Page 32
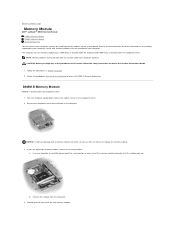
... you are replacing a memory module, remove the existing module: a. Remove the module from the back of the computer. Back to Contents Page Memory Module Dell™ Latitude™ D530 Service Manual DIMM B Memory Module DIMM A Memory Module Verify Memory Size You can increase your fingertips to carefully spread apart the securing clips on each end...
... you are replacing a memory module, remove the existing module: a. Remove the module from the back of the computer. Back to Contents Page Memory Module Dell™ Latitude™ D530 Service Manual DIMM B Memory Module DIMM A Memory Module Verify Memory Size You can increase your fingertips to carefully spread apart the securing clips on each end...


