
Service Manual
Page 7
... 12.1-inch SVGA (800 x 600) HPHC dual-scan (STN) color display. Jacks for the Microsoft® Windows® 98 operating system] or turned off). System Overview 1-1 A lithium ion battery with the computer's main battery, a second battery doubles battery operating time. A CD-ROM drive for...[or standby mode for connecting external speakers or headphones, a microphone, and record/playback devices to 128 MB of the Dell® Latitude® CP and CPi portable computers. A 512-KB or 256-KB pipelined-burst SRAM external cache. A Sound Blaster Pro-compatible integrated audio ...
... 12.1-inch SVGA (800 x 600) HPHC dual-scan (STN) color display. Jacks for the Microsoft® Windows® 98 operating system] or turned off). System Overview 1-1 A lithium ion battery with the computer's main battery, a second battery doubles battery operating time. A CD-ROM drive for...[or standby mode for connecting external speakers or headphones, a microphone, and record/playback devices to 128 MB of the Dell® Latitude® CP and CPi portable computers. A 512-KB or 256-KB pipelined-burst SRAM external cache. A Sound Blaster Pro-compatible integrated audio ...
Service Manual
Page 10
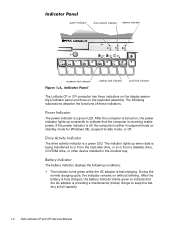
...turns green while the AC adapter is being transferred to or from the hard-disk drive, or to or from a diskette drive, CD-ROM drive, or other device installed in suspend mode (or standby mode for Windows 98), suspend-to keep the battery at full capacity. 1-4 Dell Latitude CP and CPi... battery indicator numbers lock indicator capitals lock indicator scroll lock indicator The Latitude CP or CPi computer has three indicators on the display assembly's indicator panel and three on without blinking. After the computer is turned on, the power indicator lights up when data is fast-charging. ...
...turns green while the AC adapter is being transferred to or from the hard-disk drive, or to or from a diskette drive, CD-ROM drive, or other device installed in suspend mode (or standby mode for Windows 98), suspend-to keep the battery at full capacity. 1-4 Dell Latitude CP and CPi... battery indicator numbers lock indicator capitals lock indicator scroll lock indicator The Latitude CP or CPi computer has three indicators on the display assembly's indicator panel and three on without blinking. After the computer is turned on, the power indicator lights up when data is fast-charging. ...
Service Manual
Page 11
... top of these codes. Pressing the power button on the power state. If the computer is attached, pressing the power button on the Latitude C/Port APR or C/Dock Expansion Station has no user activity occurs within 15 seconds, the system automatically enters suspend (or standby mode for...system alarm event will also turn on the computer.) Pressing the power button for the power state changes are as follows: If the computer is off (power indicator is open , pressing the power button initiates a boot operation. If no effect on the Latitude CP or CPi computer, C/Dock Expansion Station,...
... top of these codes. Pressing the power button on the power state. If the computer is attached, pressing the power button on the Latitude C/Port APR or C/Dock Expansion Station has no user activity occurs within 15 seconds, the system automatically enters suspend (or standby mode for...system alarm event will also turn on the computer.) Pressing the power button for the power state changes are as follows: If the computer is off (power indicator is open , pressing the power button initiates a boot operation. If no effect on the Latitude CP or CPi computer, C/Dock Expansion Station,...
Service Manual
Page 22
... corrections. Press the power button for 4 seconds to turn off or in the following conditions apply. All indicators remain off the computer, and let the battery and computer cool to -disk mode. 2-2 Dell Latitude CP and CPi Service Manual Battery indicator is alternating between green and amber.... Then turn off . An error occurred during system POST. Battery indicator is amber and blinking rapidly when the...
... corrections. Press the power button for 4 seconds to turn off or in the following conditions apply. All indicators remain off the computer, and let the battery and computer cool to -disk mode. 2-2 Dell Latitude CP and CPi Service Manual Battery indicator is alternating between green and amber.... Then turn off . An error occurred during system POST. Battery indicator is amber and blinking rapidly when the...

Service Manual
Page 30
In the event of a battery failure, the battery indicator displays indicator codes that identify the severity of the problem. abnormal charge current Fatal Cell imbalance; battery indicator 3-4 Dell Latitude CP and CPi Service Manual abnormal charge; The following table lists these failure codes. abnormal discharge; Temporary Over temperature; critical discharge Turn off the computer and let the battery and computer cool to room temperature. Indicator flashes alternately green and amber. Indicator flashes amber four times per second. Replace the battery.
In the event of a battery failure, the battery indicator displays indicator codes that identify the severity of the problem. abnormal charge current Fatal Cell imbalance; battery indicator 3-4 Dell Latitude CP and CPi Service Manual abnormal charge; The following table lists these failure codes. abnormal discharge; Temporary Over temperature; critical discharge Turn off the computer and let the battery and computer cool to room temperature. Indicator flashes alternately green and amber. Indicator flashes amber four times per second. Replace the battery.
Service Manual
Page 37
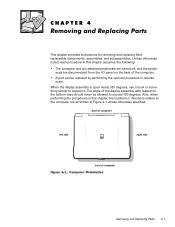
... side right side front of the computer. Also, when performing the procedures in this chapter assumes the following: The computer and any attached peripherals are turned off, and the peripherals are as shown in Figure 4-1 unless otherwise specified. Unless otherwise noted, each procedure in reverse order. The angle of the display...
... side right side front of the computer. Also, when performing the procedures in this chapter assumes the following: The computer and any attached peripherals are turned off, and the peripherals are as shown in Figure 4-1 unless otherwise specified. Unless otherwise noted, each procedure in reverse order. The angle of the display...

Service Manual
Page 38
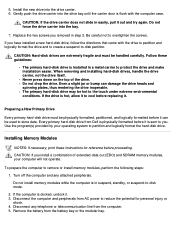
Most of the procedures in this guide require the use of one or more of the following tools: Number 1 magnetized Phillips-head screwdriver Small flat-blade screwdriver Small plastic scribe Before you cannot shut down the computer using the computer's operating system, press the power button for 4 seconds. 4-2 Dell Latitude CP and CPi Service Manual If you start to work on the computer, perform the following steps: NOTE: Make sure the computer is turned off and not in suspend-to-disk mode.
Most of the procedures in this guide require the use of one or more of the following tools: Number 1 magnetized Phillips-head screwdriver Small flat-blade screwdriver Small plastic scribe Before you cannot shut down the computer using the computer's operating system, press the power button for 4 seconds. 4-2 Dell Latitude CP and CPi Service Manual If you start to work on the computer, perform the following steps: NOTE: Make sure the computer is turned off and not in suspend-to-disk mode.

Service Manual
Page 85
... 5-mm screw near the microprocessor module Be sure and transfer the memory module(s) to enter the system's service tag number into the diskette drive, and turn on the computer.
... 5-mm screw near the microprocessor module Be sure and transfer the memory module(s) to enter the system's service tag number into the diskette drive, and turn on the computer.

User Guide
Page 4
...or hard-disk drive, or LS120 drive module. NOTE: Your computer was shipped with the Dell Latitude CP Series. Connectors for the Dell Latitude C/Port Advanced Port Replicator (C/Port APR) and the Dell Latitude C/Dock Expansion Station. Software wavetable support, Sound Blaster emulation Three audio jacks for connecting external...connections. 768 active-matrix color display. Two power conservation modes-suspend mode and suspend-to the hard-disk drive and turning off or in the battery bay, with Click-and-drag buttonless functions are designed to the environment than the lithium ...
...or hard-disk drive, or LS120 drive module. NOTE: Your computer was shipped with the Dell Latitude CP Series. Connectors for the Dell Latitude C/Port Advanced Port Replicator (C/Port APR) and the Dell Latitude C/Dock Expansion Station. Software wavetable support, Sound Blaster emulation Three audio jacks for connecting external...connections. 768 active-matrix color display. Two power conservation modes-suspend mode and suspend-to the hard-disk drive and turning off or in the battery bay, with Click-and-drag buttonless functions are designed to the environment than the lithium ...

User Guide
Page 5
...terms, indicate your acceptance by typing y when prompted by the computer. The System Setup program lets you receive from Dell. Before turning on your hard-disk drive. Dell offers the following software is installed on your computer for the first time, read all license agreements that you can ...install in the upgrade kit you view and change , you turn on your operating system. The following devices and upgrade options: C/Port ...
...terms, indicate your acceptance by typing y when prompted by the computer. The System Setup program lets you receive from Dell. Before turning on your hard-disk drive. Dell offers the following software is installed on your computer for the first time, read all license agreements that you can ...install in the upgrade kit you view and change , you turn on your operating system. The following devices and upgrade options: C/Port ...

User Guide
Page 10
... contact the law enforcement agency to carry with the computer case. 2. Before traveling, make the computer as light as missing or stolen. Turn off the computer or press to enter suspend-to avoid damaging the cable. 6. Preparing Your Computer for Travel To prepare your computer for ... together. Remove any cables attached to installed PC Cards (you do not have to which you reported the missing computer. If someone calls Dell for travel by air. Remove any extraneous items, such as missing or stolen. Provide the computer's service tag number, the case number,...
... contact the law enforcement agency to carry with the computer case. 2. Before traveling, make the computer as light as missing or stolen. Turn off the computer or press to enter suspend-to avoid damaging the cable. 6. Preparing Your Computer for Travel To prepare your computer for ... together. Remove any cables attached to installed PC Cards (you do not have to which you reported the missing computer. If someone calls Dell for travel by air. Remove any extraneous items, such as missing or stolen. Provide the computer's service tag number, the case number,...

User Guide
Page 11
...battery power for information about the kinds of ownership to visit, and consider acquiring an international carnet from hazards such as baggage. Dell has several carrying cases that the computer slides around in some countries. All airlines forbid the use the computer. Power interruptions can ...does not slide around . CAUTION: Have airport security personnel check the computer by your employer, carry documentation of your right to turn on an airplane, check the in case you must pass the computer through an airport X-ray security machine. Avoid packing the computer...
...battery power for information about the kinds of ownership to visit, and consider acquiring an international carnet from hazards such as baggage. Dell has several carrying cases that the computer slides around in some countries. All airlines forbid the use the computer. Power interruptions can ...does not slide around . CAUTION: Have airport security personnel check the computer by your employer, carry documentation of your right to turn on an airplane, check the in case you must pass the computer through an airport X-ray security machine. Avoid packing the computer...

User Guide
Page 15
If there is lit. Close the display and turn off your computer before removing the hard-disk drive. Remove the new drive from exposure to loss of the drive. Back to use later in ... or shipping the hard-disk drive. Gently pull the drive carrier out of data. Save the original packaging to Contents Page Removing and Replacing Parts: Dell™ Latitude™ CPi A-Series System User's Guide Installing a Primary Hard-Disk Drive | Installing Memory Modules Installing a Primary Hard-Disk Drive CAUTION: To prevent data loss...
If there is lit. Close the display and turn off your computer before removing the hard-disk drive. Remove the new drive from exposure to loss of the drive. Back to use later in ... or shipping the hard-disk drive. Gently pull the drive carrier out of data. Save the original packaging to Contents Page Removing and Replacing Parts: Dell™ Latitude™ CPi A-Series System User's Guide Installing a Primary Hard-Disk Drive | Installing Memory Modules Installing a Primary Hard-Disk Drive CAUTION: To prevent data loss...
User Guide
Page 16
... to -disk partition. If the drive is in step 2. Disconnect the computer and peripherals from Dell is physically formatted before it . CAUTION: Hard-disk drives are extremely fragile and must be hot to cool before proceeding. Turn off the computer and any telephone or telecommunication line from the battery bay or the...
... to -disk partition. If the drive is in step 2. Disconnect the computer and peripherals from Dell is physically formatted before it . CAUTION: Hard-disk drives are extremely fragile and must be hot to cool before proceeding. Turn off the computer and any telephone or telecommunication line from the battery bay or the...

User Guide
Page 17
Close the display, turn the computer upside down until it clicks into their sockets in the center of the memory module socket just far enough for the memory module ...
Close the display, turn the computer upside down until it clicks into their sockets in the center of the memory module socket just far enough for the memory module ...

User Guide
Page 18
...is in the slots on . If the total is displayed in the lower-right corner of the General tab window. a. In one of the Dell Diagnostics to confirm that the System Memory option reflects the newly installed memory: Click the Start button, point to AC power and... turn them on either side of additional memory and automatically updates the system configuration information. 7. Repeat preparatory steps 1 through 5 and removal and installation steps 1 through 8...
...is in the slots on . If the total is displayed in the lower-right corner of the General tab window. a. In one of the Dell Diagnostics to confirm that the System Memory option reflects the newly installed memory: Click the Start button, point to AC power and... turn them on either side of additional memory and automatically updates the system configuration information. 7. Repeat preparatory steps 1 through 5 and removal and installation steps 1 through 8...

User Guide
Page 30
.... Product Information If you need to remove the computer covers, be refused at the keyboard, relay detailed information during shipment to Dell Computer Corporation. Collect On Delivery (C.O.D.) packages are also responsible for insuring any product returned, and you call, our experts can ...write it clearly and prominently on their track record: more efficiently. You are not accepted. If possible, turn on your country as follows: 1. Technical Support Service Dell's industry-leading hardware technical support service is available 24 hours a day, seven days a week, to answer...
.... Product Information If you need to remove the computer covers, be refused at the keyboard, relay detailed information during shipment to Dell Computer Corporation. Collect On Delivery (C.O.D.) packages are also responsible for insuring any product returned, and you call, our experts can ...write it clearly and prominently on their track record: more efficiently. You are not accepted. If possible, turn on your country as follows: 1. Technical Support Service Dell's industry-leading hardware technical support service is available 24 hours a day, seven days a week, to answer...

User Guide
Page 38
... possible, use the travel module without turning off and undock it. 4. You can also install a battery, a CDROM drive, a LS-120 drive; Place the drives in the modular bay. Slide the new device firmly into the modular bay. Back to Contents Page Modular Bay: Dell™ Latitude™ CPi A-Series System User's Guide Using the...
... possible, use the travel module without turning off and undock it. 4. You can also install a battery, a CDROM drive, a LS-120 drive; Place the drives in the modular bay. Slide the new device firmly into the modular bay. Back to Contents Page Modular Bay: Dell™ Latitude™ CPi A-Series System User's Guide Using the...

User Guide
Page 39
.... 3. Install the new device. Dock the computer and turn it . 2. Turn off and undock it. 2. If your computer is docked, turn it on, if necessary. 1. Dock the computer and turn it on , if necessary. 1. Dock the computer and turn it on . 1. Remove the travel module. 3. Remove... Remove the second hard-disk drive. 3. Install the new device. 4. Turn off and undock it off and undock the computer. 2. If your computer is docked, turn it . 2. Install the new device. 4. Remove the battery. 3. Turn off and undock the computer. 2. Install the new device. 4. Remove ...
.... 3. Install the new device. Dock the computer and turn it . 2. Turn off and undock it. 2. If your computer is docked, turn it on, if necessary. 1. Dock the computer and turn it on , if necessary. 1. Dock the computer and turn it on . 1. Remove the travel module. 3. Remove... Remove the second hard-disk drive. 3. Install the new device. 4. Turn off and undock it off and undock the computer. 2. If your computer is docked, turn it . 2. Install the new device. 4. Remove the battery. 3. Turn off and undock the computer. 2. Install the new device. 4. Remove ...

User Guide
Page 40
Remove the travel module. 3. Dock the computer and turn it on . Dock the computer and turn it on , if necessary. 1. For instructions, see the documentation that drive. Install the new device. 4. Setting Up a Second Hard-Disk Drive The first time you install a second hard-disk drive in the modular bay, you must format that came with the device. Turn off and undock the computer. 2. Back to Contents Page Travel module CD-ROM drive LS-120 drive Second hard-disk drive 4.
Remove the travel module. 3. Dock the computer and turn it on . Dock the computer and turn it on , if necessary. 1. For instructions, see the documentation that drive. Install the new device. 4. Setting Up a Second Hard-Disk Drive The first time you install a second hard-disk drive in the modular bay, you must format that came with the device. Turn off and undock the computer. 2. Back to Contents Page Travel module CD-ROM drive LS-120 drive Second hard-disk drive 4.


