
Quick Reference Guide
Page 17
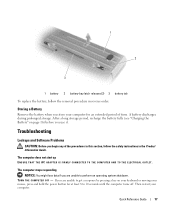
... TO THE COMPUTER AND TO THE ELECTRICAL OUTLET. TU R N T H E C O M P U T E R O F F - 1 2 3 1 battery 2 battery-bay latch releases (2) 3 battery tab To replace the battery, follow the safety instructions in reverse order. Quick Reference Guide 17 Storing a Battery Remove the battery when you use it. The computer stops...seconds until the computer turns off. After a long storage period, recharge the battery fully (see "Charging the Battery" on your keyboard or moving your mouse, press and hold the power button for an extended period of the procedures in this section, follow the ...
... TO THE COMPUTER AND TO THE ELECTRICAL OUTLET. TU R N T H E C O M P U T E R O F F - 1 2 3 1 battery 2 battery-bay latch releases (2) 3 battery tab To replace the battery, follow the safety instructions in reverse order. Quick Reference Guide 17 Storing a Battery Remove the battery when you use it. The computer stops...seconds until the computer turns off. After a long storage period, recharge the battery fully (see "Charging the Battery" on your keyboard or moving your mouse, press and hold the power button for an extended period of the procedures in this section, follow the ...
User's Guide
Page 4
Hibernate Mode 34 Configuring Power Management Settings 35 Accessing Power Options Properties 35 Charging the Battery 35 Replacing the Battery 36 Storing a Battery 37 Battery Errors 37 5 Using the Keyboard Numeric Keypad 39 Key Combinations 40 Keyboard Illumination 40 System Functions 40 Battery 40 Display Functions 40 Power Management 40 Microsoft® Windows®...
Hibernate Mode 34 Configuring Power Management Settings 35 Accessing Power Options Properties 35 Charging the Battery 35 Replacing the Battery 36 Storing a Battery 37 Battery Errors 37 5 Using the Keyboard Numeric Keypad 39 Key Combinations 40 Keyboard Illumination 40 System Functions 40 Battery 40 Display Functions 40 Power Management 40 Microsoft® Windows®...
User's Guide
Page 9
... Restore 111 Using the Operating System Media 112 14 Adding and Replacing Parts Before You Begin 115 Recommended Tools 115 Turning Off Your Computer 115 Before Working Inside Your Computer 116 Hinge Cover 118 Keyboard 119 Internal Card With Bluetooth® Wireless Technology 120 Coin-Cell... Broadband Card 129 Subscriber Identity Module (SIM) Card 132 Hard Drive 132 Returning a Hard Drive to Dell 134 Media Bay 135 Removing Media Bay Devices 135 FCM (Flash Cache Module) Card 135 15 Dell™ QuickSet 16 Traveling With Your Computer Identifying Your Computer 139 Contents 9
... Restore 111 Using the Operating System Media 112 14 Adding and Replacing Parts Before You Begin 115 Recommended Tools 115 Turning Off Your Computer 115 Before Working Inside Your Computer 116 Hinge Cover 118 Keyboard 119 Internal Card With Bluetooth® Wireless Technology 120 Coin-Cell... Broadband Card 129 Subscriber Identity Module (SIM) Card 132 Hard Drive 132 Returning a Hard Drive to Dell 134 Media Bay 135 Removing Media Bay Devices 135 FCM (Flash Cache Module) Card 135 15 Dell™ QuickSet 16 Traveling With Your Computer Identifying Your Computer 139 Contents 9
User's Guide
Page 42
Customizing the Touch Pad and Track Stick You can replace your track stick cap if it wears down to change the direction of the touch pad or use your thumb to press the left touch-... move the cursor. On the second tap, leave your finger on the touch pad and move the selected object by visiting the Dell website at dell.com. 42 Using the Keyboard Press the track stick left, right, up, or down from prolonged use. • To move the cursor, lightly slide your finger over...
Customizing the Touch Pad and Track Stick You can replace your track stick cap if it wears down to change the direction of the touch pad or use your thumb to press the left touch-... move the cursor. On the second tap, leave your finger on the touch pad and move the selected object by visiting the Dell website at dell.com. 42 Using the Keyboard Press the track stick left, right, up, or down from prolonged use. • To move the cursor, lightly slide your finger over...
User's Guide
Page 77
...the surrounding palm rest. Mouse NOTICE: Disconnect the mouse from their electrical outlets. 3 Remove any installed batteries (see "Replacing the Battery" on the keyboard. Computer, Keyboard, and Display CAUTION: Before you begin any attached devices from the computer and from the computer before cleaning the mouse ...If your computer or keyboard. You can also use liquid or aerosol cleaners, which may contain flammable substances. • Use a can of the touch ...
...the surrounding palm rest. Mouse NOTICE: Disconnect the mouse from their electrical outlets. 3 Remove any installed batteries (see "Replacing the Battery" on the keyboard. Computer, Keyboard, and Display CAUTION: Before you begin any attached devices from the computer and from the computer before cleaning the mouse ...If your computer or keyboard. You can also use liquid or aerosol cleaners, which may contain flammable substances. • Use a can of the touch ...
User's Guide
Page 89
... drive. Correct the appropriate options in the system setup program (see "Hard drive problems" on page 103). KEYBOARD D ATA LI NE FAI LURE - Run the Keyboard Controller test in the Dell Diagnostics (see "Dell Diagnostics" on page 81). KEYBOARD STUCK KEY FA ILURE - M E M O R Y A D D R E S S L ...Dell Diagnostics (see "Dell Diagnostics" on page 86), and boot the computer from media. Then shut down the computer, wait 30 seconds, and then restart it. The hard drive may be defective. KEYBOARD CLOCK LI NE FAIL URE - Reinstall the memory modules and, if necessary, replace...
... drive. Correct the appropriate options in the system setup program (see "Hard drive problems" on page 103). KEYBOARD D ATA LI NE FAI LURE - Run the Keyboard Controller test in the Dell Diagnostics (see "Dell Diagnostics" on page 81). KEYBOARD STUCK KEY FA ILURE - M E M O R Y A D D R E S S L ...Dell Diagnostics (see "Dell Diagnostics" on page 86), and boot the computer from media. Then shut down the computer, wait 30 seconds, and then restart it. The hard drive may be defective. KEYBOARD CLOCK LI NE FAIL URE - Reinstall the memory modules and, if necessary, replace...
User's Guide
Page 91
... Product Information Guide. UN E X PE C T E D I N TE R R U P T I B L E . Replace the battery, or connect the computer to charge the battery. Keyboard Problems Fill out the Diagnostics Checklist (see "Diagnostics Checklist" on page 149). System configuration settings are corrupted. If the problem... 81). Run the System Set tests in the system setup program does not match the system clock. Run the System Set tests in the Dell Diagnostics (see "Dell Diagnostics" on page 81). P L E A S E R U N T H E S YS T E M S E T U P P R O G R A M - TI MER CHIP COUNTER 2 FAIL ED - ...
... Product Information Guide. UN E X PE C T E D I N TE R R U P T I B L E . Replace the battery, or connect the computer to charge the battery. Keyboard Problems Fill out the Diagnostics Checklist (see "Diagnostics Checklist" on page 149). System configuration settings are corrupted. If the problem... 81). Run the System Set tests in the system setup program does not match the system clock. Run the System Set tests in the Dell Diagnostics (see "Dell Diagnostics" on page 81). P L E A S E R U N T H E S YS T E M S E T U P P R O G R A M - TI MER CHIP COUNTER 2 FAIL ED - ...

User's Guide
Page 119
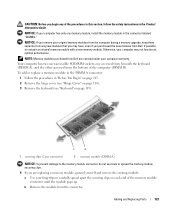
NOTICE: To avoid electrostatic discharge, ground yourself by using a wrist grounding strap or by periodically touching an unpainted metal surface (such as the back panel) on page 118). Adding and Replacing Parts 119 Keyboard CAUTION: Before performing the following procedures, follow the safety instructions in "Before You Begin" on page 115. 1 2 1 hinge cover 2 keyboard 2 Remove the hinge cover (see "Hinge Cover" on the computer. 1 Follow the instructions in your Product Information Guide.
NOTICE: To avoid electrostatic discharge, ground yourself by using a wrist grounding strap or by periodically touching an unpainted metal surface (such as the back panel) on page 118). Adding and Replacing Parts 119 Keyboard CAUTION: Before performing the following procedures, follow the safety instructions in "Before You Begin" on page 115. 1 2 1 hinge cover 2 keyboard 2 Remove the hinge cover (see "Hinge Cover" on the computer. 1 Follow the instructions in your Product Information Guide.

User's Guide
Page 120
... the three screws across the top of the keyboard. NOTE: Lift the keyboard carefully in step 4 to ensure that you replace the keyboard, ensure that the keyboard tabs are fragile, easily dislodged, and time-consuming to disconnect the keyboard cable connector from the keyboard connector on the keyboard are completely in your Product Information Guide. 120 Adding and...
... the three screws across the top of the keyboard. NOTE: Lift the keyboard carefully in step 4 to ensure that you replace the keyboard, ensure that the keyboard tabs are fragile, easily dislodged, and time-consuming to disconnect the keyboard cable connector from the keyboard connector on the keyboard are completely in your Product Information Guide. 120 Adding and...

User's Guide
Page 122
... by periodically touching a connector on the back panel of the battery compartment. Memory You can increase your computer. 122 Adding and Replacing Parts See "Specifications" on page 141 for your computer memory by installing memory modules on the system board. NOTICE: To avoid electrostatic... the safety instructions in "Before You Begin" on page 115. 2 Remove the hinge cover (see "Hinge Cover" on page 118). 3 Remove the keyboard (see "Keyboard" on page 119). 1 2 3 1 coin-cell battery connector 2 coin-cell battery 3 plastic arm 4 Remove the coin-cell battery connector from the...
... by periodically touching a connector on the back panel of the battery compartment. Memory You can increase your computer. 122 Adding and Replacing Parts See "Specifications" on page 141 for your computer memory by installing memory modules on the system board. NOTICE: To avoid electrostatic... the safety instructions in "Before You Begin" on page 115. 2 Remove the hinge cover (see "Hinge Cover" on page 118). 3 Remove the keyboard (see "Keyboard" on page 119). 1 2 3 1 coin-cell battery connector 2 coin-cell battery 3 plastic arm 4 Remove the coin-cell battery connector from the...
User's Guide
Page 123
...the memory-module securing clips. 4 If you begin any new modules that you purchased the new modules from the connector. To add or replace a memory module in the DIMM A connector: 1 Follow the procedures in the Product Information Guide. NOTICE: If you remove your original ...: Before you are covered under your computer warranty. NOTICE: If your computer has only one accessed from beneath the keyboard (DIMM A), and the other accessed from Dell are replacing a memory module, ground yourself and remove the existing module: a Use your fingertips to carefully spread apart the securing...
...the memory-module securing clips. 4 If you begin any new modules that you purchased the new modules from the connector. To add or replace a memory module in the DIMM A connector: 1 Follow the procedures in the Product Information Guide. NOTICE: If you remove your original ...: Before you are covered under your computer warranty. NOTICE: If your computer has only one accessed from beneath the keyboard (DIMM A), and the other accessed from Dell are replacing a memory module, ground yourself and remove the existing module: a Use your fingertips to carefully spread apart the securing...

User's Guide
Page 127
Wireless Local Area Network (WLAN) Card If you begin any of the procedures in this section, follow the safety instructions in the Product Information Guide. 1 Follow the procedures in "Before You Begin" on page 115. 2 Remove the hinge cover (see "Hinge Cover" on page 118). 3 Remove the keyboard (see "Keyboard" on page 119). Adding and Replacing Parts 127 CAUTION: Before you ordered a WLAN card with your computer, the card is already installed.
Wireless Local Area Network (WLAN) Card If you begin any of the procedures in this section, follow the safety instructions in the Product Information Guide. 1 Follow the procedures in "Before You Begin" on page 115. 2 Remove the hinge cover (see "Hinge Cover" on page 118). 3 Remove the keyboard (see "Keyboard" on page 119). Adding and Replacing Parts 127 CAUTION: Before you ordered a WLAN card with your computer, the card is already installed.

User's Guide
Page 130
If you are replacing a Mobile Broadband card, remove the existing card: a Disconnect the Mobile Broadband card from any attached cables. 130 Adding and Replacing Parts 3 Remove the keyboard (see "Keyboard" on page 119). 2 1 1 antenna cable connectors (2) 2 Mobile Broadband card NOTICE: To prevent damage to the connector, do not use tools to spread the securing clips. 4 If a Mobile Broadband card is not already installed, go to step 5.
If you are replacing a Mobile Broadband card, remove the existing card: a Disconnect the Mobile Broadband card from any attached cables. 130 Adding and Replacing Parts 3 Remove the keyboard (see "Keyboard" on page 119). 2 1 1 antenna cable connectors (2) 2 Mobile Broadband card NOTICE: To prevent damage to the connector, do not use tools to spread the securing clips. 4 If a Mobile Broadband card is not already installed, go to step 5.

User's Guide
Page 136
1 Follow the procedures in "Before You Begin" on page 115. 2 Remove the hinge cover (see "Hinge Cover" on page 118). 3 Remove the keyboard (see "Keyboard" on page 119). 4 Ground yourself by pushing the metal securing brackets away from the area in which the card will be installed. 6 Release the card... of the metal connectors on the back of the FCM card and in the wrong slot may cause damage to your computer. 136 Adding and Replacing Parts NOTICE: When installing this card, ensure that the protective sleeves on top of its connector. The FCM card is designed to your computer. ...
1 Follow the procedures in "Before You Begin" on page 115. 2 Remove the hinge cover (see "Hinge Cover" on page 118). 3 Remove the keyboard (see "Keyboard" on page 119). 4 Ground yourself by pushing the metal securing brackets away from the area in which the card will be installed. 6 Release the card... of the metal connectors on the back of the FCM card and in the wrong slot may cause damage to your computer. 136 Adding and Replacing Parts NOTICE: When installing this card, ensure that the protective sleeves on top of its connector. The FCM card is designed to your computer. ...

User's Guide
Page 139
...could damage the display. • Remove any extraneous items, such as paper clips, pens, and paper, from the keyboard and palm rest and close the display. • Use the optional Dell™ carrying case to pack the computer and its accessories together safely. • Avoid packing the computer with items... number in this file. • Contact your credit card company and ask if it in a safe place away from hazards such as possible, replace any devices installed in the module bay with you. • Shut down your Service Tag and store it offers coded identification tags. Remove any ...
...could damage the display. • Remove any extraneous items, such as paper clips, pens, and paper, from the keyboard and palm rest and close the display. • Use the optional Dell™ carrying case to pack the computer and its accessories together safely. • Avoid packing the computer with items... number in this file. • Contact your credit card company and ask if it in a safe place away from hazards such as possible, replace any devices installed in the module bay with you. • Shut down your Service Tag and store it offers coded identification tags. Remove any ...


