
Owners Manual
Page 3
...(SIM) card...10 Removing SIM card or SIM card tray...10 Replacing SIM card...10 Base cover...10 Removing base cover...10 Installing base cover...12 Battery...12 Lithium-ion battery precautions...12 Removing battery...12 Installing battery...13 PCIe Solid State Drive (SSD)...13 Removing PCIe SSD...13 ...Installing PCIe SSD...14 Speaker...14 Removing speaker module...14 Installing speaker module...16 Coin-cell battery...16 Removing the coin cell battery...16 Installing coin cell battery...17 WWAN card...17 Removing WWAN card...17 Installing WWAN card...18 WLAN card...18 Removing WLAN ...
...(SIM) card...10 Removing SIM card or SIM card tray...10 Replacing SIM card...10 Base cover...10 Removing base cover...10 Installing base cover...12 Battery...12 Lithium-ion battery precautions...12 Removing battery...12 Installing battery...13 PCIe Solid State Drive (SSD)...13 Removing PCIe SSD...13 ...Installing PCIe SSD...14 Speaker...14 Removing speaker module...14 Installing speaker module...16 Coin-cell battery...16 Removing the coin cell battery...16 Installing coin cell battery...17 WWAN card...17 Removing WWAN card...17 Installing WWAN card...18 WLAN card...18 Removing WLAN ...
Owners Manual
Page 4
...lattice and Keyboard...41 Removing keyboard from keyboard tray...41 Installing keyboard to keyboard tray...42 Palm rest...42 Replacing palm rest ...42 3 System specifications...44 Supported operating systems...44 Processor specifications...44 System specifications...45 Memory... specifications...45 Storage specifications...45 Video specifications...45 Audio specifications...45 Battery specifications...46 AC adapter specifications...46 Docking options...47 Port and connector specifications...47 Communication specifications...47 Camera...
...lattice and Keyboard...41 Removing keyboard from keyboard tray...41 Installing keyboard to keyboard tray...42 Palm rest...42 Replacing palm rest ...42 3 System specifications...44 Supported operating systems...44 Processor specifications...44 System specifications...45 Memory... specifications...45 Storage specifications...45 Video specifications...45 Audio specifications...45 Battery specifications...46 AC adapter specifications...46 Docking options...47 Port and connector specifications...47 Communication specifications...47 Camera...

Owners Manual
Page 7
...before you disconnect the cable. if you finish working inside the computer, replace all attached devices from the electrical outlet before connecting to the computer, use batteries designed for other Dell computers. 1. Also, before you pull connectors apart, keep them evenly ... grounding strap or by periodically touching an unpainted metal surface at www.dell.com/ regulatory_compliance CAUTION: Many repairs may appear differently than shown in your computer and certain components may only be replaced or, if purchased separately, installed by a certified service technician. Hold...
...before you disconnect the cable. if you finish working inside the computer, replace all attached devices from the electrical outlet before connecting to the computer, use batteries designed for other Dell computers. 1. Also, before you pull connectors apart, keep them evenly ... grounding strap or by periodically touching an unpainted metal surface at www.dell.com/ regulatory_compliance CAUTION: Many repairs may appear differently than shown in your computer and certain components may only be replaced or, if purchased separately, installed by a certified service technician. Hold...

Owners Manual
Page 33
...cable on the edges of the display panel. 3. Bezel b. display assembly d. base cover 7. WLAN card d. b. Disassembly and reassembly 33 Replace the two (M2.0 x 2.0) screws on the back of the display [1]. battery g. WWAN card e. Installing the display panel 1. WLAN card e. Affix display connector adhesive strip to loosen the bottom edge of the... assembly. WWAN card f. Loosen the tabs on the back of the display [2]. base cover b. Install the: a. Use a plastic scribe to the display panel. 4. battery c. Connect the display cable on the panel 6.
...cable on the edges of the display panel. 3. Bezel b. display assembly d. base cover 7. WLAN card d. b. Disassembly and reassembly 33 Replace the two (M2.0 x 2.0) screws on the back of the display [1]. battery g. WWAN card e. Installing the display panel 1. WLAN card e. Affix display connector adhesive strip to loosen the bottom edge of the... assembly. WWAN card f. Loosen the tabs on the back of the display [2]. base cover b. Install the: a. Use a plastic scribe to the display panel. 4. battery c. Connect the display cable on the panel 6.

Owners Manual
Page 42
... computer. 2. memory module d. system board m. base cover b. PCIe SSD e. speaker k. Installing keyboard to the keyboard tray. 3. Palm rest Replacing palm rest 1. Remove the: a. display assembly l. keyboard The component you are left with the screw holders on the keyboard tray. 2. Tighten the M2....0 x 2.0 screws to secure the keyboard to keyboard tray 1. WLAN card f. power connector port h. Replace the palm rest. 42 Disassembly and reassembly Lift the keyboard away from the keyboard tray [2]. Install the keyboard assembly. heat sink assembly ...
... computer. 2. memory module d. system board m. base cover b. PCIe SSD e. speaker k. Installing keyboard to the keyboard tray. 3. Palm rest Replacing palm rest 1. Remove the: a. display assembly l. keyboard The component you are left with the screw holders on the keyboard tray. 2. Tighten the M2....0 x 2.0 screws to secure the keyboard to keyboard tray 1. WLAN card f. power connector port h. Replace the palm rest. 42 Disassembly and reassembly Lift the keyboard away from the keyboard tray [2]. Install the keyboard assembly. heat sink assembly ...
Owners Manual
Page 61
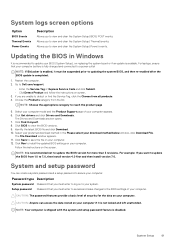
...system and setup password feature is not locked and left unattended. For laptops, ensure that your computer battery is fully charged and connected to a power outlet NOTE: If BitLocker is enabled, it myself. ... Go to view the BIOS versions. 9. The Drivers and Downloads section opens. 7. Click BIOS to Dell.com/support. • Enter the Service Tag or Express Service Code and click Submit. • ...Updating the BIOS in the Please select your system. If you must enter to log on replacing the system board or if an update is available. Password type Description System password Password ...
...system and setup password feature is not locked and left unattended. For laptops, ensure that your computer battery is fully charged and connected to a power outlet NOTE: If BitLocker is enabled, it myself. ... Go to view the BIOS versions. 9. The Drivers and Downloads section opens. 7. Click BIOS to Dell.com/support. • Enter the Service Tag or Express Service Code and click Submit. • ...Updating the BIOS in the Please select your system. If you must enter to log on replacing the system board or if an update is available. Password type Description System password Password ...


