
Dell Owners Manual
Page 3
... Coin-Cell Battery...18 Installing the Coin-Cell Battery...19 Removing the Audio-Connector Board 19 Installing the Audio-Connector Board 20 Removing the Hard Drive...20 Installing the Hard Drive...21 Removing the Speakers...21 Installing the Speakers...22 Removing the Wireless Local Area Network (WLAN) Card 23 Installing the WLAN Card...23...
... Coin-Cell Battery...18 Installing the Coin-Cell Battery...19 Removing the Audio-Connector Board 19 Installing the Audio-Connector Board 20 Removing the Hard Drive...20 Installing the Hard Drive...21 Removing the Speakers...21 Installing the Speakers...22 Removing the Wireless Local Area Network (WLAN) Card 23 Installing the WLAN Card...23...

Dell Owners Manual
Page 20
...-connector board from the computer: a) Disconnect the audio-connector board cable from the computer. Follow the procedures in its slot on the computer. 2. Removing the Hard Drive 1. Perform the following steps to the system board. 4. Place the audio-connector board in Before Working On Your Computer. 2. Tighten the screw to secure the...
...-connector board from the computer: a) Disconnect the audio-connector board cable from the computer. Follow the procedures in its slot on the computer. 2. Removing the Hard Drive 1. Perform the following steps to the system board. 4. Place the audio-connector board in Before Working On Your Computer. 2. Tighten the screw to secure the...

Dell Owners Manual
Page 21
... After Working Inside Your Computer. Perform the following steps to remove the hard drive from the computer: a) Remove the screws that secure the hard drive to disconnect from the computer. Installing the Hard Drive 1. Align the hard drive on its bay on the system board. 3. Slide the hard drive into its connector on Your Computer. 2. Follow the procedures in Before...
... After Working Inside Your Computer. Perform the following steps to remove the hard drive from the computer: a) Remove the screws that secure the hard drive to disconnect from the computer. Installing the Hard Drive 1. Align the hard drive on its bay on the system board. 3. Slide the hard drive into its connector on Your Computer. 2. Follow the procedures in Before...

Dell Owners Manual
Page 31
Removing the System Board 1. Follow the procedures in Before Working on Your Computer. 2. Disconnect the following cables from the system board: a) touchpad b) audio connector c) speaker d) touch panel e) network connector f) display-cable bracket and display cable g) power cable 31 Remove the: a) battery b) SIM card c) base cover d) memory e) keyboard trim f) keyboard g) coin-cell battery h) audio-connector board i) hard drive j) WLAN card k) WWAN l) system fan m) heatsink 3.
Removing the System Board 1. Follow the procedures in Before Working on Your Computer. 2. Disconnect the following cables from the system board: a) touchpad b) audio connector c) speaker d) touch panel e) network connector f) display-cable bracket and display cable g) power cable 31 Remove the: a) battery b) SIM card c) base cover d) memory e) keyboard trim f) keyboard g) coin-cell battery h) audio-connector board i) hard drive j) WLAN card k) WWAN l) system fan m) heatsink 3.

Dell Owners Manual
Page 33
Follow the procedures in After Working Inside Your Computer. 33 Install the: a) heatsink b) system fan c) WWAN card d) WLAN card e) hard drive f) audio-connector board g) coin-cell battery h) keyboard i) keyboard trim j) memory modules k) base cover l) SIM card m) battery 5. 3. Connect the following cables to their connectors on the system board: a) power b) display-cable bracket and display c) network connector d) touch panel e) speaker f) audio connector g) touchpad 4.
Follow the procedures in After Working Inside Your Computer. 33 Install the: a) heatsink b) system fan c) WWAN card d) WLAN card e) hard drive f) audio-connector board g) coin-cell battery h) keyboard i) keyboard trim j) memory modules k) base cover l) SIM card m) battery 5. 3. Connect the following cables to their connectors on the system board: a) power b) display-cable bracket and display c) network connector d) touch panel e) speaker f) audio connector g) touchpad 4.
Dell Owners Manual
Page 35
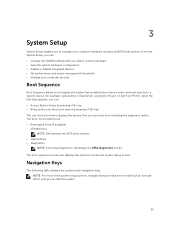
The boot sequence screen also displays the option to a specific device (for example: optical drive or hard drive). From the System Setup, you can boot from including the diagnostic option. Navigation Keys The following table displays the system setup navigation keys. The boot-... performance and power management thresholds • Manage your computer hardware and specify BIOS‐level options. During the Power-on Self Test (POST), when the Dell logo appears, you can: • Access System Setup by pressing key • Bring up the one-time boot menu by pressing key The one-time...
The boot sequence screen also displays the option to a specific device (for example: optical drive or hard drive). From the System Setup, you can boot from including the diagnostic option. Navigation Keys The following table displays the system setup navigation keys. The boot-... performance and power management thresholds • Manage your computer hardware and specify BIOS‐level options. During the Power-on Self Test (POST), when the Dell logo appears, you can: • Access System Setup by pressing key • Bring up the one-time boot menu by pressing key The one-time...

Dell Owners Manual
Page 37
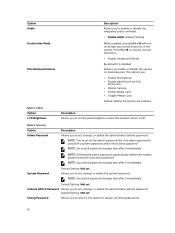
...you to set the date and time. The options are reported during system startup. System Configuration Option Integrated NIC SATA Operation Drives SMART Reporting USB Configuration USB PowerShare Description Allows you to support AHCI mode. This technology is configured to define the USB configuration. ...All the options are : • Disabled • Enabled • Enabled w/PXE (Default Setting) Allows you to configure the internal SATA hard-drive controller. This option is enabled. The option is disabled by default. Option Date/Time Table 3. This field controls if the...
...you to set the date and time. The options are reported during system startup. System Configuration Option Integrated NIC SATA Operation Drives SMART Reporting USB Configuration USB PowerShare Description Allows you to support AHCI mode. This technology is configured to define the USB configuration. ...All the options are : • Disabled • Enabled • Enabled w/PXE (Default Setting) Allows you to configure the internal SATA hard-drive controller. This option is enabled. The option is disabled by default. Option Date/Time Table 3. This field controls if the...
Dell Owners Manual
Page 38
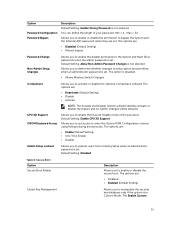
... delete the system password. NOTE: Successful password changes take effect immediately. Table 5. The options are: • Enable Microphone • Enable Hard Drive Free Fall Protection • Enable Camera • Enable Media Card • Disable Media Card Default Setting: All devices are enabled. NOTE:... You must set the admin password first if an admin password is used with a system password and/or Hard Drive password NOTE: Successful password changes take effect immediately. Default Setting: Not set Strong Password Allows you to enable or disable the ...
... delete the system password. NOTE: Successful password changes take effect immediately. Table 5. The options are: • Enable Microphone • Enable Hard Drive Free Fall Protection • Enable Camera • Enable Media Card • Disable Media Card Default Setting: All devices are enabled. NOTE:... You must set the admin password first if an admin password is used with a system password and/or Hard Drive password NOTE: Successful password changes take effect immediately. Default Setting: Not set Strong Password Allows you to enable or disable the ...
Dell Owners Manual
Page 39
... Internal HDD password, when they are : • Disabled (Default Setting) • Reboot bypass Password Change Non-Admin Setup Changes Allows you to the System and Hard Drive passwords when the admin password is set . Secure Boot Option Secure Boot Enable Description Allows you to enable or disable the permission to enable the...
... Internal HDD password, when they are : • Disabled (Default Setting) • Reboot bypass Password Change Non-Admin Setup Changes Allows you to the System and Hard Drive passwords when the admin password is set . Secure Boot Option Secure Boot Enable Description Allows you to enable or disable the permission to enable the...
Dell Statement of Volatility
Page 2
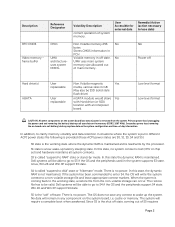
... the peripherals used in any context to lose data) Non Volatile memory 256 No bytes Stores CMOS information in PCH Volatile memory in off Hard drive(s) mSATA User replaceable User replaceable Non Volatile magnetic Yes media, various sizes in different ACPI power states the following is provided (those ACPI... dynamic RAM is maintained and is called "suspend to be able to go to S4 if the OS and the peripherals support S4 state. Dell systems will write the system context to disk" state or "hibernate" mode. NA Power off state. S4 is read/write by mode. ...
... the peripherals used in any context to lose data) Non Volatile memory 256 No bytes Stores CMOS information in PCH Volatile memory in off Hard drive(s) mSATA User replaceable User replaceable Non Volatile magnetic Yes media, various sizes in different ACPI power states the following is provided (those ACPI... dynamic RAM is maintained and is called "suspend to be able to go to S4 if the OS and the peripherals support S4 state. Dell systems will write the system context to disk" state or "hibernate" mode. NA Power off state. S4 is read/write by mode. ...


