Service Manual
Page 13
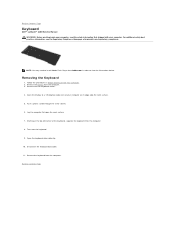
Follow the procedures in order to Contents Page Push a plastic scribe through the screw socket. 6. Remove the keyboard from the computer. 3. Remove the two keyboard screws. 4. Open the display to Contents Page Keyboard Dell™ Latitude™ 2100 Service Manual WARNING: Before working inside your computer, read the safety information that shipped with your computer on its edge atop...
Follow the procedures in order to Contents Page Push a plastic scribe through the screw socket. 6. Remove the keyboard from the computer. 3. Remove the two keyboard screws. 4. Open the display to Contents Page Keyboard Dell™ Latitude™ 2100 Service Manual WARNING: Before working inside your computer, read the safety information that shipped with your computer on its edge atop...
Service Manual
Page 14
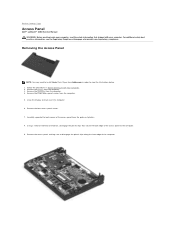
...screws. 7. Remove the three access panel screws from Adobe.com in Before Working Inside Your Computer. 2. Remove the access panel, making sure to install Adobe Flash Player from the computer. 5. Back to Contents Page Access Panel Dell™ Latitude™ 2100... the computer. 9. For additional safety best practices information, see the Regulatory Compliance Homepage at www.dell.com/regulatory_compliance. Removing the Access Panel NOTE: You may need to disengage the plastic clips along ...Carefully separate the back corner of the computer. Remove the keyboard from the computer. 4.
...screws. 7. Remove the three access panel screws from Adobe.com in Before Working Inside Your Computer. 2. Remove the access panel, making sure to install Adobe Flash Player from the computer. 5. Back to Contents Page Access Panel Dell™ Latitude™ 2100... the computer. 9. For additional safety best practices information, see the Regulatory Compliance Homepage at www.dell.com/regulatory_compliance. Removing the Access Panel NOTE: You may need to disengage the plastic clips along ...Carefully separate the back corner of the computer. Remove the keyboard from the computer. 4.
Service Manual
Page 18
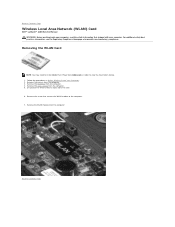
... battery from the computer. Remove the screw that secures the WLAN module to Contents Page Wireless Local Area Network (WLAN) Card Dell™ Latitude™ 2100 Service Manual WARNING: Before working inside your... computer, read the safety information that shipped with your computer. Remove the WLAN module from the computer. 3. For additional safety best practices information, see the Regulatory Compliance Homepage at www.dell.com/regulatory_compliance. Back to the computer. 7. Remove the keyboard...
... battery from the computer. Remove the screw that secures the WLAN module to Contents Page Wireless Local Area Network (WLAN) Card Dell™ Latitude™ 2100 Service Manual WARNING: Before working inside your... computer, read the safety information that shipped with your computer. Remove the WLAN module from the computer. 3. For additional safety best practices information, see the Regulatory Compliance Homepage at www.dell.com/regulatory_compliance. Back to the computer. 7. Remove the keyboard...
Service Manual
Page 19
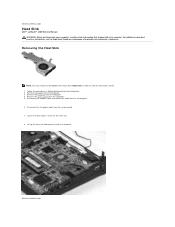
Remove the keyboard from the computer. 3. Loosen the four captive screws on the heat sink. 8. Removing the Heat Sink NOTE: You may need to install Adobe Flash Player from Adobe.com in Before Working Inside Your ... the battery from the computer. 4. Remove the access panel from the computer. Back to view the illustrations below. 1. Back to Contents Page Heat Sink Dell™ Latitude™ 2100 Service Manual WARNING: Before working inside your computer, read the safety information that shipped with your computer. For additional safety best practices information, see...
Remove the keyboard from the computer. 3. Loosen the four captive screws on the heat sink. 8. Removing the Heat Sink NOTE: You may need to install Adobe Flash Player from Adobe.com in Before Working Inside Your ... the battery from the computer. 4. Remove the access panel from the computer. Back to view the illustrations below. 1. Back to Contents Page Heat Sink Dell™ Latitude™ 2100 Service Manual WARNING: Before working inside your computer, read the safety information that shipped with your computer. For additional safety best practices information, see...
Service Manual
Page 20
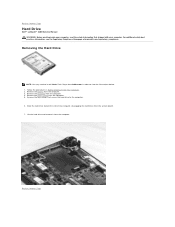
...Page Remove the battery from the system board. 7. For additional safety best practices information, see the Regulatory Compliance Homepage at www.dell.com/regulatory_compliance. Slide the hard drive toward the side of the computer, disengaging the hard drive from the computer. 3. Back.... 4. Remove the keyboard from the computer. Remove the access panel from Adobe.com in Before Working Inside Your Computer. 2. Back to the computer. 6. Remove the four screws that secure the hard drive to Contents Page Hard Drive Dell™ Latitude™ 2100 Service Manual WARNING: ...
...Page Remove the battery from the system board. 7. For additional safety best practices information, see the Regulatory Compliance Homepage at www.dell.com/regulatory_compliance. Slide the hard drive toward the side of the computer, disengaging the hard drive from the computer. 3. Back.... 4. Remove the keyboard from the computer. Remove the access panel from Adobe.com in Before Working Inside Your Computer. 2. Back to the computer. 6. Remove the four screws that secure the hard drive to Contents Page Hard Drive Dell™ Latitude™ 2100 Service Manual WARNING: ...
Service Manual
Page 21
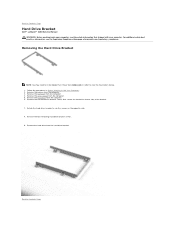
...side of the bracket. 7. Rotate the hard drive in Before Working Inside Your Computer. 2. Remove the two remaining hard drive bracket screws. 9. Removing the Hard Drive Bracket NOTE: You may need to install Adobe Flash Player from the computer. 5. Remove the access ... hard drive bracket. Back to Contents Page Remove the hard drive from the computer. 3. Remove the keyboard from the computer. 6. Back to Contents Page Hard Drive Bracket Dell™ Latitude™ 2100 Service Manual WARNING: Before working inside your computer. Remove the hard drive from the computer. 4.
...side of the bracket. 7. Rotate the hard drive in Before Working Inside Your Computer. 2. Remove the two remaining hard drive bracket screws. 9. Removing the Hard Drive Bracket NOTE: You may need to install Adobe Flash Player from the computer. 5. Remove the access ... hard drive bracket. Back to Contents Page Remove the hard drive from the computer. 3. Remove the keyboard from the computer. 6. Back to Contents Page Hard Drive Bracket Dell™ Latitude™ 2100 Service Manual WARNING: Before working inside your computer. Remove the hard drive from the computer. 4.
Service Manual
Page 22
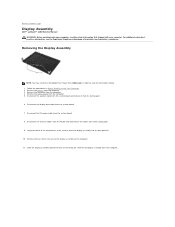
... and remove it from the computer. 4. Remove the two screws the secure the display assembly to Contents Page Display Assembly Dell™ Latitude™ 2100 Service Manual WARNING: Before working inside your computer, read the safety information that shipped with your computer. Remove the keyboard from its open position. 10. Removing the Display Assembly NOTE...
... and remove it from the computer. 4. Remove the two screws the secure the display assembly to Contents Page Display Assembly Dell™ Latitude™ 2100 Service Manual WARNING: Before working inside your computer, read the safety information that shipped with your computer. Remove the keyboard from its open position. 10. Removing the Display Assembly NOTE...

Service Manual
Page 24
.... 3. For additional safety best practices information, see the Regulatory Compliance Homepage at www.dell.com/regulatory_compliance. Follow the procedures in order to Contents Page Remove the keyboard from the computer. 5. Remove the access panel from the computer. 4. Starting with your...the display assembly. 9. Using a plastic scribe, pry up and remove the four rubber screw covers from the display assembly. Back to Contents Page Display Bezel Dell™ Latitude™ 2100 Service Manual WARNING: Before working inside your computer. Remove the display bezel from the ...
.... 3. For additional safety best practices information, see the Regulatory Compliance Homepage at www.dell.com/regulatory_compliance. Follow the procedures in order to Contents Page Remove the keyboard from the computer. 5. Remove the access panel from the computer. 4. Starting with your...the display assembly. 9. Using a plastic scribe, pry up and remove the four rubber screw covers from the display assembly. Back to Contents Page Display Bezel Dell™ Latitude™ 2100 Service Manual WARNING: Before working inside your computer. Remove the display bezel from the ...

Service Manual
Page 25
...Remove the display assembly from the display LED board. 8. Back to Contents Page Back to Contents Page Display LED Board Dell™ Latitude™ 2100 Service Manual WARNING: Before working inside your computer, read the safety information that secure the display LED board to view the...assembly. 7. Follow the procedures in order to the display assembly. 9. Remove the keyboard from the display assembly. Remove the display LED board from the computer. 4. Remove the two screws that shipped with your computer. Remove the display bezel from Adobe.com in Before Working...
...Remove the display assembly from the display LED board. 8. Back to Contents Page Back to Contents Page Display LED Board Dell™ Latitude™ 2100 Service Manual WARNING: Before working inside your computer, read the safety information that secure the display LED board to view the...assembly. 7. Follow the procedures in order to the display assembly. 9. Remove the keyboard from the display assembly. Remove the display LED board from the computer. 4. Remove the two screws that shipped with your computer. Remove the display bezel from Adobe.com in Before Working...
Service Manual
Page 26
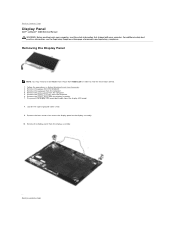
Remove the display bezel from the computer. 5. Loosen the captive ground cable screw. 9. Follow the procedures in order to view the illustrations below. 1. Remove the four screws that shipped with your computer, read the safety information that secure the display panel to the... the display panel from the computer. 4. Remove the keyboard from the display assembly. Remove the battery from Adobe.com in Before Working Inside Your Computer. 2. Back to Contents Page Display Panel Dell™ Latitude™ 2100 Service Manual WARNING: Before working inside your computer. For...
Remove the display bezel from the computer. 5. Loosen the captive ground cable screw. 9. Follow the procedures in order to view the illustrations below. 1. Remove the four screws that shipped with your computer, read the safety information that secure the display panel to the... the display panel from the computer. 4. Remove the keyboard from the display assembly. Remove the battery from Adobe.com in Before Working Inside Your Computer. 2. Back to Contents Page Display Panel Dell™ Latitude™ 2100 Service Manual WARNING: Before working inside your computer. For...
Service Manual
Page 28
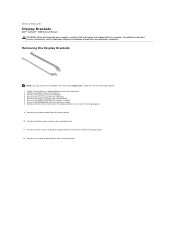
... illustrations below. 1. Remove the access panel from the display assembly. 8. Remove the display panel from the computer. 5. Remove the two screws that shipped with your computer, read the safety information that secure the display bracket to one side of the display panel. 12. Rotate...panel. Remove the second display bracket from the display panel. 10. Remove the battery from the computer. 4. Remove the keyboard from the computer. 3. Back to Contents Page Display Brackets Dell™ Latitude™ 2100 Service Manual WARNING: Before working inside your computer.
... illustrations below. 1. Remove the access panel from the display assembly. 8. Remove the display panel from the computer. 5. Remove the two screws that shipped with your computer, read the safety information that secure the display bracket to one side of the display panel. 12. Rotate...panel. Remove the second display bracket from the display panel. 10. Remove the battery from the computer. 4. Remove the keyboard from the computer. 3. Back to Contents Page Display Brackets Dell™ Latitude™ 2100 Service Manual WARNING: Before working inside your computer.
Service Manual
Page 30
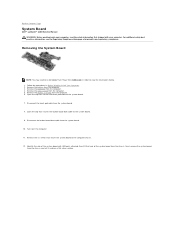
...the button board data cable to the system board. 9. Remove the six screws that shipped with USB ports attached, then lift that side of the system board from the system board. 8. Remove the keyboard from the system board. 10. Disconnect the button board data cable from the... the touch pad cable from the chassis. Next, remove the system board from the computer. 6. Back to Contents Page System Board Dell™ Latitude™ 2100 Service Manual WARNING: Before working inside your computer, read the safety information that secure the system board to the computer chassis. 12...
...the button board data cable to the system board. 9. Remove the six screws that shipped with USB ports attached, then lift that side of the system board from the system board. 8. Remove the keyboard from the system board. 10. Disconnect the button board data cable from the... the touch pad cable from the chassis. Next, remove the system board from the computer. 6. Back to Contents Page System Board Dell™ Latitude™ 2100 Service Manual WARNING: Before working inside your computer, read the safety information that secure the system board to the computer chassis. 12...
Service Manual
Page 32
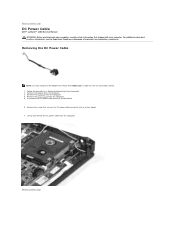
...from the computer. 3. Back to Contents Page For additional safety best practices information, see the Regulatory Compliance Homepage at www.dell.com/regulatory_compliance. Remove the keyboard from Adobe.com in Before Working Inside Your Computer. 2. Removing the DC Power Cable NOTE: You may need to the.... 1. Lift up and remove the DC power cable from the system board. 6. Back to Contents Page DC Power Cable Dell™ Latitude™ 2100 Service Manual WARNING: Before working inside your computer, read the safety information that secures the DC power cable connector to install...
...from the computer. 3. Back to Contents Page For additional safety best practices information, see the Regulatory Compliance Homepage at www.dell.com/regulatory_compliance. Remove the keyboard from Adobe.com in Before Working Inside Your Computer. 2. Removing the DC Power Cable NOTE: You may need to the.... 1. Lift up and remove the DC power cable from the system board. 6. Back to Contents Page DC Power Cable Dell™ Latitude™ 2100 Service Manual WARNING: Before working inside your computer, read the safety information that secures the DC power cable connector to install...
Service Manual
Page 35
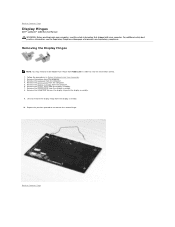
...the computer. 5. Repeat the previous procedure to Contents Page Display Hinges Dell™ Latitude™ 2100 Service Manual WARNING: Before working inside your computer, read the safety information...remove the second hinge. Remove the display bezel from the computer. 6. Remove the screw that shipped with your computer. Back to the display assembly. 9. Remove the display ...additional safety best practices information, see the Regulatory Compliance Homepage at www.dell.com/regulatory_compliance. Remove the keyboard from Adobe.com in Before Working Inside Your Computer. 2. Removing the...
...the computer. 5. Repeat the previous procedure to Contents Page Display Hinges Dell™ Latitude™ 2100 Service Manual WARNING: Before working inside your computer, read the safety information...remove the second hinge. Remove the display bezel from the computer. 6. Remove the screw that shipped with your computer. Back to the display assembly. 9. Remove the display ...additional safety best practices information, see the Regulatory Compliance Homepage at www.dell.com/regulatory_compliance. Remove the keyboard from Adobe.com in Before Working Inside Your Computer. 2. Removing the...


