Setup and Features Information Tech Sheet
Page 1
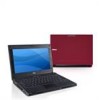
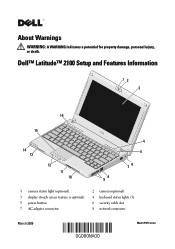
Dell™ Latitude™ 2100 Setup and Features Information 12 3 16 15 14 13 12 11 10 4 5 76 98 1 camera status light (optional) 3 display (touch screen feature is optional) 5 power button 7 AC adapter connector 2 camera (optional) 4 keyboard status lights (3) 6 security cable slot 8 network connector March 2009 Model P02T series About Warnings WARNING: A WARNING indicates a potential for property damage, personal injury, or death.
Dell™ Latitude™ 2100 Setup and Features Information 12 3 16 15 14 13 12 11 10 4 5 76 98 1 camera status light (optional) 3 display (touch screen feature is optional) 5 power button 7 AC adapter connector 2 camera (optional) 4 keyboard status lights (3) 6 security cable slot 8 network connector March 2009 Model P02T series About Warnings WARNING: A WARNING indicates a potential for property damage, personal injury, or death.

Setup and Features Information Tech Sheet
Page 3
...devices, such as a printer. CAUTION: When you begin any cards or connect the computer to a docking device or other external device, such as a mouse or keyboard (optional). 4 Open the computer display and press the power button to turn on the computer. Quick Setup WARNING: Before you disconnect the AC adapter cable...computer, grasp the connector, not the cable itself, and pull firmly but gently to avoid damaging the cable. For additional best practices information, see www.dell.com/regulatory_compliance. NOTE: It is recommended that shipped with electrical outlets worldwide.
...devices, such as a printer. CAUTION: When you begin any cards or connect the computer to a docking device or other external device, such as a mouse or keyboard (optional). 4 Open the computer display and press the power button to turn on the computer. Quick Setup WARNING: Before you disconnect the AC adapter cable...computer, grasp the connector, not the cable itself, and pull firmly but gently to avoid damaging the cable. For additional best practices information, see www.dell.com/regulatory_compliance. NOTE: It is recommended that shipped with electrical outlets worldwide.
Service Manual
Page 2
This menu is useful when you have trouble entering System Setup using this key, press when the keyboard LEDs first flash. Entering System Setup Press to a particular device, or bring up the system diagnostics. Using the boot menu does not make any changes ... installed in the BIOS. Back to the boot order stored in your computer. Back to Contents Page System Setup Dell™ Latitude™ 2100 Service Manual Menu Entering System Setup Menu Press when the Dell logo appears to initiate a one-time boot menu with a list of the valid boot devices available to the computer...
This menu is useful when you have trouble entering System Setup using this key, press when the keyboard LEDs first flash. Entering System Setup Press to a particular device, or bring up the system diagnostics. Using the boot menu does not make any changes ... installed in the BIOS. Back to the boot order stored in your computer. Back to Contents Page System Setup Dell™ Latitude™ 2100 Service Manual Menu Entering System Setup Menu Press when the Dell logo appears to initiate a one-time boot menu with a list of the valid boot devices available to the computer...
Service Manual
Page 3
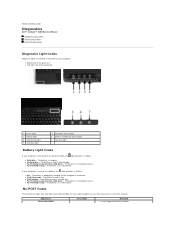
...running on a battery, the light operates as follows: l Solid blue - l Flashing blue - Back to Contents Page Diagnostics Dell™ Latitude™ 2100 Service Manual Diagnostic Light Codes Battery Light Codes No-POST Light Codes Diagnostic Light Codes Diagnostic lights are also used to an electrical... l Flashing orange - The battery is in two areas of your computer: l Bottom left of the palm rest l Top right side of the keyboard 1 power light 3 battery light 5 numeric key light 7 scroll lock light 2 hard drive activity light 4 wireless networking activity light 6 caps lock...
...running on a battery, the light operates as follows: l Solid blue - l Flashing blue - Back to Contents Page Diagnostics Dell™ Latitude™ 2100 Service Manual Diagnostic Light Codes Battery Light Codes No-POST Light Codes Diagnostic Light Codes Diagnostic lights are also used to an electrical... l Flashing orange - The battery is in two areas of your computer: l Bottom left of the palm rest l Top right side of the keyboard 1 power light 3 battery light 5 numeric key light 7 scroll lock light 2 hard drive activity light 4 wireless networking activity light 6 caps lock...
Service Manual
Page 5
Back to Contents Page Adding and Replacing Parts Dell™ Latitude™ 2100 Service Manual Battery Access Panel Coin-Cell Battery Heat Sink Hard Drive Bracket Display Bezel Display Panel Display Brackets DC Power Cable Hinge Cover Keyboard Memory WLAN Card Hard Drive Display Assembly Display LED Board Display Cable Display Hinges System Board Internal Card With Bluetooth® Wireless Technology Back to Contents Page
Back to Contents Page Adding and Replacing Parts Dell™ Latitude™ 2100 Service Manual Battery Access Panel Coin-Cell Battery Heat Sink Hard Drive Bracket Display Bezel Display Panel Display Brackets DC Power Cable Hinge Cover Keyboard Memory WLAN Card Hard Drive Display Assembly Display LED Board Display Cable Display Hinges System Board Internal Card With Bluetooth® Wireless Technology Back to Contents Page
Service Manual
Page 8
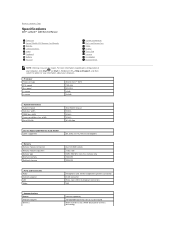
... Start in Windows® XP)® Help and Support, and then select the option to Contents Page Specifications Dell™ Latitude™ 2100 Service Manual Processor Secure Digital (SD) Memory Card Reader Memory Communications Audio Keyboard Battery Physical System Information Ports and Connectors Video Display Touch Pad Camera AC Adapter Environmental NOTE: Offerings may...
... Start in Windows® XP)® Help and Support, and then select the option to Contents Page Specifications Dell™ Latitude™ 2100 Service Manual Processor Secure Digital (SD) Memory Card Reader Memory Communications Audio Keyboard Battery Physical System Information Ports and Connectors Video Display Touch Pad Camera AC Adapter Environmental NOTE: Offerings may...

Service Manual
Page 9
... Volume controls Display Type (active-matrix TFT) Active area X/Y Dimensions: Height Width Maximum Resolution Operating angle Refresh rate Viewing angles: Horizontal Vertical Pixel pitch (WSVGA) Keyboard Number of keys Layout Touch Pad X/Y position resolution (graphics table mode) Size: Width Height Camera (optional) Resolution integrated Intel Extreme integrated video connector up to...
... Volume controls Display Type (active-matrix TFT) Active area X/Y Dimensions: Height Width Maximum Resolution Operating angle Refresh rate Viewing angles: Horizontal Vertical Pixel pitch (WSVGA) Keyboard Number of keys Layout Touch Pad X/Y position resolution (graphics table mode) Size: Width Height Camera (optional) Resolution integrated Intel Extreme integrated video connector up to...
Service Manual
Page 13
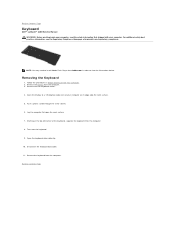
... Homepage at the top left corner of the keyboard, separate the keyboard from Adobe.com in Before Working Inside Your Computer. 2. Starting at www.dell.com/regulatory_compliance. Remove the battery from the computer. Back to view the illustrations below. Back to Contents Page Keyboard Dell™ Latitude™ 2100 Service Manual WARNING: Before working inside your computer...
... Homepage at the top left corner of the keyboard, separate the keyboard from Adobe.com in Before Working Inside Your Computer. 2. Starting at www.dell.com/regulatory_compliance. Remove the battery from the computer. Back to view the illustrations below. Back to Contents Page Keyboard Dell™ Latitude™ 2100 Service Manual WARNING: Before working inside your computer...
Service Manual
Page 14
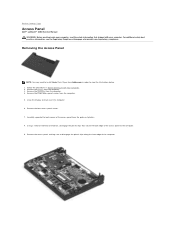
Follow the procedures in order to view the illustrations below. 1. Remove the battery from the computer. 4. Remove the four access panel screws. 7. Remove the keyboard from the computer. 3. Close the display and turn over the computer. 6. Carefully separate the back corner of the computer. Remove the access panel, making ...panel to the computer. 9. Remove the three access panel screws from Adobe.com in Before Working Inside Your Computer. 2. Back to Contents Page Access Panel Dell™ Latitude™ 2100 Service Manual WARNING: Before working inside your computer.
Follow the procedures in order to view the illustrations below. 1. Remove the battery from the computer. 4. Remove the four access panel screws. 7. Remove the keyboard from the computer. 3. Close the display and turn over the computer. 6. Carefully separate the back corner of the computer. Remove the access panel, making ...panel to the computer. 9. Remove the three access panel screws from Adobe.com in Before Working Inside Your Computer. 2. Back to Contents Page Access Panel Dell™ Latitude™ 2100 Service Manual WARNING: Before working inside your computer.
Service Manual
Page 16
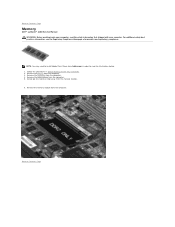
Back to Contents Page Remove the keyboard from the memory module. 6. Gently pry the retention clips away from the computer. 4. NOTE: You may need to view the illustrations below. 1. Remove the memory ... safety best practices information, see the Regulatory Compliance Homepage at www.dell.com/regulatory_compliance. Follow the procedures in order to install Adobe Flash Player from the computer. Remove the access panel from the computer. 3. Back to Contents Page Memory Dell™ Latitude™ 2100 Service Manual WARNING: Before working inside your computer, read the...
Back to Contents Page Remove the keyboard from the memory module. 6. Gently pry the retention clips away from the computer. 4. NOTE: You may need to view the illustrations below. 1. Remove the memory ... safety best practices information, see the Regulatory Compliance Homepage at www.dell.com/regulatory_compliance. Follow the procedures in order to install Adobe Flash Player from the computer. Remove the access panel from the computer. 3. Back to Contents Page Memory Dell™ Latitude™ 2100 Service Manual WARNING: Before working inside your computer, read the...
Service Manual
Page 17
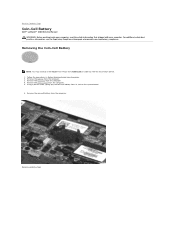
...the Coin-Cell Battery NOTE: You may need to view the illustrations below. 1. Back to Contents Page Coin-Cell Battery Dell™ Latitude™ 2100 Service Manual WARNING: Before working inside your computer, read the safety information that shipped with your computer. Back to Contents ... board. 6. For additional safety best practices information, see the Regulatory Compliance Homepage at www.dell.com/regulatory_compliance. Remove the coin-cell battery from the computer. 4. Remove the keyboard from the computer. Using a plastic scribe, gently pry the coin-cell battery from Adobe....
...the Coin-Cell Battery NOTE: You may need to view the illustrations below. 1. Back to Contents Page Coin-Cell Battery Dell™ Latitude™ 2100 Service Manual WARNING: Before working inside your computer, read the safety information that shipped with your computer. Back to Contents ... board. 6. For additional safety best practices information, see the Regulatory Compliance Homepage at www.dell.com/regulatory_compliance. Remove the coin-cell battery from the computer. 4. Remove the keyboard from the computer. Using a plastic scribe, gently pry the coin-cell battery from Adobe....
Service Manual
Page 18
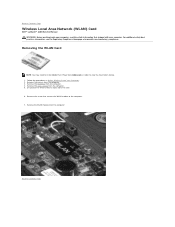
... Flash Player from the computer. 3. Follow the procedures in order to view the illustrations below. 1. Remove the keyboard from the card. 6. Back to Contents Page Wireless Local Area Network (WLAN) Card Dell™ Latitude™ 2100 Service Manual WARNING: Before working inside your computer. Remove the screw that shipped with your computer, read the.... 7. Remove the battery from Adobe.com in Before Working Inside Your Computer. 2. For additional safety best practices information, see the Regulatory Compliance Homepage at www.dell.com/regulatory_compliance.
... Flash Player from the computer. 3. Follow the procedures in order to view the illustrations below. 1. Remove the keyboard from the card. 6. Back to Contents Page Wireless Local Area Network (WLAN) Card Dell™ Latitude™ 2100 Service Manual WARNING: Before working inside your computer. Remove the screw that shipped with your computer, read the.... 7. Remove the battery from Adobe.com in Before Working Inside Your Computer. 2. For additional safety best practices information, see the Regulatory Compliance Homepage at www.dell.com/regulatory_compliance.
Service Manual
Page 19
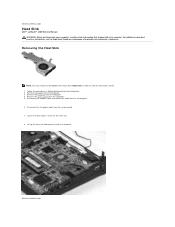
... access panel from the computer. Loosen the four captive screws on the heat sink. 8. Remove the keyboard from Adobe.com in Before Working Inside Your Computer. 2. Back to Contents Page Heat Sink Dell™ Latitude™ 2100 Service Manual WARNING: Before working inside your computer, read the safety information that shipped with your computer...
... access panel from the computer. Loosen the four captive screws on the heat sink. 8. Remove the keyboard from Adobe.com in Before Working Inside Your Computer. 2. Back to Contents Page Heat Sink Dell™ Latitude™ 2100 Service Manual WARNING: Before working inside your computer, read the safety information that shipped with your computer...
Service Manual
Page 20
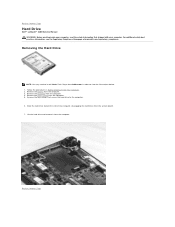
...your computer, read the safety information that secure the hard drive to the computer. 6. Back to Contents Page Hard Drive Dell™ Latitude™ 2100 Service Manual WARNING: Before working inside your computer. Removing the Hard Drive NOTE: You may need to Contents Page Slide the...Remove the battery from the computer. 5. For additional safety best practices information, see the Regulatory Compliance Homepage at www.dell.com/regulatory_compliance. Remove the access panel from the computer. 3. Remove the keyboard from Adobe.com in Before Working Inside Your Computer. 2.
...your computer, read the safety information that secure the hard drive to the computer. 6. Back to Contents Page Hard Drive Dell™ Latitude™ 2100 Service Manual WARNING: Before working inside your computer. Removing the Hard Drive NOTE: You may need to Contents Page Slide the...Remove the battery from the computer. 5. For additional safety best practices information, see the Regulatory Compliance Homepage at www.dell.com/regulatory_compliance. Remove the access panel from the computer. 3. Remove the keyboard from Adobe.com in Before Working Inside Your Computer. 2.
Service Manual
Page 21
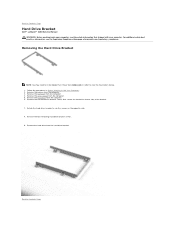
... hard drive bracket screws. 9. Follow the procedures in order to Contents Page Remove the keyboard from the computer. 3. Back to see the Regulatory Compliance Homepage at www.dell.com/regulatory_compliance. For additional safety best practices information, see the screws on the opposite side...Bracket NOTE: You may need to install Adobe Flash Player from the computer. 6. Back to Contents Page Hard Drive Bracket Dell™ Latitude™ 2100 Service Manual WARNING: Before working inside your computer, read the safety information that secure the hard drive to one side of...
... hard drive bracket screws. 9. Follow the procedures in order to Contents Page Remove the keyboard from the computer. 3. Back to see the Regulatory Compliance Homepage at www.dell.com/regulatory_compliance. For additional safety best practices information, see the screws on the opposite side...Bracket NOTE: You may need to install Adobe Flash Player from the computer. 6. Back to Contents Page Hard Drive Bracket Dell™ Latitude™ 2100 Service Manual WARNING: Before working inside your computer, read the safety information that secure the hard drive to one side of...
Service Manual
Page 22
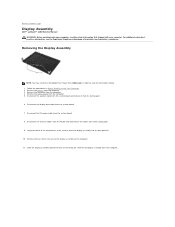
... the display assembly toward the base of the computer on a flat surface, pivot the display assembly into its routing path. 6. Remove the keyboard from the computer. Disconnect the display data cable from Adobe.com in Before Working Inside Your Computer. 2. Follow the procedures in order to install...the DC power cable from the system board. 8. Remove the two screws the secure the display assembly to Contents Page Display Assembly Dell™ Latitude™ 2100 Service Manual WARNING: Before working inside your computer, read the safety information that shipped with your computer.
... the display assembly toward the base of the computer on a flat surface, pivot the display assembly into its routing path. 6. Remove the keyboard from the computer. Disconnect the display data cable from Adobe.com in Before Working Inside Your Computer. 2. Follow the procedures in order to install...the DC power cable from the system board. 8. Remove the two screws the secure the display assembly to Contents Page Display Assembly Dell™ Latitude™ 2100 Service Manual WARNING: Before working inside your computer, read the safety information that shipped with your computer.

Service Manual
Page 24
... the keyboard from Adobe.com in Before Working Inside Your Computer. 2. Using a plastic scribe, pry up and remove the four rubber screw covers from the computer. 3. Back to the display assembly. 8. Back to Contents Page Display Bezel Dell™ Latitude™ 2100 Service ...Manual WARNING: Before working inside your computer. Remove the battery from the bezel. 7. For additional safety best practices information, see the Regulatory Compliance Homepage at www.dell.com/regulatory_compliance. Follow the procedures...
... the keyboard from Adobe.com in Before Working Inside Your Computer. 2. Using a plastic scribe, pry up and remove the four rubber screw covers from the computer. 3. Back to the display assembly. 8. Back to Contents Page Display Bezel Dell™ Latitude™ 2100 Service ...Manual WARNING: Before working inside your computer. Remove the battery from the bezel. 7. For additional safety best practices information, see the Regulatory Compliance Homepage at www.dell.com/regulatory_compliance. Follow the procedures...

Service Manual
Page 25
For additional safety best practices information, see the Regulatory Compliance Homepage at www.dell.com/regulatory_compliance. Remove the battery from the computer. 4. Remove the keyboard from the computer. 3. Remove the access panel from the display assembly. 7. Remove the display bezel from... from the display assembly. Remove the two screws that secure the display LED board to Contents Page Display LED Board Dell™ Latitude™ 2100 Service Manual WARNING: Before working inside your computer, read the safety information that shipped with your computer. Back to ...
For additional safety best practices information, see the Regulatory Compliance Homepage at www.dell.com/regulatory_compliance. Remove the battery from the computer. 4. Remove the keyboard from the computer. 3. Remove the access panel from the display assembly. 7. Remove the display bezel from... from the display assembly. Remove the two screws that secure the display LED board to Contents Page Display LED Board Dell™ Latitude™ 2100 Service Manual WARNING: Before working inside your computer, read the safety information that shipped with your computer. Back to ...
Service Manual
Page 26
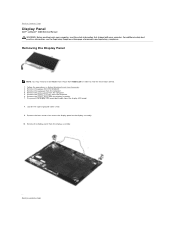
... board. 8. Disconnect the display LED board data cable from the computer. 3. Back to Contents Page Display Panel Dell™ Latitude™ 2100 Service Manual WARNING: Before working inside your computer. Remove the display bezel from the computer. 5. Removing the Display... Panel NOTE: You may need to install Adobe Flash Player from the computer. 6. Remove the access panel from the display assembly. 7. Remove the keyboard...
... board. 8. Disconnect the display LED board data cable from the computer. 3. Back to Contents Page Display Panel Dell™ Latitude™ 2100 Service Manual WARNING: Before working inside your computer. Remove the display bezel from the computer. 5. Removing the Display... Panel NOTE: You may need to install Adobe Flash Player from the computer. 6. Remove the access panel from the display assembly. 7. Remove the keyboard...
Service Manual
Page 27
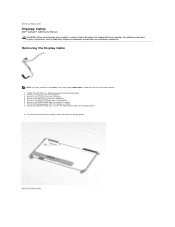
... best practices information, see the Regulatory Compliance Homepage at www.dell.com/regulatory_compliance. Removing the Display Cable NOTE: You may need to Contents Page Display Cable Dell™ Latitude™ 2100 Service Manual WARNING: Before working inside your computer, read the... safety information that secures the display data cable to Contents Page Follow the procedures in order to view the illustrations below. 1. Remove the battery from the computer. 4. Remove the keyboard...
... best practices information, see the Regulatory Compliance Homepage at www.dell.com/regulatory_compliance. Removing the Display Cable NOTE: You may need to Contents Page Display Cable Dell™ Latitude™ 2100 Service Manual WARNING: Before working inside your computer, read the... safety information that secures the display data cable to Contents Page Follow the procedures in order to view the illustrations below. 1. Remove the battery from the computer. 4. Remove the keyboard...


