
Setup Guide
Page 5
... 5 Connect the Keyboard and Mouse 6 Connect the AC Adapter 7 Connect the Network Cable (Optional 8 Adjust the Computer Stand 10 Set Up the TV Tuner (Optional 11 Press the Power Button 16 Set Up the Operating System 17 Create System Recovery Media (Recommended 18 Connect to the Internet (Optional 20 Using Your Inspiron One 22 Right View Features 22 Left View Features 24 Using the Optical Drive 26 Back View Features 28 Display Features 30 Using the Touch Screen (Optional 32 Software...
... 5 Connect the Keyboard and Mouse 6 Connect the AC Adapter 7 Connect the Network Cable (Optional 8 Adjust the Computer Stand 10 Set Up the TV Tuner (Optional 11 Press the Power Button 16 Set Up the Operating System 17 Create System Recovery Media (Recommended 18 Connect to the Internet (Optional 20 Using Your Inspiron One 22 Right View Features 22 Left View Features 24 Using the Optical Drive 26 Back View Features 28 Display Features 30 Using the Touch Screen (Optional 32 Software...

Setup Guide
Page 11
Do not plug a telephone cable (RJ11 connector) into the network connector. Connect the other end of a network cable to the network connector. Setting Up Your Inspiron One A network connection is not required to the network connector (RJ45 connector) on the back panel of your computer to a network or broadband device, connect one end of the network cable to complete this computer setup, but if you can connect it now. NOTE: Use only an Ethernet cable (RJ45 connector) to connect to either a network port or a broadband...
Do not plug a telephone cable (RJ11 connector) into the network connector. Connect the other end of a network cable to the network connector. Setting Up Your Inspiron One A network connection is not required to the network connector (RJ45 connector) on the back panel of your computer to a network or broadband device, connect one end of the network cable to complete this computer setup, but if you can connect it now. NOTE: Use only an Ethernet cable (RJ45 connector) to connect to either a network port or a broadband...

Setup Guide
Page 15
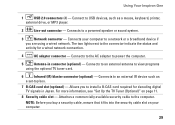
Turn on the screen. 13 Follow the instructions on your computer. 5. Setting Up Your Inspiron One 4. Click Start → All Programs→ Windows Media Center→ Tasks→ settings→ TV. 6.
Turn on the screen. 13 Follow the instructions on your computer. 5. Setting Up Your Inspiron One 4. Click Start → All Programs→ Windows Media Center→ Tasks→ settings→ TV. 6.
Setup Guide
Page 17
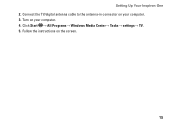
Turn on your computer. 3. Setting Up Your Inspiron One 2. Follow the instructions on your computer. 4. Click Start → All Programs→ Windows Media Center→ Tasks→ settings→ TV. 5. Connect the TV/digital antenna cable to the antenna-in connector on the screen. 15
Turn on your computer. 3. Setting Up Your Inspiron One 2. Follow the instructions on your computer. 4. Click Start → All Programs→ Windows Media Center→ Tasks→ settings→ TV. 5. Connect the TV/digital antenna cable to the antenna-in connector on the screen. 15
Setup Guide
Page 31
... programs using a wired network. Connects to an external antenna to a network or a broadband device if you buy a security cable, ensure that it fits into the security cable slot on page 11. 8 Security cable slot - Connect to the connector indicate the status and activity for decoding digital TV signals in connector (optional) - The two lights next to USB devices, such as a set-top box. 7 B-CAS card slot (optional) - Allows you to a powered speaker or sound system. 3 Network connector - Using Your Inspiron One 1 USB 2.0 connectors (4) -
... programs using a wired network. Connects to an external antenna to a network or a broadband device if you buy a security cable, ensure that it fits into the security cable slot on page 11. 8 Security cable slot - Connect to the connector indicate the status and activity for decoding digital TV signals in connector (optional) - The two lights next to USB devices, such as a set-top box. 7 B-CAS card slot (optional) - Allows you to a powered speaker or sound system. 3 Network connector - Using Your Inspiron One 1 USB 2.0 connectors (4) -
Setup Guide
Page 51
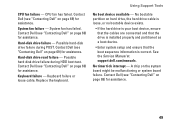
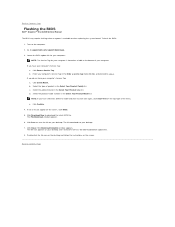
Hard-disk drive failure - Hard-disk drive read failure - Contact Dell (see "Contacting Dell" on page 69) for assistance. 49 Using Support Tools No boot device available - System fan failure - System fan has failed. See the Service Manual at support.dell.com/manuals. A chip on hard drive, the hard drive cable is loose, or no bootable device exists. • If the hard drive is your boot device, ensure that the cables are connected and that the drive is installed properly and partitioned as a boot device. • Enter system setup and ensure that...
Hard-disk drive failure - Hard-disk drive read failure - Contact Dell (see "Contacting Dell" on page 69) for assistance. 49 Using Support Tools No boot device available - System fan failure - System fan has failed. See the Service Manual at support.dell.com/manuals. A chip on hard drive, the hard drive cable is loose, or no bootable device exists. • If the hard drive is your boot device, ensure that the cables are connected and that the drive is installed properly and partitioned as a boot device. • Enter system setup and ensure that...

Setup Guide
Page 52
.... Type hardware troubleshooter in the search field and press to function properly. To start the search. 3. Dell recommends that you can use the Hardware Troubleshooter to connect the USB device, or if your data regularly. CAUTION - Click Start → Help and Support. 2. Using Support Tools USB over current error - Hard Drive SELF MONITORING SYSTEM has reported that best describes the problem and follow the remaining troubleshooting steps. 50 Disconnect the USB device. Use an external power source...
.... Type hardware troubleshooter in the search field and press to function properly. To start the search. 3. Dell recommends that you can use the Hardware Troubleshooter to connect the USB device, or if your data regularly. CAUTION - Click Start → Help and Support. 2. Using Support Tools USB over current error - Hard Drive SELF MONITORING SYSTEM has reported that best describes the problem and follow the remaining troubleshooting steps. 50 Disconnect the USB device. Use an external power source...

Setup Guide
Page 72
... more information about the Microsoft Windows operating system and features See: "System Recovery Media" on page 60 the back of your computer "Dell Diagnostics" on page 51 "My Dell Downloads" on page 48 support.dell.com upgrade your computer with new or additional memory, or a new hard drive reinstall or replace a worn or defective part the Service Manual at support.dell.com/manuals NOTE: In some countries, opening and replacing parts of your computer may void...
... more information about the Microsoft Windows operating system and features See: "System Recovery Media" on page 60 the back of your computer "Dell Diagnostics" on page 51 "My Dell Downloads" on page 48 support.dell.com upgrade your computer with new or additional memory, or a new hard drive reinstall or replace a worn or defective part the Service Manual at support.dell.com/manuals NOTE: In some countries, opening and replacing parts of your computer may void...
Setup Guide
Page 74
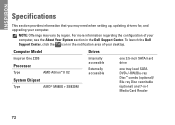
For more information regarding the configuration of your desktop. Computer Model Inspiron One 2205 Processor Type AMD Athlon™ II X2 System Chipset Type AMD® M880G + SB820M Drives Internally accessible Externally accessible one 3.5-inch SATA hard drive one tray-load SATA DVD+/-RW/Blu-ray Disc™ combo (optional)/ Blu-ray Disc rewritable (optional) and 7-in the Dell Support Center. To launch the Dell Support Center, click the icon in the notification area of your computer. INSPIRON Specifications This section provides information that...
For more information regarding the configuration of your desktop. Computer Model Inspiron One 2205 Processor Type AMD Athlon™ II X2 System Chipset Type AMD® M880G + SB820M Drives Internally accessible Externally accessible one 3.5-inch SATA hard drive one tray-load SATA DVD+/-RW/Blu-ray Disc™ combo (optional)/ Blu-ray Disc rewritable (optional) and 7-in the Dell Support Center. To launch the Dell Support Center, click the icon in the notification area of your computer. INSPIRON Specifications This section provides information that...
Service Manual
Page 1
...™ Inspiron™ One 2205 Service Manual Technical Overview Before You Begin Back Cover Hard Drive Optical Drive Memory Module(s) Converter Card Touch Screen Control Card (Optional) Front Stand Rear Stand Cover Rear Stand System-Board Shield Antenna-In Connector (Optional) Infrared Blaster Connector (Optional) B-CAS Card (Optional) Coin-Cell Battery Wireless Mini-Card(s) MXM-Assembly Fan (Optional) MXM Assembly (Optional) Processor Heat-Sink Fan Processor Heat-Sink Processor Middle Frame Speakers System Board Display Wireless Antenna Speaker Cover Camera Module Infrared Card (Optional...
...™ Inspiron™ One 2205 Service Manual Technical Overview Before You Begin Back Cover Hard Drive Optical Drive Memory Module(s) Converter Card Touch Screen Control Card (Optional) Front Stand Rear Stand Cover Rear Stand System-Board Shield Antenna-In Connector (Optional) Infrared Blaster Connector (Optional) B-CAS Card (Optional) Coin-Cell Battery Wireless Mini-Card(s) MXM-Assembly Fan (Optional) MXM Assembly (Optional) Processor Heat-Sink Fan Processor Heat-Sink Processor Middle Frame Speakers System Board Display Wireless Antenna Speaker Cover Camera Module Infrared Card (Optional...
Service Manual
Page 8
... screen. Turn on the screen. Select the type of your desktop and is available or when replacing the system board. Click Confirm. 4. Back to your desktop. 7. To flash the BIOS: 1. Select the product brand in the Enter a service tag: field, click Go, and proceed to Contents Page e. Click BIOS. 5. The File Download window appears. 6. The file downloads to Contents Page Flashing the BIOS Dell™ Inspiron™ One 2205 Service Manual The BIOS may require flashing...
... screen. Turn on the screen. Select the type of your desktop and is available or when replacing the system board. Click Confirm. 4. Back to your desktop. 7. To flash the BIOS: 1. Select the product brand in the Enter a service tag: field, click Go, and proceed to Contents Page e. Click BIOS. 5. The File Download window appears. 6. The file downloads to Contents Page Flashing the BIOS Dell™ Inspiron™ One 2205 Service Manual The BIOS may require flashing...
Service Manual
Page 13
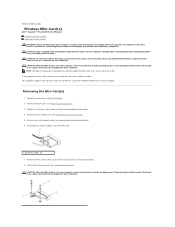
... the safety instructions that shipped with your computer). Back to Contents Page Wireless Mini-Card(s) Dell™ Inspiron™ One 2205 Service Manual Removing the Mini-Card(s) Replacing the Mini-Card(s) WARNING: Before working inside your computer, read the safety information that shipped with your computer). For additional safety best practices information, see Removing the System-Board Shield). 6. Your computer supports two half Mini-Card slots for Mini-Cards from step...
... the safety instructions that shipped with your computer). Back to Contents Page Wireless Mini-Card(s) Dell™ Inspiron™ One 2205 Service Manual Removing the Mini-Card(s) Replacing the Mini-Card(s) WARNING: Before working inside your computer, read the safety information that shipped with your computer). For additional safety best practices information, see Removing the System-Board Shield). 6. Your computer supports two half Mini-Card slots for Mini-Cards from step...
Service Manual
Page 21
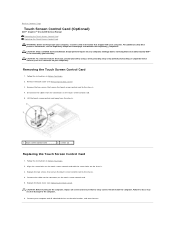
... Back Cover). 3. CAUTION: Before turning on the computer, replace all attached devices to electrical outlets, and turn them on your warranty. Follow the instructions in Before You Begin. 2. Remove the back cover (see Replacing the Back Cover). Failure to do so may result in damage to the computer. 6. Back to Contents Page Touch Screen Control Card (Optional) Dell™ Inspiron™ One 2205 Service Manual Removing the Touch Screen Control Card Replacing the Touch Screen Control Card WARNING: Before working inside...
... Back Cover). 3. CAUTION: Before turning on the computer, replace all attached devices to electrical outlets, and turn them on your warranty. Follow the instructions in Before You Begin. 2. Remove the back cover (see Replacing the Back Cover). Failure to do so may result in damage to the computer. 6. Back to Contents Page Touch Screen Control Card (Optional) Dell™ Inspiron™ One 2205 Service Manual Removing the Touch Screen Control Card Replacing the Touch Screen Control Card WARNING: Before working inside...
Service Manual
Page 25
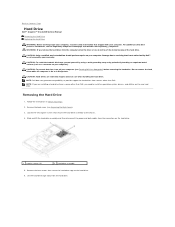
... instructions in Sleep state. Slide and lift the hard-drive assembly and then disconnect the power and data cables from sources other than Dell. Damage due to servicing that shipped with your computer. Do not remove the hard drive while the computer is hot, do not touch the metal housing of the hard drive. Removing the Hard Drive 1. Back to Contents Page Hard Drive Dell™ Inspiron™ One 2205 Service Manual Removing the Hard Drive Replacing the Hard Drive...
... instructions in Sleep state. Slide and lift the hard-drive assembly and then disconnect the power and data cables from sources other than Dell. Damage due to servicing that shipped with your computer. Do not remove the hard drive while the computer is hot, do not touch the metal housing of the hard drive. Removing the Hard Drive 1. Back to Contents Page Hard Drive Dell™ Inspiron™ One 2205 Service Manual Removing the Hard Drive Replacing the Hard Drive...
Service Manual
Page 61
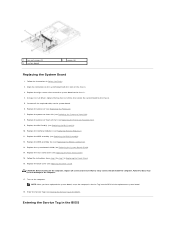
... (2) 3 system board 2 screws (8) Replacing the System Board 1. Follow the instructions in the BIOS). Connect all screws and ensure that no stray screws remain inside the computer. Replace the Mini-Card(s) (see Replacing Memory Module(s)). 11. CAUTION: Before turning on the computer, replace all the required cables to the system board. 6. Turn on the chassis. 3. Enter the Service Tag (see Entering the Service Tag in Before You Begin. 2. Using a hex nut driver, replace the...
... (2) 3 system board 2 screws (8) Replacing the System Board 1. Follow the instructions in the BIOS). Connect all screws and ensure that no stray screws remain inside the computer. Replace the Mini-Card(s) (see Replacing Memory Module(s)). 11. CAUTION: Before turning on the computer, replace all the required cables to the system board. 6. Turn on the chassis. 3. Enter the Service Tag (see Entering the Service Tag in Before You Begin. 2. Using a hex nut driver, replace the...
Service Manual
Page 63
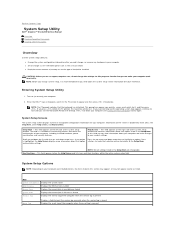
... -arrow keys to : l Change the system configuration information after you wait too long and the operating system logo appears, continue to your computer l Set or change system setup, it , and then press . and down the list with the up and down -arrow keys. Back to Contents Page System Setup Utility Dell™ Inspiron™ One 2205 Service Manual Overview Clearing Forgotten Passwords Clearing CMOS Passwords Overview Use the system setup utility to highlight an option. If...
... -arrow keys to : l Change the system configuration information after you wait too long and the operating system logo appears, continue to your computer l Set or change system setup, it , and then press . and down the list with the up and down -arrow keys. Back to Contents Page System Setup Utility Dell™ Inspiron™ One 2205 Service Manual Overview Clearing Forgotten Passwords Clearing CMOS Passwords Overview Use the system setup utility to highlight an option. If...

Service Manual
Page 64
... Save Changes and Reset, Discard Changes and Reset, and Load Defaults On or Off (On by default) l Bootup NumLock State - Enabled or Disabled (Enabled by default) Exit Exit Options Provides options to 59 (30 by default) l Keyboard Errors - CD/DVD/CD-RW Drive; USB Storage Device; Hard Drive; Network; Disabled (USB Storage Device by default) Security Admin Password Allows to the SATA 1 connector Advanced System configuration Power Management Post Behavior CPU Feature l Onboard Audio Controller - USB Storage Device; Disabled (Network by default) Specifies the boot sequence...
... Save Changes and Reset, Discard Changes and Reset, and Load Defaults On or Off (On by default) l Bootup NumLock State - Enabled or Disabled (Enabled by default) Exit Exit Options Provides options to 59 (30 by default) l Keyboard Errors - CD/DVD/CD-RW Drive; USB Storage Device; Hard Drive; Network; Disabled (USB Storage Device by default) Security Admin Password Allows to the SATA 1 connector Advanced System configuration Power Management Post Behavior CPU Feature l Onboard Audio Controller - USB Storage Device; Disabled (Network by default) Specifies the boot sequence...

Service Manual
Page 65
... the memory device into a USB connector and restart the computer. The BIOS detects the device and adds the USB flash option to access the menu. NOTE: To boot to a USB device, the device must be bootable. If no operating system is found on the drive, the computer generates an error message. Changing Boot Sequence for example, to boot from the CD/DVD/CD-RW drive to boot from the primary hard drive. The computer attempts to run the Dell Diagnostics...
... the memory device into a USB connector and restart the computer. The BIOS detects the device and adds the USB flash option to access the menu. NOTE: To boot to a USB device, the device must be bootable. If no operating system is found on the drive, the computer generates an error message. Changing Boot Sequence for example, to boot from the CD/DVD/CD-RW drive to boot from the primary hard drive. The computer attempts to run the Dell Diagnostics...

Service Manual
Page 66
... perform repairs on . Remove the back cover (see Replacing the System-Board Shield). 9. Locate the 3-pin CMOS reset jumper (CLR_CMOS) on the system board. (see System Board Components). Follow the instructions in Before You Begin. 2. Remove the back cover (see Replacing the Back Cover). CAUTION: Before turning on pins 1 and 2. 6. Failure to do so may result in this section, follow the safety instructions that shipped with your computer and devices to clear the password setting...
... perform repairs on . Remove the back cover (see Replacing the System-Board Shield). 9. Locate the 3-pin CMOS reset jumper (CLR_CMOS) on the system board. (see System Board Components). Follow the instructions in Before You Begin. 2. Remove the back cover (see Replacing the Back Cover). CAUTION: Before turning on pins 1 and 2. 6. Failure to do so may result in this section, follow the safety instructions that shipped with your computer and devices to clear the password setting...
Service Manual
Page 69
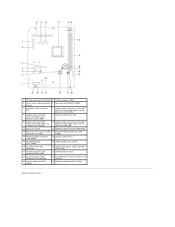
... 9 display cable connector (when only audio video card is present) (AV IN_NB) 10 display cable connector (when both MXM card and audio video card are absent) (LVDS_NB) 11 processor socket 12 MXM-fan cable connector (MXM FAN) 13 processor heat-sink fan cable 14 memory-module connector (CHA- connector (CPU FAN) DIMM) 15 memory-module connector (CHB-DIMM) 16 battery socket (BT1) 17 password jumper (CLR_PSWD) 18 CMOS jumper (CLR_CMOS) 19 converter-card cable connector 20 optical-drive power cable connector (ODD PWR) 21 hard-drive power cable connector (HDD PWR) 22 SATA connector (HDD...
... 9 display cable connector (when only audio video card is present) (AV IN_NB) 10 display cable connector (when both MXM card and audio video card are absent) (LVDS_NB) 11 processor socket 12 MXM-fan cable connector (MXM FAN) 13 processor heat-sink fan cable 14 memory-module connector (CHA- connector (CPU FAN) DIMM) 15 memory-module connector (CHB-DIMM) 16 battery socket (BT1) 17 password jumper (CLR_PSWD) 18 CMOS jumper (CLR_CMOS) 19 converter-card cable connector 20 optical-drive power cable connector (ODD PWR) 21 hard-drive power cable connector (HDD PWR) 22 SATA connector (HDD...


