
Setup Guide
Page 5
Contents Setting Up Your Inspiron One 5 Before Setting Up Your Computer 5 Connect the Keyboard and Mouse 6 Connect the AC Adapter 7 Connect the Network Cable (Optional 8 Adjust the Computer Stand 10 Set ... Internet (Optional 20 Using Your Inspiron One 22 Right View Features 22 Left View Features 24 Using the Optical Drive 26 Back View Features 28 Display Features 30 Using the Touch Screen (Optional 32 Software Features 36 Dell DataSafe Online Backup 37 Dell Dock (Optional 38 Solving Problems 39 Touch Screen Problems 39 Beep Codes 41...
Contents Setting Up Your Inspiron One 5 Before Setting Up Your Computer 5 Connect the Keyboard and Mouse 6 Connect the AC Adapter 7 Connect the Network Cable (Optional 8 Adjust the Computer Stand 10 Set ... Internet (Optional 20 Using Your Inspiron One 22 Right View Features 22 Left View Features 24 Using the Optical Drive 26 Back View Features 28 Display Features 30 Using the Touch Screen (Optional 32 Software Features 36 Dell DataSafe Online Backup 37 Dell Dock (Optional 38 Solving Problems 39 Touch Screen Problems 39 Beep Codes 41...

Setup Guide
Page 33
...Inspiron One 1 IR receiver (optional) - Indicates if the camera is on page 34. 31 Provides quality sound for video capture, conferencing, and chat. 3 Camera activity indicator - A solid white light indicates camera activity. 4 Microphone - Built-in camera for video chatting and voice recording. 5 Display - For more information, see "Touch... Screen Gestures (Optional)" on or off. Detects signals from an IR device such as a Dell TV remote control. 2 Camera - Your display can vary based on selections...
...Inspiron One 1 IR receiver (optional) - Indicates if the camera is on page 34. 31 Provides quality sound for video capture, conferencing, and chat. 3 Camera activity indicator - A solid white light indicates camera activity. 4 Microphone - Built-in camera for video chatting and voice recording. 5 Display - For more information, see "Touch... Screen Gestures (Optional)" on or off. Detects signals from an IR device such as a Dell TV remote control. 2 Camera - Your display can vary based on selections...

Setup Guide
Page 34
... the applications may not be launched directly through your computer. 32 The following are the applications available on Dell Stage: NOTE: Some of the applications on your Dell Inspiron One converts your favorite media and multi-touch applications. Provides quick access to the Documents folder on your computer provides access to your computer into an...
... the applications may not be launched directly through your computer. 32 The following are the applications available on Dell Stage: NOTE: Some of the applications on your Dell Inspiron One converts your favorite media and multi-touch applications. Provides quick access to the Documents folder on your computer provides access to your computer into an...

Setup Guide
Page 35
...the keyboard or touch screen. Click or tap the web page preview to open it in the web browser. Provides quick access to four of your favorite web pages. Provides a preview of up to your pictures. View, organize, or edit your frequently-used programs. Using Your Inspiron One • ...- The tile allows you to 'purchase and download' or 'rent and watch online' movies and TV shows when connected to the Internet. • Dell Web - View videos. Provides a preview of up to add, edit, or delete a web page preview. The optional CinemaNow application allows you to four...
...the keyboard or touch screen. Click or tap the web page preview to open it in the web browser. Provides quick access to four of your favorite web pages. Provides a preview of up to your pictures. View, organize, or edit your frequently-used programs. Using Your Inspiron One • ...- The tile allows you to 'purchase and download' or 'rent and watch online' movies and TV shows when connected to the Internet. • Dell Web - View videos. Provides a preview of up to add, edit, or delete a web page preview. The optional CinemaNow application allows you to four...

Setup Guide
Page 36
... a right-click. Pinch - Dwell Allows you to flip content forward or backward based on the touch screen, to access additional information by moving two fingers apart or bringing them closer together on the screen. Using Your Inspiron One Touch Screen Gestures (Optional) NOTE: Some of the active window. Flick Allows you to open context...
... a right-click. Pinch - Dwell Allows you to flip content forward or backward based on the touch screen, to access additional information by moving two fingers apart or bringing them closer together on the screen. Using Your Inspiron One Touch Screen Gestures (Optional) NOTE: Some of the active window. Flick Allows you to open context...
Setup Guide
Page 41
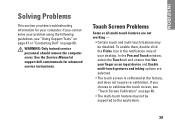
...multi-touch gestures and inking options are not working - • Certain touch and multi-touch features may not be disabled. If you choose to calibrate the touch screen, see "Using Support Tools" on page 47 or "Contacting Dell" on page 40. • The multi-touch ... and does not require re-calibration. In the Pen and Touch window, select the Touch tab and ensure that Use your problem using the following guidelines, see "Touch Screen Calibration" on page 69. INSPIRON Solving Problems This section provides troubleshooting information for advanced service instructions...
...multi-touch gestures and inking options are not working - • Certain touch and multi-touch features may not be disabled. If you choose to calibrate the touch screen, see "Using Support Tools" on page 47 or "Contacting Dell" on page 40. • The multi-touch ... and does not require re-calibration. In the Pen and Touch window, select the Touch tab and ensure that Use your problem using the following guidelines, see "Touch Screen Calibration" on page 69. INSPIRON Solving Problems This section provides troubleshooting information for advanced service instructions...

Setup Guide
Page 42
...b. Solving Problems If the touch screen starts losing its sensitivity - • Calibrate the touch screen (see "Touch Screen Calibration" on page 40). • The touch screen may have foreign particles (such as sticky notes) that you calibrate the touch screen if you have touch screen problems or if you...cloth and wipe the surface and sides of the touch screen to remove any dirt or fingerprints. c. To calibrate the touch screen, click Start → Control panel→ Tablet PC Settings→ Display→ Calibrate... 40 Touch Screen Calibration NOTE: It is recommended that are ...
...b. Solving Problems If the touch screen starts losing its sensitivity - • Calibrate the touch screen (see "Touch Screen Calibration" on page 40). • The touch screen may have foreign particles (such as sticky notes) that you calibrate the touch screen if you have touch screen problems or if you...cloth and wipe the surface and sides of the touch screen to remove any dirt or fingerprints. c. To calibrate the touch screen, click Start → Control panel→ Tablet PC Settings→ Display→ Calibrate... 40 Touch Screen Calibration NOTE: It is recommended that are ...

Setup Guide
Page 78
Specifications AC Adapter Output current: 90 W 130 W Rated output voltage Temperature range: Operating Storage 4.62 A 6.70 A 19.50 VDC +/- 1 0° to 40°C (32° to 104°F) -40° to 70°C (-40° to 158°F) Physical Height Width Depth Weight: Touch screen Non-touch screen 400 mm (15.7 inches) 530 mm (20.9 inches) 87 mm (3.4 inches) configurable to less than 8.10 kg (17.86 lb) configurable to less than 7.40 kg (16.31 lb) 76
Specifications AC Adapter Output current: 90 W 130 W Rated output voltage Temperature range: Operating Storage 4.62 A 6.70 A 19.50 VDC +/- 1 0° to 40°C (32° to 104°F) -40° to 70°C (-40° to 158°F) Physical Height Width Depth Weight: Touch screen Non-touch screen 400 mm (15.7 inches) 530 mm (20.9 inches) 87 mm (3.4 inches) configurable to less than 8.10 kg (17.86 lb) configurable to less than 7.40 kg (16.31 lb) 76

Setup Guide
Page 83
G gestures touch screen 34 H hard drive activity light 23 hardware problems diagnosing 50 Hardware Troubleshooter 50 headphone connector 23 help getting assistance and support 63 I Internet connection 20 ISP Internet Service Provider 20 M Media Card Reader 22 memory problems solving 44 microphone connector 23 N network connection fixing 42 P power button and light 23 power problems, solving 43 problems, solving 39 products information and purchasing 65 Index 81
G gestures touch screen 34 H hard drive activity light 23 hardware problems diagnosing 50 Hardware Troubleshooter 50 headphone connector 23 help getting assistance and support 63 I Internet connection 20 ISP Internet Service Provider 20 M Media Card Reader 22 memory problems solving 44 microphone connector 23 N network connection fixing 42 P power button and light 23 power problems, solving 43 problems, solving 39 products information and purchasing 65 Index 81
Service Manual
Page 1
.... Regulatory model: W03B series Regulatory type: W03B001 August 2010 Rev. Information in this text: Dell, the DELL logo, and Inspiron are either trademarks or registered trademarks of these materials in any proprietary interest in this document to ...reserved. A00 Reproduction of Microsoft Corporation in this document is strictly forbidden. Dell™ Inspiron™ One 2205 Service Manual Technical Overview Before You Begin Back Cover Hard Drive Optical Drive Memory Module(s) Converter Card Touch Screen Control Card (Optional) Front Stand Rear Stand Cover Rear Stand System-...
.... Regulatory model: W03B series Regulatory type: W03B001 August 2010 Rev. Information in this text: Dell, the DELL logo, and Inspiron are either trademarks or registered trademarks of these materials in any proprietary interest in this document to ...reserved. A00 Reproduction of Microsoft Corporation in this document is strictly forbidden. Dell™ Inspiron™ One 2205 Service Manual Technical Overview Before You Begin Back Cover Hard Drive Optical Drive Memory Module(s) Converter Card Touch Screen Control Card (Optional) Front Stand Rear Stand Cover Rear Stand System-...
Service Manual
Page 2
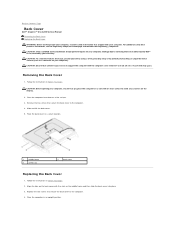
...(2) 2 back cover Replacing the Back Cover 1. Place the back cover in Before You Begin. Back to Contents Page Back Cover Dell™ Inspiron™ One 2205 Service Manual Removing the Back Cover Replacing the Back Cover WARNING: Before working inside your computer, read the safety information that shipped... Ensure that you place the computer on a soft cloth or clean surface to servicing that is not authorized by Dell™ is not covered by periodically touching an unpainted metal surface (such as a connector on your computer. CAUTION: Before opening your computer, ensure that ...
...(2) 2 back cover Replacing the Back Cover 1. Place the back cover in Before You Begin. Back to Contents Page Back Cover Dell™ Inspiron™ One 2205 Service Manual Removing the Back Cover Replacing the Back Cover WARNING: Before working inside your computer, read the safety information that shipped... Ensure that you place the computer on a soft cloth or clean surface to servicing that is not authorized by Dell™ is not covered by periodically touching an unpainted metal surface (such as a connector on your computer. CAUTION: Before opening your computer, ensure that ...
Service Manual
Page 4
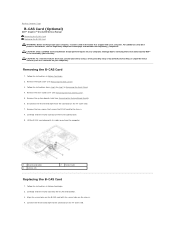
... the B-CAS-card cable to servicing that shipped with your computer, read the safety information that is not authorized by Dell™ is not covered by periodically touching an unpainted metal surface (such as a connector on the B-CAS card with its cable away from step 3 to step...see Removing the System-Board Shield). 6. Remove the two screws that secure the B-CAS card to Contents Page B-CAS Card (Optional) Dell™ Inspiron™ One 2205 Service Manual Removing the B-CAS Card Replacing the B-CAS Card WARNING: Before working inside your computer. Carefully slide the B-CAS card ...
... the B-CAS-card cable to servicing that shipped with your computer, read the safety information that is not authorized by Dell™ is not covered by periodically touching an unpainted metal surface (such as a connector on the B-CAS card with its cable away from step 3 to step...see Removing the System-Board Shield). 6. Remove the two screws that secure the B-CAS card to Contents Page B-CAS Card (Optional) Dell™ Inspiron™ One 2205 Service Manual Removing the B-CAS Card Replacing the B-CAS Card WARNING: Before working inside your computer. Carefully slide the B-CAS card ...
Service Manual
Page 6
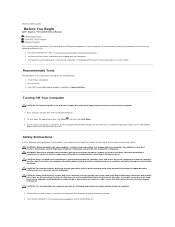
...in reverse order. Ensure that the computer is completed, the enclosure must be replaced or-if purchased separately-installed by periodically touching an unpainted metal surface (such as a connector on your computer). Unless otherwise noted, each procedure assumes that shipped with... before you connect a cable, ensure that shipped with your computer. Back to Contents Page Before You Begin Dell™ Inspiron™ One 2205 Service Manual Recommended Tools Turning Off Your Computer Safety Instructions This manual provides procedures for complete information about safety precautions...
...in reverse order. Ensure that the computer is completed, the enclosure must be replaced or-if purchased separately-installed by periodically touching an unpainted metal surface (such as a connector on your computer). Unless otherwise noted, each procedure assumes that shipped with... before you connect a cable, ensure that shipped with your computer. Back to Contents Page Before You Begin Dell™ Inspiron™ One 2205 Service Manual Recommended Tools Turning Off Your Computer Safety Instructions This manual provides procedures for complete information about safety precautions...

Service Manual
Page 7
... unplug the cable from your computer and then unplug the cable from their electrical outlets. 5. CAUTION: Before touching anything inside your computer and all attached devices from the network device. 3. While you work, periodically touch an unpainted metal surface to dissipate static electricity, which could harm internal components. Disconnect all attached devices...
... unplug the cable from your computer and then unplug the cable from their electrical outlets. 5. CAUTION: Before touching anything inside your computer and all attached devices from the network device. 3. While you work, periodically touch an unpainted metal surface to dissipate static electricity, which could harm internal components. Disconnect all attached devices...

Service Manual
Page 9
... mylar sleeve on the Bluetooth card. 7. Back to Contents Page Internal Card With Bluetooth® Wireless Technology Dell™ Inspiron™ One 2205 Service Manual Removing the Bluetooth Card Replacing the Bluetooth Card WARNING: Before working inside your computer, read the safety... safety best practices information, see the Regulatory Compliance Homepage at www.dell.com/regulatory_compliance. If you ordered a card with Bluetooth wireless technology with your computer, it is not covered by periodically touching an unpainted metal surface (such as a connector on your computer....
... mylar sleeve on the Bluetooth card. 7. Back to Contents Page Internal Card With Bluetooth® Wireless Technology Dell™ Inspiron™ One 2205 Service Manual Removing the Bluetooth Card Replacing the Bluetooth Card WARNING: Before working inside your computer, read the safety... safety best practices information, see the Regulatory Compliance Homepage at www.dell.com/regulatory_compliance. If you ordered a card with Bluetooth wireless technology with your computer, it is not covered by periodically touching an unpainted metal surface (such as a connector on your computer....
Service Manual
Page 11
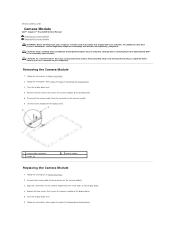
Back to Contents Page Camera Module Dell™ Inspiron™ One 2205 Service Manual Removing the Camera Module Replacing the Camera Module WARNING: Before working inside your computer, read the safety information that shipped with the... Follow the instructions from step 5 to the display bezel. 5. Removing the Camera Module 1. Remove the two screws that is not authorized by Dell™ is not covered by periodically touching an unpainted metal surface (such as a connector on your computer). Follow the instructions from step 2 to the display bezel. 5. Follow the instructions...
Back to Contents Page Camera Module Dell™ Inspiron™ One 2205 Service Manual Removing the Camera Module Replacing the Camera Module WARNING: Before working inside your computer, read the safety information that shipped with the... Follow the instructions from step 5 to the display bezel. 5. Removing the Camera Module 1. Remove the two screws that is not authorized by Dell™ is not covered by periodically touching an unpainted metal surface (such as a connector on your computer). Follow the instructions from step 2 to the display bezel. 5. Follow the instructions...
Service Manual
Page 13
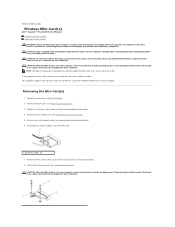
...Mini-Card(s) Dell™ Inspiron™ One 2205 Service Manual Removing the Mini-Card(s) Replacing the Mini-Card(s) WARNING: Before working inside your computer, read the safety information that is not authorized by Dell™ is not covered by periodically touching an unpainted metal...the system-board shield (see "Protecting Against Electrostatic Discharge" in protective antistatic packaging (see the Regulatory Compliance Homepage at www.dell.com/regulatory_compliance. Remove the two screws that shipped with your warranty. CAUTION: When the Mini-Card is already installed. ...
...Mini-Card(s) Dell™ Inspiron™ One 2205 Service Manual Removing the Mini-Card(s) Replacing the Mini-Card(s) WARNING: Before working inside your computer, read the safety information that is not authorized by Dell™ is not covered by periodically touching an unpainted metal...the system-board shield (see "Protecting Against Electrostatic Discharge" in protective antistatic packaging (see the Regulatory Compliance Homepage at www.dell.com/regulatory_compliance. Remove the two screws that shipped with your warranty. CAUTION: When the Mini-Card is already installed. ...
Service Manual
Page 15
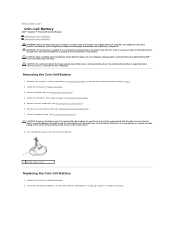
... to Contents Page Coin-Cell Battery Dell™ Inspiron™ One 2205 Service Manual Removing the Coin-Cell...technician should perform repairs on your warranty. Remove the back cover (see the Regulatory Compliance Homepage at www.dell.com/regulatory_compliance. For additional safety best practices information, see Removing the Back Cover). 4. Record all the ... the same or equivalent type recommended by periodically touching an unpainted metal surface (such as a connector on your computer. Discard used batteries according to touch the system board with the side labeled "+" ...
... to Contents Page Coin-Cell Battery Dell™ Inspiron™ One 2205 Service Manual Removing the Coin-Cell...technician should perform repairs on your warranty. Remove the back cover (see the Regulatory Compliance Homepage at www.dell.com/regulatory_compliance. For additional safety best practices information, see Removing the Back Cover). 4. Record all the ... the same or equivalent type recommended by periodically touching an unpainted metal surface (such as a connector on your computer. Discard used batteries according to touch the system board with the side labeled "+" ...

Service Manual
Page 17
...board (see Removing the Camera Module). 11. Carefully peel the silver foil that adheres the camera module to Contents Page Display Dell™ Inspiron™ One 2205 Service Manual Display Bezel Display Panel Display Cable WARNING: Before working inside edge of the camera cable, infrared-card cable, ...to servicing that secure the display bezel to the chassis. 8. Remove the 19 screws that is not authorized by Dell™ is not covered by periodically touching an unpainted metal surface (such as a connector on your computer). For additional safety best practices information, see the...
...board (see Removing the Camera Module). 11. Carefully peel the silver foil that adheres the camera module to Contents Page Display Dell™ Inspiron™ One 2205 Service Manual Display Bezel Display Panel Display Cable WARNING: Before working inside edge of the camera cable, infrared-card cable, ...to servicing that secure the display bezel to the chassis. 8. Remove the 19 screws that is not authorized by Dell™ is not covered by periodically touching an unpainted metal surface (such as a connector on your computer). For additional safety best practices information, see the...
Service Manual
Page 21
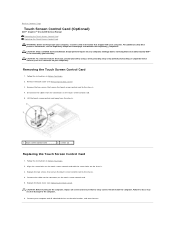
...your warranty. Remove the back cover (see the Regulatory Compliance Homepage at www.dell.com/regulatory_compliance. Lift the touch screen control card away from the connectors on . Removing the Touch Screen Control Card 1. Follow the instructions in damage to the computer. 6. ...Replace the two screws that secure the touch screen control card to the chassis. 4. Back to Contents Page Touch Screen Control Card (Optional) Dell™ Inspiron™ One 2205 Service Manual Removing the Touch Screen Control Card Replacing the Touch Screen Control Card WARNING: Before working inside...
...your warranty. Remove the back cover (see the Regulatory Compliance Homepage at www.dell.com/regulatory_compliance. Lift the touch screen control card away from the connectors on . Removing the Touch Screen Control Card 1. Follow the instructions in damage to the computer. 6. ...Replace the two screws that secure the touch screen control card to the chassis. 4. Back to Contents Page Touch Screen Control Card (Optional) Dell™ Inspiron™ One 2205 Service Manual Removing the Touch Screen Control Card Replacing the Touch Screen Control Card WARNING: Before working inside...


