
Setup Guide
Page 5
... Set Up the TV Tuner (Optional 11 Press the Power Button 16 Set Up the Operating System 17 Create System Recovery Media (Recommended 18 Connect to the Internet (Optional 20 Using Your Inspiron One 22 Right View Features 22 Left View Features 24 Using... the Optical Drive 26 Back View Features 28 Display Features 30 Using the Touch Screen (Optional 32 Software Features 36 Dell DataSafe Online Backup 37 Dell Dock (Optional 38 Solving Problems 39 Touch Screen Problems 39 Beep Codes 41 Network Problems 42 Power...
... Set Up the TV Tuner (Optional 11 Press the Power Button 16 Set Up the Operating System 17 Create System Recovery Media (Recommended 18 Connect to the Internet (Optional 20 Using Your Inspiron One 22 Right View Features 22 Left View Features 24 Using... the Optical Drive 26 Back View Features 28 Display Features 30 Using the Touch Screen (Optional 32 Software Features 36 Dell DataSafe Online Backup 37 Dell Dock (Optional 38 Solving Problems 39 Touch Screen Problems 39 Beep Codes 41 Network Problems 42 Power...
Setup Guide
Page 7
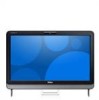
... Up Your Computer When positioning your computer, ensure that you allow easy access to a power source, adequate ventilation, and a level surface to identify your computer when you access the Dell Support website or contact technical support. You should never place your computer. WARNING: Before you..., read the safety information that you begin any of 5.1 cm (2 inches) on all other sides. Restricting airflow around your Dell™ Inspiron One computer. For additional safety best practices information, see the Regulatory Compliance Homepage at the back of the computer and a minimum of...
... Up Your Computer When positioning your computer, ensure that you allow easy access to a power source, adequate ventilation, and a level surface to identify your computer when you access the Dell Support website or contact technical support. You should never place your computer. WARNING: Before you..., read the safety information that you begin any of 5.1 cm (2 inches) on all other sides. Restricting airflow around your Dell™ Inspiron One computer. For additional safety best practices information, see the Regulatory Compliance Homepage at the back of the computer and a minimum of...

Setup Guide
Page 9
Setting Up Your Inspiron One Connect the AC Adapter Connect the AC adapter to your computer. 7 Using an incompatible cable or improperly connecting the cable to a power strip or electrical outlet may cause fire or permanent damage to the computer and then plug it into an electrical outlet or surge protector. WARNING: The AC adapter works with electrical outlets worldwide. However, power connectors and power strips vary among countries.
Setting Up Your Inspiron One Connect the AC Adapter Connect the AC adapter to your computer. 7 Using an incompatible cable or improperly connecting the cable to a power strip or electrical outlet may cause fire or permanent damage to the computer and then plug it into an electrical outlet or surge protector. WARNING: The AC adapter works with electrical outlets worldwide. However, power connectors and power strips vary among countries.

Setup Guide
Page 18
Setting Up Your Inspiron One Press the Power Button 16
Setting Up Your Inspiron One Press the Power Button 16
Setup Guide
Page 25
...detected an error during Power-on the button indicates the following power states: • Solid white - NOTE: To connect to a pair of your computer. 6 Audio-in sleep/standby mode or there might be a problem with audio programs. 7 Hard drive activity light - Using Your Inspiron One 5 Audio-out/... when pressed. The computer is in /Microphone connector - Contact Dell (see "Contacting Dell" on when the computer reads or writes data. Connects to a powered speaker or sound system, use with the system board or the power supply. Turns on page 69) for assistance. • Off...
...detected an error during Power-on the button indicates the following power states: • Solid white - NOTE: To connect to a pair of your computer. 6 Audio-in sleep/standby mode or there might be a problem with audio programs. 7 Hard drive activity light - Using Your Inspiron One 5 Audio-out/... when pressed. The computer is in /Microphone connector - Contact Dell (see "Contacting Dell" on when the computer reads or writes data. Connects to a powered speaker or sound system, use with the system board or the power supply. Turns on page 69) for assistance. • Off...
Setup Guide
Page 31
... player. 2 Line-out connector - Connects to the AC adapter to USB devices, such as a set-top box. 7 B-CAS card slot (optional) - Connect to power the computer. 5 Antenna-in Japan. The two lights next to install a B-CAS card required for a wired network connection. 4 AC adapter connector - Allows you buy ... a broadband device if you are using the optional TV tuner card. 6 Infrared (IR) blaster connector (optional) - Connects to an external antenna to a powered speaker or sound system. 3 Network connector - Using Your Inspiron One 1 USB 2.0 connectors (4) -
... player. 2 Line-out connector - Connects to the AC adapter to USB devices, such as a set-top box. 7 B-CAS card slot (optional) - Connect to power the computer. 5 Antenna-in Japan. The two lights next to install a B-CAS card required for a wired network connection. 4 AC adapter connector - Allows you buy ... a broadband device if you are using the optional TV tuner card. 6 Infrared (IR) blaster connector (optional) - Connects to an external antenna to a powered speaker or sound system. 3 Network connector - Using Your Inspiron One 1 USB 2.0 connectors (4) -

Setup Guide
Page 42
... the computer. b. Use a clean, lint-free cloth and wipe the surface and sides of the touch screen to remove any dirt or fingerprints. Disconnect the power cable from the wall outlet. Touch Screen Calibration NOTE: It is recommended that you calibrate the touch screen if you change the screen resolution. c. Solving...
... the computer. b. Use a clean, lint-free cloth and wipe the surface and sides of the touch screen to remove any dirt or fingerprints. Disconnect the power cable from the wall outlet. Touch Screen Calibration NOTE: It is recommended that you calibrate the touch screen if you change the screen resolution. c. Solving...
Setup Guide
Page 44
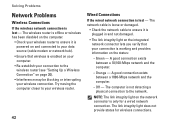
... is working and provides information on the status: --Green - The network cable is loose or damaged. • Check the network cable to ensure it is powered on and connected to your wireless connection. The link integrity light does not provide status for a wired network connection. Solving Problems Network Problems Wireless Connections...
... is working and provides information on the status: --Green - The network cable is loose or damaged. • Check the network cable to ensure it is powered on and connected to your wireless connection. The link integrity light does not provide status for a wired network connection. Solving Problems Network Problems Wireless Connections...
Setup Guide
Page 45
... "Contacting Dell" on page 69). The display may not be a problem with another device, such as a lamp. • Check the AC adapter cable connections. The computer is in sleep/standby mode or there might be responding. • Press the power button until the computer turns...mouse, or press the power button to verify that the computer turns on properly. • Ensure that the light on the AC adapter is on. • If the problem persists, contact Dell (see "Contacting Dell" on . • Temporarily bypass power protection devices, power strips, and power extension cables to resume ...
... "Contacting Dell" on page 69). The display may not be a problem with another device, such as a lamp. • Check the AC adapter cable connections. The computer is in sleep/standby mode or there might be responding. • Press the power button until the computer turns...mouse, or press the power button to verify that the computer turns on properly. • Ensure that the light on the AC adapter is on. • If the problem persists, contact Dell (see "Contacting Dell" on . • Temporarily bypass power protection devices, power strips, and power extension cables to resume ...
Setup Guide
Page 46
... page 51). • If the problem persists, contact Dell (see "Contacting Dell" on page 69). If you encounter interference that resolves the problem. • If the problem persists, contact Dell (see "Contacting Dell" on page 69). 44 If the power light is not responding, press the power button until the computer turns off and then turn...
... page 51). • If the problem persists, contact Dell (see "Contacting Dell" on page 69). If you encounter interference that resolves the problem. • If the problem persists, contact Dell (see "Contacting Dell" on page 69). 44 If the power light is not responding, press the power button until the computer turns off and then turn...
Setup Guide
Page 47
... Problems If the computer does not start up - Ensure that it runs in its documentation or on your keyboard or moving your mouse, press the power button for an earlier Microsoft® Windows® operating system -
... Problems If the computer does not start up - Ensure that it runs in its documentation or on your keyboard or moving your mouse, press the power button for an earlier Microsoft® Windows® operating system -

Setup Guide
Page 52
... the problem and follow the remaining troubleshooting steps. 50 S.M.A.R.T error, possible hard drive failure. Use an external power source to resolve the incompatibility. Dell recommends that you can use the Hardware Troubleshooter to connect the USB device, or if your data regularly. Your... USB device needs more power for assistance. Click Start → Help and Support. 2. Using Support Tools USB over current error -...
... the problem and follow the remaining troubleshooting steps. 50 S.M.A.R.T error, possible hard drive failure. Use an external power source to resolve the incompatibility. Dell recommends that you can use the Hardware Troubleshooter to connect the USB device, or if your data regularly. Your... USB device needs more power for assistance. Click Start → Help and Support. 2. Using Support Tools USB over current error -...

Setup Guide
Page 77
Input voltage 100-240 VAC Input current: 90 W 1.50 A 130 W 2.30 A/2.50 A Input frequency 50-60 Hz Output power 90 W or 130 W 75 For more information, see the safety information that shipped with this computer. Communications Network adapter 10/100/1000 Ethernet LAN on ...
Input voltage 100-240 VAC Input current: 90 W 1.50 A 130 W 2.30 A/2.50 A Input frequency 50-60 Hz Output power 90 W or 130 W 75 For more information, see the safety information that shipped with this computer. Communications Network adapter 10/100/1000 Ethernet LAN on ...

Setup Guide
Page 83
G gestures touch screen 34 H hard drive activity light 23 hardware problems diagnosing 50 Hardware Troubleshooter 50 headphone connector 23 help getting assistance and support 63 I Internet connection 20 ISP Internet Service Provider 20 M Media Card Reader 22 memory problems solving 44 microphone connector 23 N network connection fixing 42 P power button and light 23 power problems, solving 43 problems, solving 39 products information and purchasing 65 Index 81
G gestures touch screen 34 H hard drive activity light 23 hardware problems diagnosing 50 Hardware Troubleshooter 50 headphone connector 23 help getting assistance and support 63 I Internet connection 20 ISP Internet Service Provider 20 M Media Card Reader 22 memory problems solving 44 microphone connector 23 N network connection fixing 42 P power button and light 23 power problems, solving 43 problems, solving 39 products information and purchasing 65 Index 81
Service Manual
Page 6
.... Back to Contents Page Before You Begin Dell™ Inspiron™ One 2205 Service Manual Recommended Tools Turning Off Your Computer Safety Instructions This manual provides procedures for complete information about safety precautions, working inside the computer. 1. To shut down the operating system, press and hold the power button until the computer turns off . WARNING...
.... Back to Contents Page Before You Begin Dell™ Inspiron™ One 2205 Service Manual Recommended Tools Turning Off Your Computer Safety Instructions This manual provides procedures for complete information about safety precautions, working inside the computer. 1. To shut down the operating system, press and hold the power button until the computer turns off . WARNING...

Service Manual
Page 7
Disconnect all telephone or network cables from your computer. 6. Press and hold the power button while the computer is unplugged to dissipate static electricity, which could harm internal components. CAUTION: Before touching anything inside your computer and all attached ...
Disconnect all telephone or network cables from your computer. 6. Press and hold the power button while the computer is unplugged to dissipate static electricity, which could harm internal components. CAUTION: Before touching anything inside your computer and all attached ...
Service Manual
Page 25
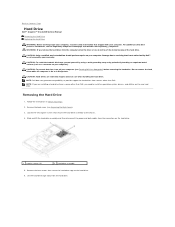
... Back to Contents Page Hard Drive Dell™ Inspiron™ One 2205 Service Manual Removing the Hard Drive... Replacing the Hard Drive WARNING: Before working inside your computer, read the safety information that shipped with your computer. CAUTION: Hard drives are installing a hard drive from a source other than Dell...Computer) before removing the hard drive. NOTE: Dell does not guarantee compatibility or provide support for...you remove the hard drive from sources other than Dell. CAUTION: To prevent data loss, turn off ...
... Back to Contents Page Hard Drive Dell™ Inspiron™ One 2205 Service Manual Removing the Hard Drive... Replacing the Hard Drive WARNING: Before working inside your computer, read the safety information that shipped with your computer. CAUTION: Hard drives are installing a hard drive from a source other than Dell...Computer) before removing the hard drive. NOTE: Dell does not guarantee compatibility or provide support for...you remove the hard drive from sources other than Dell. CAUTION: To prevent data loss, turn off ...
Service Manual
Page 26
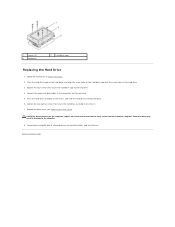
Connect the power and data cables to electrical outlets, and turn them on the chassis and slide the hard-drive assembly into place. 6. Tighten the two captive screws ...
Connect the power and data cables to electrical outlets, and turn them on the chassis and slide the hard-drive assembly into place. 6. Tighten the two captive screws ...

Service Manual
Page 45
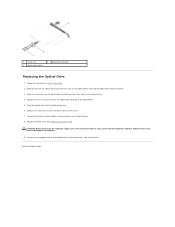
...-drive bracket to the chassis. 5. Pull the optical-drive bezel to Contents Page Optical Drive Dell™ Inspiron™ One 2205 Service Manual Removing the Optical Drive Replacing the Optical Drive WARNING: Before working inside your computer.... Back to detach it from the optical drive. Removing the Optical Drive 1. Remove the two screws that shipped with your computer). Follow the instructions in Before You Begin. 2. Disconnect the power...
...-drive bracket to the chassis. 5. Pull the optical-drive bezel to Contents Page Optical Drive Dell™ Inspiron™ One 2205 Service Manual Removing the Optical Drive Replacing the Optical Drive WARNING: Before working inside your computer.... Back to detach it from the optical drive. Removing the Optical Drive 1. Remove the two screws that shipped with your computer). Follow the instructions in Before You Begin. 2. Disconnect the power...
Service Manual
Page 46
... attached devices to electrical outlets, and turn them on the optical drive. 4. 1 screws (2) 3 optical-drive bezel 2 optical-drive bracket Replacing the Optical Drive 1. Connect the power and data cables to Contents Page
... attached devices to electrical outlets, and turn them on the optical drive. 4. 1 screws (2) 3 optical-drive bezel 2 optical-drive bracket Replacing the Optical Drive 1. Connect the power and data cables to Contents Page


