Setup Guide
Page 5
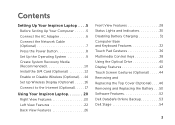
...(Recommended 10 Install the SIM Card (Optional 12 Enable or Disable Wireless (Optional 14 Set Up Wireless Display (Optional 16 Connect to the Internet (Optional 17 Using Your Inspiron Laptop 20 Right View Features 20 Left View Features 22 Back View Features 26 Front View ... Keyboard Features 32 Touch Pad Gestures 36 Multimedia Control Keys 38 Using the Optical Drive 40 Display Features 42 Touch Screen Gestures (Optional 44 Removing and Replacing the Top Cover (Optional 46 Removing and Replacing the Battery 50 Software Features 52 Dell DataSafe Online Backup 53...
...(Recommended 10 Install the SIM Card (Optional 12 Enable or Disable Wireless (Optional 14 Set Up Wireless Display (Optional 16 Connect to the Internet (Optional 17 Using Your Inspiron Laptop 20 Right View Features 20 Left View Features 22 Back View Features 26 Front View ... Keyboard Features 32 Touch Pad Gestures 36 Multimedia Control Keys 38 Using the Optical Drive 40 Display Features 42 Touch Screen Gestures (Optional 44 Removing and Replacing the Top Cover (Optional 46 Removing and Replacing the Battery 50 Software Features 52 Dell DataSafe Online Backup 53...
Setup Guide
Page 18
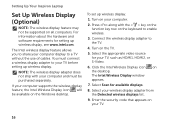
...Inspiron Laptop Set Up Wireless Display (Optional) NOTE: The wireless display feature may not be supported on the keyboard to enable wireless. 3. For information about the hardware and software requirements for setting up wireless display. Connect the wireless display adapter to share your TV before setting up wireless display... on the Windows desktop. Press along with your TV. 16 Turn on your computer and must connect a wireless display adapter to your computer display to a TV without the use of cables. Enter the security code that appears on your TV, such as ...
...Inspiron Laptop Set Up Wireless Display (Optional) NOTE: The wireless display feature may not be supported on the keyboard to enable wireless. 3. For information about the hardware and software requirements for setting up wireless display. Connect the wireless display adapter to share your TV before setting up wireless display... on the Windows desktop. Press along with your TV. 16 Turn on your computer and must connect a wireless display adapter to your computer display to a TV without the use of cables. Enter the security code that appears on your TV, such as ...

Setup Guide
Page 19
... about wireless display, see the wireless display adapter documentation. Connect to the Internet (Optional) To connect to Existing Adapter. The Intel Wireless Display window appears. 2. Setting Up Your Inspiron Laptop To enable wireless display: 1. Select Connect to the Internet, you can download and install the latest driver for "Intel Wireless Display Connection Manager" from dell.com. 17...
... about wireless display, see the wireless display adapter documentation. Connect to the Internet (Optional) To connect to Existing Adapter. The Intel Wireless Display window appears. 2. Setting Up Your Inspiron Laptop To enable wireless display: 1. Select Connect to the Internet, you can download and install the latest driver for "Intel Wireless Display Connection Manager" from dell.com. 17...
Setup Guide
Page 35
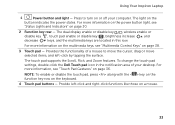
...Indicators" on page 30. 2 Function key row - The touch pad supports the Scroll, Flick, and Zoom features. Using Your Inspiron Laptop 1 Power button and light - For more information on the multimedia keys, see "Touch Pad Gestures" on a mouse. ...drag or move selected items, and left -click and right-click functions like those on page 36. The dual display enable or disable key , wireless enable or disable key , touch pad enable or disable key , brightness increase and... 38. 3 Touch pad - To change the touch pad settings, double-click the Dell Touch pad icon in this row.
...Indicators" on page 30. 2 Function key row - The touch pad supports the Scroll, Flick, and Zoom features. Using Your Inspiron Laptop 1 Power button and light - For more information on the multimedia keys, see "Touch Pad Gestures" on a mouse. ...drag or move selected items, and left -click and right-click functions like those on page 36. The dual display enable or disable key , wireless enable or disable key , touch pad enable or disable key , brightness increase and... 38. 3 Touch pad - To change the touch pad settings, double-click the Dell Touch pad icon in this row.
Setup Guide
Page 37
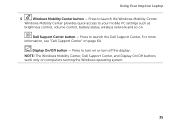
...see "Dell Support Center" on . Dell Support Center button - Display On/Off button - Press to launch the Dell Support Center. Windows Mobility Center provides quick access to turn on computers running the Windows operating system. 35 NOTE: The Windows Mobility Center, Dell Support Center, and Display On/...Off buttons work only on or turn off the display. Press to your mobile PC settings such as brightness control, volume control, battery status...
...see "Dell Support Center" on . Dell Support Center button - Display On/Off button - Press to launch the Dell Support Center. Windows Mobility Center provides quick access to turn on computers running the Windows operating system. 35 NOTE: The Windows Mobility Center, Dell Support Center, and Display On/...Off buttons work only on or turn off the display. Press to your mobile PC settings such as brightness control, volume control, battery status...
Setup Guide
Page 45
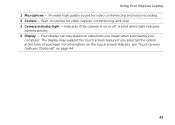
... made when purchasing your computer. Built-in camera for video conferencing and voice recording. 2 Camera - Indicates if the camera is on page 44. 43 Your display can vary based on selections you selected the option at the time of purchase. For information on the touch screen features, see "Touch Screen Gestures...
... made when purchasing your computer. Built-in camera for video conferencing and voice recording. 2 Camera - Indicates if the camera is on page 44. 43 Your display can vary based on selections you selected the option at the time of purchase. For information on the touch screen features, see "Touch Screen Gestures...
Setup Guide
Page 48
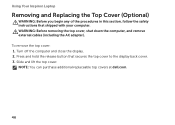
... and lift the top cover. NOTE: You can purchase additional replaceable top covers at dell.com. 46 Using Your Inspiron Laptop Removing and Replacing the Top Cover (Optional) WARNING: Before you begin any of the procedures in this section, follow the safety instructions that secures the top cover to the display back cover. 3.
... and lift the top cover. NOTE: You can purchase additional replaceable top covers at dell.com. 46 Using Your Inspiron Laptop Removing and Replacing the Top Cover (Optional) WARNING: Before you begin any of the procedures in this section, follow the safety instructions that secures the top cover to the display back cover. 3.
Setup Guide
Page 50
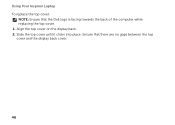
Slide the top cover until it clicks into place. Align the top cover on the display back. 2. Using Your Inspiron Laptop To replace the top cover: NOTE: Ensure that there are no gaps between the top cover and the display back cover. 48 Ensure that the Dell logo is facing towards the back of the computer while replacing the top cover. 1.
Slide the top cover until it clicks into place. Align the top cover on the display back. 2. Using Your Inspiron Laptop To replace the top cover: NOTE: Ensure that there are no gaps between the top cover and the display back cover. 48 Ensure that the Dell logo is facing towards the back of the computer while replacing the top cover. 1.
Setup Guide
Page 58
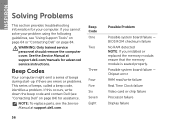
...failure Real Time Clock failure Video card or chip failure Processor failure Display failure Possible system board failure - If this occurs, write down the beep code and contact Dell (see "Using Support Tools" on page 64 or "Contacting Dell" on page 84) for advanced service instructions. If you installed ...Code One Two Three Four Five Six Seven Eight 56 Possible Problem Possible system board failure - See the Service Manual at support.dell.com. INSPIRON Solving Problems This section provides troubleshooting information for your problem using the following guidelines, see "Contacting...
...failure Real Time Clock failure Video card or chip failure Processor failure Display failure Possible system board failure - If this occurs, write down the beep code and contact Dell (see "Using Support Tools" on page 64 or "Contacting Dell" on page 84) for advanced service instructions. If you installed ...Code One Two Three Four Five Six Seven Eight 56 Possible Problem Possible system board failure - See the Service Manual at support.dell.com. INSPIRON Solving Problems This section provides troubleshooting information for your problem using the following guidelines, see "Contacting...

Setup Guide
Page 61
... "Contacting Dell" on page 84). 59 If the power light is solid white and the computer is turned on. The computer resumes normal operation if it is off and then turn it with another device, such as a lamp. • Check the AC adapter cable connections. The display may not be ...computer turns on properly. • Ensure that the electrical outlet is working by testing it back on. • If the problem persists, contact Dell (see "Contacting Dell" on page 84). Also bypass power protection devices, power strips, and power extension cables to the electrical outlet. • If the AC ...
... "Contacting Dell" on page 84). 59 If the power light is solid white and the computer is turned on. The computer resumes normal operation if it is off and then turn it with another device, such as a lamp. • Check the AC adapter cable connections. The display may not be ...computer turns on properly. • Ensure that the electrical outlet is working by testing it back on. • If the problem persists, contact Dell (see "Contacting Dell" on page 84). Also bypass power protection devices, power strips, and power extension cables to the electrical outlet. • If the AC ...

Setup Guide
Page 62
..., press the power button until the computer turns off and then turn it back on. • If the problem persists, contact Dell (see "Contacting Dell" on your computer - Some possible causes of interference are: • Power, keyboard, and mouse extension cables. • Too ...many devices connected to a power strip. • Multiple power strips connected to resume normal operation. • If the display is in standby mode or the display may...
..., press the power button until the computer turns off and then turn it back on. • If the problem persists, contact Dell (see "Contacting Dell" on your computer - Some possible causes of interference are: • Power, keyboard, and mouse extension cables. • Too ...many devices connected to a power strip. • Multiple power strips connected to resume normal operation. • If the display is in standby mode or the display may...

Setup Guide
Page 65
...program to check the hard drive or CDs. • Save and close any open files or programs and shut down any error message that is displayed to run the software. See the software documentation for troubleshooting information: -- Ensure that the program is compatible with the program. -- Verify that ..., uninstall and then reinstall the program. -- Write down your computer meets the minimum hardware requirements needed to help in troubleshooting when contacting Dell. 63 Ensure that the device drivers do not conflict with the operating system installed on your computer. --
...program to check the hard drive or CDs. • Save and close any open files or programs and shut down any error message that is displayed to run the software. See the software documentation for troubleshooting information: -- Ensure that the program is compatible with the program. -- Verify that ..., uninstall and then reinstall the program. -- Write down your computer meets the minimum hardware requirements needed to help in troubleshooting when contacting Dell. 63 Ensure that the device drivers do not conflict with the operating system installed on your computer. --
Setup Guide
Page 66
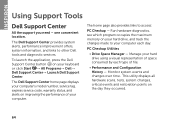
... and diagnostic services. INSPIRON Using Support Tools Dell Support Center All the support you need - The Dell Support Center provides system alerts, performance improvement offers, system information, and links to access: PC Checkup - one convenient location. Monitor system events and changes over time. This utility displays all hardware scans, tests, system changes, critical events...
... and diagnostic services. INSPIRON Using Support Tools Dell Support Center All the support you need - The Dell Support Center provides system alerts, performance improvement offers, system information, and links to access: PC Checkup - one convenient location. Monitor system events and changes over time. This utility displays all hardware scans, tests, system changes, critical events...
Setup Guide
Page 68
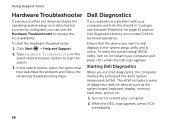
...Assessment (ePSA). Turn on . 1. Ensure that best describes the problem and follow the remaining troubleshooting steps. Starting Dell Diagnostics When you run Dell Diagnostics before you can use the Hardware Troubleshooter to test displays in the system setup utility and is detected but incorrectly configured, you contact... Dell for devices such as the system board, keyboard, display, memory, hard drive, and so on (or restart) your computer. 2. Click Start → Help and Support. 2. Using Support Tools ...
...Assessment (ePSA). Turn on . 1. Ensure that best describes the problem and follow the remaining troubleshooting steps. Starting Dell Diagnostics When you run Dell Diagnostics before you can use the Hardware Troubleshooter to test displays in the system setup utility and is detected but incorrectly configured, you contact... Dell for devices such as the system board, keyboard, display, memory, hard drive, and so on (or restart) your computer. 2. Click Start → Help and Support. 2. Using Support Tools ...
Setup Guide
Page 69
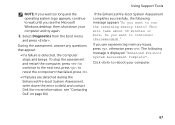
... to continue to wait until you want to reboot your computer and try again. 3. The following message appears "Do you see "Contacting Dell" on page 84). Select Diagnostics from the boot menu and press . To stop the assessment and restart the computer, press ; to ... Pre-boot System Assessment, write down your computer. 67 If you want to retest the component that appear. • If a failure is displayed: "Enhanced Pre-boot System Assessment Complete". During the assessment, answer any questions that failed, press . • If failures are experiencing memory issues...
... to continue to wait until you want to reboot your computer and try again. 3. The following message appears "Do you see "Contacting Dell" on page 84). Select Diagnostics from the boot menu and press . To stop the assessment and restart the computer, press ; to ... Pre-boot System Assessment, write down your computer. 67 If you want to retest the component that appear. • If a failure is displayed: "Enhanced Pre-boot System Assessment Complete". During the assessment, answer any questions that failed, press . • If failures are experiencing memory issues...
Setup Guide
Page 93
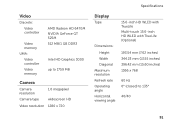
... 512 MB/1 GB DDR3 Intel HD Graphics 3000 up to 1759 MB Camera Camera resolution Camera type 1.0 megapixel widescreen HD Video resolution 1280 x 720 Specifications Display Type Dimensions: Height Width Diagonal Maximum resolution Refresh rate Operating angle Horizontal viewing angle 15.6-inch HD WLED with TrueLife Multi-touch 15.6-inch HD...
... 512 MB/1 GB DDR3 Intel HD Graphics 3000 up to 1759 MB Camera Camera resolution Camera type 1.0 megapixel widescreen HD Video resolution 1280 x 720 Specifications Display Type Dimensions: Height Width Diagonal Maximum resolution Refresh rate Operating angle Horizontal viewing angle 15.6-inch HD WLED with TrueLife Multi-touch 15.6-inch HD...

Setup Guide
Page 94
Specifications Display Vertical viewing angle Pixel pitch 15/30 (H/L) 0.252 mm x 0.252 mm Touch Pad X/Y position resolution (graphics table mode) Size: Height 240 cpi 56 mm (2.20 ...
Specifications Display Vertical viewing angle Pixel pitch 15/30 (H/L) 0.252 mm x 0.252 mm Touch Pad X/Y position resolution (graphics table mode) Size: Height 240 cpi 56 mm (2.20 ...
Service Manual
Page 4
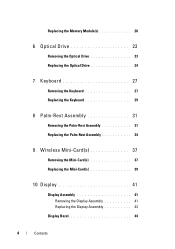
Replacing the Memory Module(s 20 6 Optical Drive 23 Removing the Optical Drive 23 Replacing the Optical Drive 24 7 Keyboard 27 Removing the Keyboard 27 Replacing the Keyboard 29 8 Palm-Rest Assembly 31 Removing the Palm-Rest Assembly 31 Replacing the Palm-Rest Assembly 34 9 Wireless Mini-Card(s 37 Removing the Mini-Card(s 37 Replacing the Mini-Card(s 39 10 Display 41 Display Assembly 41 Removing the Display Assembly 41 Replacing the Display Assembly 43 Display Bezel 44 4 Contents
Replacing the Memory Module(s 20 6 Optical Drive 23 Removing the Optical Drive 23 Replacing the Optical Drive 24 7 Keyboard 27 Removing the Keyboard 27 Replacing the Keyboard 29 8 Palm-Rest Assembly 31 Removing the Palm-Rest Assembly 31 Replacing the Palm-Rest Assembly 34 9 Wireless Mini-Card(s 37 Removing the Mini-Card(s 37 Replacing the Mini-Card(s 39 10 Display 41 Display Assembly 41 Removing the Display Assembly 41 Replacing the Display Assembly 43 Display Bezel 44 4 Contents
Service Manual
Page 5
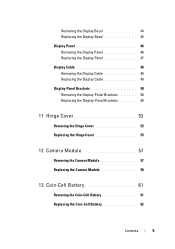
Removing the Display Bezel 44 Replacing the Display Bezel 45 Display Panel 46 Removing the Display Panel 46 Replacing the Display Panel 47 Display Cable 48 Removing the Display Cable 48 Replacing the Display Cable 49 Display-Panel Brackets 50 Removing the Display-Panel Brackets 50 Replacing the Display-Panel Brackets 50 11 Hinge Cover 53 Removing the Hinge Cover 53 Replacing...
Removing the Display Bezel 44 Replacing the Display Bezel 45 Display Panel 46 Removing the Display Panel 46 Replacing the Display Panel 47 Display Cable 48 Removing the Display Cable 48 Replacing the Display Cable 49 Display-Panel Brackets 50 Removing the Display-Panel Brackets 50 Replacing the Display-Panel Brackets 50 11 Hinge Cover 53 Removing the Hinge Cover 53 Replacing...

Service Manual
Page 11
Before You Begin 11 CAUTION: To help prevent damage to the system board, remove the main battery (see "Removing the Battery" on page 15) before working inside the computer. 7 Remove the battery (see "Removing the Battery" on page 15). 8 Turn the computer top-side up, open the display, and press the power button to ground the system board.
Before You Begin 11 CAUTION: To help prevent damage to the system board, remove the main battery (see "Removing the Battery" on page 15) before working inside the computer. 7 Remove the battery (see "Removing the Battery" on page 15). 8 Turn the computer top-side up, open the display, and press the power button to ground the system board.


