Service Manual
Page 5
... list of product in the Enter a service tag: field, click Go, and proceed to save the file on your desktop and is located on the screen. The File Download window appears. 6. The file icon appears on the top right of your computer's Service Tag: a. c. Click Save to step ... Model. Select the product model number in the Select Your Product Line list. Back to support.dell.com/support/downloads. 3. Go to Contents Page Flashing the BIOS Dell™ Inspiron™ 1018 Service Manual The BIOS may require flashing when an update is available or when replacing the system ...
... list of product in the Enter a service tag: field, click Go, and proceed to save the file on your desktop and is located on the screen. The File Download window appears. 6. The file icon appears on the top right of your computer's Service Tag: a. c. Click Save to step ... Model. Select the product model number in the Select Your Product Line list. Back to support.dell.com/support/downloads. 3. Go to Contents Page Flashing the BIOS Dell™ Inspiron™ 1018 Service Manual The BIOS may require flashing when an update is available or when replacing the system ...

Setup Guide
Page 11
... the screen. Set Up Microsoft Windows To set up Microsoft® Windows® for the first time, follow the instructions on the operating system and features, see support.dell.com/MyNewDell. CAUTION: Do not interrupt the operating system's setup process. Setting Up Your Inspiron Laptop... Set Up the Operating System Your Dell computer is recommended that you download and install the latest BIOS...
... the screen. Set Up Microsoft Windows To set up Microsoft® Windows® for the first time, follow the instructions on the operating system and features, see support.dell.com/MyNewDell. CAUTION: Do not interrupt the operating system's setup process. Setting Up Your Inspiron Laptop... Set Up the Operating System Your Dell computer is recommended that you download and install the latest BIOS...

Setup Guide
Page 13
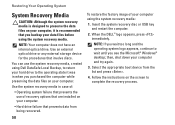
Insert the disc or USB key in the computer. 3. Click Create Recovery Media. 5. NOTE: For information on using the system recovery media, see "Connect the AC Adapter" on page 6). 2. Click Start → All Programs→ Dell DataSafe Local Backup. 4. Follow the instructions on page 50. 11 Setting Up Your Inspiron Laptop To create a system recovery media: 1. Ensure that the AC adapter is connected (see "System Recovery Media" on the screen.
Insert the disc or USB key in the computer. 3. Click Create Recovery Media. 5. NOTE: For information on using the system recovery media, see "Connect the AC Adapter" on page 6). 2. Click Start → All Programs→ Dell DataSafe Local Backup. 4. Follow the instructions on page 50. 11 Setting Up Your Inspiron Laptop To create a system recovery media: 1. Ensure that the AC adapter is connected (see "System Recovery Media" on the screen.

Setup Guide
Page 16
... Connect to complete the setup. Click Start → Control Panel. 4. Setting Up a Wired Connection • If you can purchase one at www.dell.com. Follow the instructions on page 12). 2. Before you are using a dial-up connection, connect the telephone line to the external USB modem (... wall jack before you set up your wireless router, see "Enable or Disable Wireless" on the screen to a network. 5. To set up your connection to a wireless router: 1. Setting Up Your Inspiron Laptop Connect to the Internet (Optional) To connect to the Internet, you need an external modem...
... Connect to complete the setup. Click Start → Control Panel. 4. Setting Up a Wired Connection • If you can purchase one at www.dell.com. Follow the instructions on page 12). 2. Before you are using a dial-up connection, connect the telephone line to the external USB modem (... wall jack before you set up your wireless router, see "Enable or Disable Wireless" on the screen to a network. 5. To set up your connection to a wireless router: 1. Setting Up Your Inspiron Laptop Connect to the Internet (Optional) To connect to the Internet, you need an external modem...

Setup Guide
Page 17
Contact your ISP for offerings available in the past, the ISP might have a service outage. Setting Up Your Inspiron Laptop To set up a new connection or network→ Connect to the Internet window appears. Save and close any open files, and exit any open ... cannot connect to the Internet but have an ISP, the Connect to the Internet wizard can help you get one. Follow the instructions on the screen and use the setup information provided by country. In the search box, type network, and then click Network and Sharing Center→ Set up your...
Contact your ISP for offerings available in the past, the ISP might have a service outage. Setting Up Your Inspiron Laptop To set up a new connection or network→ Connect to the Internet window appears. Save and close any open files, and exit any open ... cannot connect to the Internet but have an ISP, the Connect to the Internet wizard can help you get one. Follow the instructions on the screen and use the setup information provided by country. In the search box, type network, and then click Network and Sharing Center→ Set up your...

Setup Guide
Page 25
Zoom Allows you to increase or decrease the magnification of the touch pad). To zoom out: Move a finger down in the zoom zone (extreme left of the touch pad). To zoom in: Move a finger up in or out. Using Your Inspiron Laptop 23 Allows you to zoom in the zoom zone (extreme left of the screen content. The zoom feature includes: One finger zoom -
Zoom Allows you to increase or decrease the magnification of the touch pad). To zoom out: Move a finger down in the zoom zone (extreme left of the touch pad). To zoom in: Move a finger up in or out. Using Your Inspiron Laptop 23 Allows you to zoom in the zoom zone (extreme left of the screen content. The zoom feature includes: One finger zoom -

Setup Guide
Page 31
... that provides easy access to frequently-used applications, files, and folders. Remove a Category or Icon 1. Using Your Inspiron Laptop Dell Dock The Dell Dock is displayed. 2. Click Save. Right-click the category or icon on the screen. Right-click the Dock and click Advanced Setting. 2. Follow the instructions on the Dock and click Delete...
... that provides easy access to frequently-used applications, files, and folders. Remove a Category or Icon 1. Using Your Inspiron Laptop Dell Dock The Dell Dock is displayed. 2. Click Save. Right-click the category or icon on the screen. Right-click the Dock and click Advanced Setting. 2. Follow the instructions on the Dock and click Delete...

Setup Guide
Page 32
Using Your Inspiron Laptop Dell DataSafe Online Backup NOTE: Dell DataSafe Online Backup may not be available in all regions. Dell DataSafe Online is recommended for fast upload/download speeds. For more information, go to delldatasafe.com. NOTE: A broadband connection is an automated backup and recovery ..., or natural disasters. Follow the instructions that helps protect your computer using a password-protected account. To schedule backups: 1. You can access the service on the screen. 30 Double click the Dell DataSafe Online icon on the taskbar. 2.
Using Your Inspiron Laptop Dell DataSafe Online Backup NOTE: Dell DataSafe Online Backup may not be available in all regions. Dell DataSafe Online is recommended for fast upload/download speeds. For more information, go to delldatasafe.com. NOTE: A broadband connection is an automated backup and recovery ..., or natural disasters. Follow the instructions that helps protect your computer using a password-protected account. To schedule backups: 1. You can access the service on the screen. 30 Double click the Dell DataSafe Online icon on the taskbar. 2.

Setup Guide
Page 37
... drive or any external storage device for the procedures that the AC adapter is no longer responding. 4. If the computer stops responding or a solid blue screen appears - CAUTION: You might lose data if you are unable to get a response by pressing a key on the disc (CD or DVD). NOTE: Software usually...
... drive or any external storage device for the procedures that the AC adapter is no longer responding. 4. If the computer stops responding or a solid blue screen appears - CAUTION: You might lose data if you are unable to get a response by pressing a key on the disc (CD or DVD). NOTE: Software usually...
Setup Guide
Page 38
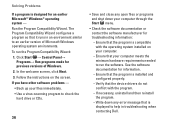
...Start menu. • Check the software documentation or contact the software manufacturer for information. --Ensure that it runs in troubleshooting when contacting Dell. If you have other software problems - • Back up your files immediately. • Use a virus-scanning program to check ...message that is installed and configured properly. --Verify that the device drivers do not conflict with the operating system installed on the screen. In the welcome screen, click Next. 3. Click Start → Control Panel→ Programs→ Run programs made for an earlier Microsoft®...
...Start menu. • Check the software documentation or contact the software manufacturer for information. --Ensure that it runs in troubleshooting when contacting Dell. If you have other software problems - • Back up your files immediately. • Use a virus-scanning program to check ...message that is installed and configured properly. --Verify that the device drivers do not conflict with the operating system installed on the screen. In the welcome screen, click Next. 3. Click Start → Control Panel→ Programs→ Run programs made for an earlier Microsoft®...

Setup Guide
Page 40
...message appeared. Follow the instructions on page 61). 38 NOTE: If the message you received is available at support.dell.com/manuals or contact Dell (see "Contacting Dell" on the screen to register and download the software. 3. From this web site you identify the cause and action needed to ...downloadstore.dell.com/media. 2. To register and use . Go to resolve the issue. Reinstall or create backup media of the ...
...message appeared. Follow the instructions on page 61). 38 NOTE: If the message you received is available at support.dell.com/manuals or contact Dell (see "Contacting Dell" on the screen to register and download the software. 3. From this web site you identify the cause and action needed to ...downloadstore.dell.com/media. 2. To register and use . Go to resolve the issue. Reinstall or create backup media of the ...
Setup Guide
Page 43
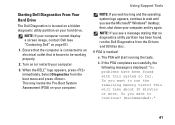
... Using Support Tools Starting Dell Diagnostics From Your Hard Drive The Dell Diagnostics is located on a hidden diagnostic utility partition on page 61). 1. This may invoke the Pre-Boot System Assessment (PSA) on (or restart) your computer cannot display a screen image, contact Dell (see a message stating... that is known to run the Dell Diagnostics from the boot menu and press . NOTE: If you want to be working properly. 2. ...
... Using Support Tools Starting Dell Diagnostics From Your Hard Drive The Dell Diagnostics is located on a hidden diagnostic utility partition on page 61). 1. This may invoke the Pre-Boot System Assessment (PSA) on (or restart) your computer cannot display a screen image, contact Dell (see a message stating... that is known to run the Dell Diagnostics from the boot menu and press . NOTE: If you want to be working properly. 2. ...
Setup Guide
Page 44
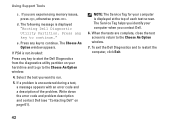
...helps you identify your hard drive and to go to the Choose An Option window. 4. If you are complete, close the test screen to return to start the Dell Diagnostics from the diagnostics utility partition on page 61). Press any key to the Choose An Option window. 7. The following message is... encountered during a test, a message appears with an error code and a description of each test screen. To exit the Dell Diagnostics and to run. 5. If PSA is displayed at the top of the problem. Select the test you contact...
...helps you identify your hard drive and to go to the Choose An Option window. 4. If you are complete, close the test screen to return to start the Dell Diagnostics from the diagnostics utility partition on page 61). Press any key to the Choose An Option window. 7. The following message is... encountered during a test, a message appears with an error code and a description of each test screen. To exit the Dell Diagnostics and to run. 5. If PSA is displayed at the top of the problem. Select the test you contact...
Setup Guide
Page 46
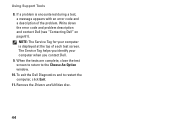
...An Option window. 10. Write down the error code and problem description and contact Dell (see "Contacting Dell" on page 61). Remove the Drivers and Utilities disc. 44 When the tests are complete, close the test screen to return to restart the computer, click Exit. 11. NOTE: The Service ...Tag for your computer when you contact Dell. 9. Using Support Tools 8. The Service Tag helps you identify your computer is encountered ...
...An Option window. 10. Write down the error code and problem description and contact Dell (see "Contacting Dell" on page 61). Remove the Drivers and Utilities disc. 44 When the tests are complete, close the test screen to return to restart the computer, click Exit. 11. NOTE: The Service ...Tag for your computer when you contact Dell. 9. Using Support Tools 8. The Service Tag helps you identify your computer is encountered ...

Setup Guide
Page 48
... the event that System Restore makes to your data files or recover them. System Restore does not monitor your computer are an administrator on the screen. Restoring Your Operating System System Restore The Windows operating systems provide a System Restore option which allows you to return your computer to an earlier operating...
... the event that System Restore makes to your data files or recover them. System Restore does not monitor your computer are an administrator on the screen. Restoring Your Operating System System Restore The Windows operating systems provide a System Restore option which allows you to return your computer to an earlier operating...

Setup Guide
Page 51
...at the time of the data to Dell DataSafe Local Backup Professional: 1. Restoring Your Operating System Upgrading to Dell DataSafe Local Backup Professional NOTE: Dell DataSafe Local Backup Professional may be installed on your computer based on the screen to : • Backup and restore ...your computer, if you to complete the upgrade. 49 Dell DataSafe Local Backup Professional ...
...at the time of the data to Dell DataSafe Local Backup Professional: 1. Restoring Your Operating System Upgrading to Dell DataSafe Local Backup Professional NOTE: Dell DataSafe Local Backup Professional may be installed on your computer based on the screen to : • Backup and restore ...your computer, if you to complete the upgrade. 49 Dell DataSafe Local Backup Professional ...
Setup Guide
Page 52
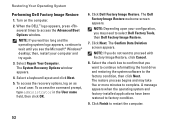
... 2. then, shut down your hard drive to the operating state it is designed to preserve the data files on the screen to complete the recovery process. When the DELL™ logo appears, press immediately. NOTE: If you wait too long and the operating system logo appears, continue to ... the system recovery media: 1. Select the appropriate boot device from being recovered. 50 To restore the factory image of your data files before using Dell DataSafe Local Backup, to return your computer and try again. 3. You can use of : • Operating system failure that prevents the use...
... 2. then, shut down your hard drive to the operating state it is designed to preserve the data files on the screen to complete the recovery process. When the DELL™ logo appears, press immediately. NOTE: If you wait too long and the operating system logo appears, continue to ... the system recovery media: 1. Select the appropriate boot device from being recovered. 50 To restore the factory image of your data files before using Dell DataSafe Local Backup, to return your computer and try again. 3. You can use of : • Operating system failure that prevents the use...
Setup Guide
Page 54
then, restart your configuration, you see the Microsoft® Windows® desktop; Select a keyboard layout and click Next. 5. The Dell Factory Image Restore welcome screen appears. Click Finish to factory condition. 9. Click Dell Factory Image Restore. NOTE: If you want to proceed with Factory Image Restore, click Cancel. 8. Select the check box to confirm...
then, restart your configuration, you see the Microsoft® Windows® desktop; Select a keyboard layout and click Next. 5. The Dell Factory Image Restore welcome screen appears. Click Finish to factory condition. 9. Click Dell Factory Image Restore. NOTE: If you want to proceed with Factory Image Restore, click Cancel. 8. Select the check box to confirm...

