Service Manual
Page 5
Back to support.dell.com/support/downloads. 3. NOTE: If you have selected a different model and want to start over again, click Start Over on the top right of results appear on the screen. A list of the menu. The File Download window appears. 6. Double-click the file icon ...on the desktop and follow the instructions on the computer. 2. Turn on the screen. Go to Contents Page Flashing the BIOS Dell™ Inspiron™ 1012 Service Manual 1. b. Select the product brand in the Select Your Product Model list. The file icon appears on ...
Back to support.dell.com/support/downloads. 3. NOTE: If you have selected a different model and want to start over again, click Start Over on the top right of results appear on the screen. A list of the menu. The File Download window appears. 6. Double-click the file icon ...on the desktop and follow the instructions on the computer. 2. Turn on the screen. Go to Contents Page Flashing the BIOS Dell™ Inspiron™ 1012 Service Manual 1. b. Select the product brand in the Select Your Product Model list. The file icon appears on ...

Setup Guide
Page 11
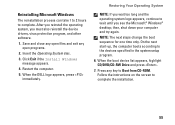
... accepting license agreements, setting preferences, and setting up an Internet connection. The Windows setup screens will need to complete. Setting Up Your Inspiron Laptop Set Up the Operating System Your Dell computer is recommended that shipped with the operating system you will take some time to reinstall... Doing so may take you download and install the latest BIOS and drivers for the first time, follow the instructions on the screen. These steps are mandatory and may render your computer, it is preconfigured with your computer for the first time, follow the instructions...
... accepting license agreements, setting preferences, and setting up an Internet connection. The Windows setup screens will need to complete. Setting Up Your Inspiron Laptop Set Up the Operating System Your Dell computer is recommended that shipped with the operating system you will take some time to reinstall... Doing so may take you download and install the latest BIOS and drivers for the first time, follow the instructions on the screen. These steps are mandatory and may render your computer, it is preconfigured with your computer for the first time, follow the instructions...
Setup Guide
Page 17
.... Contact your ISP information ready. Have your ISP to the Internet but have successfully connected in your computer (see "Enable or Disable Wireless" on the screen to → Wireless Network Connections→ View Wireless Networks. 4. If you do not have a service outage. Click Start→ Connect to complete the setup. Save... Center→ Connect to complete the setup. If you get one. 15 Follow the instructions on your country. Ensure that wireless is enabled on the screen to a network. 4. Setting Up Your Inspiron Laptop 3.
.... Contact your ISP information ready. Have your ISP to the Internet but have successfully connected in your computer (see "Enable or Disable Wireless" on the screen to → Wireless Network Connections→ View Wireless Networks. 4. If you do not have a service outage. Click Start→ Connect to complete the setup. Save... Center→ Connect to complete the setup. If you get one. 15 Follow the instructions on your country. Ensure that wireless is enabled on the screen to a network. 4. Setting Up Your Inspiron Laptop 3.
Setup Guide
Page 18
...in step 6, continue to the Windows Classic view. 1. Click Next. NOTE: If you have an internal optical drive. Setting Up Your Inspiron Laptop To setup your Internet connection: Windows XP NOTE: The following steps were written for the procedures that involve discs. 6. The New ...Connection Wizard appears. 5. Click Connect to complete the setup. If you set your Dell™ computer to step 8. Otherwise, follow the instructions on the screen to the Internet. Click Start→ Control Panel. 3. Save and close any open files, and exit any...
...in step 6, continue to the Windows Classic view. 1. Click Next. NOTE: If you have an internal optical drive. Setting Up Your Inspiron Laptop To setup your Internet connection: Windows XP NOTE: The following steps were written for the procedures that involve discs. 6. The New ...Connection Wizard appears. 5. Click Connect to complete the setup. If you set your Dell™ computer to step 8. Otherwise, follow the instructions on the screen to the Internet. Click Start→ Control Panel. 3. Save and close any open files, and exit any...

Setup Guide
Page 19
.... 3. Click Network and Sharing Center→ Set up the TV tuner for the channels available in your TV tuner settings: 1. Setting Up Your Inspiron Laptop 8. Save and close any open files, and exit any open programs. 2. The Connect to the Internet?, and click Next. 9. Use the... to complete the setup. To set up a new connection or network→ Connect to complete the setup. Click Dell Digital TV→ Dell Digital TV and follow the instructions on the screen and use the setup information provided by your ISP. 4. Windows 7 1. Set Up the TV Tuner (Optional) ...
.... 3. Click Network and Sharing Center→ Set up the TV tuner for the channels available in your TV tuner settings: 1. Setting Up Your Inspiron Laptop 8. Save and close any open files, and exit any open programs. 2. The Connect to the Internet?, and click Next. 9. Use the... to complete the setup. To set up a new connection or network→ Connect to complete the setup. Click Dell Digital TV→ Dell Digital TV and follow the instructions on the screen and use the setup information provided by your ISP. 4. Windows 7 1. Set Up the TV Tuner (Optional) ...
Setup Guide
Page 37
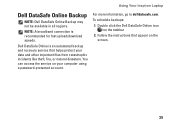
... and recovery service that appear on the screen. 35 Double click the Dell DataSafe Online icon on your data and other important files from catastrophic incidents like theft, fire, or natural disasters. For more information, go to delldatasafe.com. Using Your Inspiron Laptop Dell DataSafe Online Backup NOTE: Dell DataSafe Online Backup may not be...
... and recovery service that appear on the screen. 35 Double click the Dell DataSafe Online icon on your data and other important files from catastrophic incidents like theft, fire, or natural disasters. For more information, go to delldatasafe.com. Using Your Inspiron Laptop Dell DataSafe Online Backup NOTE: Dell DataSafe Online Backup may not be...

Setup Guide
Page 38
... in the Title field. 3. Add an Icon Drag and drop the icon to personalize the Dock. 36 Right-click the category or icon on the screen. Remove a Category or Icon 1. Using Your Inspiron Laptop Dell Dock The Dell Dock is displayed. 2. Personalize the Dock 1. Right-click the Dock and click Advanced Setting.... 2.
... in the Title field. 3. Add an Icon Drag and drop the icon to personalize the Dock. 36 Right-click the category or icon on the screen. Remove a Category or Icon 1. Using Your Inspiron Laptop Dell Dock The Dell Dock is displayed. 2. Personalize the Dock 1. Right-click the Dock and click Advanced Setting.... 2.
Setup Guide
Page 43
...). CAUTION: You might lose data if you are unable to the electrical outlet. Ensure that involve discs. If the computer stops responding or a solid blue screen appears - If a program stops responding - Click End Task. The Program Compatibility Wizard configures a program so that is firmly connected to the computer and to perform...
...). CAUTION: You might lose data if you are unable to the electrical outlet. Ensure that involve discs. If the computer stops responding or a solid blue screen appears - If a program stops responding - Click End Task. The Program Compatibility Wizard configures a program so that is firmly connected to the computer and to perform...
Setup Guide
Page 44
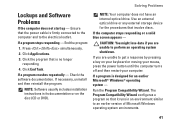
... close any open files or programs and shut down any error message that your computer. --Ensure that is displayed to help in troubleshooting when Contacting Dell. Under Fix a Problem click Getting older programs to run on Windows XP. 3. In the search box, type Use an older program with the program. --If...→ Help and Support→ Fixing a Problem→ Application and Software Problems. 2. Follow the instructions on the Program Compatibility wizard. Follow the instructions on the screen. Windows® 7 1. Click Start . 2. Solving Problems Windows® XP 1.
... close any open files or programs and shut down any error message that your computer. --Ensure that is displayed to help in troubleshooting when Contacting Dell. Under Fix a Problem click Getting older programs to run on Windows XP. 3. In the search box, type Use an older program with the program. --If...→ Help and Support→ Fixing a Problem→ Application and Software Problems. 2. Follow the instructions on the Program Compatibility wizard. Follow the instructions on the screen. Windows® 7 1. Click Start . 2. Solving Problems Windows® XP 1.
Setup Guide
Page 48
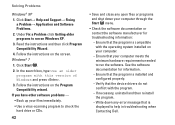
... problem with your computer. Ensure that the device that is connected to be working properly. 2. NOTE: If your computer cannot display a screen image, contact Dell (see "Contacting Dell" on (or restart) your computer. 46 Turn on page 64). 1. Press during POST (Power On Self Test) to test displays...computer, perform the checks in "Lockups and Software Problems" on your hard drive or from the Drivers and Utilities disc. Start the Dell Diagnostics from the boot menu and press . Select Diagnostics from your hard drive. Ensure that the computer is known to an electrical ...
... problem with your computer. Ensure that the device that is connected to be working properly. 2. NOTE: If your computer cannot display a screen image, contact Dell (see "Contacting Dell" on (or restart) your computer. 46 Turn on page 64). 1. Press during POST (Power On Self Test) to test displays...computer, perform the checks in "Lockups and Software Problems" on your hard drive or from the Drivers and Utilities disc. Start the Dell Diagnostics from the boot menu and press . Select Diagnostics from your hard drive. Ensure that the computer is known to an electrical ...

Setup Guide
Page 49
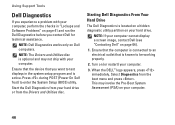
... the Drivers and Utilities disc. Do you are experiencing memory issues, press , otherwise press . c. The following message is displayed "Booting Dell Diagnostic Utility Partition. Select the test you want to run the remaining memory tests? NOTE: If you encounter a problem during a test,...you want to continue? (Recommended)." The PSA will take about 30 minutes or more. Write down your screen. then, shut down the error code and problem description and contact Dell (see a message stating that no diagnostics utility partition has been found with the error code and a ...
... the Drivers and Utilities disc. Do you are experiencing memory issues, press , otherwise press . c. The following message is displayed "Booting Dell Diagnostic Utility Partition. Select the test you want to run the remaining memory tests? NOTE: If you encounter a problem during a test,...you want to continue? (Recommended)." The PSA will take about 30 minutes or more. Write down your screen. then, shut down the error code and problem description and contact Dell (see a message stating that no diagnostics utility partition has been found with the error code and a ...

Setup Guide
Page 50
... 6. When the boot device list appears, highlight CD/DVD/CD-RW and press . 4. When the tests are complete, close the test screen to return to run. 48 When the DELL logo appears, press immediately. then, shut down and restart the computer. The Service Tag helps you identify your computer when you see... to the Choose An Option window. 7. Insert the Drivers and Utilities disc. 2. Shut down your computer is displayed at the top of each test screen. Select the Boot from CD-ROM option from the menu that involve discs. 1. On the next start the CD menu and press to wait until...
... 6. When the boot device list appears, highlight CD/DVD/CD-RW and press . 4. When the tests are complete, close the test screen to return to run. 48 When the DELL logo appears, press immediately. then, shut down and restart the computer. The Service Tag helps you identify your computer when you see... to the Choose An Option window. 7. Insert the Drivers and Utilities disc. 2. Shut down your computer is displayed at the top of each test screen. Select the Boot from CD-ROM option from the menu that involve discs. 1. On the next start the CD menu and press to wait until...

Setup Guide
Page 51
... appear on page 64). When the tests are complete, close the test screen to return to restart the computer, click Exit. 10. Write down the error code and problem description and contact Dell (see "Contacting Dell" on your computer when you encounter a problem during a test, a ...message with the error code and a description of each test screen. Using Support Tools 49 If you contact Dell. 8. To exit the Dell Diagnostics and to the Choose An Option...
... appear on page 64). When the tests are complete, close the test screen to return to restart the computer, click Exit. 10. Write down the error code and problem description and contact Dell (see "Contacting Dell" on your computer when you encounter a problem during a test, a ...message with the error code and a description of each test screen. Using Support Tools 49 If you contact Dell. 8. To exit the Dell Diagnostics and to the Choose An Option...

Setup Guide
Page 53
... and click Next. 51 Restoring Your Operating System Starting System Restore To restore your administrator to continue the desired action. 3. Follow the instructions on the screen. Undoing the Last System Restore NOTE: Before you may appear. In the Start Search box, type System Restore and press . 3. NOTE: The User ... box, type System Restore and press . otherwise, contact your computer: Windows XP 1. Click Start. 2. Click Start . 2. If you are an administrator on the screen. In the welcome screen, click Undo my last restoration and then click Next. 3. In the welcome...
... and click Next. 51 Restoring Your Operating System Starting System Restore To restore your administrator to continue the desired action. 3. Follow the instructions on the screen. Undoing the Last System Restore NOTE: Before you may appear. In the Start Search box, type System Restore and press . 3. NOTE: The User ... box, type System Restore and press . otherwise, contact your computer: Windows XP 1. Click Start. 2. Click Start . 2. If you are an administrator on the screen. In the welcome screen, click Undo my last restoration and then click Next. 3. In the welcome...

Setup Guide
Page 55
... 8. Click Start→ Control Panel. 2. Restoring Your Operating System 6. On the Hardware tab, click Device Manager. 4. Click Next. The Confirm Data Deletion screen appears. Click the Drivers tab→ Roll Back Driver. 53 Click Finish to factory condition. 9. The restore process begins and may need to complete. Right...-click the device for which the new driver is installed and click Properties. 5. The Dell Factory Image Restore welcome screen appears. NOTE: If you may take five or more minutes to select...
... 8. Click Start→ Control Panel. 2. Restoring Your Operating System 6. On the Hardware tab, click Device Manager. 4. Click Next. The Confirm Data Deletion screen appears. Click the Drivers tab→ Roll Back Driver. 53 Click Finish to factory condition. 9. The restore process begins and may need to complete. Right...-click the device for which the new driver is installed and click Properties. 5. The Dell Factory Image Restore welcome screen appears. NOTE: If you may take five or more minutes to select...
Setup Guide
Page 57
Press any open programs. 2. Follow the instructions on the screen to Boot from CD-ROM. NOTE: The next steps change the boot sequence for one time only. Save and close any open files and exit any key to complete the installation. 55 When the DELL logo appears, press immediately. On the next start...
Press any open programs. 2. Follow the instructions on the screen to Boot from CD-ROM. NOTE: The next steps change the boot sequence for one time only. Save and close any open files and exit any key to complete the installation. 55 When the DELL logo appears, press immediately. On the next start...


