
Comprehensive Specifications
Page 6
AC Adapter Input voltage Input current Input frequency Output power Output current Rated output voltage Temperature range Operating Storage 100-240 VAC 0.8 A or 1.0 A 50-60 Hz 30 W 1....
AC Adapter Input voltage Input current Input frequency Output power Output current Rated output voltage Temperature range Operating Storage 100-240 VAC 0.8 A or 1.0 A 50-60 Hz 30 W 1....
Service Manual
Page 1
...for property damage, personal injury, or death. Dell Inc. Bluetooth is subject to hardware or loss of Dell Inc. Dell™ Inspiron™ 1012 Service Manual Before You Begin Battery Keyboard Memory... Module Hard-Drive Assembly Palm Rest Assembly Power Button Board Touch Pad Module Internal Card With Bluetooth® Wireless Technology Processor Heat Sink Wireless Mini-Card(s) Video Accelerator Card Hinge Cover Display Camera Module Speakers Support Bracket (s) I/O Board Status Light Board System Board AC Adapter...
...for property damage, personal injury, or death. Dell Inc. Bluetooth is subject to hardware or loss of Dell Inc. Dell™ Inspiron™ 1012 Service Manual Before You Begin Battery Keyboard Memory... Module Hard-Drive Assembly Palm Rest Assembly Power Button Board Touch Pad Module Internal Card With Bluetooth® Wireless Technology Processor Heat Sink Wireless Mini-Card(s) Video Accelerator Card Hinge Cover Display Camera Module Speakers Support Bracket (s) I/O Board Status Light Board System Board AC Adapter...
Service Manual
Page 13
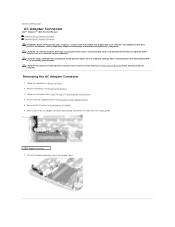
... procedures in Removing the System Board. 4. Remove the left support bracket (see the Regulatory Compliance Homepage at www.dell.com/regulatory_compliance. Back to Contents Page AC Adapter Connector Dell™ Inspiron™ 1012 Service Manual Removing the AC Adapter Connector Replacing the AC Adapter Connector WARNING: Before working inside your computer, read the safety information that is not authorized by...
... procedures in Removing the System Board. 4. Remove the left support bracket (see the Regulatory Compliance Homepage at www.dell.com/regulatory_compliance. Back to Contents Page AC Adapter Connector Dell™ Inspiron™ 1012 Service Manual Removing the AC Adapter Connector Replacing the AC Adapter Connector WARNING: Before working inside your computer, read the safety information that is not authorized by...

Service Manual
Page 14
...Follow the instructions from step 4 to Contents Page Back to step 21 in damage to the computer. Place the AC adapter connector in Before You Begin. 2. Replacing the AC Adapter Connector 1. Follow the procedures in the computer base. 3. Failure to do so may result in Replacing the ...System Board. 7. Route the AC adapter connector cable through the routing guide. 4. CAUTION: Before turning on the computer, ...
...Follow the instructions from step 4 to Contents Page Back to step 21 in damage to the computer. Place the AC adapter connector in Before You Begin. 2. Replacing the AC Adapter Connector 1. Follow the procedures in the computer base. 3. Failure to do so may result in Replacing the ...System Board. 7. Route the AC adapter connector cable through the routing guide. 4. CAUTION: Before turning on the computer, ...
Service Manual
Page 49
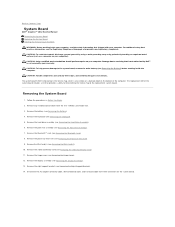
...(see Removing the Bluetooth Card). 8. Removing the System Board 1. Remove the keyboard (see Removing the Mini-Card(s)). 10. Remove the Mini-Card(s) (see Removing the Keyboard). 5. CAUTION: Only a certified service technician should perform repairs on your...AC adapter connector cable, SIM card board cable, and I/O board cable from the 3-in-1 Media Card reader slot. 3. Remove the video accelerator card (see Removing the Display Assembly). 13. Remove the display assembly (see Removing the Video Accelerator Card). 11. Back to Contents Page System Board Dell™ Inspiron™ 1012...
...(see Removing the Bluetooth Card). 8. Removing the System Board 1. Remove the keyboard (see Removing the Mini-Card(s)). 10. Remove the Mini-Card(s) (see Removing the Keyboard). 5. CAUTION: Only a certified service technician should perform repairs on your...AC adapter connector cable, SIM card board cable, and I/O board cable from the 3-in-1 Media Card reader slot. 3. Remove the video accelerator card (see Removing the Display Assembly). 13. Remove the display assembly (see Removing the Video Accelerator Card). 11. Back to Contents Page System Board Dell™ Inspiron™ 1012...

Service Manual
Page 50
... board out of the slots in Before You Begin. 2. Remove the screw that secures the system board to the computer base. 1 system board 2 screw 17. 1 AC adapter cable connector 3 I/O board cable connector 2 SIM card board cable connector 15.
... board out of the slots in Before You Begin. 2. Remove the screw that secures the system board to the computer base. 1 system board 2 screw 17. 1 AC adapter cable connector 3 I/O board cable connector 2 SIM card board cable connector 15.
Service Manual
Page 51
... the Bluetooth Card). 15. Failure to do so may result in the Set Service Tag field. Enter the service tag (see Replacing the Mini-Card(s)). 13. Back to the security tab and enter the service tag in damage to enter the system setup program. 4. Replace the... Replace any cards removed from the 3-in the BIOS 1. Turn on the computer. 3. Replace the battery (see Replacing the Right Support Bracket). 9. Connect the AC adapter connector cable, SIM card board cable, and I/O board cable to their connectors on the computer, replace all screws and ensure that the main battery is...
... the Bluetooth Card). 15. Failure to do so may result in the Set Service Tag field. Enter the service tag (see Replacing the Mini-Card(s)). 13. Back to the security tab and enter the service tag in damage to enter the system setup program. 4. Replace the... Replace any cards removed from the 3-in the BIOS 1. Turn on the computer. 3. Replace the battery (see Replacing the Right Support Bracket). 9. Connect the AC adapter connector cable, SIM card board cable, and I/O board cable to their connectors on the computer, replace all screws and ensure that the main battery is...

Setup Guide
Page 5
Contents Setting Up Your Inspiron Laptop 5 Before Setting Up Your Computer 5 Connect the AC Adapter 6 Connect the Network Cable (Optional 7 Press the Power Button 8 Set Up the Operating System 9 Install the SIM Card (Optional 10 Enable or Disable Wireless (...Tuner (Optional 17 Using Your Inspiron Laptop 18 Right Side Features 18 Left Side Features 20 Back Side Features 22 Computer Base Features 24 Touch Pad Gestures 27 Display Features 28 Removing and Replacing the Battery 30 Software Features 32 Dell DataSafe Online Backup 35 Dell Dock 36 Solving Problems 37 Beep...
Contents Setting Up Your Inspiron Laptop 5 Before Setting Up Your Computer 5 Connect the AC Adapter 6 Connect the Network Cable (Optional 7 Press the Power Button 8 Set Up the Operating System 9 Install the SIM Card (Optional 10 Enable or Disable Wireless (...Tuner (Optional 17 Using Your Inspiron Laptop 18 Right Side Features 18 Left Side Features 20 Back Side Features 22 Computer Base Features 24 Touch Pad Gestures 27 Display Features 28 Removing and Replacing the Battery 30 Software Features 32 Dell DataSafe Online Backup 35 Dell Dock 36 Solving Problems 37 Beep...

Setup Guide
Page 8
Using an incompatible cable or improperly connecting the cable to a power strip or electrical outlet may cause fire or permanent damage to the computer and then plug it into an electrical outlet or surge protector. However, power connectors and power strips vary among countries. WARNING: The AC adapter works with electrical outlets worldwide. Setting Up Your Inspiron Laptop Connect the AC Adapter Connect the AC adapter to your computer. 6
Using an incompatible cable or improperly connecting the cable to a power strip or electrical outlet may cause fire or permanent damage to the computer and then plug it into an electrical outlet or surge protector. However, power connectors and power strips vary among countries. WARNING: The AC adapter works with electrical outlets worldwide. Setting Up Your Inspiron Laptop Connect the AC Adapter Connect the AC adapter to your computer. 6

Setup Guide
Page 25
Connects to an AC adapter to the computer. NOTE: Before you buy an security cable, ensure that it works with the security cable slot on your computer. 2 AC adapter connector - Using Your Inspiron Laptop 1 Security cable slot - Attaches a commercially available security cable to power the computer and charge the battery. 23
Connects to an AC adapter to the computer. NOTE: Before you buy an security cable, ensure that it works with the security cable slot on your computer. 2 AC adapter connector - Using Your Inspiron Laptop 1 Security cable slot - Attaches a commercially available security cable to power the computer and charge the battery. 23

Setup Guide
Page 27
The light indicates the following states when the computer is powered using either the AC adapter or the battery. Indicator light status Computer state(s) Battery charge level AC adapter Solid white On Off/hibernate Charging 90% Battery Solid white On >10% Breathing white Standby >=10% Solid amber On/standby Using Your Inspiron Laptop 1 Power button - Turns the computer on or off when pressed. 2 Power/Battery indicator light -
The light indicates the following states when the computer is powered using either the AC adapter or the battery. Indicator light status Computer state(s) Battery charge level AC adapter Solid white On Off/hibernate Charging 90% Battery Solid white On >10% Breathing white Standby >=10% Solid amber On/standby Using Your Inspiron Laptop 1 Power button - Turns the computer on or off when pressed. 2 Power/Battery indicator light -

Setup Guide
Page 32
...Dell. Do not use a battery purchased from other computers. To replace the battery: Align the tabs on the battery with the slots in this section, follow the safety instructions that shipped with your computer. WARNING: Before removing the battery, shut down the computer, and remove external cables (including the AC adapter...). Rotate and lift the battery out of fire or explosion. Slide the battery release latches to unlock position. 2. To remove the battery: 1. WARNING: Using an incompatible battery may increase the risk of the battery bay. Using Your Inspiron ...
...Dell. Do not use a battery purchased from other computers. To replace the battery: Align the tabs on the battery with the slots in this section, follow the safety instructions that shipped with your computer. WARNING: Before removing the battery, shut down the computer, and remove external cables (including the AC adapter...). Rotate and lift the battery out of fire or explosion. Slide the battery release latches to unlock position. 2. To remove the battery: 1. WARNING: Using an incompatible battery may increase the risk of the battery bay. Using Your Inspiron ...
Setup Guide
Page 41
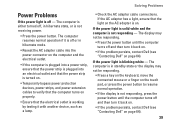
... the computer turns off or in hibernate state, or is off and then turn it back on. • If the problem persists, contact Dell (see "Contacting Dell" on the AC adapter is working by testing it is not receiving power. • Press the power button. The display may not be responding. • Press the...
... the computer turns off or in hibernate state, or is off and then turn it back on. • If the problem persists, contact Dell (see "Contacting Dell" on the AC adapter is working by testing it is not receiving power. • Press the power button. The display may not be responding. • Press the...

Setup Guide
Page 72
...) 70 Battery Charge time when the computer is powered off (approximate): Operating time Coin-cell battery 4.0 hours (3/6-cell) varies depending on operating conditions CR-2032 AC Adapter Input voltage Input current Input frequency Output power Output current Rated output voltage 100-240 VAC 0.8 A or 1.0 A 50-60 Hz 30 W 1.58 A 19.0 VDC
...) 70 Battery Charge time when the computer is powered off (approximate): Operating time Coin-cell battery 4.0 hours (3/6-cell) varies depending on operating conditions CR-2032 AC Adapter Input voltage Input current Input frequency Output power Output current Rated output voltage 100-240 VAC 0.8 A or 1.0 A 50-60 Hz 30 W 1.58 A 19.0 VDC

Setup Guide
Page 73
AC Adapter Temperature range: Operating 0° to 40°C (32° to 104°F) Storage -40° to 70°C (-40° to 158°F) Physical Height ...
AC Adapter Temperature range: Operating 0° to 40°C (32° to 104°F) Storage -40° to 70°C (-40° to 158°F) Physical Height ...


