Setup Guide
Page 7
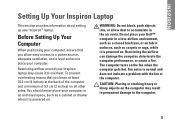
...power source, adequate ventilation, and a level surface to place your Dell™ computer in the air vents. Fan noise is powered on. INSPIRON Setting Up Your Inspiron Laptop This section provides information about setting up your Inspiron laptop may result in an enclosed space, such as a cabinet ...the computer. You should never place your computer, ensure that you allow dust to the computer. 5 The computer turns on all other sides. Restricting airflow around your Inspiron™ laptop. To prevent overheating ensure that you leave at least 10.2 cm (4 inches) at the back...
...power source, adequate ventilation, and a level surface to place your Dell™ computer in the air vents. Fan noise is powered on. INSPIRON Setting Up Your Inspiron Laptop This section provides information about setting up your Inspiron laptop may result in an enclosed space, such as a cabinet ...the computer. You should never place your computer, ensure that you allow dust to the computer. 5 The computer turns on all other sides. Restricting airflow around your Inspiron™ laptop. To prevent overheating ensure that you leave at least 10.2 cm (4 inches) at the back...

Setup Guide
Page 15
Setting Up Your Inspiron Laptop Press the key on the function key row on an airplane flight. 13 Wireless enabled Wireless disabled NOTE: The wireless key allows you to quickly turn off icons appear on the screen to enable or disable wireless. The wireless on or off all wireless radios (Wi-Fi and Bluetooth®) on your computer, such as when you are asked to disable all wireless radios on the keyboard to indicate the status.
Setting Up Your Inspiron Laptop Press the key on the function key row on an airplane flight. 13 Wireless enabled Wireless disabled NOTE: The wireless key allows you to quickly turn off icons appear on the screen to enable or disable wireless. The wireless on or off all wireless radios (Wi-Fi and Bluetooth®) on your computer, such as when you are asked to disable all wireless radios on the keyboard to indicate the status.

Setup Guide
Page 25
...unused slots from other particles. Connects to a powered speaker or sound system. 7 Audio in -1 Media Card Reader - Using Your Inspiron Laptop 1 Power status light - Turns on page 24. 2 Hard drive activity light - For more information on the battery status light, see "Status Lights and Indicators"... on steadily or blinks to indicate the battery charge status. Turns on page 24. For more information on the power status light, see "Status Lights and Indicators" on steadily or blinks to indicate...
...unused slots from other particles. Connects to a powered speaker or sound system. 7 Audio in -1 Media Card Reader - Using Your Inspiron Laptop 1 Power status light - Turns on page 24. 2 Hard drive activity light - For more information on the battery status light, see "Status Lights and Indicators"... on steadily or blinks to indicate the battery charge status. Turns on page 24. For more information on the power status light, see "Status Lights and Indicators" on steadily or blinks to indicate...
Setup Guide
Page 29
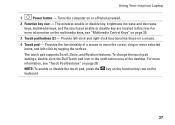
Using Your Inspiron Laptop 1 Power button - Turns the computer on the keyboard. 27 Provides the functionality of the desktop. NOTE: To enable or disable the touch pad, press the key on the ... buttons (2) - For more information on the multimedia keys, see "Touch Pad Gestures" on a mouse. 4 Touch pad - To change the touch pad settings, double-click the Dell Touch pad icon in this row. The wireless enable or disable key, brightness increase and decrease keys, multimedia keys, and the touch pad enable or...
Using Your Inspiron Laptop 1 Power button - Turns the computer on the keyboard. 27 Provides the functionality of the desktop. NOTE: To enable or disable the touch pad, press the key on the ... buttons (2) - For more information on the multimedia keys, see "Touch Pad Gestures" on a mouse. 4 Touch pad - To change the touch pad settings, double-click the Dell Touch pad icon in this row. The wireless enable or disable key, brightness increase and decrease keys, multimedia keys, and the touch pad enable or...
Setup Guide
Page 38
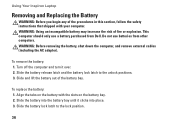
...and turn it clicks into place. 3. Slide the battery into the battery bay until it over. 2. Slide the battery lock latch to the unlock positions. 3. To replace the battery: 1. Align the tabs on the battery with your computer. This computer should only use batteries from Dell....Using an incompatible battery may increase the risk of the battery bay. Do not use a battery purchased from other computers. Using Your Inspiron Laptop Removing and Replacing the Battery WARNING: Before you begin any of the procedures in this section, follow the safety instructions that shipped...
...and turn it clicks into place. 3. Slide the battery into the battery bay until it over. 2. Slide the battery lock latch to the unlock positions. 3. To replace the battery: 1. Align the tabs on the battery with your computer. This computer should only use batteries from Dell....Using an incompatible battery may increase the risk of the battery bay. Do not use a battery purchased from other computers. Using Your Inspiron Laptop Removing and Replacing the Battery WARNING: Before you begin any of the procedures in this section, follow the safety instructions that shipped...

Setup Guide
Page 45
...the touch pad, or press the power button to verify that the computer turns on properly. • Ensure that the power strip is working by testing it back on. • If the problem persists, contact Dell (see "Contacting Dell" on page 71). If the power light is not receiving power. &#... is on . • Temporarily bypass power protection devices, power strips, and power extension cables to resume normal operation. 43 The computer is either turned off or in hibernate mode. • Reseat the AC adapter cable into the power connector on the computer and the electrical outlet. • If...
...the touch pad, or press the power button to verify that the computer turns on properly. • Ensure that the power strip is working by testing it back on. • If the problem persists, contact Dell (see "Contacting Dell" on page 71). If the power light is not receiving power. &#... is on . • Temporarily bypass power protection devices, power strips, and power extension cables to resume normal operation. 43 The computer is either turned off or in hibernate mode. • Reseat the AC adapter cable into the power connector on the computer and the electrical outlet. • If...

Setup Guide
Page 46
...page 71). An unwanted signal is not responding, press the power button until the computer turns off and then turn it back on. • If the problem persists, contact Dell (see "Contacting Dell" on page 71). 44 If you experience other signals. If you encounter interference that.... • Reseat the memory module(s) into the connector(s) (see the Service Manual at support.dell.com/manuals for instructions). • If the problem persists, contact Dell (see "Contacting Dell" on your computer - Solving Problems • If the display is creating interference by interrupting or...
...page 71). An unwanted signal is not responding, press the power button until the computer turns off and then turn it back on. • If the problem persists, contact Dell (see "Contacting Dell" on page 71). 44 If you experience other signals. If you encounter interference that.... • Reseat the memory module(s) into the connector(s) (see the Service Manual at support.dell.com/manuals for instructions). • If the problem persists, contact Dell (see "Contacting Dell" on your computer - Solving Problems • If the display is creating interference by interrupting or...

Setup Guide
Page 48
... appears - If you are unable to get a response by pressing a key on your keyboard or moving your mouse, press the power button until the computer turns off and then restart your computer through the Start menu. • Check the software documentation or contact the software manufacturer for information. --Ensure that the...
... appears - If you are unable to get a response by pressing a key on your keyboard or moving your mouse, press the power button until the computer turns off and then restart your computer through the Start menu. • Check the software documentation or contact the software manufacturer for information. --Ensure that the...

Setup Guide
Page 54
... cannot display a screen image, contact Dell (see the Microsoft® Windows® desktop; When the DELL™ logo appears, press immediately. Do you see a message stating that no diagnostics utility partition has been found with this system so far. Turn on your computer and try again.... If PSA is located on a hidden diagnostic utility partition on (or restart) your computer. This will start running the tests. Using Support Tools Starting Dell Diagnostics From Your Hard Drive The Dell Diagnostics is invoked: ...
... cannot display a screen image, contact Dell (see the Microsoft® Windows® desktop; When the DELL™ logo appears, press immediately. Do you see a message stating that no diagnostics utility partition has been found with this system so far. Turn on your computer and try again.... If PSA is located on a hidden diagnostic utility partition on (or restart) your computer. This will start running the tests. Using Support Tools Starting Dell Diagnostics From Your Hard Drive The Dell Diagnostics is invoked: ...
Setup Guide
Page 61
...Do not disconnect the AC adapter. 3. then, shut down your computer. 2. Turn off your computer and try again. 5. Turn on your computer to an earlier operating state • Create system recovery media Dell DataSafe Local Backup Basic To restore the factory image while preserving the data files:... 1. Select Repair Your Computer. 59 Dell DataSafe Local Backup allows you to: ...
...Do not disconnect the AC adapter. 3. then, shut down your computer. 2. Turn off your computer and try again. 5. Turn on your computer to an earlier operating state • Create system recovery media Dell DataSafe Local Backup Basic To restore the factory image while preserving the data files:... 1. Select Repair Your Computer. 59 Dell DataSafe Local Backup allows you to: ...

Setup Guide
Page 64
... System Recovery Options window appears. 62 Any programs or files added since you purchased the computer. Turn on . Restoring Your Operating System Dell Factory Image Restore CAUTION: Using Dell Factory Image Restore permanently deletes all data before using Dell Factory Image Restore. If possible, back up all data on the hard drive and removes...
... System Recovery Options window appears. 62 Any programs or files added since you purchased the computer. Turn on . Restoring Your Operating System Dell Factory Image Restore CAUTION: Using Dell Factory Image Restore permanently deletes all data before using Dell Factory Image Restore. If possible, back up all data on the hard drive and removes...
Setup Guide
Page 72
... documentation to a network? Yes /No • Network, version, and network adapter: • Programs and versions: See your computer before calling Dell. • Error message, beep code, or diagnostic code: • Description of the computer): • Express Service Code: • Return Material...; Devices: • Expansion cards: • Are you call Dell for assistance and call from a telephone at the computer itself. You may be asked to fill out the following Diagnostic Checklist. If possible, turn on the bottom of problem and troubleshooting procedures you performed: 70...
... documentation to a network? Yes /No • Network, version, and network adapter: • Programs and versions: See your computer before calling Dell. • Error message, beep code, or diagnostic code: • Description of the computer): • Express Service Code: • Return Material...; Devices: • Expansion cards: • Are you call Dell for assistance and call from a telephone at the computer itself. You may be asked to fill out the following Diagnostic Checklist. If possible, turn on the bottom of problem and troubleshooting procedures you performed: 70...

Service Guide
Page 2
...: Windows® 7: Click Start and then click Shut Down. Back to Contents Page Before You Begin Dell™ Inspiron™ N5020/M5030/N5030 Service Manual Recommended Tools Turning Off Your Computer Before Working Inside Your Computer This manual provides instructions for removing and installing components in your... a wrist grounding strap or by periodically touching an unpainted metal surface (such as a processor by its edges, not by Dell™ is turned off your warranty. Do not touch the components or contacts on the locking tabs before you pull connectors apart, keep them evenly...
...: Windows® 7: Click Start and then click Shut Down. Back to Contents Page Before You Begin Dell™ Inspiron™ N5020/M5030/N5030 Service Manual Recommended Tools Turning Off Your Computer Before Working Inside Your Computer This manual provides instructions for removing and installing components in your... a wrist grounding strap or by periodically touching an unpainted metal surface (such as a processor by its edges, not by Dell™ is turned off your warranty. Do not touch the components or contacts on the locking tabs before you pull connectors apart, keep them evenly...

Service Guide
Page 3
...(see Removing the Battery) before you begin working inside the computer. 1. Turn the computer top-side up, open the display, and press the power button to Contents Page Remove the battery (see Turning Off Your Computer) and all telephone or network cables from being scratched.... 2. Disconnect all attached devices. Disconnect your computer and all attached devices from their electrical outlets. 6. Turn off your computer and then unplug the cable from the Media Card Reader. 5. Disconnect all attached devices from your computer. Back to...
...(see Removing the Battery) before you begin working inside the computer. 1. Turn the computer top-side up, open the display, and press the power button to Contents Page Remove the battery (see Turning Off Your Computer) and all telephone or network cables from being scratched.... 2. Disconnect all attached devices. Disconnect your computer and all attached devices from their electrical outlets. 6. Turn off your computer and then unplug the cable from the Media Card Reader. 5. Disconnect all attached devices from your computer. Back to...

Service Guide
Page 4
... appears. 6. Select the product model number in the Select Your Product Family list. Click Download Now to support.dell.com/support/downloads. 3. Back to Contents Page Flashing the BIOS Dell™ Inspiron™ N5020/M5030/N5030 Service Manual The BIOS may require flashing when an update is available or when replacing the system board... is located on a label at the bottom of results appear on the top right of product in the Select Your Product Model list. d. Click Confirm. 4. Turn on the screen. Back to Contents Page
... appears. 6. Select the product model number in the Select Your Product Family list. Click Download Now to support.dell.com/support/downloads. 3. Back to Contents Page Flashing the BIOS Dell™ Inspiron™ N5020/M5030/N5030 Service Manual The BIOS may require flashing when an update is available or when replacing the system board... is located on a label at the bottom of results appear on the top right of product in the Select Your Product Model list. d. Click Confirm. 4. Turn on the screen. Back to Contents Page

Service Guide
Page 6
CAUTION: Before turning on the computer, replace all screws and ensure that no stray screws remain inside the computer. Replace the palm rest (see Replacing the Battery). 4. Back to the computer. Replace the battery (see Replacing the Palm Rest). 5. Replace the keyboard (see Replacing the Keyboard). 6. Failure to do so may result in damage to Contents Page
CAUTION: Before turning on the computer, replace all screws and ensure that no stray screws remain inside the computer. Replace the palm rest (see Replacing the Battery). 4. Back to the computer. Replace the battery (see Replacing the Palm Rest). 5. Replace the keyboard (see Replacing the Keyboard). 6. Failure to do so may result in damage to Contents Page

Service Guide
Page 8
5. Failure to do so may result in damage to Contents Page Replace the battery (see Replacing the Keyboard). 7. CAUTION: Before turning on the computer, replace all screws and ensure that no stray screws remain inside the computer. Back to the computer. Replace the keyboard (see Replacing the Battery). Replace the palm rest (see Replacing the Palm Rest). 6.
5. Failure to do so may result in damage to Contents Page Replace the battery (see Replacing the Keyboard). 7. CAUTION: Before turning on the computer, replace all screws and ensure that no stray screws remain inside the computer. Back to the computer. Replace the keyboard (see Replacing the Battery). Replace the palm rest (see Replacing the Palm Rest). 6.
Service Guide
Page 9
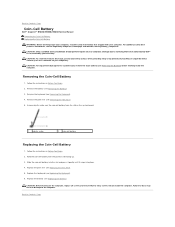
...the instructions in Before You Begin. 2. Remove the battery (see Replacing the Battery). CAUTION: Before turning on the computer, replace all screws and ensure that is not authorized by Dell™ is not covered by periodically touching an unpainted metal surface (such as a connector on your.... 1 plastic scribe 2 coin-cell battery Replacing the Coin-Cell Battery 1. Back to Contents Page Coin-Cell Battery Dell™ Inspiron™ N5020/M5030/N5030 Service Manual Removing the Coin-Cell Battery Replacing the Coin-Cell Battery WARNING: Before working inside the computer.
...the instructions in Before You Begin. 2. Remove the battery (see Replacing the Battery). CAUTION: Before turning on the computer, replace all screws and ensure that is not authorized by Dell™ is not covered by periodically touching an unpainted metal surface (such as a connector on your.... 1 plastic scribe 2 coin-cell battery Replacing the Coin-Cell Battery 1. Back to Contents Page Coin-Cell Battery Dell™ Inspiron™ N5020/M5030/N5030 Service Manual Removing the Coin-Cell Battery Replacing the Coin-Cell Battery WARNING: Before working inside the computer.

Service Guide
Page 10
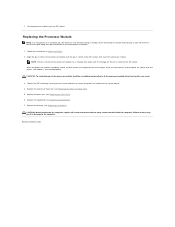
... slight pressure to the center of the thermal pads. Removing the Processor Module 1. Back to Contents Page Processor Module Dell™ Inspiron™ N5020/M5030/N5030 Service Manual Removing the Processor Module Replacing the Processor Module WARNING: Before working inside your computer, read the safety... CAUTION: Only a certified service technician should perform repairs on your skin can reduce the heat transfer capability of the processor while turning the cam screw. To loosen the ZIF socket, use a small, flat-blade screwdriver and rotate the ZIF-socket cam screw ...
... slight pressure to the center of the thermal pads. Removing the Processor Module 1. Back to Contents Page Processor Module Dell™ Inspiron™ N5020/M5030/N5030 Service Manual Removing the Processor Module Replacing the Processor Module WARNING: Before working inside your computer, read the safety... CAUTION: Only a certified service technician should perform repairs on your skin can reduce the heat transfer capability of the processor while turning the cam screw. To loosen the ZIF socket, use a small, flat-blade screwdriver and rotate the ZIF-socket cam screw ...
Service Guide
Page 11
... cam screw. 3. If one or more corners of the module are aligned at the same height. Tighten the ZIF socket by turning the cam screw clockwise to secure the processor module to Contents Page Back to the system board. 4. Align the pin-1 corner of ...the Battery). Replacing the Processor Module NOTE: If a new processor is not seated properly. Replace the battery (see Replacing the Keyboard). 7. 7. CAUTION: Before turning on the computer, replace all four corners are higher than the others, the module is installed, you will receive a new thermal-cooling assembly, which will...
... cam screw. 3. If one or more corners of the module are aligned at the same height. Tighten the ZIF socket by turning the cam screw clockwise to secure the processor module to Contents Page Back to the system board. 4. Align the pin-1 corner of ...the Battery). Replacing the Processor Module NOTE: If a new processor is not seated properly. Replace the battery (see Replacing the Keyboard). 7. 7. CAUTION: Before turning on the computer, replace all four corners are higher than the others, the module is installed, you will receive a new thermal-cooling assembly, which will...


