Setup Guide
Page 61
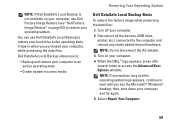
...operating system logo appears, continue to the computer and remove any newly added internal hardware. Restoring Your Operating System NOTE: If Dell DataSafe Local Backup is not available on your computer, use Dell DataSafe Local Backup to restore your hard drive to the operating state it was in when you to...: • Backup and restore your computer, while preserving the data files. When the DELL™ logo appears, press several times to ...
...operating system logo appears, continue to the computer and remove any newly added internal hardware. Restoring Your Operating System NOTE: If Dell DataSafe Local Backup is not available on your computer, use Dell DataSafe Local Backup to restore your hard drive to the operating state it was in when you to...: • Backup and restore your computer, while preserving the data files. When the DELL™ logo appears, press several times to ...

Setup Guide
Page 64
...files-are permanently deleted from the hard drive. Performing Dell Factory Image Restore 1. NOTE: If Dell Factory Image Restore is not available on your computer, use Dell DataSafe Local Backup (see the Microsoft® Windows® desktop; When the DELL™ logo appears, press ... certain computers. Restoring Your Operating System Dell Factory Image Restore CAUTION: Using Dell Factory Image Restore permanently deletes all data before using Dell Factory Image Restore. If possible, back up all data on the hard drive and removes any programs or drivers installed after you...
...files-are permanently deleted from the hard drive. Performing Dell Factory Image Restore 1. NOTE: If Dell Factory Image Restore is not available on your computer, use Dell DataSafe Local Backup (see the Microsoft® Windows® desktop; When the DELL™ logo appears, press ... certain computers. Restoring Your Operating System Dell Factory Image Restore CAUTION: Using Dell Factory Image Restore permanently deletes all data before using Dell Factory Image Restore. If possible, back up all data on the hard drive and removes any programs or drivers installed after you...
Setup Guide
Page 70
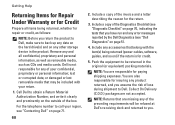
... or for Credit Prepare all confidential, proprietary and personal information, as well as removable media, such as follows: NOTE: Before you return the product to Dell, make sure to back up any data on the hard drive(s) and on any other storage device in the original (or equivalent) packing materials.... Include a copy of the box. For the telephone number to call your region, see "Diagnostic Checklist" on page 70, indicating the tests that may be refused at Dell's receiving dock...
... or for Credit Prepare all confidential, proprietary and personal information, as well as removable media, such as follows: NOTE: Before you return the product to Dell, make sure to back up any data on the hard drive(s) and on any other storage device in the original (or equivalent) packing materials.... Include a copy of the box. For the telephone number to call your region, see "Diagnostic Checklist" on page 70, indicating the tests that may be refused at Dell's receiving dock...
Service Guide
Page 19
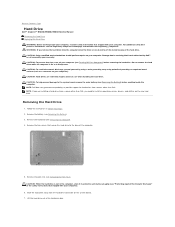
... using a wrist grounding strap or by your computer. Slide the hard drive away from a source other than Dell, you remove the hard drive from sources other than Dell. Remove the palm rest (see Removing the Battery). 3. Back to Contents Page Hard Drive Dell™ Inspiron™ N5020/M5030/N5030 Service Manual Removing the Hard Drive Replacing the Hard Drive WARNING: Before working inside your computer, read the safety information...
... using a wrist grounding strap or by your computer. Slide the hard drive away from a source other than Dell, you remove the hard drive from sources other than Dell. Remove the palm rest (see Removing the Battery). 3. Back to Contents Page Hard Drive Dell™ Inspiron™ N5020/M5030/N5030 Service Manual Removing the Hard Drive Replacing the Hard Drive WARNING: Before working inside your computer, read the safety information...
Service Guide
Page 20
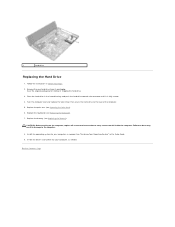
... the drivers and utilities for your computer, as needed . Failure to the computer. 8. Place the hard drive in damage to do so may result in the hard-drive bay and push the hard drive towards the connector until it is fully seated. 4. Replace the palm rest (see Replacing the Keyboard)....the two screws that no stray screws remain inside the computer. Replace the keyboard (see Replacing the Palm Rest). 6. Remove the new hard drive from its packaging. drive to Contents Page Back to the base of the computer. 5. CAUTION: Before turning on the computer, replace all screws...
... the drivers and utilities for your computer, as needed . Failure to the computer. 8. Place the hard drive in damage to do so may result in the hard-drive bay and push the hard drive towards the connector until it is fully seated. 4. Replace the palm rest (see Replacing the Keyboard)....the two screws that no stray screws remain inside the computer. Replace the keyboard (see Replacing the Palm Rest). 6. Remove the new hard drive from its packaging. drive to Contents Page Back to the base of the computer. 5. CAUTION: Before turning on the computer, replace all screws...
Service Guide
Page 39
... (see Removing the Hard Drive). 7. Remove the processor heat sink (see Removing the Processor Module). 12. Follow the instructions in the BIOS WARNING: Before working inside your computer, read the safety information that is not authorized by Dell™ is not covered by periodically touching an unpainted metal surface (such as a connector on your computer. Remove the...
... (see Removing the Hard Drive). 7. Remove the processor heat sink (see Removing the Processor Module). 12. Follow the instructions in the BIOS WARNING: Before working inside your computer, read the safety information that is not authorized by Dell™ is not covered by periodically touching an unpainted metal surface (such as a connector on your computer. Remove the...

Service Guide
Page 40
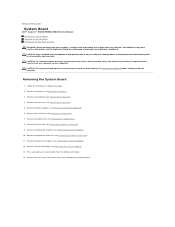
...system board 15. Replace the processor heat sink (see Replacing the Keyboard). 15. Follow the instructions in damage to the computer. 16. Replace the hard drive (see Entering the Service Tag in the BIOS of the replacement system board. 17. Failure to the computer base. 4. Turn on the computer ...to do so may result in Before You Begin. 2. Replace the battery (see Replacing the Coin-Cell Battery). 6. NOTE: After you removed from the Media Card Reader. 5. Replace the coin-cell battery (see Replacing the Battery). Replacing the System Board 1. Replace the Bluetooth...
...system board 15. Replace the processor heat sink (see Replacing the Keyboard). 15. Follow the instructions in damage to the computer. 16. Replace the hard drive (see Entering the Service Tag in the BIOS of the replacement system board. 17. Failure to the computer base. 4. Turn on the computer ...to do so may result in Before You Begin. 2. Replace the battery (see Replacing the Coin-Cell Battery). 6. NOTE: After you removed from the Media Card Reader. 5. Replace the coin-cell battery (see Replacing the Battery). Replacing the System Board 1. Replace the Bluetooth...


