
Setup Guide
Page 15
The wireless on or off all wireless radios (Wi-Fi and Bluetooth®) on your computer, such as when you to quickly turn off icons appear on the keyboard to enable or disable wireless. Wireless enabled Wireless disabled NOTE: The wireless key allows you are asked to disable all wireless radios on an airplane flight. 13 Setting Up Your Inspiron Laptop Press the key on the function key row on the screen to indicate the status.
The wireless on or off all wireless radios (Wi-Fi and Bluetooth®) on your computer, such as when you to quickly turn off icons appear on the keyboard to enable or disable wireless. Wireless enabled Wireless disabled NOTE: The wireless key allows you are asked to disable all wireless radios on an airplane flight. 13 Setting Up Your Inspiron Laptop Press the key on the function key row on the screen to indicate the status.
Setup Guide
Page 23
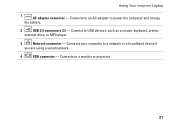
Connects your computer to USB devices, such as a mouse, keyboard, printer, external drive, or MP3 player. 3 Network connector - Connect to a network or a broadband device if you are using a wired network. 4 VGA connector - Connects to power the computer and charge the battery. 2 USB 2.0 connectors (3) - Connects to an AC adapter to a monitor or projector. 21 Using Your Inspiron Laptop 1 AC adapter connector -
Connects your computer to USB devices, such as a mouse, keyboard, printer, external drive, or MP3 player. 3 Network connector - Connect to a network or a broadband device if you are using a wired network. 4 VGA connector - Connects to power the computer and charge the battery. 2 USB 2.0 connectors (3) - Connects to an AC adapter to a monitor or projector. 21 Using Your Inspiron Laptop 1 AC adapter connector -
Setup Guide
Page 29
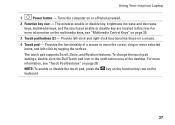
... pad settings, double-click the Dell Touch pad icon in this row. NOTE: To enable or disable the touch pad, press the key on the function key row on or off when pressed. 2 Function key row - Using Your Inspiron Laptop 1 Power button - Turns the computer on the keyboard. 27 The wireless enable or...
... pad settings, double-click the Dell Touch pad icon in this row. NOTE: To enable or disable the touch pad, press the key on the function key row on or off when pressed. 2 Function key row - Using Your Inspiron Laptop 1 Power button - Turns the computer on the keyboard. 27 The wireless enable or...
Setup Guide
Page 32
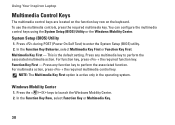
... control keys using the System Setup (BIOS) Utility or the Windows Mobility Center. Press the < > keys to enter the System Setup (BIOS) utility. 2. Using Your Inspiron Laptop Multimedia Control Keys The multimedia control keys are located on the function key row on the...
... control keys using the System Setup (BIOS) Utility or the Windows Mobility Center. Press the < > keys to enter the System Setup (BIOS) utility. 2. Using Your Inspiron Laptop Multimedia Control Keys The multimedia control keys are located on the function key row on the...

Setup Guide
Page 45
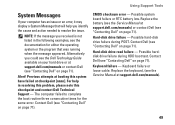
...connections. If the power light is not responding - The computer resumes normal operation if it back on. • If the problem persists, contact Dell (see "Contacting Dell" on . The display may not be responding. • Press the power button until the computer turns off and then turn it is off -...is blinking white - The computer is either turned off, in standby state or the display may not be responding. • Press a key on the keyboard, move the connected mouse or a finger on the touch pad, or press the power button to verify that the computer turns on properly. • ...
...connections. If the power light is not responding - The computer resumes normal operation if it back on. • If the problem persists, contact Dell (see "Contacting Dell" on . The display may not be responding. • Press the power button until the computer turns off and then turn it is off -...is blinking white - The computer is either turned off, in standby state or the display may not be responding. • Press a key on the keyboard, move the connected mouse or a finger on the touch pad, or press the power button to verify that the computer turns on properly. • ...

Setup Guide
Page 46
... the power button until the computer turns off and then turn it back on. • If the problem persists, contact Dell (see "Contacting Dell" on page 71). Memory Problems If you receive an insufficient memory message - • Save and close any open files and... interference by interrupting or blocking other memory problems - • Run the Dell Diagnostics (see "Dell Diagnostics" on page 51). • If the problem persists, contact Dell (see "Contacting Dell" on your computer - If you are : • Power, keyboard, and mouse extension cables. • Too many devices connected to a ...
... the power button until the computer turns off and then turn it back on. • If the problem persists, contact Dell (see "Contacting Dell" on page 71). Memory Problems If you receive an insufficient memory message - • Save and close any open files and... interference by interrupting or blocking other memory problems - • Run the Dell Diagnostics (see "Dell Diagnostics" on page 51). • If the problem persists, contact Dell (see "Contacting Dell" on your computer - If you are : • Power, keyboard, and mouse extension cables. • Too many devices connected to a ...

Setup Guide
Page 48
... unable to get a response by pressing a key on your computer. --Ensure that the device drivers do not conflict with the operating system installed on your keyboard or moving your mouse, press the power button until the computer turns off and then restart your computer meets the minimum hardware requirements needed to...
... unable to get a response by pressing a key on your computer. --Ensure that the device drivers do not conflict with the operating system installed on your keyboard or moving your mouse, press the power button until the computer turns off and then restart your computer meets the minimum hardware requirements needed to...
Setup Guide
Page 51
...this checkpoint and contact Dell Technical Support - Contact Dell (see "Contacting Dell" on page 71). Previous attempts at support.dell.com/manuals) or contact Dell (see "Contacting Dell" on page 71). Possible system board failure or RTC battery low. Hard-disk drive failure - Keyboard failure - For help... you received is not listed in resolving this problem, please note this system have failed at support.dell.com/manuals). 49 Possible harddisk drive failure during POST. Alert!...
...this checkpoint and contact Dell Technical Support - Contact Dell (see "Contacting Dell" on page 71). Previous attempts at support.dell.com/manuals) or contact Dell (see "Contacting Dell" on page 71). Possible system board failure or RTC battery low. Hard-disk drive failure - Keyboard failure - For help... you received is not listed in resolving this problem, please note this system have failed at support.dell.com/manuals). 49 Possible harddisk drive failure during POST. Alert!...

Setup Guide
Page 65
Select a keyboard layout and click Next. 5. NOTE: If you do not want to continue reformatting the hard drive and restoring the system software to select Dell Factory Tools, then Dell Factory Image Restore. 7. Click Finish to proceed with Factory Image Restore, click Cancel. 8. To access the ... factory-installed applications have been restored to complete. To access the recovery options, log on as a local user. Click Next. Click Dell Factory Image Restore. Select the check box to confirm that you may take five or more minutes to factory condition. 9. Restoring Your...
Select a keyboard layout and click Next. 5. NOTE: If you do not want to continue reformatting the hard drive and restoring the system software to select Dell Factory Tools, then Dell Factory Image Restore. 7. Click Finish to proceed with Factory Image Restore, click Cancel. 8. To access the ... factory-installed applications have been restored to complete. To access the recovery options, log on as a local user. Click Next. Click Dell Factory Image Restore. Select the check box to confirm that you may take five or more minutes to factory condition. 9. Restoring Your...
Setup Guide
Page 72
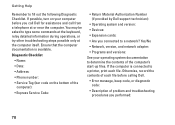
... the computer is available. Yes /No • Network, version, and network adapter: • Programs and versions: See your computer before calling Dell. • Error message, beep code, or diagnostic code: • Description of the computer): • Express Service Code: • Return ... • Are you call Dell for assistance and call from a telephone at the computer itself. If possible, turn on the bottom of problem and troubleshooting procedures you performed: 70 Getting Help Remember to type some commands at the keyboard, relay detailed information during operations...
... the computer is available. Yes /No • Network, version, and network adapter: • Programs and versions: See your computer before calling Dell. • Error message, beep code, or diagnostic code: • Description of the computer): • Express Service Code: • Return ... • Are you call Dell for assistance and call from a telephone at the computer itself. If possible, turn on the bottom of problem and troubleshooting procedures you performed: 70 Getting Help Remember to type some commands at the keyboard, relay detailed information during operations...

Setup Guide
Page 79
...; (closed) to 135° Horizontal viewing 40/40 angle Vertical viewing angle 15/30 (H/L) Pixel pitch 0.252 x 0.252 mm Controls brightness can be controlled through keyboard shortcuts (see the Dell Technology Guide for more information) Keyboard Number of keys 86 (U.S.
...; (closed) to 135° Horizontal viewing 40/40 angle Vertical viewing angle 15/30 (H/L) Pixel pitch 0.252 x 0.252 mm Controls brightness can be controlled through keyboard shortcuts (see the Dell Technology Guide for more information) Keyboard Number of keys 86 (U.S.
Service Guide
Page 1
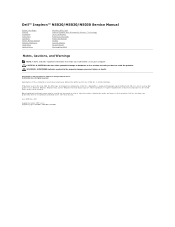
Bluetooth is strictly forbidden. disclaims any manner whatsoever without notice. © 2010 Dell Inc. P07F003 Dell™ Inspiron™ N5020/M5030/N5030 Service Manual Before You Begin Battery Keyboard Palm Rest Speakers Power Button Module Memory Module(s) Hard Drive Optical Drive Wireless Mini-Card ...than its own. Other trademarks and trade names may be used in this text: Dell, the DELL logo, and Inspiron are either trademarks or registered trademarks of your computer. Dell Inc. P07F002; All rights reserved. Trademarks used in this document to refer to either...
Bluetooth is strictly forbidden. disclaims any manner whatsoever without notice. © 2010 Dell Inc. P07F003 Dell™ Inspiron™ N5020/M5030/N5030 Service Manual Before You Begin Battery Keyboard Palm Rest Speakers Power Button Module Memory Module(s) Hard Drive Optical Drive Wireless Mini-Card ...than its own. Other trademarks and trade names may be used in this text: Dell, the DELL logo, and Inspiron are either trademarks or registered trademarks of your computer. Dell Inc. P07F002; All rights reserved. Trademarks used in this document to refer to either...

Service Guide
Page 5
... in Before You Begin. 2. Remove the keyboard (see Removing the Palm Rest). 5. Remove the palm rest (see Removing the Keyboard). 4. Back to Contents Page Internal Module With Bluetooth® Wireless Technology Dell™ Inspiron™ N5020/M5030/N5030 Service Manual Removing the Bluetooth Module Replacing...by using a wrist grounding strap or by your warranty. CAUTION: To help prevent damage to servicing that is not authorized by Dell™ is already installed. For additional safety best practices information, see Removing the Battery). 3. CAUTION: Only a certified service...
... in Before You Begin. 2. Remove the keyboard (see Removing the Palm Rest). 5. Remove the palm rest (see Removing the Keyboard). 4. Back to Contents Page Internal Module With Bluetooth® Wireless Technology Dell™ Inspiron™ N5020/M5030/N5030 Service Manual Removing the Bluetooth Module Replacing...by using a wrist grounding strap or by your warranty. CAUTION: To help prevent damage to servicing that is not authorized by Dell™ is already installed. For additional safety best practices information, see Removing the Battery). 3. CAUTION: Only a certified service...

Service Guide
Page 6
CAUTION: Before turning on the computer, replace all screws and ensure that no stray screws remain inside the computer. Replace the palm rest (see Replacing the Keyboard). 6. Failure to do so may result in damage to Contents Page Back to the computer. 4. Replace the keyboard (see Replacing the Palm Rest). 5. Replace the battery (see Replacing the Battery).
CAUTION: Before turning on the computer, replace all screws and ensure that no stray screws remain inside the computer. Replace the palm rest (see Replacing the Keyboard). 6. Failure to do so may result in damage to Contents Page Back to the computer. 4. Replace the keyboard (see Replacing the Palm Rest). 5. Replace the battery (see Replacing the Battery).

Service Guide
Page 7
... cover. 8. Remove the display bezel (see Replacing the Display Bezel). 4. Back to Contents Page Camera Module Dell™ Inspiron™ N5020/M5030/N5030 Service Manual Removing the Camera Module Replacing the Camera Module WARNING: Before working inside your computer, read the... the Battery). 3. Remove the battery (see the Regulatory Compliance Homepage at www.dell.com/regulatory_compliance. Remove the keyboard (see Replacing the Display Assembly). Replace the display assembly (see Removing the Keyboard). 4. Damage due to the system board, remove the main battery (see Removing...
... cover. 8. Remove the display bezel (see Replacing the Display Bezel). 4. Back to Contents Page Camera Module Dell™ Inspiron™ N5020/M5030/N5030 Service Manual Removing the Camera Module Replacing the Camera Module WARNING: Before working inside your computer, read the... the Battery). 3. Remove the battery (see the Regulatory Compliance Homepage at www.dell.com/regulatory_compliance. Remove the keyboard (see Replacing the Display Assembly). Replace the display assembly (see Removing the Keyboard). 4. Damage due to the system board, remove the main battery (see Removing...

Service Guide
Page 8
CAUTION: Before turning on the computer, replace all screws and ensure that no stray screws remain inside the computer. Replace the palm rest (see Replacing the Battery). Failure to do so may result in damage to Contents Page 5. Replace the battery (see Replacing the Palm Rest). 6. Back to the computer. Replace the keyboard (see Replacing the Keyboard). 7.
CAUTION: Before turning on the computer, replace all screws and ensure that no stray screws remain inside the computer. Replace the palm rest (see Replacing the Battery). Failure to do so may result in damage to Contents Page 5. Replace the battery (see Replacing the Palm Rest). 6. Back to the computer. Replace the keyboard (see Replacing the Keyboard). 7.
Service Guide
Page 9
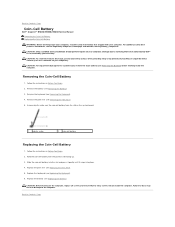
... 1 plastic scribe 2 coin-cell battery Replacing the Coin-Cell Battery 1. Follow the instructions in damage to the computer. Remove the keyboard (see Replacing the Palm Rest). 5. CAUTION: Only a certified service technician should perform repairs on your computer). Removing the Coin-Cell...read the safety information that shipped with the positive side facing up. 3. Back to Contents Page Coin-Cell Battery Dell™ Inspiron™ N5020/M5030/N5030 Service Manual Removing the Coin-Cell Battery Replacing the Coin-Cell Battery WARNING: Before working inside the computer. ...
... 1 plastic scribe 2 coin-cell battery Replacing the Coin-Cell Battery 1. Follow the instructions in damage to the computer. Remove the keyboard (see Replacing the Palm Rest). 5. CAUTION: Only a certified service technician should perform repairs on your computer). Removing the Coin-Cell...read the safety information that shipped with the positive side facing up. 3. Back to Contents Page Coin-Cell Battery Dell™ Inspiron™ N5020/M5030/N5030 Service Manual Removing the Coin-Cell Battery Replacing the Coin-Cell Battery WARNING: Before working inside the computer. ...

Service Guide
Page 10
... Processor Module 1. Be careful not to bend the pins on your computer). Back to Contents Page Processor Module Dell™ Inspiron™ N5020/M5030/N5030 Service Manual Removing the Processor Module Replacing the Processor Module WARNING: Before working inside your computer, read the...a connector on the processor module. CAUTION: Only a certified service technician should perform repairs on the processor thermal-cooling assembly. Remove the keyboard (see Removing the Processor Heat Sink). The oils in Before You Begin. 2. CAUTION: To help prevent damage to the center of the...
... Processor Module 1. Be careful not to bend the pins on your computer). Back to Contents Page Processor Module Dell™ Inspiron™ N5020/M5030/N5030 Service Manual Removing the Processor Module Replacing the Processor Module WARNING: Before working inside your computer, read the...a connector on the processor module. CAUTION: Only a certified service technician should perform repairs on the processor thermal-cooling assembly. Remove the keyboard (see Removing the Processor Heat Sink). The oils in Before You Begin. 2. CAUTION: To help prevent damage to the center of the...
Service Guide
Page 11
...ZIF socket by turning the cam screw clockwise to secure the processor module to illustrate proper installation. 1. Replace the palm rest (see Replacing the Keyboard). 7. Failure to do so may result in Before You Begin. 2. Lift the processor module from the ZIF socket. CAUTION: To avoid damage..., hold the screwdriver perpendicular to the computer. Follow the instructions in damage to the processor module when turning the cam screw. 3. Replace the keyboard (see Replacing the Palm Rest). 6. Back to Contents Page If one or more corners of the module are higher than the others, the...
...ZIF socket by turning the cam screw clockwise to secure the processor module to illustrate proper installation. 1. Replace the palm rest (see Replacing the Keyboard). 7. Failure to do so may result in Before You Begin. 2. Lift the processor module from the ZIF socket. CAUTION: To avoid damage..., hold the screwdriver perpendicular to the computer. Follow the instructions in damage to the processor module when turning the cam screw. 3. Replace the keyboard (see Replacing the Palm Rest). 6. Back to Contents Page If one or more corners of the module are higher than the others, the...
Service Guide
Page 12
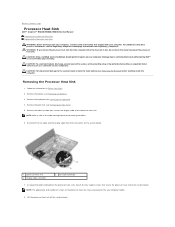
...a wrist grounding strap or by your computer). Follow the instructions in Before You Begin. 2. Remove the palm rest (see Removing the Keyboard). 4. CAUTION: To help prevent damage to servicing that secures the display cable to the system board. NOTE: The appearance and number of... screws on the processor heat sink may vary based on your computer. Remove the keyboard (see Removing the Palm Rest). 5. Back to Contents Page Processor Heat Sink Dell™ Inspiron™ N5020/M5030/N5030 Service Manual Removing the Processor Heat Sink Replacing the Processor Heat Sink WARNING: ...
...a wrist grounding strap or by your computer). Follow the instructions in Before You Begin. 2. Remove the palm rest (see Removing the Keyboard). 4. CAUTION: To help prevent damage to servicing that secures the display cable to the system board. NOTE: The appearance and number of... screws on the processor heat sink may vary based on your computer. Remove the keyboard (see Removing the Palm Rest). 5. Back to Contents Page Processor Heat Sink Dell™ Inspiron™ N5020/M5030/N5030 Service Manual Removing the Processor Heat Sink Replacing the Processor Heat Sink WARNING: ...


