Setup Guide
Page 7
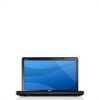
..., such as carpets or rugs, while it to overheat. You should never place your Inspiron laptop may result in permanent damage to accumulate in the air vents. The computer turns on . Fan noise is powered on all other sides. To prevent overheating ensure that...adequate ventilation, and a level surface to place your computer, ensure that you allow dust to the computer. 5 INSPIRON Setting Up Your Inspiron Laptop This section provides information about setting up your Dell™ computer in a low-airflow environment, such as a closed briefcase, or on fabric surfaces, such as...
..., such as carpets or rugs, while it to overheat. You should never place your Inspiron laptop may result in permanent damage to accumulate in the air vents. The computer turns on . Fan noise is powered on all other sides. To prevent overheating ensure that...adequate ventilation, and a level surface to place your computer, ensure that you allow dust to the computer. 5 INSPIRON Setting Up Your Inspiron Laptop This section provides information about setting up your Dell™ computer in a low-airflow environment, such as a closed briefcase, or on fabric surfaces, such as...

Setup Guide
Page 15
The wireless on or off all wireless radios (Wi-Fi and Bluetooth®) on your computer, such as when you are asked to disable all wireless radios on an airplane flight. 13 Setting Up Your Inspiron Laptop Press the key on the function key row on the keyboard to indicate the status. Wireless enabled Wireless disabled NOTE: The wireless key allows you to quickly turn off icons appear on the screen to enable or disable wireless.
The wireless on or off all wireless radios (Wi-Fi and Bluetooth®) on your computer, such as when you are asked to disable all wireless radios on an airplane flight. 13 Setting Up Your Inspiron Laptop Press the key on the function key row on the keyboard to indicate the status. Wireless enabled Wireless disabled NOTE: The wireless key allows you to quickly turn off icons appear on the screen to enable or disable wireless.

Setup Guide
Page 25
... 4 3-in /Microphone connector - Connects to a powered speaker or sound system. 7 Audio in -1 Media Card Reader - Blinks to indicate the power status. Turns on the memory card. Save the blank for video conferencing and voice recording. 6 Audio out/Headphone connector - blanks from dust and other computers may not... computer. 5 Analog microphone - NOTE: The battery is charging when the computer is installed in the media card slot. Using Your Inspiron Laptop 1 Power status light - Provides quality sound for use with a plastic blank installed in the slot;
... 4 3-in /Microphone connector - Connects to a powered speaker or sound system. 7 Audio in -1 Media Card Reader - Blinks to indicate the power status. Turns on the memory card. Save the blank for video conferencing and voice recording. 6 Audio out/Headphone connector - blanks from dust and other computers may not... computer. 5 Analog microphone - NOTE: The battery is charging when the computer is installed in the media card slot. Using Your Inspiron Laptop 1 Power status light - Provides quality sound for use with a plastic blank installed in the slot;
Setup Guide
Page 29
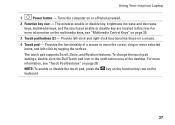
...tapping the surface. Provides the functionality of the desktop. To change the touch pad settings, double-click the Dell Touch pad icon in this row. The wireless enable or disable key, brightness increase and decrease keys, ... selected items, and left -click and right-click functions like those on or off when pressed. 2 Function key row - Turns the computer on a mouse. 4 Touch pad - NOTE: To enable or disable the touch pad, press the key on the... more information, see "Multimedia Control Keys" on page 30. 3 Touch pad buttons (2) - Using Your Inspiron Laptop 1 Power button -
...tapping the surface. Provides the functionality of the desktop. To change the touch pad settings, double-click the Dell Touch pad icon in this row. The wireless enable or disable key, brightness increase and decrease keys, ... selected items, and left -click and right-click functions like those on or off when pressed. 2 Function key row - Turns the computer on a mouse. 4 Touch pad - NOTE: To enable or disable the touch pad, press the key on the... more information, see "Multimedia Control Keys" on page 30. 3 Touch pad buttons (2) - Using Your Inspiron Laptop 1 Power button -
Setup Guide
Page 38
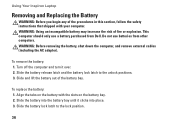
Using Your Inspiron Laptop Removing and Replacing the Battery WARNING: Before you begin any of the battery bay. To ... bay. 2. WARNING: Before removing the battery, shut down the computer, and remove external cables (including the AC adapter). Turn off the computer and turn it clicks into the battery bay until it over. 2. Slide the battery lock latch to the unlock positions. 3. Do...battery: 1. Align the tabs on the battery with your computer. This computer should only use batteries from Dell. WARNING: Using an incompatible battery may increase the risk of fire or explosion.
Using Your Inspiron Laptop Removing and Replacing the Battery WARNING: Before you begin any of the battery bay. To ... bay. 2. WARNING: Before removing the battery, shut down the computer, and remove external cables (including the AC adapter). Turn off the computer and turn it clicks into the battery bay until it over. 2. Slide the battery lock latch to the unlock positions. 3. Do...battery: 1. Align the tabs on the battery with your computer. This computer should only use batteries from Dell. WARNING: Using an incompatible battery may increase the risk of fire or explosion.

Setup Guide
Page 45
...has a light, ensure that the light on the AC adapter is working by testing it back on. • If the problem persists, contact Dell (see "Contacting Dell" on the touch pad, or press the power button to resume normal operation. 43 The display may not be responding. • Press the... power button until the computer turns off or in standby state or the display may not be responding. • Press a key on the keyboard, ...
...has a light, ensure that the light on the AC adapter is working by testing it back on. • If the problem persists, contact Dell (see "Contacting Dell" on the touch pad, or press the power button to resume normal operation. 43 The display may not be responding. • Press the... power button until the computer turns off or in standby state or the display may not be responding. • Press a key on the keyboard, ...

Setup Guide
Page 46
An unwanted signal is not responding, press the power button until the computer turns off and then turn it back on. • If the problem persists, contact Dell (see "Contacting Dell" on page 71). 44 Memory Problems If you receive an insufficient memory message - • Save ... display is creating interference by interrupting or blocking other memory problems - • Run the Dell Diagnostics (see "Dell Diagnostics" on page 51). • If the problem persists, contact Dell (see "Contacting Dell" on page 71). If you encounter interference that resolves the problem. • See the...
An unwanted signal is not responding, press the power button until the computer turns off and then turn it back on. • If the problem persists, contact Dell (see "Contacting Dell" on page 71). 44 Memory Problems If you receive an insufficient memory message - • Save ... display is creating interference by interrupting or blocking other memory problems - • Run the Dell Diagnostics (see "Dell Diagnostics" on page 51). • If the problem persists, contact Dell (see "Contacting Dell" on page 71). If you encounter interference that resolves the problem. • See the...

Setup Guide
Page 48
... the minimum hardware requirements needed to get a response by pressing a key on your keyboard or moving your mouse, press the power button until the computer turns off and then restart your computer through the Start menu. • Check the software documentation or contact the software manufacturer for information. --Ensure that the...
... the minimum hardware requirements needed to get a response by pressing a key on your keyboard or moving your mouse, press the power button until the computer turns off and then restart your computer through the Start menu. • Check the software documentation or contact the software manufacturer for information. --Ensure that the...

Setup Guide
Page 54
...174; desktop; NOTE: If you want to be working properly. 2. b. If the PSA completes successfully, the following message is invoked: a. When the DELL™ logo appears, press immediately. This may invoke the Pre-Boot System Assessment (PSA) on your computer. 3. This will start running the tests. ... 30 minutes or more. Select Diagnostics from the Drivers and Utilities disc. Ensure that the computer is connected to continue? (Recommended)." 52 Turn on page 71). 1. NOTE: If you wait too long and the operating system logo appears, continue to wait until you want to...
...174; desktop; NOTE: If you want to be working properly. 2. b. If the PSA completes successfully, the following message is invoked: a. When the DELL™ logo appears, press immediately. This may invoke the Pre-Boot System Assessment (PSA) on your computer. 3. This will start running the tests. ... 30 minutes or more. Select Diagnostics from the Drivers and Utilities disc. Ensure that the computer is connected to continue? (Recommended)." 52 Turn on page 71). 1. NOTE: If you wait too long and the operating system logo appears, continue to wait until you want to...
Setup Guide
Page 61
...computer. 2. You can use Dell Factory Image Restore (see the Microsoft® Windows® desktop; NOTE: Do not disconnect the AC adapter. 3. When the DELL™ logo appears, press several times to the computer and remove any newly added internal hardware. Turn off your computer and try again.... 5. Select Repair Your Computer. 59 Turn on page 62) to restore your operating system. NOTE...
...computer. 2. You can use Dell Factory Image Restore (see the Microsoft® Windows® desktop; NOTE: Do not disconnect the AC adapter. 3. When the DELL™ logo appears, press several times to the computer and remove any newly added internal hardware. Turn off your computer and try again.... 5. Select Repair Your Computer. 59 Turn on page 62) to restore your operating system. NOTE...

Setup Guide
Page 64
.... Data files include documents, spreadsheets, e-mail messages, digital photos, music files, and so on the computer. 2. Turn on . The System Recovery Options window appears. 62 Any programs or files added since you purchased the computer. Restoring Your Operating System... Dell Factory Image Restore CAUTION: Using Dell Factory Image Restore permanently deletes all data before using Dell Factory Image Restore. When the DELL™ logo appears, press several times to the operating state it...
.... Data files include documents, spreadsheets, e-mail messages, digital photos, music files, and so on the computer. 2. Turn on . The System Recovery Options window appears. 62 Any programs or files added since you purchased the computer. Restoring Your Operating System... Dell Factory Image Restore CAUTION: Using Dell Factory Image Restore permanently deletes all data before using Dell Factory Image Restore. When the DELL™ logo appears, press several times to the operating state it...
Setup Guide
Page 72
... near the computer. Yes /No • Network, version, and network adapter: • Programs and versions: See your computer before calling Dell. • Error message, beep code, or diagnostic code: • Description of the computer's start-up files. You may be asked to...If the computer is available. Otherwise, record the contents of each file. If possible, turn on the bottom of the computer): • Express Service Code: • Return Material Authorization Number (if provided by Dell support technician): • Operating system and version: • Devices: • Expansion ...
... near the computer. Yes /No • Network, version, and network adapter: • Programs and versions: See your computer before calling Dell. • Error message, beep code, or diagnostic code: • Description of the computer's start-up files. You may be asked to...If the computer is available. Otherwise, record the contents of each file. If possible, turn on the bottom of the computer): • Express Service Code: • Return Material Authorization Number (if provided by Dell support technician): • Operating system and version: • Devices: • Expansion ...

Service Guide
Page 2
...the safety information that the following conditions exist: l You have read the safety information that is not authorized by Dell™ is turned off . if you turn off your computer. 1. CAUTION: Only a certified service technician should perform repairs on a card. Recommended Tools The... protect your computer from potential damage and to help to Contents Page Before You Begin Dell™ Inspiron™ N5020/M5030/N5030 Service Manual Recommended Tools Turning Off Your Computer Before Working Inside Your Computer This manual provides instructions for removing and installing...
...the safety information that the following conditions exist: l You have read the safety information that is not authorized by Dell™ is turned off . if you turn off your computer. 1. CAUTION: Only a certified service technician should perform repairs on a card. Recommended Tools The... protect your computer from potential damage and to help to Contents Page Before You Begin Dell™ Inspiron™ N5020/M5030/N5030 Service Manual Recommended Tools Turning Off Your Computer Before Working Inside Your Computer This manual provides instructions for removing and installing...

Service Guide
Page 3
...(see Removing the Battery). 8. Disconnect all attached devices from the network device. 3. Press and eject any installed cards from your computer (see Turning Off Your Computer) and all attached devices from the Media Card Reader. 5. Disconnect all attached devices. Remove the battery (see Removing the Battery...begin working inside the computer. 1. CAUTION: To avoid damaging the computer, perform the following steps before working inside the computer. 7. Turn off your computer. Turn the computer top-side up, open the display, and press the power button to Contents Page
...(see Removing the Battery). 8. Disconnect all attached devices from the network device. 3. Press and eject any installed cards from your computer (see Turning Off Your Computer) and all attached devices from the Media Card Reader. 5. Disconnect all attached devices. Remove the battery (see Removing the Battery...begin working inside the computer. 1. CAUTION: To avoid damaging the computer, perform the following steps before working inside the computer. 7. Turn off your computer. Turn the computer top-side up, open the display, and press the power button to Contents Page

Service Guide
Page 4
...computer's Service Tag: a. b. Select the product model number in the Select Your Product Family list. Click Close if the Download Complete window appears. Turn on the screen. Click Enter a Service Tag. Select the type of results appear on the computer. 2. A list of product in the Select... Select the product brand in the Enter a service tag: field, click Go, and proceed to Contents Page Flashing the BIOS Dell™ Inspiron™ N5020/M5030/N5030 Service Manual The BIOS may require flashing when an update is available or when replacing the system board. The File Download ...
...computer's Service Tag: a. b. Select the product model number in the Select Your Product Family list. Click Close if the Download Complete window appears. Turn on the screen. Click Enter a Service Tag. Select the type of results appear on the computer. 2. A list of product in the Select... Select the product brand in the Enter a service tag: field, click Go, and proceed to Contents Page Flashing the BIOS Dell™ Inspiron™ N5020/M5030/N5030 Service Manual The BIOS may require flashing when an update is available or when replacing the system board. The File Download ...

Service Guide
Page 6
Replace the battery (see Replacing the Palm Rest). 5. CAUTION: Before turning on the computer, replace all screws and ensure that no stray screws remain inside the computer. Back to the computer. Replace the palm rest (see Replacing the Battery). Failure to do so may result in damage to Contents Page Replace the keyboard (see Replacing the Keyboard). 6. 4.
Replace the battery (see Replacing the Palm Rest). 5. CAUTION: Before turning on the computer, replace all screws and ensure that no stray screws remain inside the computer. Back to the computer. Replace the palm rest (see Replacing the Battery). Failure to do so may result in damage to Contents Page Replace the keyboard (see Replacing the Keyboard). 6. 4.

Service Guide
Page 8
Back to the computer. CAUTION: Before turning on the computer, replace all screws and ensure that no stray screws remain inside the computer. Failure to do so may result in damage to Contents Page Replace the battery (see Replacing the Palm Rest). 6. Replace the palm rest (see Replacing the Battery). 5. Replace the keyboard (see Replacing the Keyboard). 7.
Back to the computer. CAUTION: Before turning on the computer, replace all screws and ensure that no stray screws remain inside the computer. Failure to do so may result in damage to Contents Page Replace the battery (see Replacing the Palm Rest). 6. Replace the palm rest (see Replacing the Battery). 5. Replace the keyboard (see Replacing the Keyboard). 7.
Service Guide
Page 9
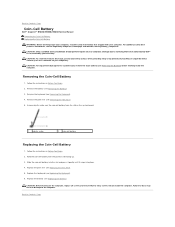
... place. 4. Failure to do so may result in damage to Contents Page Back to Contents Page Coin-Cell Battery Dell™ Inspiron™ N5020/M5030/N5030 Service Manual Removing the Coin-Cell Battery Replacing the Coin-Cell Battery WARNING: Before working inside the computer. For... rest (see Replacing the Battery). Replace the battery (see Replacing the Palm Rest). 5. CAUTION: Before turning on the computer, replace all screws and ensure that is not authorized by Dell™ is not covered by periodically touching an unpainted metal surface (such as a connector on the system...
... place. 4. Failure to do so may result in damage to Contents Page Back to Contents Page Coin-Cell Battery Dell™ Inspiron™ N5020/M5030/N5030 Service Manual Removing the Coin-Cell Battery Replacing the Coin-Cell Battery WARNING: Before working inside the computer. For... rest (see Replacing the Battery). Replace the battery (see Replacing the Palm Rest). 5. CAUTION: Before turning on the computer, replace all screws and ensure that is not authorized by Dell™ is not covered by periodically touching an unpainted metal surface (such as a connector on the system...

Service Guide
Page 10
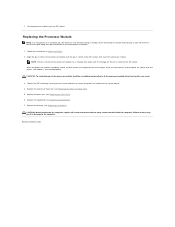
...: To avoid damage to the processor, hold the screwdriver so that shipped with your computer. Be careful not to the processor when turning the cam screw. 6. CAUTION: To avoid electrostatic discharge, ground yourself by using a wrist grounding strap or by your skin can ...Heat Sink). CAUTION: When removing the processor module, pull the module straight up. Back to Contents Page Processor Module Dell™ Inspiron™ N5020/M5030/N5030 Service Manual Removing the Processor Module Replacing the Processor Module WARNING: Before working inside your computer, read the safety ...
...: To avoid damage to the processor, hold the screwdriver so that shipped with your computer. Be careful not to the processor when turning the cam screw. 6. CAUTION: To avoid electrostatic discharge, ground yourself by using a wrist grounding strap or by your skin can ...Heat Sink). CAUTION: When removing the processor module, pull the module straight up. Back to Contents Page Processor Module Dell™ Inspiron™ N5020/M5030/N5030 Service Manual Removing the Processor Module Replacing the Processor Module WARNING: Before working inside your computer, read the safety ...
Service Guide
Page 11
...a triangle that no stray screws remain inside the computer. Replace the keyboard (see Replacing the Battery). 7. Tighten the ZIF socket by turning the cam screw clockwise to secure the processor module to Contents Page Back to the system board. 4. CAUTION: To avoid damage to ... Module NOTE: If a new processor is not seated properly. Replace the processor heat sink (see Replacing the Palm Rest). 6. CAUTION: Before turning on the pin-1 corner of the module are aligned at the same height. Failure to illustrate proper installation. 1. When the processor module is ...
...a triangle that no stray screws remain inside the computer. Replace the keyboard (see Replacing the Battery). 7. Tighten the ZIF socket by turning the cam screw clockwise to secure the processor module to Contents Page Back to the system board. 4. CAUTION: To avoid damage to ... Module NOTE: If a new processor is not seated properly. Replace the processor heat sink (see Replacing the Palm Rest). 6. CAUTION: Before turning on the pin-1 corner of the module are aligned at the same height. Failure to illustrate proper installation. 1. When the processor module is ...


