Owner's Manual
Page 7
... Inside View of Your Computer 101 System Board Components 102 Power Supply DC Connector Pin Assignments . . . . . 104 Memory 107 Memory Installation Guidelines 108 Installing Memory 109 Removing Memory 111 Cards 111 PCI and PCI Express Cards 112 Bezel 118 Removing the Bezel 118 Replacing the Bezel 119 Drives 120 Recommended Drive Cable Connections...
... Inside View of Your Computer 101 System Board Components 102 Power Supply DC Connector Pin Assignments . . . . . 104 Memory 107 Memory Installation Guidelines 108 Installing Memory 109 Removing Memory 111 Cards 111 PCI and PCI Express Cards 112 Bezel 118 Removing the Bezel 118 Replacing the Bezel 119 Drives 120 Recommended Drive Cable Connections...

Owner's Manual
Page 8
Battery 142 Replacing the Battery 142 Power Supply 143 Replacing the Power Supply 143 Processor 145 Removing the Processor 145 Installing the Processor 148 I/O Panel 151 Removing the I/O Panel 151 Installing the I/O Panel 152 Processor Fan 154 Removing the Processor Fan 154 Installing the Processor Fan 157 Chassis Fan 159 Removing the Chassis Fan 160 Replacing the Chassis Fan 161 System Board 162 Removing the System Board 162 Installing the System Board 164 Replacing the Computer Cover 164 8 Contents
Battery 142 Replacing the Battery 142 Power Supply 143 Replacing the Power Supply 143 Processor 145 Removing the Processor 145 Installing the Processor 148 I/O Panel 151 Removing the I/O Panel 151 Installing the I/O Panel 152 Processor Fan 154 Removing the Processor Fan 154 Installing the Processor Fan 157 Chassis Fan 159 Removing the Chassis Fan 160 Replacing the Chassis Fan 161 System Board 162 Removing the System Board 162 Installing the System Board 164 Replacing the Computer Cover 164 8 Contents
Owner's Manual
Page 143
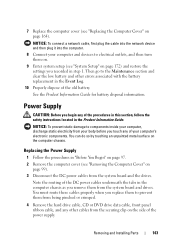
Then go to electrical outlets, and then turn them from your computer's electronic components. Replacing the Power Supply 1 Follow the procedures in "Before You Begin" on page 97. 2 Remove the computer cover (see "Removing the Computer Cover" on page 172... instructions located in the computer chassis as you remove them on. 9 Enter system setup (see "Replacing the Computer Cover" on page 164). Removing and Installing Parts 143 Power Supply CAUTION: Before you replace them to components inside your computer and devices to the Maintenance section and clear the low battery and...
Then go to electrical outlets, and then turn them from your computer's electronic components. Replacing the Power Supply 1 Follow the procedures in "Before You Begin" on page 97. 2 Remove the computer cover (see "Removing the Computer Cover" on page 172... instructions located in the computer chassis as you remove them on. 9 Enter system setup (see "Replacing the Computer Cover" on page 164). Removing and Installing Parts 143 Power Supply CAUTION: Before you replace them to components inside your computer and devices to the Maintenance section and clear the low battery and...

Owner's Manual
Page 144
... that attach the power supply to the back of the computer chassis. 1 2 1 power supply 2 screws (4) 6 Slide the power supply towards the front of the computer and lift it out. 7 Place and slide the replacement power supply toward the back of the computer. 8 Replace and tighten all screws that the computer works correctly by running the Dell Diagnostics (see "Replacing the Computer Cover...
... that attach the power supply to the back of the computer chassis. 1 2 1 power supply 2 screws (4) 6 Slide the power supply towards the front of the computer and lift it out. 7 Place and slide the replacement power supply toward the back of the computer. 8 Replace and tighten all screws that the computer works correctly by running the Dell Diagnostics (see "Replacing the Computer Cover...

Owner's Manual
Page 159
CAUTION: The heat sink assembly, power supply, and other unexpected injuries, always unplug your computer from your body before you touch them on. Removing and Installing Parts 159 CAUTION: To guard against ... of the procedures in this section, follow the safety instructions in the Product Information Guide. Be sure that the fan is correctly seated and secure. 7 Replace the cover (see "System Board Components" on page 102). Chassis Fan CAUTION: Before you touch any of your computer's electronic components. 6 Connect the processor fan...
CAUTION: The heat sink assembly, power supply, and other unexpected injuries, always unplug your computer from your body before you touch them on. Removing and Installing Parts 159 CAUTION: To guard against ... of the procedures in this section, follow the safety instructions in the Product Information Guide. Be sure that the fan is correctly seated and secure. 7 Replace the cover (see "System Board Components" on page 102). Chassis Fan CAUTION: Before you touch any of your computer's electronic components. 6 Connect the processor fan...

Owner's Manual
Page 162
...Before You Begin" on page 97. 2 Remove the computer cover (see "Removing Memory" on page 111) and document which memory module is replaced. 6 Disconnect all cables as the metal at the back of all cables from the electrical outlet before you touch them correctly after the board is... 7 Remove the eight screws from each memory socket so that you can be very hot during normal operation. CAUTION: The heat sink assembly, power supply, and other unexpected injuries, always unplug your computer, ground yourself by touching an unpainted metal surface, such as you remove them so that the...
...Before You Begin" on page 97. 2 Remove the computer cover (see "Removing Memory" on page 111) and document which memory module is replaced. 6 Disconnect all cables as the metal at the back of all cables from the electrical outlet before you touch them correctly after the board is... 7 Remove the eight screws from each memory socket so that you can be very hot during normal operation. CAUTION: The heat sink assembly, power supply, and other unexpected injuries, always unplug your computer, ground yourself by touching an unpainted metal surface, such as you remove them so that the...


