
Owner's Manual
Page 3
Contents 1 Finding Information 11 2 Setting Up and Using Your Computer . . . 15 Front View of the Computer 15 Back View of the Computer 17 Back Panel Connectors 18 Installing Your Computer in an Enclosure 20 Setting Up a Printer 22 Printer Cable 22 Connecting a USB Printer 22 Playing CDs and DVDs 24 Adjusting the Volume 25 Adjusting the Picture 26 Copying CDs and DVDs 27 How to Copy a CD or DVD 27 Using Blank CDs and DVDs 28 Helpful Tips 29 Using a Media Card Reader (Optional 30 Connecting Two Monitors 31 Connecting Two Monitors With VGA Connectors 31 Contents 3
Contents 1 Finding Information 11 2 Setting Up and Using Your Computer . . . 15 Front View of the Computer 15 Back View of the Computer 17 Back Panel Connectors 18 Installing Your Computer in an Enclosure 20 Setting Up a Printer 22 Printer Cable 22 Connecting a USB Printer 22 Playing CDs and DVDs 24 Adjusting the Volume 25 Adjusting the Picture 26 Copying CDs and DVDs 27 How to Copy a CD or DVD 27 Using Blank CDs and DVDs 28 Helpful Tips 29 Using a Media Card Reader (Optional 30 Connecting Two Monitors 31 Connecting Two Monitors With VGA Connectors 31 Contents 3

Owner's Manual
Page 4
... With a VGA Connector and One Monitor With a DVI Connector 32 Connecting a TV 32 Changing the Display Settings 33 Power Management 33 Power Management Options in Microsoft® Windows® XP 33 Standby Mode 33 Hibernate Mode ... 42 Using the Nvidia MediaShield ROM Utility . . . . . 43 Using Nvidia MediaShield 44 Transferring Information to a New Computer 44 Setting Up a Home and Office Network 47 Connecting to a Network Adapter 47 Network Setup Wizard 47 Connecting to the Internet 48 Setting Up Your Internet...
... With a VGA Connector and One Monitor With a DVI Connector 32 Connecting a TV 32 Changing the Display Settings 33 Power Management 33 Power Management Options in Microsoft® Windows® XP 33 Standby Mode 33 Hibernate Mode ... 42 Using the Nvidia MediaShield ROM Utility . . . . . 43 Using Nvidia MediaShield 44 Transferring Information to a New Computer 44 Setting Up a Home and Office Network 47 Connecting to a Network Adapter 47 Network Setup Wizard 47 Connecting to the Internet 48 Setting Up Your Internet...
Owner's Manual
Page 7
... PCI and PCI Express Cards 112 Bezel 118 Removing the Bezel 118 Replacing the Bezel 119 Drives 120 Recommended Drive Cable Connections . . . . . 121 Connecting Drive Cables 121 Drive Interface Connectors 121 Connecting and Disconnecting Drive Cables . . . 122 Hard Drives 122 Installing a Second Hard Drive 125 Floppy Drive 127 Media Card Reader 133 CD...
... PCI and PCI Express Cards 112 Bezel 118 Removing the Bezel 118 Replacing the Bezel 119 Drives 120 Recommended Drive Cable Connections . . . . . 121 Connecting Drive Cables 121 Drive Interface Connectors 121 Connecting and Disconnecting Drive Cables . . . 122 Hard Drives 122 Installing a Second Hard Drive 125 Floppy Drive 127 Media Card Reader 133 CD...

Owner's Manual
Page 16
... drive or optional Media Card Reader. NOTICE: To avoid losing data, do not use the back USB connectors for devices that typically remain connected, such as printers and keyboards. 9 IEEE 1394 connector (optional) Attach high-speed serial multimedia devices, such as digital video cameras. 10.... The light in the center of speakers. 11 microphone connector Use the microphone connector to attach a personal computer microphone for devices that you connect occasionally, such as a CD player is on using the Media Card Reader, see "System Setup Options" on the computer. 5 optional CD...
... drive or optional Media Card Reader. NOTICE: To avoid losing data, do not use the back USB connectors for devices that typically remain connected, such as printers and keyboards. 9 IEEE 1394 connector (optional) Attach high-speed serial multimedia devices, such as digital video cameras. 10.... The light in the center of speakers. 11 microphone connector Use the microphone connector to attach a personal computer microphone for devices that you connect occasionally, such as a CD player is on using the Media Card Reader, see "System Setup Options" on the computer. 5 optional CD...

Owner's Manual
Page 18
... Green - Back Panel Connectors 1 2 34 5 6 7 11 10 9 8 1 network activity light Flashes a yellow light when the computer is not detecting a physical connection to the network. 18 Setting Up and Using Your Computer A click indicates that you must use Category 5 wiring and connectors for your network. A high volume... to be in a steady "on the back panel of a network cable to a network or broadband device, connect one end of your network or broadband device. Connect the other end of the network cable to the network adapter connector on " state. 2 network adapter connector To...
... Green - Back Panel Connectors 1 2 34 5 6 7 11 10 9 8 1 network activity light Flashes a yellow light when the computer is not detecting a physical connection to the network. 18 Setting Up and Using Your Computer A click indicates that you must use Category 5 wiring and connectors for your network. A high volume... to be in a steady "on the back panel of a network cable to a network or broadband device, connect one end of your network or broadband device. Connect the other end of the network cable to the network adapter connector on " state. 2 network adapter connector To...

Owner's Manual
Page 19
... speakers. On computers with a video card, use the front USB connectors for computers with a sound card, the microphone connector is recommended that you connect occasionally, such as a cassette player, CD player, or VCR. Setting Up and Using Your Computer 19 It is on the card. 8 side... L/R surround Use the gray connector to attach a record/playback device such as joysticks or cameras. 11 VGA video connector Connect the monitor's VGA cable to a Low connector Frequency Effects (LFE) audio channel. 4 center/subwoofer Use the orange connector to attach a speaker...
... speakers. On computers with a video card, use the front USB connectors for computers with a sound card, the microphone connector is recommended that you connect occasionally, such as a cassette player, CD player, or VCR. Setting Up and Using Your Computer 19 It is on the card. 8 side... L/R surround Use the gray connector to attach a record/playback device such as joysticks or cameras. 11 VGA video connector Connect the monitor's VGA cable to a Low connector Frequency Effects (LFE) audio channel. 4 center/subwoofer Use the orange connector to attach a speaker...

Owner's Manual
Page 22
...technical assistance, refer to your computer with the printer for setup information, including how to: • Obtain and install updated drivers. • Connect the printer to the USB connectors on . 1 Complete the operating system setup if you have not already done so. 2 Attach the USB ... install the toner or ink cartridge. See the documentation that it is turned on the computer and the printer. Printer Cable Your printer connects to the printer owner's manual or contact the printer manufacturer. Setting Up a Printer NOTICE: Complete the operating system setup before you purchased...
...technical assistance, refer to your computer with the printer for setup information, including how to: • Obtain and install updated drivers. • Connect the printer to the USB connectors on . 1 Complete the operating system setup if you have not already done so. 2 Attach the USB ... install the toner or ink cartridge. See the documentation that it is turned on the computer and the printer. Printer Cable Your printer connects to the printer owner's manual or contact the printer manufacturer. Setting Up a Printer NOTICE: Complete the operating system setup before you purchased...
Owner's Manual
Page 31
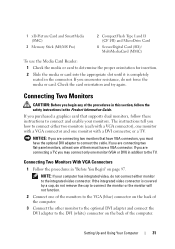
...If the integrated video connector is completely seated in the Product Information Guide. If you purchased a graphics card that have VGA connectors, you may connect only one monitor (VGA or DVI) in "Before You Begin" on the back of the computer. 1 xD-Picture Card and SmartMedia (SMC)...SecureDigital Card (SD)/ MultiMediaCard (MMC) To use the Media Card Reader: 1 Check the media or card to connect and enable your computer has integrated video, do not connect either monitor to connect either two monitors (each with a VGA connector), one monitor with a VGA connector and one monitor with a ...
...If the integrated video connector is completely seated in the Product Information Guide. If you purchased a graphics card that have VGA connectors, you may connect only one monitor (VGA or DVI) in "Before You Begin" on the back of the computer. 1 xD-Picture Card and SmartMedia (SMC)...SecureDigital Card (SD)/ MultiMediaCard (MMC) To use the Media Card Reader: 1 Check the media or card to connect and enable your computer has integrated video, do not connect either monitor to connect either two monitors (each with a VGA connector), one monitor with a VGA connector and one monitor with a ...

Owner's Manual
Page 32
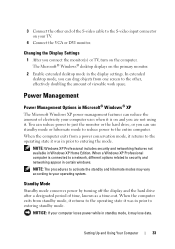
... Monitor With a VGA Connector and One Monitor With a DVI Connector 1 Follow the procedures in "Before You Begin" on page 97. 2 Connect one end of the S-video cable to the optional TV-OUT connector on the back of the computer. 32 Setting Up and Using Your Computer 1 2* 3* 4 *... not be present on your computer. 1 Follow the procedures in "Before You Begin" on page 97. 2 Connect the VGA connector on the monitor to the VGA (blue) connector on the back of the computer. 3 Connect the DVI connector on the other monitor to the DVI (white) connector on the back of the...
... Monitor With a VGA Connector and One Monitor With a DVI Connector 1 Follow the procedures in "Before You Begin" on page 97. 2 Connect one end of the S-video cable to the optional TV-OUT connector on the back of the computer. 32 Setting Up and Using Your Computer 1 2* 3* 4 *... not be present on your computer. 1 Follow the procedures in "Before You Begin" on page 97. 2 Connect the VGA connector on the monitor to the VGA (blue) connector on the back of the computer. 3 Connect the DVI connector on the other monitor to the DVI (white) connector on the back of the...
Owner's Manual
Page 33
...the display and the hard drive after a designated period of time, known as a time-out. NOTICE: If your computer uses when it is connected to a network, different options related to security and networking appear in certain windows. Power Management Power Management Options in standby mode, it . Setting... When the computer exits from a power conservation mode, it returns to the operating state it was in prior to entering standby mode. 3 Connect the other , effectively doubling the amount of viewable work space. In extended desktop mode, you are not using it may vary according to ...
...the display and the hard drive after a designated period of time, known as a time-out. NOTICE: If your computer uses when it is connected to a network, different options related to security and networking appear in certain windows. Power Management Power Management Options in standby mode, it . Setting... When the computer exits from a power conservation mode, it returns to the operating state it was in prior to entering standby mode. 3 Connect the other , effectively doubling the amount of viewable work space. In extended desktop mode, you are not using it may vary according to ...

Owner's Manual
Page 42
... keys to RAID-enabled mode before you did not select a RAID configuration when the computer was purchased. Ensure that you set your hard drives are connected 8 Press the up- and down -arrow keys to highlight the Serial-ATA Configuration, then press . 5 Press the up - and down -arrow keys to select Enabled...
... keys to RAID-enabled mode before you did not select a RAID configuration when the computer was purchased. Ensure that you set your hard drives are connected 8 Press the up- and down -arrow keys to highlight the Serial-ATA Configuration, then press . 5 Press the up - and down -arrow keys to select Enabled...

Owner's Manual
Page 46
... All Programs Accessories System Tools Windows Easy Transfer. screen, select the method you can transfer the data to the new computer over a network or serial connection, or you chose for transfer to the new computer. Windows Vista®: The Windows Vista operating system provides the Windows Easy Transfer wizard to move...
... All Programs Accessories System Tools Windows Easy Transfer. screen, select the method you can transfer the data to the new computer over a network or serial connection, or you chose for transfer to the new computer. Windows Vista®: The Windows Vista operating system provides the Windows Easy Transfer wizard to move...

Owner's Manual
Page 47
..., point to guide you through the process of your computer. Setting Up and Using Your Computer 47 Setting Up a Home and Office Network Connecting to a Network Adapter NOTICE: Plug the network cable into the modem connector on the computer. Do not plug the network cable into the ...network adapter connector on the computer. Do not plug a network cable into place, and then gently pull it to ensure that it is secure. 2 Connect the other end of the network cable to a network device. 1 2 4 3 1 network adapter connector 3 network cable 2 network device 4 network adapter connector ...
..., point to guide you through the process of your computer. Setting Up and Using Your Computer 47 Setting Up a Home and Office Network Connecting to a Network Adapter NOTICE: Plug the network cable into the modem connector on the computer. Do not plug the network cable into the ...network adapter connector on the computer. Do not plug a network cable into place, and then gently pull it to ensure that it is secure. 2 Connect the other end of the network cable to a network device. 1 2 4 3 1 network adapter connector 3 network cable 2 network device 4 network adapter connector ...

Owner's Manual
Page 48
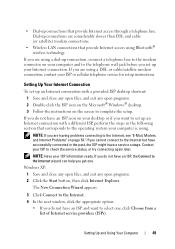
... vary by country. use your existing telephone line or cellular telephone service. With a DSL connection, you need a modem or network connection and an Internet service provider (ISP). Connecting to the Internet, you can access the Internet and use the search term Network. NOTE:...on -screen prompts. Your ISP will bring up the Network dialog screen. Click Network and Sharing Center. NOTE: Selecting the connection method This computer connects directly to the Internet enables the integrated firewall provided with Windows XP SP1. 4 Complete the checklist and required preparations. 5...
... vary by country. use your existing telephone line or cellular telephone service. With a DSL connection, you need a modem or network connection and an Internet service provider (ISP). Connecting to the Internet, you can access the Internet and use the search term Network. NOTE:...on -screen prompts. Your ISP will bring up the Network dialog screen. Click Network and Sharing Center. NOTE: Selecting the connection method This computer connects directly to the Internet enables the integrated firewall provided with Windows XP SP1. 4 Complete the checklist and required preparations. 5...
Owner's Manual
Page 49
...Internet. 4 In the next window, click the appropriate option: • If you do not have an ISP, the Connect to the Internet wizard can help you set up an Internet connection with a provided ISP desktop shortcut: 1 Save and close any open files, and exit any open programs. 2 Click...a service outage. If you want to select one . If you cannot connect to the Internet but have successfully connected in the following section that corresponds to the operating system your computer is using a dial-up connection, connect a telephone line to the modem connector on your computer and to the ...
...Internet. 4 In the next window, click the appropriate option: • If you do not have an ISP, the Connect to the Internet wizard can help you set up an Internet connection with a provided ISP desktop shortcut: 1 Save and close any open files, and exit any open programs. 2 Click...a service outage. If you want to select one . If you cannot connect to the Internet but have successfully connected in the following section that corresponds to the operating system your computer is using a dial-up connection, connect a telephone line to the modem connector on your computer and to the ...

Owner's Manual
Page 50
.... • If you will use the setup information provided by your ISP to complete the setup. If you do not know which type of connection to select, contact your ISP to step 6. Contact your ISP. 5 Click Next. Windows Vista®: 1 Save and close any open files, and exit any open ... to complete the setup. NOTE: If you selected Set up modem or ISDN. If you cannot connect to the Internet, but you want to connect to the Internet. NOTE: If you do not know which type of connection to select, click Help me choose or contact your ISP. 5 Follow the instructions on how...
.... • If you will use the setup information provided by your ISP to complete the setup. If you do not know which type of connection to select, contact your ISP to step 6. Contact your ISP. 5 Click Next. Windows Vista®: 1 Save and close any open files, and exit any open ... to complete the setup. NOTE: If you selected Set up modem or ISDN. If you cannot connect to the Internet, but you want to connect to the Internet. NOTE: If you do not know which type of connection to select, click Help me choose or contact your ISP. 5 Follow the instructions on how...

Owner's Manual
Page 51
...a program, see the program's documentation. R E P L A C E T H E B A T T E R Y - If you begin any of a new battery exploding if it is properly connected. • If an error message appears on page 183). Troubleshooting Tips Follow these tips when you troubleshoot your computer: • If you added or removed... the installation procedures and ensure that the part is correctly installed. • If a peripheral device does not work properly, contact Dell (see "Replacing the Battery" on page 142). This message may help technical support personnel diagnose and fix the problem. •...
...a program, see the program's documentation. R E P L A C E T H E B A T T E R Y - If you begin any of a new battery exploding if it is properly connected. • If an error message appears on page 183). Troubleshooting Tips Follow these tips when you troubleshoot your computer: • If you added or removed... the installation procedures and ensure that the part is correctly installed. • If a peripheral device does not work properly, contact Dell (see "Replacing the Battery" on page 142). This message may help technical support personnel diagnose and fix the problem. •...

Owner's Manual
Page 52
TEST THE DRIVE - • Insert another floppy disk, CD, or DVD to check for and remove viruses. CHECK THE CABLE CONNECTIONS R U N T H E H A R D W A R E TR O U B L E S H O O T E R - Windows Vista®: Click Start and click Computer. Viruses can sometimes prevent Windows from recognizing the drive. C L E A N T H E D R I V E O R D I C.... • Insert bootable media and restart the computer. Windows XP: Click Start and click My Computer. See "Starting the Dell Diagnostics From Your Hard Drive" on page 87. ENSURE THAT THE DRIVE IS ENABLED IN THE SYSTEM SETUP PROGRAM - ENSURE THAT...
TEST THE DRIVE - • Insert another floppy disk, CD, or DVD to check for and remove viruses. CHECK THE CABLE CONNECTIONS R U N T H E H A R D W A R E TR O U B L E S H O O T E R - Windows Vista®: Click Start and click Computer. Viruses can sometimes prevent Windows from recognizing the drive. C L E A N T H E D R I V E O R D I C.... • Insert bootable media and restart the computer. Windows XP: Click Start and click My Computer. See "Starting the Dell Diagnostics From Your Hard Drive" on page 87. ENSURE THAT THE DRIVE IS ENABLED IN THE SYSTEM SETUP PROGRAM - ENSURE THAT...

Owner's Manual
Page 54
... logged in with Administrator privileges to remove the checkmark. 3 Click Apply and then OK. 54 Solving Problems The modem does not operate while it is connected to an analog telephone jack only. C H E C K T H E W I N D O W S M A I L E X P R E S S S E C U R I T Y S E T T I N G S - Hard drive problems RUN CHECK DISK - Windows Vista: 1 Click Start and click Computer. 2 Right-click Local Disk... Right-click Local Disk C:. 3 Click Properties Tools Check Now. 4 Click Scan for and attempt recovery of bad sectors and click Start. NOTE: Connect the modem to a digital telephone network.
... logged in with Administrator privileges to remove the checkmark. 3 Click Apply and then OK. 54 Solving Problems The modem does not operate while it is connected to an analog telephone jack only. C H E C K T H E W I N D O W S M A I L E X P R E S S S E C U R I T Y S E T T I N G S - Hard drive problems RUN CHECK DISK - Windows Vista: 1 Click Start and click Computer. 2 Right-click Local Disk... Right-click Local Disk C:. 3 Click Properties Tools Check Now. 4 Click Scan for and attempt recovery of bad sectors and click Start. NOTE: Connect the modem to a digital telephone network.
Owner's Manual
Page 55
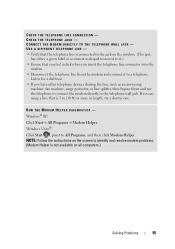
... sharing the line, such as an answering machine, fax machine, surge protector, or line splitter, then bypass them and use the telephone to connect the modem directly to the telephone wall jack. Windows® XP: Click Start All Programs Modem Helper. Listen for a dial tone. •... NOTE: Follow the instructions on the modem. (The jack has either a green label or a connector-shaped icon next to a telephone. CHECK THE TELEPHONE LINE CONNECTION - CONNECT THE MODEM DIRECTLY TO THE TELEPHONE WALL JACK - USE A DIFFERENT TELEPHONE LINE - • Verify that the telephone line is 3 m (10 ft) or...
... sharing the line, such as an answering machine, fax machine, surge protector, or line splitter, then bypass them and use the telephone to connect the modem directly to the telephone wall jack. Windows® XP: Click Start All Programs Modem Helper. Listen for a dial tone. •... NOTE: Follow the instructions on the modem. (The jack has either a green label or a connector-shaped icon next to a telephone. CHECK THE TELEPHONE LINE CONNECTION - CONNECT THE MODEM DIRECTLY TO THE TELEPHONE WALL JACK - USE A DIFFERENT TELEPHONE LINE - • Verify that the telephone line is 3 m (10 ft) or...


