
Owners Manual
Page 4
10 Palm Rest 27 Removing the Palm Rest 27 Replacing the Palm Rest 31 11 Power-Adapter Port 33 Removing the Power-Adapter Port 33 Replacing the Power-Adapter Port 34 12 Display Assembly 35 Removing the Display Assembly 35 Replacing the Display Assembly 37 Removing the Display Bezel 37 Replacing the Display ...
10 Palm Rest 27 Removing the Palm Rest 27 Replacing the Palm Rest 31 11 Power-Adapter Port 33 Removing the Power-Adapter Port 33 Replacing the Power-Adapter Port 34 12 Display Assembly 35 Removing the Display Assembly 35 Replacing the Display Assembly 37 Removing the Display Bezel 37 Replacing the Display ...

Owners Manual
Page 7
... to ground the system board. CAUTION: To avoid damaging the computer, ensure that shipped with your computer. 5 Press and hold the power button for about safety precautions, working inside your computer, ground yourself by their electrical outlets. 4 Disconnect all telephone cables, network cables...| 7 CAUTION: To avoid damaging the components and cards, handle them by touching an unpainted metal surface, such as the metal at dell.com/ regulatory_compliance. CAUTION: Before touching anything inside your computer. 1 Save and close all open files and exit all open programs before ...
... to ground the system board. CAUTION: To avoid damaging the computer, ensure that shipped with your computer. 5 Press and hold the power button for about safety precautions, working inside your computer, ground yourself by their electrical outlets. 4 Disconnect all telephone cables, network cables...| 7 CAUTION: To avoid damaging the components and cards, handle them by touching an unpainted metal surface, such as the metal at dell.com/ regulatory_compliance. CAUTION: Before touching anything inside your computer. 1 Save and close all open files and exit all open programs before ...
Owners Manual
Page 28
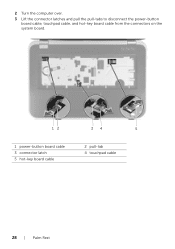
2 Turn the computer over. 3 Lift the connector latches and pull the pull-tabs to disconnect the power-button board cable, touchpad cable, and hot-key board cable from the connectors on the system board. 12 34 5 1 power-button board cable 3 connector latch 5 hot-key board cable 2 pull-tab 4 touchpad cable 28 | Palm Rest
2 Turn the computer over. 3 Lift the connector latches and pull the pull-tabs to disconnect the power-button board cable, touchpad cable, and hot-key board cable from the connectors on the system board. 12 34 5 1 power-button board cable 3 connector latch 5 hot-key board cable 2 pull-tab 4 touchpad cable 28 | Palm Rest
Owners Manual
Page 31
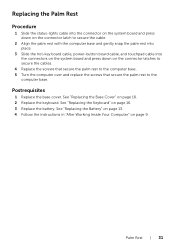
... secure the cable. 2 Align the palm rest with the computer base and gently snap the palm rest into place. 3 Slide the hot-key board cable, power-button board cable, and touchpad cable into the connectors on the system board and press down on page 9. See "Replacing the Base Cover" on page...
... secure the cable. 2 Align the palm rest with the computer base and gently snap the palm rest into place. 3 Slide the hot-key board cable, power-button board cable, and touchpad cable into the connectors on the system board and press down on page 9. See "Replacing the Base Cover" on page...

Owners Manual
Page 33
...safety information that secure the power-adapter port bracket to the computer base. 2 Lift the power-adapter port bracket off the computer base. 1 2 1 screws (2) 2 power-adapter port bracket Power-Adapter Port | 33 See "Removing the Keyboard" on page 27. 11 Power-Adapter Port WARNING: Before ...working inside your computer and follow the steps in "Before You Begin" on page 7. For additional safety best practices information, see the Regulatory Compliance Homepage at dell.com/regulatory_compliance. See "Removing the Palm...
...safety information that secure the power-adapter port bracket to the computer base. 2 Lift the power-adapter port bracket off the computer base. 1 2 1 screws (2) 2 power-adapter port bracket Power-Adapter Port | 33 See "Removing the Keyboard" on page 27. 11 Power-Adapter Port WARNING: Before ...working inside your computer and follow the steps in "Before You Begin" on page 7. For additional safety best practices information, see the Regulatory Compliance Homepage at dell.com/regulatory_compliance. See "Removing the Palm...

Owners Manual
Page 34
...port cable from the connector on the system board. 4 Lift the power-adapter port off the computer base. 1 2 3 1 power-adapter port cable 3 power-adapter port 2 system-board connector Replacing the Power-Adapter Port Procedure 1 Place the power-adapter port in "After Working Inside Your Computer" on the computer ...base. 4 Replace the screws that secure the power-adapter port bracket to the connector on the system board. 3 Align the screw holes on the power-adapter port bracket with the screw holes on page 9. 34 | Power-Adapter Port See "Replacing the Battery" on page 13...
...port cable from the connector on the system board. 4 Lift the power-adapter port off the computer base. 1 2 3 1 power-adapter port cable 3 power-adapter port 2 system-board connector Replacing the Power-Adapter Port Procedure 1 Place the power-adapter port in "After Working Inside Your Computer" on the computer ...base. 4 Replace the screws that secure the power-adapter port bracket to the connector on the system board. 3 Align the screw holes on the power-adapter port bracket with the screw holes on page 9. 34 | Power-Adapter Port See "Replacing the Battery" on page 13...

Owners Manual
Page 50
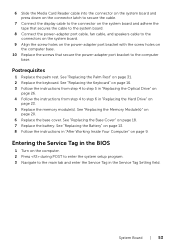
Procedure NOTE: Your computer's Service Tag is stored in the BIOS after you replace the system-board assembly. You must enter the Service Tag in the system board. NOTE: Before disconnecting the cables from the system board, note the location of the connectors so that you can reconnect them correctly after you replace the system-board assembly. 1 Remove the screws that secure the power-adapter port bracket to the computer base. 2 Lift the power-adapter port bracket off the computer base. 1 2 1 screws (2) 2 power-adapter port bracket 50 | System Board
Procedure NOTE: Your computer's Service Tag is stored in the BIOS after you replace the system-board assembly. You must enter the Service Tag in the system board. NOTE: Before disconnecting the cables from the system board, note the location of the connectors so that you can reconnect them correctly after you replace the system-board assembly. 1 Remove the screws that secure the power-adapter port bracket to the computer base. 2 Lift the power-adapter port bracket off the computer base. 1 2 1 screws (2) 2 power-adapter port bracket 50 | System Board
Owners Manual
Page 51
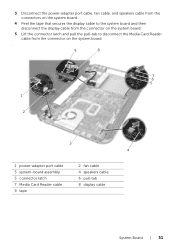
3 Disconnect the power-adapter port cable, fan cable, and speakers cable from the connectors on the system board. 4 Peel the tape that secures the display cable to the system board and then disconnect the display cable from the connector on the system board. 5 Lift the connector latch and pull the pull-tab to disconnect the Media Card Reader cable from the connector on the system board. . 9 8 7 6 5 1 2 3 4 1 power-adapter port cable 3 system-board assembly 5 connector latch 7 Media Card Reader cable 9 tape 2 fan cable 4 speakers cable 6 pull-tab 8 display cable System Board | 51
3 Disconnect the power-adapter port cable, fan cable, and speakers cable from the connectors on the system board. 4 Peel the tape that secures the display cable to the system board and then disconnect the display cable from the connector on the system board. 5 Lift the connector latch and pull the pull-tab to disconnect the Media Card Reader cable from the connector on the system board. . 9 8 7 6 5 1 2 3 4 1 power-adapter port cable 3 system-board assembly 5 connector latch 7 Media Card Reader cable 9 tape 2 fan cable 4 speakers cable 6 pull-tab 8 display cable System Board | 51
Owners Manual
Page 53
.... 7 Connect the display cable to the connector on the system board and adhere the tape that secures the cable to the system board. 8 Connect the power-adapter port cable, fan cable, and speakers cable to the connectors on the system board. 9 Align the screw holes on the... power-adapter port bracket with the screw holes on the computer base. 10 Replace the screws that secure the power-adapter port bracket to step 6 in "Replacing the Hard Drive" on page 23. 5 Replace the memory...
.... 7 Connect the display cable to the connector on the system board and adhere the tape that secures the cable to the system board. 8 Connect the power-adapter port cable, fan cable, and speakers cable to the connectors on the system board. 9 Align the screw holes on the... power-adapter port bracket with the screw holes on the computer base. 10 Replace the screws that secure the power-adapter port bracket to step 6 in "Replacing the Hard Drive" on page 23. 5 Replace the memory...
Me and My Dell
Page 3
Contents Charms Sidebar 15 Signing in to Windows 8 16 Closing a Windows 8 app 17 Turning off your computer - Windows 8 17 Power Adapter 21 Battery 22 Laptop Battery 22 Conserving the Battery Power 22 Coin-Cell Battery 23 Improving the Battery Performance 23 Touchpad 24 About Touchpad 24 Touchpad Gestures 24 Scroll 24 Zoom 26 Rotate 27 Flick 28 My Favorites 28 Desktop 28 Display 29 3D Display 29 Wireless Display 29 Touchscreen Display 30 Contents 3
Contents Charms Sidebar 15 Signing in to Windows 8 16 Closing a Windows 8 app 17 Turning off your computer - Windows 8 17 Power Adapter 21 Battery 22 Laptop Battery 22 Conserving the Battery Power 22 Coin-Cell Battery 23 Improving the Battery Performance 23 Touchpad 24 About Touchpad 24 Touchpad Gestures 24 Scroll 24 Zoom 26 Rotate 27 Flick 28 My Favorites 28 Desktop 28 Display 29 3D Display 29 Wireless Display 29 Touchscreen Display 30 Contents 3
Me and My Dell
Page 11
... Ergonomic Instructions for Laptops 162 Dell and the Environment 164 Regulatory Compliance Policy 165 Contact Details for Regulatory Compliance Web site 165 Additional Compliance Information 165 Migration Tips 166 Migrating to Windows 7 From an Earlier Windows Operating System 166 Transfer Methods 167 Power Management 167 Configuring the Power Settings 168 Contents 11
... Ergonomic Instructions for Laptops 162 Dell and the Environment 164 Regulatory Compliance Policy 165 Contact Details for Regulatory Compliance Web site 165 Additional Compliance Information 165 Migration Tips 166 Migrating to Windows 7 From an Earlier Windows Operating System 166 Transfer Methods 167 Power Management 167 Configuring the Power Settings 168 Contents 11

Me and My Dell
Page 17
... screen), and then click Settings. 2. NOTE: You can also choose to the upper-right corner of the screen and release the app. Tap or click Power and then choose Shut down. Windows 8 To turn off your computer - Swipe from the top of the screen to the bottom of the screen and...
... screen), and then click Settings. 2. NOTE: You can also choose to the upper-right corner of the screen and release the app. Tap or click Power and then choose Shut down. Windows 8 To turn off your computer - Swipe from the top of the screen to the bottom of the screen and...
Me and My Dell
Page 21
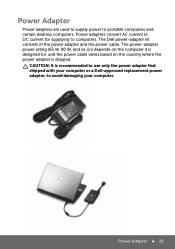
... that shipped with your computer or a Dell-approved replacement power adapter, to computers. Power adapters convert AC current to DC current for , and the power cable varies based on the country where the power adapter is designed for supplying to avoid damaging your computer. Power Adapter 21 The power-adapter power rating (65 W, 90 W, and so on...
... that shipped with your computer or a Dell-approved replacement power adapter, to computers. Power adapters convert AC current to DC current for , and the power cable varies based on the country where the power adapter is designed for supplying to avoid damaging your computer. Power Adapter 21 The power-adapter power rating (65 W, 90 W, and so on...
Me and My Dell
Page 22
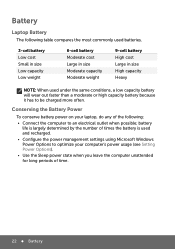
Conserving the Battery Power To conserve battery power on your computer's power usage (see Setting Power Options). • Use the Sleep power state when you leave the computer unattended for long periods of the following table compares the most commonly used batteries....capacity Moderate weight 9-cell battery High cost Large in size High capacity Heavy NOTE: When used and recharged. • Configure the power management settings using Microsoft Windows Power Options to optimize your laptop, do any of time. 22 Battery Battery Laptop Battery The following : • Connect...
Conserving the Battery Power To conserve battery power on your computer's power usage (see Setting Power Options). • Use the Sleep power state when you leave the computer unattended for long periods of the following table compares the most commonly used batteries....capacity Moderate weight 9-cell battery High cost Large in size High capacity Heavy NOTE: When used and recharged. • Configure the power management settings using Microsoft Windows Power Options to optimize your laptop, do any of time. 22 Battery Battery Laptop Battery The following : • Connect...
Me and My Dell
Page 23
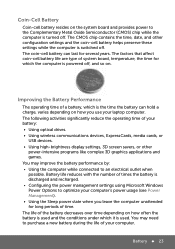
... life reduces with the number of the battery decreases over time depending on the system board and provides power to optimize your computer's power usage (see Power Management). • Using the Sleep power state when you use your battery: • Using optical drives. • Using wireless communications devices,...often the battery is used and the conditions under which it is used. The CMOS chip contains the time, date, and other power-intensive programs like complex 3D graphics applications and games. The coin-cell battery can last for long periods of a battery, which...
... life reduces with the number of the battery decreases over time depending on the system board and provides power to optimize your computer's power usage (see Power Management). • Using the Sleep power state when you use your battery: • Using optical drives. • Using wireless communications devices,...often the battery is used and the conditions under which it is used. The CMOS chip contains the time, date, and other power-intensive programs like complex 3D graphics applications and games. The coin-cell battery can last for long periods of a battery, which...
Me and My Dell
Page 35
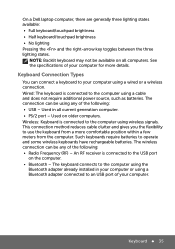
... The wireless connection can be available on older computers. NOTE: Backlit keyboard may not be using a cable and does not require additional power source, such as batteries. Wired: The keyboard is connected to the computer using any of the following : • Radio Frequency ...for more comfortable position within a few meters from the computer. See the specifications of your computer using wireless signals. On a Dell laptop computer, there are generally three lighting states available: • Full keyboard/touchpad brightness • Half keyboard/touchpad brightness &#...
... The wireless connection can be available on older computers. NOTE: Backlit keyboard may not be using a cable and does not require additional power source, such as batteries. Wired: The keyboard is connected to the computer using any of the following : • Radio Frequency ...for more comfortable position within a few meters from the computer. See the specifications of your computer using wireless signals. On a Dell laptop computer, there are generally three lighting states available: • Full keyboard/touchpad brightness • Half keyboard/touchpad brightness &#...
Me and My Dell
Page 36
...location on the label is: • Portable computers: Bottom of the portable computer • Desktop computer: Back or top of the computer chassis Using Dell's Online System Profiler If your computer. Click Find My Service Tag and follow the steps below: -- Locating the Service Tag and Express- Service Code ... keys, and so on the screen. Locating the Label on Your Computer The Service Tag and the Express-Service Code is powered on and you have access to support.dell.com. -- Storage devices can be internal or external. To scan for the Service Tag and Express-Service code. Go to...
...location on the label is: • Portable computers: Bottom of the portable computer • Desktop computer: Back or top of the computer chassis Using Dell's Online System Profiler If your computer. Click Find My Service Tag and follow the steps below: -- Locating the Service Tag and Express- Service Code ... keys, and so on the screen. Locating the Label on Your Computer The Service Tag and the Express-Service Code is powered on and you have access to support.dell.com. -- Storage devices can be internal or external. To scan for the Service Tag and Express-Service code. Go to...
Me and My Dell
Page 37
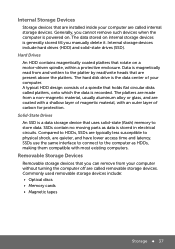
... called platters, onto which the data is a data storage device that rotate on a motor‑driven spindle, within a protective enclosure. The hard disk drive is powered on internal storage devices is generally stored till you cannot remove such devices when the computer is the data center of a spindle that holds flat...
... called platters, onto which the data is a data storage device that rotate on a motor‑driven spindle, within a protective enclosure. The hard disk drive is powered on internal storage devices is generally stored till you cannot remove such devices when the computer is the data center of a spindle that holds flat...

Me and My Dell
Page 38
..., media players, gaming consoles, and so on. The standard physical medium is cut off. Memory cards are re-writeable, fast, and retain data even when power supply is a 12 cm plastic optical disc, the same size as DVDs and CDs. Some common types of optical discs are : Secure Digital (SD)/Secure...
..., media players, gaming consoles, and so on. The standard physical medium is cut off. Memory cards are re-writeable, fast, and retain data even when power supply is a 12 cm plastic optical disc, the same size as DVDs and CDs. Some common types of optical discs are : Secure Digital (SD)/Secure...

Me and My Dell
Page 40
... system board. Provides slot(s) to install processor(s). • Memory-module connector(s) - Contains the system memory or BIOS program. • Power connectors - Provides slot(s) to the system board from the computer power supply. Provide power to install expansion card(s). • Chipset - All other devices connect to the system board to be able to interact...
... system board. Provides slot(s) to install processor(s). • Memory-module connector(s) - Contains the system memory or BIOS program. • Power connectors - Provides slot(s) to the system board from the computer power supply. Provide power to install expansion card(s). • Chipset - All other devices connect to the system board to be able to interact...


