

Me and My Dell
Page 30
SSDs are : • Blu-ray writer - Commonly used removable storage devices include: • Optical discs • Memory cards • Flash drives • External hard drives Optical Drives and Discs Your computer may support a DVD RW or a DVD RW and Blu-ray combo ... devices can remove from your computer and generally cannot be removed while the computer is turned on . HDDs have disk platters, whereas SSDs have flash memory.
SSDs are : • Blu-ray writer - Commonly used removable storage devices include: • Optical discs • Memory cards • Flash drives • External hard drives Optical Drives and Discs Your computer may support a DVD RW or a DVD RW and Blu-ray combo ... devices can remove from your computer and generally cannot be removed while the computer is turned on . HDDs have disk platters, whereas SSDs have flash memory.

Me and My Dell
Page 31
... (MMC+) Multi Media Card (MMC) Mobile RS MMC Storage Device 31 Some common types of memory cards are commonly used in devices such as media or flash cards, use flash memory to store data. Memory Cards Memory cards, also referred to as digital cameras, mobile phones, media players, gaming consoles, and so on...
... (MMC+) Multi Media Card (MMC) Mobile RS MMC Storage Device 31 Some common types of memory cards are commonly used in devices such as media or flash cards, use flash memory to store data. Memory Cards Memory cards, also referred to as digital cameras, mobile phones, media players, gaming consoles, and so on...

Me and My Dell
Page 33
...may also be used in some compact desktops and all-in the memory modules before you can open or use them. Memory Module 33 Any file or application loads in -one computers. Memory Module A memory module stores temporary data that your computer needs to perform tasks. ...Used in MHz). Faster and higher amount of memory generally provides better performance. Common memory‑module types are categorized based on their capacity (in...
...may also be used in some compact desktops and all-in the memory modules before you can open or use them. Memory Module 33 Any file or application loads in -one computers. Memory Module A memory module stores temporary data that your computer needs to perform tasks. ...Used in MHz). Faster and higher amount of memory generally provides better performance. Common memory‑module types are categorized based on their capacity (in...

Me and My Dell
Page 34
Some important components of a system board are: • Processor socket • Memory-module connectors • Expansion‑card slots • CMOS to interact with each other devices connect to the system board to be able to store ... below lists the basic components of system board and the computer it is designed for. 1 processor socket 3 power connector 5 PCI-Express x1 connector 7 eSATA connector 2 memory-module connector 4 battery socket 6 PCI-Express x16 connector 8 processor 34 System Board A system board may vary based on the type of a desktop system board...
Some important components of a system board are: • Processor socket • Memory-module connectors • Expansion‑card slots • CMOS to interact with each other devices connect to the system board to be able to store ... below lists the basic components of system board and the computer it is designed for. 1 processor socket 3 power connector 5 PCI-Express x1 connector 7 eSATA connector 2 memory-module connector 4 battery socket 6 PCI-Express x16 connector 8 processor 34 System Board A system board may vary based on the type of a desktop system board...

Me and My Dell
Page 35
.... Some of the system board, however, with some new generation processors, the chipset may be integrated in GigaHertz (GHz) or MegaHertz (MHz) • On-board memory, also referred to the processors designed for one type of processing cores • Speed or frequency measured in the processor. Chipset 35
.... Some of the system board, however, with some new generation processors, the chipset may be integrated in GigaHertz (GHz) or MegaHertz (MHz) • On-board memory, also referred to the processors designed for one type of processing cores • Speed or frequency measured in the processor. Chipset 35

Me and My Dell
Page 37
... board. Use the BIOS setup program to select which card to perform video processing. Video Card 37 Integrated video cards generally share the system memory (RAM) and the may also utilize the processor to use. NOTE: When a discrete video card is integrated on the processor. These cards are installed separately... on the cards and generally provide higher performance than integrated video cards. Often referred to as a monitor or projector. Discrete video cards have dedicated memory on the system board.
... board. Use the BIOS setup program to select which card to perform video processing. Video Card 37 Integrated video cards generally share the system memory (RAM) and the may also utilize the processor to use. NOTE: When a discrete video card is integrated on the processor. These cards are installed separately... on the cards and generally provide higher performance than integrated video cards. Often referred to as a monitor or projector. Discrete video cards have dedicated memory on the system board.
Me and My Dell
Page 85
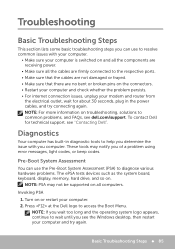
...Troubleshooting Basic Troubleshooting Steps This section lists some basic troubleshooting steps you can use to resolve common issues with you computer. To contact Dell for about 30 seconds, plug in diagnostic tools to wait until you of a problem using error messages, light codes, or beep...The ePSA tests devices such as the system board, keyboard, display, memory, hard drive, and so on troubleshooting, solutions to common problems, and FAQs, see dell.com/support. NOTE: PSA may notify you see "Contacting Dell". Basic Troubleshooting Steps 85 Invoking PSA 1. Turn on and...
...Troubleshooting Basic Troubleshooting Steps This section lists some basic troubleshooting steps you can use to resolve common issues with you computer. To contact Dell for about 30 seconds, plug in diagnostic tools to wait until you of a problem using error messages, light codes, or beep...The ePSA tests devices such as the system board, keyboard, display, memory, hard drive, and so on troubleshooting, solutions to common problems, and FAQs, see dell.com/support. NOTE: PSA may notify you see "Contacting Dell". Basic Troubleshooting Steps 85 Invoking PSA 1. Turn on and...

Me and My Dell
Page 86
...the component that failed, or stop the test and restart the computer. This will take about 30 minutes or more. Appears at dell.com/support or contact Dell. Status bar appears at the bottom‑left of the ePSA home screen. 86 Diagnostics Follow the instructions on the...the test. Press to continue if you want to finish the test. Appears on the right of the ePSA home screen. Do you are experiencing memory issue, otherwise press to continue? (Recommended)." Do you want to abort testing and restart your computer, click Exit. • Status window - ...
...the component that failed, or stop the test and restart the computer. This will take about 30 minutes or more. Appears at dell.com/support or contact Dell. Status bar appears at the bottom‑left of the ePSA home screen. 86 Diagnostics Follow the instructions on the...the test. Press to continue if you want to finish the test. Appears on the right of the ePSA home screen. Do you are experiencing memory issue, otherwise press to continue? (Recommended)." Do you want to abort testing and restart your computer, click Exit. • Status window - ...

Me and My Dell
Page 88
... the error code(s) and search for solutions at the Dell logo to access the Boot Menu. Do you want to continue if you see the Windows desktop, then restart your screen: "Testing completed. Press to run the remaining memory tests? NOTE: If you wait too long and the operating system logo appears..., continue to wait until you are experiencing memory issue, otherwise press to the next test, retest the component that failed, or stop the test and restart the computer. Select Diagnostics and press . 4. Follow ...
... the error code(s) and search for solutions at the Dell logo to access the Boot Menu. Do you want to continue if you see the Windows desktop, then restart your screen: "Testing completed. Press to run the remaining memory tests? NOTE: If you wait too long and the operating system logo appears..., continue to wait until you are experiencing memory issue, otherwise press to the next test, retest the component that failed, or stop the test and restart the computer. Select Diagnostics and press . 4. Follow ...

Me and My Dell
Page 89
... a beep code, identifies a problem. Display failure Diagnostics 89 BIOS ROM checksum failure No RAM detected NOTE: If you installed or replaced the memory module, ensure that the memory module is supported for assistance. Beep Codes One Two Three Four Five Six Seven Eight Possible Problem Possible system board failure - If this...
... a beep code, identifies a problem. Display failure Diagnostics 89 BIOS ROM checksum failure No RAM detected NOTE: If you installed or replaced the memory module, ensure that the memory module is supported for assistance. Beep Codes One Two Three Four Five Six Seven Eight Possible Problem Possible system board failure - If this...

Me and My Dell
Page 90
You can use BIOS setup program to not boot, work incorrectly, or damage your computer, such as amount of memory, type of hard drive, and so on. • Change the system configuration information after you add, change the settings, enter BIOS setup program, locate the ...setting that you see the Windows desktop, then restart your computer. Press at the Dell logo to the operating system when the computer boots up. To change , or remove any hardware in the BIOS using BIOS setup program. BIOS BIOS...
You can use BIOS setup program to not boot, work incorrectly, or damage your computer, such as amount of memory, type of hard drive, and so on. • Change the system configuration information after you add, change the settings, enter BIOS setup program, locate the ...setting that you see the Windows desktop, then restart your computer. Press at the Dell logo to the operating system when the computer boots up. To change , or remove any hardware in the BIOS using BIOS setup program. BIOS BIOS...

Me and My Dell
Page 95
... your computer into sleep automatically puts your computer helps when you are not planning to resume work . It puts any open documents and programs in memory and on your computer before adding or removing hardware inside the computer. To modify the power settings, click Change plan settings. • Hybrid sleep - Click...
... your computer into sleep automatically puts your computer helps when you are not planning to resume work . It puts any open documents and programs in memory and on your computer before adding or removing hardware inside the computer. To modify the power settings, click Change plan settings. • Hybrid sleep - Click...
Inspiron 14z N411z Owners Manual
Page 4
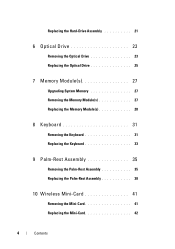
Replacing the Hard-Drive Assembly 21 6 Optical Drive 23 Removing the Optical Drive 23 Replacing the Optical Drive 25 7 Memory Module(s 27 Upgrading System Memory 27 Removing the Memory Module(s 27 Replacing the Memory Module(s 28 8 Keyboard 31 Removing the Keyboard 31 Replacing the Keyboard 33 9 Palm-Rest Assembly 35 Removing the Palm-Rest Assembly 35 Replacing the Palm-Rest Assembly 38 10 Wireless Mini-Card 41 Removing the Mini-Card 41 Replacing the Mini-Card 42 4 Contents
Replacing the Hard-Drive Assembly 21 6 Optical Drive 23 Removing the Optical Drive 23 Replacing the Optical Drive 25 7 Memory Module(s 27 Upgrading System Memory 27 Removing the Memory Module(s 27 Replacing the Memory Module(s 28 8 Keyboard 31 Removing the Keyboard 31 Replacing the Keyboard 33 9 Palm-Rest Assembly 35 Removing the Palm-Rest Assembly 35 Replacing the Palm-Rest Assembly 38 10 Wireless Mini-Card 41 Removing the Mini-Card 41 Replacing the Mini-Card 42 4 Contents
Inspiron 14z N411z Owners Manual
Page 27
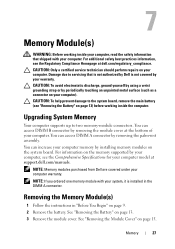
...for your computer model at the bottom of your computer. Upgrading System Memory Your computer supports up to the system board, remove the main battery (see the Regulatory Compliance Homepage at dell.com/regulatory_compliance. For information on your computer warranty. See "Removing ...the Module Cover" on page 13. 3 Remove the module cover. 7 Memory Module(s) WARNING: Before working inside your warranty. You can increase...
...for your computer model at the bottom of your computer. Upgrading System Memory Your computer supports up to the system board, remove the main battery (see the Regulatory Compliance Homepage at dell.com/regulatory_compliance. For information on your computer warranty. See "Removing ...the Module Cover" on page 13. 3 Remove the module cover. 7 Memory Module(s) WARNING: Before working inside your warranty. You can increase...

Inspiron 14z N411z Owners Manual
Page 28
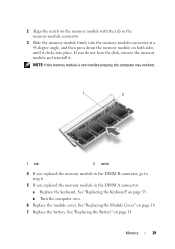
... To prevent damage to the memory-module connector, do not use tools to spread the memory module securing clips. 4 To remove the memory module from the DIMM A connector: a Turn the computer over. To remove the memory module from the DIMM B ...Memory See "Removing the Keyboard" on page 31. 5 Use your fingertips to step 5. Replacing the Memory Module(s) 1 Follow the instructions in "Before You Begin" on each end of the memory-module connector until the memory module pops up. 3 2 1 1 securing clips (2) 3 memory module 2 memory-module connector 6 Remove the memory module from the memory...
... To prevent damage to the memory-module connector, do not use tools to spread the memory module securing clips. 4 To remove the memory module from the DIMM A connector: a Turn the computer over. To remove the memory module from the DIMM B ...Memory See "Removing the Keyboard" on page 31. 5 Use your fingertips to step 5. Replacing the Memory Module(s) 1 Follow the instructions in "Before You Begin" on each end of the memory-module connector until the memory module pops up. 3 2 1 1 securing clips (2) 3 memory module 2 memory-module connector 6 Remove the memory module from the memory...
Inspiron 14z N411z Owners Manual
Page 29
... connector, go to step 6. 5 If you do not hear the click, remove the memory module and reinstall it clicks into the memory-module connector at a 45-degree angle, and then press down the memory module on page 14. Memory 29 See "Replacing the Keyboard" on page 16. 7 Replace the battery. b Turn... the computer over. 6 Replace the module cover. If you replaced the memory module in the DIMM A connector: a Replace the keyboard. See "Replacing the Module Cover" on page 33. See "Replacing the Battery" on both sides ...
... connector, go to step 6. 5 If you do not hear the click, remove the memory module and reinstall it clicks into the memory-module connector at a 45-degree angle, and then press down the memory module on page 14. Memory 29 See "Replacing the Keyboard" on page 16. 7 Replace the battery. b Turn... the computer over. 6 Replace the module cover. If you replaced the memory module in the DIMM A connector: a Replace the keyboard. See "Replacing the Module Cover" on page 33. See "Replacing the Battery" on both sides ...

Inspiron 14z N411z Owners Manual
Page 30
Connect your computer and all attached devices to electrical outlets, and turn them on. To confirm the amount of memory installed in the computer: Click Start → Control Panel→ System and Security→ System. 30 Memory As the computer boots, it detects the memory module(s) and automatically updates the system configuration information.
Connect your computer and all attached devices to electrical outlets, and turn them on. To confirm the amount of memory installed in the computer: Click Start → Control Panel→ System and Security→ System. 30 Memory As the computer boots, it detects the memory module(s) and automatically updates the system configuration information.

Inspiron 14z N411z Owners Manual
Page 73
...: Only a certified service technician should perform repairs on page 45. 11 Remove the thermal fan. See "Removing the Memory Module(s)" on page 31. 7 Remove the memory module(s). Damage due to servicing that shipped with your warranty. Removing the System Board 1 Follow the instructions in "Removing... Follow the instructions from step 4 to the system board, remove the main battery (see the Regulatory Compliance Homepage at dell.com/regulatory_compliance. 16 System Board WARNING: Before working inside your computer, read the safety information that is not authorized by...
...: Only a certified service technician should perform repairs on page 45. 11 Remove the thermal fan. See "Removing the Memory Module(s)" on page 31. 7 Remove the memory module(s). Damage due to servicing that shipped with your warranty. Removing the System Board 1 Follow the instructions in "Removing... Follow the instructions from step 4 to the system board, remove the main battery (see the Regulatory Compliance Homepage at dell.com/regulatory_compliance. 16 System Board WARNING: Before working inside your computer, read the safety information that is not authorized by...
Inspiron 14z N411z Owners Manual
Page 76
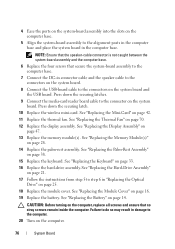
... the slots on the computer base. 5 Align the system-board assembly to the connectors on the system board and the USB board. See "Replacing the Memory Module(s)" on page 70. 12 Replace the display assembly. See "Replacing the Battery" on page 47. 13 Replace the... memory module(s). See "Replacing the Display Assembly" on page 14. See "Replacing the Mini-Card" on page 38. 15 Replace the keyboard. NOTE: Ensure that the ...
... the slots on the computer base. 5 Align the system-board assembly to the connectors on the system board and the USB board. See "Replacing the Memory Module(s)" on page 70. 12 Replace the display assembly. See "Replacing the Battery" on page 47. 13 Replace the... memory module(s). See "Replacing the Display Assembly" on page 14. See "Replacing the Mini-Card" on page 38. 15 Replace the keyboard. NOTE: Ensure that the ...

Inspiron 14z N411z Owners Manual
Page 79
...Heat-Sink Assembly 79 17 Heat-Sink Assembly WARNING: Before working inside your computer, read the safety information that is not authorized by Dell is hot, do not touch the metal housing of the heat-sink assembly. Damage due to the system board, remove the main ...battery (see the Regulatory Compliance Homepage at dell.com/regulatory_compliance. See "Removing the Memory Module(s)" on page 19. 6 Remove the keyboard. CAUTION: To help prevent damage to servicing that shipped with your warranty. ...
...Heat-Sink Assembly 79 17 Heat-Sink Assembly WARNING: Before working inside your computer, read the safety information that is not authorized by Dell is hot, do not touch the metal housing of the heat-sink assembly. Damage due to the system board, remove the main ...battery (see the Regulatory Compliance Homepage at dell.com/regulatory_compliance. See "Removing the Memory Module(s)" on page 19. 6 Remove the keyboard. CAUTION: To help prevent damage to servicing that shipped with your warranty. ...


