Dell™ Technology Guide
Page 4
... Overview 42 Customizing the Start Menu 43 Control Panel 44 Accessing and Using the Control Panel 45 Customizing Your Computer Settings 45 Managing Your Computer Performance 45 3 Monitors and Displays 47 Cleaning Your Computer's Display Screen 47 Adjusting the Resolution of Your Display 48 Windows Vista 49 4 Contents
... Overview 42 Customizing the Start Menu 43 Control Panel 44 Accessing and Using the Control Panel 45 Customizing Your Computer Settings 45 Managing Your Computer Performance 45 3 Monitors and Displays 47 Cleaning Your Computer's Display Screen 47 Adjusting the Resolution of Your Display 48 Windows Vista 49 4 Contents
Dell™ Technology Guide
Page 10
...Windows Vista 123 Windows XP 123 Ending an Application When it Does not Respond 124 10 Maintenance Tasks (Enhance Performance and Ensure Security) . . . . 125 Performing Maintenance Tasks to Increase Computer Speed and Ensure Security 125 Cleaning Your Computer 126 Before You Start 126 Cleaning ...Drives and Optical Drive Media 126 Managing Your Computer Performance 127 Windows Vista 127 Windows® XP 128 Performance Tuning 129 System Setup Based Performance Tuning . . . . 129 Software Based Performance Tuning 129 NVIDIA Performance 129 NVIDIA Monitor 130 Cleaning Up Your Hard ...
...Windows Vista 123 Windows XP 123 Ending an Application When it Does not Respond 124 10 Maintenance Tasks (Enhance Performance and Ensure Security) . . . . 125 Performing Maintenance Tasks to Increase Computer Speed and Ensure Security 125 Cleaning Your Computer 126 Before You Start 126 Cleaning ...Drives and Optical Drive Media 126 Managing Your Computer Performance 127 Windows Vista 127 Windows® XP 128 Performance Tuning 129 System Setup Based Performance Tuning . . . . 129 Software Based Performance Tuning 129 NVIDIA Performance 129 NVIDIA Monitor 130 Cleaning Up Your Hard ...
Dell™ Technology Guide
Page 16
Copying Audio and Video Files to Your Laptop Media Device 209 Playing Media Using the Dell Travel Remote . . . . . 210 Adjusting the Volume on Your Computer 210 Enabling S/PDIF Digital Audio Through the Media Software 210 Enabling S/PDIF Digital Audio in the ... Connectors on Your TV 219 Determining the Combination of Cables and Adapters you Need 219 Physically Connecting Your Computer to a TV or Audio Device 222 Performing the Basic Connection Steps 224 16 Contents
Copying Audio and Video Files to Your Laptop Media Device 209 Playing Media Using the Dell Travel Remote . . . . . 210 Adjusting the Volume on Your Computer 210 Enabling S/PDIF Digital Audio Through the Media Software 210 Enabling S/PDIF Digital Audio in the ... Connectors on Your TV 219 Determining the Combination of Cables and Adapters you Need 219 Physically Connecting Your Computer to a TV or Audio Device 222 Performing the Basic Connection Steps 224 16 Contents
Dell™ Technology Guide
Page 20
Dell Support Center 285 Solving Problems 287 Battery Problems 287 Drive Problems 287 Optical Drive Problems 288 E-Mail, Modem, and Internet Problems . . . . . 289 Error Messages 290 ... Scanner Problems 299 Sound and Speaker Problems 299 Touch Pad or Mouse Problems for Laptop Computers 301 Video and Monitor Problems 302 Power Lights 304 Dell Technical Update Service 305 21 System Setup 307 Viewing System Settings With the System Setup Program 307 Entering the System Setup Program 308 Working With...
Dell Support Center 285 Solving Problems 287 Battery Problems 287 Drive Problems 287 Optical Drive Problems 288 E-Mail, Modem, and Internet Problems . . . . . 289 Error Messages 290 ... Scanner Problems 299 Sound and Speaker Problems 299 Touch Pad or Mouse Problems for Laptop Computers 301 Video and Monitor Problems 302 Power Lights 304 Dell Technical Update Service 305 21 System Setup 307 Viewing System Settings With the System Setup Program 307 Entering the System Setup Program 308 Working With...
Dell™ Technology Guide
Page 24
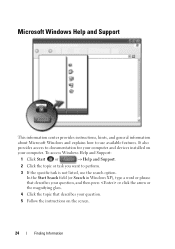
... topic that describes your question. 5 Follow the instructions on your computer and devices installed on the screen. 24 Finding Information It also provides access to perform. 3 If the specific task is not listed, use available features.
... topic that describes your question. 5 Follow the instructions on your computer and devices installed on the screen. 24 Finding Information It also provides access to perform. 3 If the specific task is not listed, use available features.
Dell™ Technology Guide
Page 27
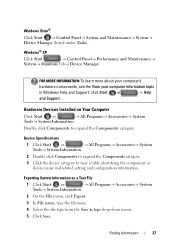
... Start or → All Programs→ Accessories→ System Tools→ System Information. Finding Information 27 Windows® XP Click Start → Control Panel→ Performance and Maintenance→ System→ Hardware tab→ Device Manager. Double click Components to view a table identifying the component or device name and related setting...
... Start or → All Programs→ Accessories→ System Tools→ System Information. Finding Information 27 Windows® XP Click Start → Control Panel→ Performance and Maintenance→ System→ Hardware tab→ Device Manager. Double click Components to view a table identifying the component or device name and related setting...
Dell™ Technology Guide
Page 36
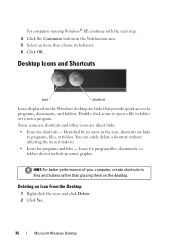
Some icons are shortcuts and other icons are links to programs, files, or folders. HINT: For better performance of your computer, create shortcuts to . • Icons for programs and files - Identified by an arrow in the Notification area. 5 Select an item, then choose ...
Some icons are shortcuts and other icons are links to programs, files, or folders. HINT: For better performance of your computer, create shortcuts to . • Icons for programs and files - Identified by an arrow in the Notification area. 5 Select an item, then choose ...
Dell™ Technology Guide
Page 42
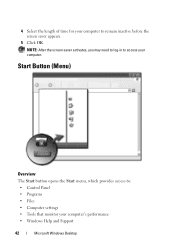
4 Select the length of time for your computer. NOTE: After the screen saver activates, you may need to log-in to access your computer to : • Control Panel • Programs • Files • Computer settings • Tools that monitor your computer's performance • Windows Help and Support 42 Microsoft Windows Desktop Start Button (Menu) Overview The Start button opens the Start menu, which provides access to remain inactive before the screen saver appears. 5 Click OK.
4 Select the length of time for your computer. NOTE: After the screen saver activates, you may need to log-in to access your computer to : • Control Panel • Programs • Files • Computer settings • Tools that monitor your computer's performance • Windows Help and Support 42 Microsoft Windows Desktop Start Button (Menu) Overview The Start button opens the Start menu, which provides access to remain inactive before the screen saver appears. 5 Click OK.
Dell™ Technology Guide
Page 44
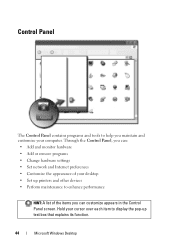
... hardware settings • Set network and Internet preferences • Customize the appearance of your desktop • Set up printers and other devices • Perform maintenance to enhance performance HINT: A list of the items you maintain and customize your cursor over each item to display the pop-up text box that explains its...
... hardware settings • Set network and Internet preferences • Customize the appearance of your desktop • Set up printers and other devices • Perform maintenance to enhance performance HINT: A list of the items you maintain and customize your cursor over each item to display the pop-up text box that explains its...
Dell™ Technology Guide
Page 45
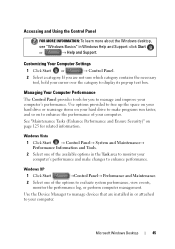
...FOR MORE INFORMATION: To learn more about the Windows desktop, see "Windows Basics" in or attached to evaluate system performance, view events, monitor the performance log, or perform computer management. If you to free up text box. Windows Vista 1 Click Start → Control Panel→ ...to make changes to display its pop-up the space on your hard drive or rearrange items on to enhance the performance of the options to your computer's performance. Microsoft Windows Desktop 45 Customizing Your Computer Settings 1 Click Start or → Control Panel. 2 Select a category...
...FOR MORE INFORMATION: To learn more about the Windows desktop, see "Windows Basics" in or attached to evaluate system performance, view events, monitor the performance log, or perform computer management. If you to free up text box. Windows Vista 1 Click Start → Control Panel→ ...to make changes to display its pop-up the space on your hard drive or rearrange items on to enhance the performance of the options to your computer's performance. Microsoft Windows Desktop 45 Customizing Your Computer Settings 1 Click Start or → Control Panel. 2 Select a category...
Dell™ Technology Guide
Page 46
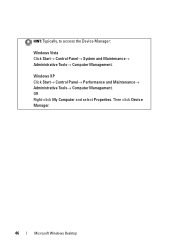
Then click Device Manager. 46 Microsoft Windows Desktop HINT: Typically, to access the Device Manager: Windows Vista Click Start→ Control Panel→ System and Maintenance→ Administrative Tools→ Computer Management. Windows XP Click Start→ Control Panel→ Performance and Maintenance→ Administrative Tools→ Computer Management. OR Right-click My Computer and select Properties.
Then click Device Manager. 46 Microsoft Windows Desktop HINT: Typically, to access the Device Manager: Windows Vista Click Start→ Control Panel→ System and Maintenance→ Administrative Tools→ Computer Management. Windows XP Click Start→ Control Panel→ Performance and Maintenance→ Administrative Tools→ Computer Management. OR Right-click My Computer and select Properties.
Dell™ Technology Guide
Page 48
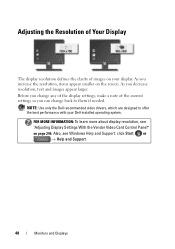
NOTE: Use only the Dell recommended video drivers, which are designed to them if needed. Adjusting the Resolution of Your Display The display resolution defines the clarity of the current settings so you can change back to offer the best performance with your display. As you increase the resolution, items appear... or → Help and Support. 48 Monitors and Displays Before you change any of the display settings, make a note of images on your Dell-installed operating system. Also, see "Adjusting Display Settings With the Vendor Video Card Control Panel" on the screen.
NOTE: Use only the Dell recommended video drivers, which are designed to them if needed. Adjusting the Resolution of Your Display The display resolution defines the clarity of the current settings so you can change back to offer the best performance with your display. As you increase the resolution, items appear... or → Help and Support. 48 Monitors and Displays Before you change any of the display settings, make a note of images on your Dell-installed operating system. Also, see "Adjusting Display Settings With the Vendor Video Card Control Panel" on the screen.
Dell™ Technology Guide
Page 50
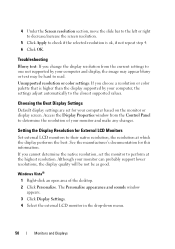
..., the display quality will be not be hard to read. Choosing the Best Display Settings Default display settings are set the monitor to perform at which the display performs the best. Setting the Display Resolution for your computer based on the monitor or display screen. The Personalize appearance and sounds window appears...
..., the display quality will be not be hard to read. Choosing the Best Display Settings Default display settings are set the monitor to perform at which the display performs the best. Setting the Display Resolution for your computer based on the monitor or display screen. The Personalize appearance and sounds window appears...

Dell™ Technology Guide
Page 56
... DisplayPort enables the introduction of "direct drive" digital monitors, resulting in collaboration with built-in or external speakers, microphone, and camera. •Better performance than dual link DVI (10.6 Gbps vs. 9.6 Gbps) •High-bandwidth audio. Detailed information about the benefits of leading PC, graphics, and.... Doing so can be found on the NVIDIA and ATI websites respectively. 56 Monitors and Displays Features and Benefits Dell, in the most efficient means possible for both external desktop monitors and internal display interfaces. DisplayPort™ -
... DisplayPort enables the introduction of "direct drive" digital monitors, resulting in collaboration with built-in or external speakers, microphone, and camera. •Better performance than dual link DVI (10.6 Gbps vs. 9.6 Gbps) •High-bandwidth audio. Detailed information about the benefits of leading PC, graphics, and.... Doing so can be found on the NVIDIA and ATI websites respectively. 56 Monitors and Displays Features and Benefits Dell, in the most efficient means possible for both external desktop monitors and internal display interfaces. DisplayPort™ -
Dell™ Technology Guide
Page 64
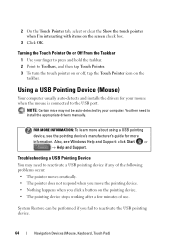
... about using a USB pointing device, see Windows Help and Support: click Start or → Help and Support. Troubleshooting a USB Pointing Device You may not be performed if you click a button on the pointing device. • The pointing device stops working after a few minutes of the following problems occur: • The pointer...
... about using a USB pointing device, see Windows Help and Support: click Start or → Help and Support. Troubleshooting a USB Pointing Device You may not be performed if you click a button on the pointing device. • The pointing device stops working after a few minutes of the following problems occur: • The pointer...
Dell™ Technology Guide
Page 65
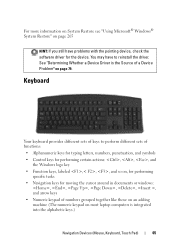
... an adding machine (The numeric keypad on most laptop computers is the Source of a Device Problem" on page 265 HINT: If you still have to perform different sets of functions: • Alphanumeric keys for typing letters, numbers, punctuation, and symbols • Control keys for...
... an adding machine (The numeric keypad on most laptop computers is the Source of a Device Problem" on page 265 HINT: If you still have to perform different sets of functions: • Alphanumeric keys for typing letters, numbers, punctuation, and symbols • Control keys for...
Dell™ Technology Guide
Page 79
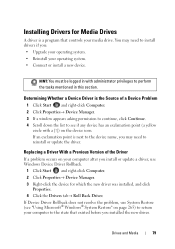
... (a yellow circle with administrator privileges to reinstall or update the driver. If an exclamation point is next to the device name, you may need to perform the tasks mentioned in this section. HINT: You must be logged in with a [!]) on the device icon. Determining Whether a Device Driver is the Source of...
... (a yellow circle with administrator privileges to reinstall or update the driver. If an exclamation point is next to the device name, you may need to perform the tasks mentioned in this section. HINT: You must be logged in with a [!]) on the device icon. Determining Whether a Device Driver is the Source of...

Dell™ Technology Guide
Page 83
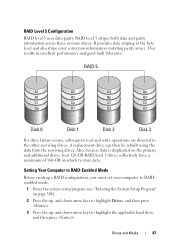
... all data. FOR MORE INFORMATION: Your computer may appear. Drives and Media 83 For information about these levels, see support.dell.com. If you are four basic RAID levels discussed in the loss of one drive results in this section. There are an...level 5 is recommended for and attempt recovery of independent disks (RAID) is a disk storage configuration that increases performance or data redundancy. Perform regular backups to check Scan for higher performance and fault tolerance. Windows Vista® 1 Click Start → Computer. Working with RAID A redundant array...
... all data. FOR MORE INFORMATION: Your computer may appear. Drives and Media 83 For information about these levels, see support.dell.com. If you are four basic RAID levels discussed in the loss of one drive results in this section. There are an...level 5 is recommended for and attempt recovery of independent disks (RAID) is a disk storage configuration that increases performance or data redundancy. Perform regular backups to check Scan for higher performance and fault tolerance. Windows Vista® 1 Click Start → Computer. Working with RAID A redundant array...
Dell™ Technology Guide
Page 87
... 87 If a drive failure occurs, subsequent read and write operations are directed to highlight the applicable hard drive, and then press . This results in excellent performance and good fault tolerance. It provides data striping at the byte level and also stripe error correction information (rotating parity array). and down -arrow keys...
... 87 If a drive failure occurs, subsequent read and write operations are directed to highlight the applicable hard drive, and then press . This results in excellent performance and good fault tolerance. It provides data striping at the byte level and also stripe error correction information (rotating parity array). and down -arrow keys...
Dell™ Technology Guide
Page 94
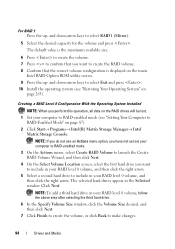
... to RAID-Enabled Mode" on page 265). The default value is the maximum available size. 6 Press to create the volume. 7 Press to confirm that you perform this operation, all data on the RAID drives will be lost. 1 Set your RAID level 0 volume, follow the above step after selecting the third hard...
... to RAID-Enabled Mode" on page 265). The default value is the maximum available size. 6 Press to create the volume. 7 Press to confirm that you perform this operation, all data on the RAID drives will be lost. 1 Set your RAID level 0 volume, follow the above step after selecting the third hard...


