Service Manual
Page 7
19 Coin-Cell Battery 87 Removing the Coin-Cell Battery 87 Replacing the Coin-Cell Battery 88 20 Thermal Cooling Assembly 89 Removing the Thermal Cooling Assembly 89 Replacing the Thermal Cooling Assembly 90 21 Processor Module 91 Removing the Processor Module 91 Replacing the Processor Module 92 22 Hard-Drive Assembly 95 Removing the Hard-Drive Assembly 95 Replacing the Hard-Drive Assembly 97 23 I/O Board 99 Removing the I/O Board 99 Replacing the I/O Board 100 24 AC-Adapter Connector 101 Removing the AC-Adapter Connector 101 Contents 7
19 Coin-Cell Battery 87 Removing the Coin-Cell Battery 87 Replacing the Coin-Cell Battery 88 20 Thermal Cooling Assembly 89 Removing the Thermal Cooling Assembly 89 Replacing the Thermal Cooling Assembly 90 21 Processor Module 91 Removing the Processor Module 91 Replacing the Processor Module 92 22 Hard-Drive Assembly 95 Removing the Hard-Drive Assembly 95 Replacing the Hard-Drive Assembly 97 23 I/O Board 99 Removing the I/O Board 99 Replacing the I/O Board 100 24 AC-Adapter Connector 101 Removing the AC-Adapter Connector 101 Contents 7
Service Manual
Page 8
Replacing the AC-Adapter Connector 102 25 Flashing the BIOS 105 8 Contents
Replacing the AC-Adapter Connector 102 25 Flashing the BIOS 105 8 Contents
Service Manual
Page 25
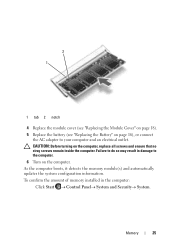
... 4 Replace the module cover (see "Replacing the Module Cover" on page 18). 5 Replace the battery (see "Replacing the Battery" on page 16), or connect the AC adapter to the computer. 6 Turn on the computer, replace all screws and ensure that no stray screws remain inside the computer.
... 4 Replace the module cover (see "Replacing the Module Cover" on page 18). 5 Replace the battery (see "Replacing the Battery" on page 16), or connect the AC adapter to the computer. 6 Turn on the computer, replace all screws and ensure that no stray screws remain inside the computer.

Service Manual
Page 77
...cards by your computer. 17 System Board WARNING: Before working inside your computer, read the safety information that is not authorized by Dell is not covered by their edges, and avoid touching pins and contacts. Removing the System Board 1 Follow the instructions in "...system board, remove the main battery (see the Regulatory Compliance Homepage at dell.com/regulatory_compliance. CAUTION: To help prevent damage to step 5 in "Removing the Optical Drive" on page 19. 7 Disconnect the AC-adapter connector cable from the connector on your computer). For additional safety best practices...
...cards by your computer. 17 System Board WARNING: Before working inside your computer, read the safety information that is not authorized by Dell is not covered by their edges, and avoid touching pins and contacts. Removing the System Board 1 Follow the instructions in "...system board, remove the main battery (see the Regulatory Compliance Homepage at dell.com/regulatory_compliance. CAUTION: To help prevent damage to step 5 in "Removing the Optical Drive" on page 19. 7 Disconnect the AC-adapter connector cable from the connector on your computer). For additional safety best practices...

Service Manual
Page 78
1 1 AC-adapter connector cable 8 Remove the keyboard (see "Removing the Keyboard" on page 27). 9 Remove the palm-rest assembly (see "Removing the Palm-Rest Assembly" on page 31). 10 Remove the thermal fan (see "Removing the Thermal Fan" on page 49). 11 Loosen the display cable grounding screw. 12 Disconnect the display cable and speakers cable from the connectors on the system board. 13 Remove the five screws that secure the system board to the computer base. 78 System Board
1 1 AC-adapter connector cable 8 Remove the keyboard (see "Removing the Keyboard" on page 27). 9 Remove the palm-rest assembly (see "Removing the Palm-Rest Assembly" on page 31). 10 Remove the thermal fan (see "Removing the Thermal Fan" on page 49). 11 Loosen the display cable grounding screw. 12 Disconnect the display cable and speakers cable from the connectors on the system board. 13 Remove the five screws that secure the system board to the computer base. 78 System Board
Service Manual
Page 81
...-rest assembly (see "Replacing the Palm-Rest Assembly" on page 35). 14 Replace the keyboard (see "Replacing the Keyboard" on page 29). 15 Connect the AC-adapter connector cable to the connector on the system board. 16 Follow the instructions from step 4 to step 5 in "Replacing the Optical Drive" on page 21...
...-rest assembly (see "Replacing the Palm-Rest Assembly" on page 35). 14 Replace the keyboard (see "Replacing the Keyboard" on page 29). 15 Connect the AC-adapter connector cable to the connector on the system board. 16 Follow the instructions from step 4 to step 5 in "Replacing the Optical Drive" on page 21...
Service Manual
Page 82
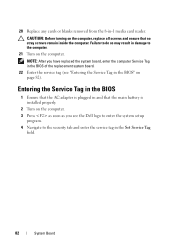
.... 20 Replace any cards or blanks removed from the 8-in the BIOS" on page 82). Entering the Service Tag in the BIOS 1 Ensure that the AC adapter is installed properly. 2 Turn on the computer. 3 Press as soon as you have replaced the system board, enter the computer Service Tag in the BIOS... of the replacement system board. 22 Enter the service tag (see the Dell logo to enter the system setup program. 4 Navigate to the computer. 21 Turn on the computer. Failure to do so may result in damage to...
.... 20 Replace any cards or blanks removed from the 8-in the BIOS" on page 82). Entering the Service Tag in the BIOS 1 Ensure that the AC adapter is installed properly. 2 Turn on the computer. 3 Press as soon as you have replaced the system board, enter the computer Service Tag in the BIOS... of the replacement system board. 22 Enter the service tag (see the Dell logo to enter the system setup program. 4 Navigate to the computer. 21 Turn on the computer. Failure to do so may result in damage to...

Service Manual
Page 101
... board, remove the main battery (see "Removing the Battery" on page 69). 5 Remove the VGA connector board (see the Regulatory Compliance Homepage at dell.com/regulatory_compliance. Removing the AC-Adapter Connector 1 Follow the instructions in "Before You Begin" on page 9. 2 Follow the instructions from the routing guides. 7 Remove the screw that secures the...
... board, remove the main battery (see "Removing the Battery" on page 69). 5 Remove the VGA connector board (see the Regulatory Compliance Homepage at dell.com/regulatory_compliance. Removing the AC-Adapter Connector 1 Follow the instructions in "Before You Begin" on page 9. 2 Follow the instructions from the routing guides. 7 Remove the screw that secures the...

Service Manual
Page 102
...step 20 in "Before You Begin" on page 9. 2 Place the AC-adapter connector on the computer base. 3 Replace the screw that secures the AC-adapter connector to the computer base. 4 Route the AC-adapter connector cable through the routing guides. 5 Replace the VGA connector board (...see "Replacing the Display Assembly" on page 56). 8 Follow the instructions from step 7 to the computer. 102 AC-Adapter Connector 1 2 1 screw 2 AC-adapter connector cable Replacing the AC-Adapter Connector 1 Follow the instructions in "Replacing the System Board" on the computer, replace all screws and ensure that...
...step 20 in "Before You Begin" on page 9. 2 Place the AC-adapter connector on the computer base. 3 Replace the screw that secures the AC-adapter connector to the computer base. 4 Route the AC-adapter connector cable through the routing guides. 5 Replace the VGA connector board (...see "Replacing the Display Assembly" on page 56). 8 Follow the instructions from step 7 to the computer. 102 AC-Adapter Connector 1 2 1 screw 2 AC-adapter connector cable Replacing the AC-Adapter Connector 1 Follow the instructions in "Replacing the System Board" on the computer, replace all screws and ensure that...

Setup Guide
Page 5
...Before Setting Up Your Computer 5 Connect the AC Adapter 6 Connect the Network Cable (Optional 7 Press the Power Button 8 Set Up the Operating System 9 Create System Recovery Media (Recommended 10 Enable or Disable Wireless (Optional 12 Connect to the Internet (Optional 14 Using Your Inspiron Laptop 16 Right View Features 16 Left View... Drive 36 Display Features 38 Removing and Replacing the Top Cover (Optional 40 Removing and Replacing the Battery 44 Software Features 46 Dell DataSafe Online Backup 47 Dell Stage 48 Solving Problems 50 Beep Codes 50 Network Problems 51 3
...Before Setting Up Your Computer 5 Connect the AC Adapter 6 Connect the Network Cable (Optional 7 Press the Power Button 8 Set Up the Operating System 9 Create System Recovery Media (Recommended 10 Enable or Disable Wireless (Optional 12 Connect to the Internet (Optional 14 Using Your Inspiron Laptop 16 Right View Features 16 Left View... Drive 36 Display Features 38 Removing and Replacing the Top Cover (Optional 40 Removing and Replacing the Battery 44 Software Features 46 Dell DataSafe Online Backup 47 Dell Stage 48 Solving Problems 50 Beep Codes 50 Network Problems 51 3

Setup Guide
Page 8
However, power connectors and power strips vary among countries. Setting Up Your Inspiron Laptop Connect the AC Adapter Connect the AC adapter to your computer. 6 WARNING: The AC adapter works with electrical outlets worldwide. Using an incompatible cable or improperly connecting the cable to a power strip or electrical outlet may cause fire or permanent damage to the computer and then plug it into an electrical outlet or surge protector.
However, power connectors and power strips vary among countries. Setting Up Your Inspiron Laptop Connect the AC Adapter Connect the AC adapter to your computer. 6 WARNING: The AC adapter works with electrical outlets worldwide. Using an incompatible cable or improperly connecting the cable to a power strip or electrical outlet may cause fire or permanent damage to the computer and then plug it into an electrical outlet or surge protector.

Setup Guide
Page 13
NOTE: It is connected (see "Connect the AC Adapter" on the screen. Ensure that the AC adapter is recommended that you create a password reset disk as soon as you set up Microsoft Windows. Follow the instructions on page 6). 2. Insert the ...information on restoring your operating system using the system recovery media, see the Windows 7 support on page 65. Click Start → All Programs→ Dell DataSafe Local Backup. 4. For more information, see "System Recovery Media" on support.dell.com/MyNewDell. 11 Setting Up Your Inspiron Laptop To create system recovery media: 1.
NOTE: It is connected (see "Connect the AC Adapter" on the screen. Ensure that the AC adapter is recommended that you create a password reset disk as soon as you set up Microsoft Windows. Follow the instructions on page 6). 2. Insert the ...information on restoring your operating system using the system recovery media, see the Windows 7 support on page 65. Click Start → All Programs→ Dell DataSafe Local Backup. 4. For more information, see "System Recovery Media" on support.dell.com/MyNewDell. 11 Setting Up Your Inspiron Laptop To create system recovery media: 1.

Setup Guide
Page 25
NOTE: Before you buy a security cable, ensure that it fits into the security cable slot on your computer to a network or broadband device if you are using a wired network. 2 USB 3.0 connector - Connects your computer. 4 AC adapter connector - Attaches a commercially available security cable to power the computer and charge the battery. 23 Provides faster data transmission between your computer and USB devices. 3 Security cable slot - Using Your Inspiron Laptop 1 Network connector - Connects to the AC adapter to the computer.
NOTE: Before you buy a security cable, ensure that it fits into the security cable slot on your computer to a network or broadband device if you are using a wired network. 2 USB 3.0 connector - Connects your computer. 4 AC adapter connector - Attaches a commercially available security cable to power the computer and charge the battery. 23 Provides faster data transmission between your computer and USB devices. 3 Security cable slot - Using Your Inspiron Laptop 1 Network connector - Connects to the AC adapter to the computer.
Setup Guide
Page 27
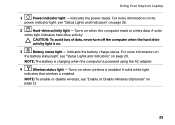
... charging when the computer is enabled. A solid white light indicates hard drive activity. A solid white light indicates that wireless is powered using the AC adapter. 4 Wireless status light - Using Your Inspiron Laptop 1 Power indicator light - CAUTION: To avoid loss of data, never turn off the computer when the hard drive activity light is...
... charging when the computer is enabled. A solid white light indicates hard drive activity. A solid white light indicates that wireless is powered using the AC adapter. 4 Wireless status light - Using Your Inspiron Laptop 1 Power indicator light - CAUTION: To avoid loss of data, never turn off the computer when the hard drive activity light is...
Setup Guide
Page 28
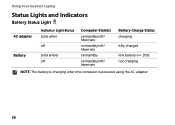
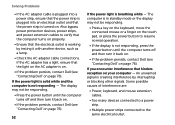
Using Your Inspiron Laptop Status Lights and Indicators Battery Status Light AC adapter Battery Indicator Light Status solid white off solid amber off Computer State(s) on/standby/off/ hibernate on/standby/off/ hibernate on/standby on/standby/off/ hibernate Battery Charge Status charging fully charged low battery (
Using Your Inspiron Laptop Status Lights and Indicators Battery Status Light AC adapter Battery Indicator Light Status solid white off solid amber off Computer State(s) on/standby/off/ hibernate on/standby/off/ hibernate on/standby on/standby/off/ hibernate Battery Charge Status charging fully charged low battery (

Setup Guide
Page 42
NOTE: You can purchase additional replaceable top covers at dell.com. 40 Press and hold the top cover release button, and then slide the top cover. To remove the top cover: 1. Turn off the computer and close the display. 2. Using Your Inspiron Laptop Removing and Replacing the Top Cover (Optional) WARNING: Before you begin any of the procedures in this section, follow the safety instructions that shipped with your computer. WARNING: Before removing the top cover, shut down the computer, and remove external cables (including the AC adapter).
NOTE: You can purchase additional replaceable top covers at dell.com. 40 Press and hold the top cover release button, and then slide the top cover. To remove the top cover: 1. Turn off the computer and close the display. 2. Using Your Inspiron Laptop Removing and Replacing the Top Cover (Optional) WARNING: Before you begin any of the procedures in this section, follow the safety instructions that shipped with your computer. WARNING: Before removing the top cover, shut down the computer, and remove external cables (including the AC adapter).
Setup Guide
Page 46
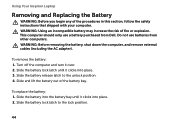
... battery out of the procedures in this section, follow the safety instructions that shipped with your computer. This computer should only use batteries from Dell. Using Your Inspiron Laptop Removing and Replacing the Battery WARNING: Before you begin any of the battery bay. Slide the battery lock latch to the unlock position... battery lock latch until it over. 2. To replace the battery: 1. WARNING: Before removing the battery, shut down the computer, and remove external cables (including the AC adapter).
... battery out of the procedures in this section, follow the safety instructions that shipped with your computer. This computer should only use batteries from Dell. Using Your Inspiron Laptop Removing and Replacing the Battery WARNING: Before you begin any of the battery bay. Slide the battery lock latch to the unlock position... battery lock latch until it over. 2. To replace the battery: 1. WARNING: Before removing the battery, shut down the computer, and remove external cables (including the AC adapter).

Setup Guide
Page 53
... outlet. 51 The computer resumes normal operation if it is loose or damaged. The network cable is plugged in hibernate mode. • Reseat the AC adapter cable into the AC adapter, and to ensure it is enabled on the computer (see "Setting Up a Wireless Connection" on the computer, into the power connector on page...
... outlet. 51 The computer resumes normal operation if it is loose or damaged. The network cable is plugged in hibernate mode. • Reseat the AC adapter cable into the AC adapter, and to ensure it is enabled on the computer (see "Setting Up a Wireless Connection" on the computer, into the power connector on page...
Setup Guide
Page 54
... strip, ensure that the power strip is plugged into an electrical outlet and that the light on the AC adapter is on. • If the problem persists, contact Dell (see "Contacting Dell" on page 76). If the AC adapter has a light, ensure that the power strip is breathing white - The display may not be responding. •...
... strip, ensure that the power strip is plugged into an electrical outlet and that the light on the AC adapter is on. • If the problem persists, contact Dell (see "Contacting Dell" on page 76). If the AC adapter has a light, ensure that the power strip is breathing white - The display may not be responding. •...

Setup Guide
Page 55
End the program: 1. Select the program that is firmly connected to the computer and to see if that the AC adapter cable is no longer responding. 4. Click End Task. 53 If you are not using to the electrical outlet. Ensure that resolves the problem. &#.../manuals). • Reseat the memory module(s) into the connector(s) (see the Service Manual at support.dell.com/manuals). • If the problem persists, contact Dell (see "Contacting Dell" on page 76). Solving Problems Memory Problems If you receive an insufficient memory message - • Save and close any open files and ...
End the program: 1. Select the program that is firmly connected to the computer and to see if that the AC adapter cable is no longer responding. 4. Click End Task. 53 If you are not using to the electrical outlet. Ensure that resolves the problem. &#.../manuals). • Reseat the memory module(s) into the connector(s) (see the Service Manual at support.dell.com/manuals). • If the problem persists, contact Dell (see "Contacting Dell" on page 76). Solving Problems Memory Problems If you receive an insufficient memory message - • Save and close any open files and ...


