
User Guide
Page 4
... Connectors 46 Power Cable Connectors 47 Connecting and Disconnecting Drive Cables 47 Hard Drive 48 Removing a Hard Drive 48 Installing a Hard Drive 49 Adding a Second Hard Drive 52 Drive-Panel Inserts 54 Floppy Drive 57 Removing the Floppy Drive 57 Installing the Floppy Drive 58 CD/DVD Drive 60 Removing a CD/DVD Drive 60 Installing a CD/DVD Drive 61 PCI and PCI Express Cards and Serial...
... Connectors 46 Power Cable Connectors 47 Connecting and Disconnecting Drive Cables 47 Hard Drive 48 Removing a Hard Drive 48 Installing a Hard Drive 49 Adding a Second Hard Drive 52 Drive-Panel Inserts 54 Floppy Drive 57 Removing the Floppy Drive 57 Installing the Floppy Drive 58 CD/DVD Drive 60 Removing a CD/DVD Drive 60 Installing a CD/DVD Drive 61 PCI and PCI Express Cards and Serial...

User Guide
Page 5
... the I/O Panel 114 Drives 115 General Installation Guidelines 115 Connecting Drive Cables 115 Drive Interface Connectors 116 Power Cable Connectors 117 Connecting and Disconnecting Drive Cables 117 CD/DVD Drive 118 Removing a CD/DVD Drive 118 Installing a CD/DVD Drive 118 Floppy Drive 120 Removing a Floppy Drive 120 Installing a Floppy Drive 121 Hard Drive 123 Removing a Hard Drive 123 Installing a Hard Drive 124 PCI and PCI...
... the I/O Panel 114 Drives 115 General Installation Guidelines 115 Connecting Drive Cables 115 Drive Interface Connectors 116 Power Cable Connectors 117 Connecting and Disconnecting Drive Cables 117 CD/DVD Drive 118 Removing a CD/DVD Drive 118 Installing a CD/DVD Drive 118 Floppy Drive 120 Removing a Floppy Drive 120 Installing a Floppy Drive 121 Hard Drive 123 Removing a Hard Drive 123 Installing a Hard Drive 124 PCI and PCI...

User Guide
Page 7
Power Cable Connectors 176 Connecting and Disconnecting Drive Cables 177 Hard Drive 177 Removing a Hard Drive 177 Installing a Hard Drive 179 CD/DVD Drive 182 Removing a CD/DVD Drive 182 Installing a CD/DVD Drive 184 Floppy Drive 185 Removing a Floppy Drive 185 Installing a Floppy Drive 186 PCI and PCI Express Cards and Serial Port Adapters 189 PCI Express Cards 189 Installing a PCI Express Card...
Power Cable Connectors 176 Connecting and Disconnecting Drive Cables 177 Hard Drive 177 Removing a Hard Drive 177 Installing a Hard Drive 179 CD/DVD Drive 182 Removing a CD/DVD Drive 182 Installing a CD/DVD Drive 184 Floppy Drive 185 Removing a Floppy Drive 185 Installing a Floppy Drive 186 PCI and PCI Express Cards and Serial Port Adapters 189 PCI Express Cards 189 Installing a PCI Express Card...

User Guide
Page 8
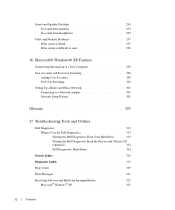
... Microsoft® Windows 223 Securing a Device in the Module Bay 224 Drives 227 General Installation Guidelines 227 Connecting Drive Cables 227 Drive Interface Connectors 227 Power Cable Connectors 228 Connecting and Disconnecting Drive Cables 228 Hard Drive 229 Installing a Hard Drive 229 Processor 233 8 Advanced Features LegacySelect Technology Control 239 Manageability 239 Alert Standard Format 239 Dell OpenManage™ IT...
... Microsoft® Windows 223 Securing a Device in the Module Bay 224 Drives 227 General Installation Guidelines 227 Connecting Drive Cables 227 Drive Interface Connectors 227 Power Cable Connectors 228 Connecting and Disconnecting Drive Cables 228 Hard Drive 229 Installing a Hard Drive 229 Processor 233 8 Advanced Features LegacySelect Technology Control 239 Manageability 239 Alert Standard Format 239 Dell OpenManage™ IT...

User Guide
Page 11
... 280 Enabling System Restore 280 Reinstalling Microsoft Windows XP 280 Before You Begin 280 Reinstalling Windows XP 281 Booting From the Operating System CD 281 Windows XP Setup 281 15 Solving Problems Battery Problems 285 Drive Problems 285 CD and DVD drive problems 285 Problems writing to a CD/DVD-RW drive 286 Hard drive problems 286 Keyboard Problems 286 Lockups and...
... 280 Enabling System Restore 280 Reinstalling Microsoft Windows XP 280 Before You Begin 280 Reinstalling Windows XP 281 Booting From the Operating System CD 281 Windows XP Setup 281 15 Solving Problems Battery Problems 285 Drive Problems 285 CD and DVD drive problems 285 Problems writing to a CD/DVD-RW drive 286 Hard drive problems 286 Keyboard Problems 286 Lockups and...
User Guide
Page 12
... 297 If the screen is blank 297 If the screen is difficult to read 298 16 Microsoft® Windows® XP Features Transferring Information to a New Computer 299 User Accounts and Fast User Switching 300 Adding User Accounts 300...Dell Diagnostics 313 Starting the Dell Diagnostics From Your Hard Drive . . . . 313 Starting the Dell Diagnostics From the Drivers and Utilities CD (Optional 313 Dell Diagnostics Main Menu 314 System Lights 316 Diagnostic Lights 317 Beep Codes 319 Error Messages 321 Resolving Software and Hardware Incompatibilities 325 Microsoft® Windows® XP...
... 297 If the screen is blank 297 If the screen is difficult to read 298 16 Microsoft® Windows® XP Features Transferring Information to a New Computer 299 User Accounts and Fast User Switching 300 Adding User Accounts 300...Dell Diagnostics 313 Starting the Dell Diagnostics From Your Hard Drive . . . . 313 Starting the Dell Diagnostics From the Drivers and Utilities CD (Optional 313 Dell Diagnostics Main Menu 314 System Lights 316 Diagnostic Lights 317 Beep Codes 319 Error Messages 321 Resolving Software and Hardware Incompatibilities 325 Microsoft® Windows® XP...

User Guide
Page 17
... Desktop System Software (DSS) - Finding Information 17 Service call and order status, warranty, and repair information NOTE: Corporate, government, and education customers can also use Windows XP • Documentation for my computer • Documentation for your Dell ...Windows Help and Support Center 1 Click the Start button and click Help and Support. 2 Type a word or phrase that describes your problem and click the arrow icon. 3 Click the topic that describes your computer and operating system and installs the updates appropriate for devices (such as memory, the hard drive...
... Desktop System Software (DSS) - Finding Information 17 Service call and order status, warranty, and repair information NOTE: Corporate, government, and education customers can also use Windows XP • Documentation for my computer • Documentation for your Dell ...Windows Help and Support Center 1 Click the Start button and click Help and Support. 2 Type a word or phrase that describes your problem and click the arrow icon. 3 Click the topic that describes your computer and operating system and installs the updates appropriate for devices (such as memory, the hard drive...

User Guide
Page 26
...is in a power-saving mode. • Blinking or solid amber - The computer is configured as a wake device in the Windows Device Manager. For more information about sleep modes and exiting from a power-saving mode, press the power button or use the ... the computer will flicker when the hard drive is in a normal operating state. • Blinking green - NOTICE: If your computer. www.dell.com | support.dell.com 1 CD/DVD drive 2 floppy drive 3 USB 2.0 connectors (2) 4 LAN indicator light 5 diagnostic lights 6 power button 7 power light 8 hard-drive activity light 9 headphone connector 10 ...
...is in a power-saving mode. • Blinking or solid amber - The computer is configured as a wake device in the Windows Device Manager. For more information about sleep modes and exiting from a power-saving mode, press the power button or use the ... the computer will flicker when the hard drive is in a normal operating state. • Blinking green - NOTICE: If your computer. www.dell.com | support.dell.com 1 CD/DVD drive 2 floppy drive 3 USB 2.0 connectors (2) 4 LAN indicator light 5 diagnostic lights 6 power button 7 power light 8 hard-drive activity light 9 headphone connector 10 ...
User Guide
Page 31
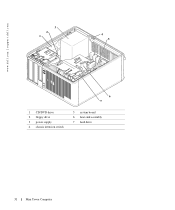
www.dell.com | support.dell.com 3 2 1 4 5 6 7 1 CD/DVD drive 2 floppy drive 3 power supply 4 chassis intrusion switch 5 system board 6 heat sink assembly 7 hard drive 31 Mini Tower Computer
www.dell.com | support.dell.com 3 2 1 4 5 6 7 1 CD/DVD drive 2 floppy drive 3 power supply 4 chassis intrusion switch 5 system board 6 heat sink assembly 7 hard drive 31 Mini Tower Computer
User Guide
Page 37
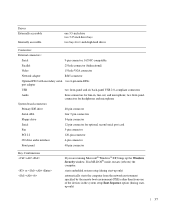
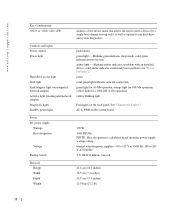
...port card Fan 5-pin connector PCI 2.2 120-pin connector CD drive audio interface 4-pin connector Front panel 40-pin connector Key Combinations or If you are running Microsoft® Windows® XP, brings up only) automatically starts the computer from the network ...environment specified by the remote boot environment (PXE) rather than from one 3.5-inch drive two 5.25-inch drive bays two bays for 1-inch-high hard drives Connectors External connectors: Serial...
...port card Fan 5-pin connector PCI 2.2 120-pin connector CD drive audio interface 4-pin connector Front panel 40-pin connector Key Combinations or If you are running Microsoft® Windows® XP, brings up only) automatically starts the computer from the network ...environment specified by the remote boot environment (PXE) rather than from one 3.5-inch drive two 5.25-inch drive bays two bays for 1-inch-high hard drives Connectors External connectors: Serial...
User Guide
Page 38
www.dell.com | support.dell.com Key Combinations or displays a boot device menu that allows the user to enter a device for 100-Mb operation; amber light - orange light for a single ...; See "Diagnostic Lights." AUX_PWR on state. manual selection power supplies-90 to 135 V at 50/60 Hz; 180 to run hard-drive and system diagnostics Controls and Lights Power control Power light Hard-drive access light Link light Link integrity light (on integrated network adapter) Activity light (on the back panel. yellow light for...
www.dell.com | support.dell.com Key Combinations or displays a boot device menu that allows the user to enter a device for 100-Mb operation; amber light - orange light for a single ...; See "Diagnostic Lights." AUX_PWR on state. manual selection power supplies-90 to 135 V at 50/60 Hz; 180 to run hard-drive and system diagnostics Controls and Lights Power control Power light Hard-drive access light Link light Link integrity light (on integrated network adapter) Activity light (on the back panel. yellow light for...

User Guide
Page 45
Drives Your computer supports: • Two serial ATA hard drives • Two floppy or optional Zip drives • Two CD or DVD drives NOTE: Due to the limited number of drive bays and IDE controllers on this computer, you will not be connected to the connector labeled "IDE" on the system board. 45 Serial ATA hard drives should be able to connect all supported devices at once. 2 1 3 1 CD/DVD drive 2 floppy drive 3 hard drive General Installation Guidelines Connect CD/DVD drives to the connectors labeled "SATA0," SATA1," "SATA2," or "SATA3" on the system board.
Drives Your computer supports: • Two serial ATA hard drives • Two floppy or optional Zip drives • Two CD or DVD drives NOTE: Due to the limited number of drive bays and IDE controllers on this computer, you will not be connected to the connector labeled "IDE" on the system board. 45 Serial ATA hard drives should be able to connect all supported devices at once. 2 1 3 1 CD/DVD drive 2 floppy drive 3 hard drive General Installation Guidelines Connect CD/DVD drives to the connectors labeled "SATA0," SATA1," "SATA2," or "SATA3" on the system board.

User Guide
Page 48
...: To avoid damage to verify that will sufficiently cushion it is configured for the drive to the drive, do not set the drive on a hard surface. Instead, set it on a surface, such as a foam pad, that it . www.dell.com | support.dell.com Hard Drive CAUTION: Before you begin this section, follow the safety instructions in the Product...
...: To avoid damage to verify that will sufficiently cushion it is configured for the drive to the drive, do not set the drive on a hard surface. Instead, set it on a surface, such as a foam pad, that it . www.dell.com | support.dell.com Hard Drive CAUTION: Before you begin this section, follow the safety instructions in the Product...

User Guide
Page 49
... tabs on each side of the drive and slide the drive up and out of the computer. 2 1 1 hard drive 2 release tabs (2) Installing a Hard Drive 1 Unpack the replacement hard drive, and prepare it for installation. 2 Check the documentation for the drive to verify that it is configured for your replacement hard drive does not have the plastic hard-drive bracket attached, remove the bracket...
... tabs on each side of the drive and slide the drive up and out of the computer. 2 1 1 hard drive 2 release tabs (2) Installing a Hard Drive 1 Unpack the replacement hard drive, and prepare it for installation. 2 Check the documentation for the drive to verify that it is configured for your replacement hard drive does not have the plastic hard-drive bracket attached, remove the bracket...

User Guide
Page 50
www.dell.com | support.dell.com 1 2 1 hard drive 2 hard-drive bracket 1 2 1 hard drive 2 hard-drive bracket 3 Gently slide the hard drive into the hard-drive bracket until it clicks into place. 50
www.dell.com | support.dell.com 1 2 1 hard drive 2 hard-drive bracket 1 2 1 hard drive 2 hard-drive bracket 3 Gently slide the hard drive into the hard-drive bracket until it clicks into place. 50

User Guide
Page 51
... instructions on installing any software required for instructions. 12 Test the hard drive by running the Dell Diagnostics. 13 If the drive you just installed is the primary drive, install your operating system on the system board. 6 Check all connectors to be certain that they are properly cabled and firmly seated. 7 Replace the computer ...
... instructions on installing any software required for instructions. 12 Test the hard drive by running the Dell Diagnostics. 13 If the drive you just installed is the primary drive, install your operating system on the system board. 6 Check all connectors to be certain that they are properly cabled and firmly seated. 7 Replace the computer ...

User Guide
Page 52
NOTICE: To avoid damage to the drive, do not set the drive on a hard surface. www.dell.com | support.dell.com Adding a Second Hard Drive CAUTION: Before you begin this section, follow the safety instructions in the Product Information Guide. NOTICE: If you are replacing a hard drive that it . Instead, set it on a surface, such as a foam pad, that will...
NOTICE: To avoid damage to the drive, do not set the drive on a hard surface. www.dell.com | support.dell.com Adding a Second Hard Drive CAUTION: Before you begin this section, follow the safety instructions in the Product Information Guide. NOTICE: If you are replacing a hard drive that it . Instead, set it on a surface, such as a foam pad, that will...

User Guide
Page 53
c Gently slide the first hard drive into the lower bay until it clicks into place. 6 Gently slide the new hard drive into the upper bay until it clicks into place. 7 Connect the power cable to the drives. 8 Attach the serial ATA connector removed in step 5 to the first hard drive. 9 Locate an unused serial ATA connector on the system board and attach a drive cable to this connector and to the second hard drive. 53
c Gently slide the first hard drive into the lower bay until it clicks into place. 6 Gently slide the new hard drive into the upper bay until it clicks into place. 7 Connect the power cable to the drives. 8 Attach the serial ATA connector removed in step 5 to the first hard drive. 9 Locate an unused serial ATA connector on the system board and attach a drive cable to this connector and to the second hard drive. 53

User Guide
Page 54
Then remove it from the hinges. 54 Drive-Panel Inserts If you are installing a new floppy or CD/DVD drive instead of replacing a drive, remove the drivepanel inserts. 1 Follow the procedures in "Before You Begin." 2 Remove the drive panel by sliding the drive release latch downward to open the panel. www.dell.com | support.dell.com 1 2 3 1 hard-drive cable 2 hard-drive cable on system board 3 power cable 10 Replace the computer cover.
Then remove it from the hinges. 54 Drive-Panel Inserts If you are installing a new floppy or CD/DVD drive instead of replacing a drive, remove the drivepanel inserts. 1 Follow the procedures in "Before You Begin." 2 Remove the drive panel by sliding the drive release latch downward to open the panel. www.dell.com | support.dell.com 1 2 3 1 hard-drive cable 2 hard-drive cable on system board 3 power cable 10 Replace the computer cover.

User Guide
Page 98
... "Diagnostic Lights" for any installed PCI and PCI Express cards. Insert a floppy disk into the appropriate connector. Insert the power cable. 98 Desktop Computer Use the headphone connector to attach a microphone. Back View 1 2 3 4 5 6 1 card slots 2 back-panel connectors 3 power...this drive. The computer is in the Windows Device Manager. Insert a CD or DVD (if applicable) into this drive. www.dell.com | support.dell.com 5 power light 6 diagnostic lights 7 hard-drive activity light 8 headphone connector 9 microphone connector 10 floppy drive 11 CD/DVD drive The ...
... "Diagnostic Lights" for any installed PCI and PCI Express cards. Insert a floppy disk into the appropriate connector. Insert the power cable. 98 Desktop Computer Use the headphone connector to attach a microphone. Back View 1 2 3 4 5 6 1 card slots 2 back-panel connectors 3 power...this drive. The computer is in the Windows Device Manager. Insert a CD or DVD (if applicable) into this drive. www.dell.com | support.dell.com 5 power light 6 diagnostic lights 7 hard-drive activity light 8 headphone connector 9 microphone connector 10 floppy drive 11 CD/DVD drive The ...


