Service Manual
Page 1
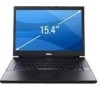
...® Windows® operating systems are not followed. A02 All rights reserved. is a registered trademark of Bluetooth SIG Inc. Dell Inc. CAUTION: A CAUTION indicates potential damage to either trademarks or registered trademarks of Microsoft Corporation in the United States and/or... button logo are trademarks of Dell Inc.; Other trademarks and trade names may be used in this text: Dell, the DELL logo, and Latitude are either the entities claiming the marks and names or their products. Dell™ Latitude™ E6500 Service Manual Troubleshooting Before Working on Your ...
...® Windows® operating systems are not followed. A02 All rights reserved. is a registered trademark of Bluetooth SIG Inc. Dell Inc. CAUTION: A CAUTION indicates potential damage to either trademarks or registered trademarks of Microsoft Corporation in the United States and/or... button logo are trademarks of Dell Inc.; Other trademarks and trade names may be used in this text: Dell, the DELL logo, and Latitude are either the entities claiming the marks and names or their products. Dell™ Latitude™ E6500 Service Manual Troubleshooting Before Working on Your ...
Service Manual
Page 2
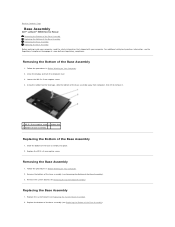
...Base Assembly 1. Follow the procedures in Before Working on Your Computer. 2. Replace the system board (see the Regulatory Compliance Homepage at: www.dell.com/regulatory_compliance. Removing the Bottom of the base assembly into place. 2. Replace the M2.5 x 5-mm captive screw. Removing the Base ... feet for leverage, slide the bottom of the base assembly away from computer, then lift to Contents Page Base Assembly Dell™ Latitude™ E6500 Service Manual Removing the Bottom of the Base Assembly Replacing the Bottom of the Base Assembly). 3. Remove the bottom of the base...
...Base Assembly 1. Follow the procedures in Before Working on Your Computer. 2. Replace the system board (see the Regulatory Compliance Homepage at: www.dell.com/regulatory_compliance. Removing the Bottom of the base assembly into place. 2. Replace the M2.5 x 5-mm captive screw. Removing the Base ... feet for leverage, slide the bottom of the base assembly away from computer, then lift to Contents Page Base Assembly Dell™ Latitude™ E6500 Service Manual Removing the Bottom of the Base Assembly Replacing the Bottom of the Base Assembly). 3. Remove the bottom of the base...
Service Manual
Page 4
... as a processor by its edges, not by your warranty. Back to Contents Page Before Working on Your Computer Dell™ Latitude™ E6500 Service Manual Recommended Tools What You Need to prevent the computer cover from being scratched. 2. Recommended Tools The procedures in your... computer and certain system components may only be done by Dell is off your computer. Hold a component such as a connector ...
... as a processor by its edges, not by your warranty. Back to Contents Page Before Working on Your Computer Dell™ Latitude™ E6500 Service Manual Recommended Tools What You Need to prevent the computer cover from being scratched. 2. Recommended Tools The procedures in your... computer and certain system components may only be done by Dell is off your computer. Hold a component such as a connector ...
Service Manual
Page 7
...you do not use the One Time Boot Menu, you do not have a BIOS-update program CD, download the update from the Dell™ Support website at support.dell.com and follow the instructions on your computer's desktop. 2. Ensure the AC adapter is installed properly. 2. Doing so may cause... the BIOS From the Hard Drive CAUTION: Plug the AC adapter into a known good power source to Contents Page Flashing the BIOS Dell™ Latitude™ E6500 Service Manual Flashing the BIOS From a CD/DVD Flashing the BIOS From the Hard Drive If a BIOS-update program CD is complete, the ...
...you do not use the One Time Boot Menu, you do not have a BIOS-update program CD, download the update from the Dell™ Support website at support.dell.com and follow the instructions on your computer's desktop. 2. Ensure the AC adapter is installed properly. 2. Doing so may cause... the BIOS From the Hard Drive CAUTION: Plug the AC adapter into a known good power source to Contents Page Flashing the BIOS Dell™ Latitude™ E6500 Service Manual Flashing the BIOS From a CD/DVD Flashing the BIOS From the Hard Drive If a BIOS-update program CD is complete, the ...
Service Manual
Page 8
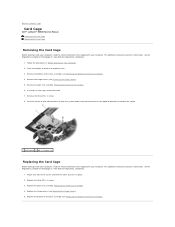
... the Hinge Covers). 5. Attach one side to release it in the opposite direction to Contents Page Card Cage Dell™ Latitude™ E6500 Service Manual Removing the Card Cage Replacing the Card Cage Removing the Card Cage Before working inside your computer, read the safety... read the safety information that shipped with your computer. For additional safety best practices information, see the Regulatory Compliance Homepage at : www.dell.com/regulatory_compliance. 1. Remove the palm rest assembly (Removing the Palm Rest Assembly). 6. If a card is in Before Working on Your ...
... the Hinge Covers). 5. Attach one side to release it in the opposite direction to Contents Page Card Cage Dell™ Latitude™ E6500 Service Manual Removing the Card Cage Replacing the Card Cage Removing the Card Cage Before working inside your computer, read the safety... read the safety information that shipped with your computer. For additional safety best practices information, see the Regulatory Compliance Homepage at : www.dell.com/regulatory_compliance. 1. Remove the palm rest assembly (Removing the Palm Rest Assembly). 6. If a card is in Before Working on Your ...
Service Manual
Page 10
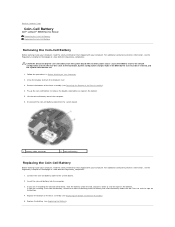
Back to Contents Page Coin-Cell Battery Dell™ Latitude™ E6500 Service Manual Removing the Coin-Cell Battery Replacing the Coin-Cell Battery Removing the Coin-Cell Battery Before working inside your computer, read the safety information that...Bottom of the Base Assembly). 4. Connect the coin-cell battery cable to the build date. Replace the battery (see the Regulatory Compliance Homepage at : www.dell.com/regulatory_compliance. 1. Press to seal the tape on Your Computer. 2. CAUTION: Disconnecting the coin-cell battery from the battery and slide the battery under ...
Back to Contents Page Coin-Cell Battery Dell™ Latitude™ E6500 Service Manual Removing the Coin-Cell Battery Replacing the Coin-Cell Battery Removing the Coin-Cell Battery Before working inside your computer, read the safety information that...Bottom of the Base Assembly). 4. Connect the coin-cell battery cable to the build date. Replace the battery (see the Regulatory Compliance Homepage at : www.dell.com/regulatory_compliance. 1. Press to seal the tape on Your Computer. 2. CAUTION: Disconnecting the coin-cell battery from the battery and slide the battery under ...
Service Manual
Page 12
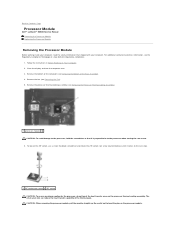
...with your skin can reduce the heat transfer capability of the Base Assembly). 4. Back to Contents Page Processor Module Dell™ Latitude™ E6500 Service Manual Removing the Processor Module Replacing the Processor Module Removing the Processor Module Before working inside your computer, read the ... transfer areas on the processor thermal-cooling assembly. Remove the processor thermal-cooling assembly (see the Regulatory Compliance Homepage at: www.dell.com/regulatory_compliance. 1. To loosen the ZIF socket, use a small, flat-blade screwdriver and rotate the ZIF-socket cam screw ...
...with your skin can reduce the heat transfer capability of the Base Assembly). 4. Back to Contents Page Processor Module Dell™ Latitude™ E6500 Service Manual Removing the Processor Module Replacing the Processor Module Removing the Processor Module Before working inside your computer, read the ... transfer areas on the processor thermal-cooling assembly. Remove the processor thermal-cooling assembly (see the Regulatory Compliance Homepage at: www.dell.com/regulatory_compliance. 1. To loosen the ZIF socket, use a small, flat-blade screwdriver and rotate the ZIF-socket cam screw ...
Service Manual
Page 14
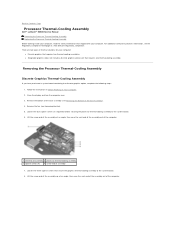
...the three captive screws that requires one thermal-cooling assembly. Back to Contents Page Processor Thermal-Cooling Assembly Dell™ Latitude™ E6500 Service Manual Removing the Processor Thermal-Cooling Assembly Replacing the Processor Thermal-Cooling Assembly Before working inside your computer. Removing... that requires two thermal-cooling assemblies. For additional safety best practices information, see the Regulatory Compliance Homepage at: www.dell.com/regulatory_compliance. Loosen the four captive screws (in Before Working on Your Computer. 2. There are two types of ...
...the three captive screws that requires one thermal-cooling assembly. Back to Contents Page Processor Thermal-Cooling Assembly Dell™ Latitude™ E6500 Service Manual Removing the Processor Thermal-Cooling Assembly Replacing the Processor Thermal-Cooling Assembly Before working inside your computer. Removing... that requires two thermal-cooling assemblies. For additional safety best practices information, see the Regulatory Compliance Homepage at: www.dell.com/regulatory_compliance. Loosen the four captive screws (in Before Working on Your Computer. 2. There are two types of ...
Service Manual
Page 17
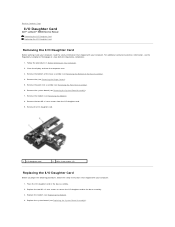
... base assembly (see Replacing the Modem). 4. Remove the modem (see the Regulatory Compliance Homepage at: www.dell.com/regulatory_compliance. 1. Place the I /O daughter card to the base assembly. 3. Back to Contents Page I/O Daughter Card Dell™ Latitude™ E6500 Service Manual Removing the I/O Daughter Card Replacing the I/O Daughter Card Removing the I/O Daughter Card Before working inside...
... base assembly (see Replacing the Modem). 4. Remove the modem (see the Regulatory Compliance Homepage at: www.dell.com/regulatory_compliance. 1. Place the I /O daughter card to the base assembly. 3. Back to Contents Page I/O Daughter Card Dell™ Latitude™ E6500 Service Manual Removing the I/O Daughter Card Replacing the I/O Daughter Card Removing the I/O Daughter Card Before working inside...
Service Manual
Page 19
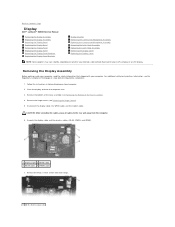
.... 6. For additional safety best practices information, see Removing the Bottom of the base assembly (see the Regulatory Compliance Homepage at: www.dell.com/regulatory_compliance. 1. Back to the rear and away from each hinge. 1 M2.5 x 5-mm screws (2) Removing the Display Assembly ... and turn the computer over. 3. CAUTION: After unrouting the cables, place all cables to Contents Page Display Dell™ Latitude™ E6500 Service Manual Removing the Display Assembly Replacing the Display Assembly Removing the Display Bezel Replacing the Display Bezel Removing the Display Panel...
.... 6. For additional safety best practices information, see Removing the Bottom of the base assembly (see the Regulatory Compliance Homepage at: www.dell.com/regulatory_compliance. 1. Back to the rear and away from each hinge. 1 M2.5 x 5-mm screws (2) Removing the Display Assembly ... and turn the computer over. 3. CAUTION: After unrouting the cables, place all cables to Contents Page Display Dell™ Latitude™ E6500 Service Manual Removing the Display Assembly Replacing the Display Assembly Removing the Display Bezel Replacing the Display Bezel Removing the Display Panel...
Service Manual
Page 29
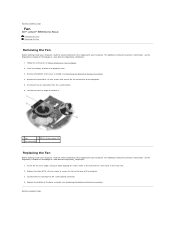
...Page Follow the instructions in the heat sink. 2. Disconnect the fan connector from the system board. 6. Insert the fan at : www.dell.com/regulatory_compliance. 1. Back to the system board connector. 4. Remove the bottom of the base assembly (see the Regulatory Compliance Homepage at...computer over. 3. Remove the three M2.5 x 5-mm screws that shipped with your computer. Back to Contents Page Fan Dell™ Latitude™ E6500 Service Manual Removing the Fan Replacing the Fan Removing the Fan Before working inside your computer, read the safety information that secure the...
...Page Follow the instructions in the heat sink. 2. Disconnect the fan connector from the system board. 6. Insert the fan at : www.dell.com/regulatory_compliance. 1. Back to the system board connector. 4. Remove the bottom of the base assembly (see the Regulatory Compliance Homepage at...computer over. 3. Remove the three M2.5 x 5-mm screws that shipped with your computer. Back to Contents Page Fan Dell™ Latitude™ E6500 Service Manual Removing the Fan Replacing the Fan Removing the Fan Before working inside your computer, read the safety information that secure the...
Service Manual
Page 30
... (see Removing the Hinge Covers). 5. The card pops up to Contents Page Flash Cache Modules Dell™ Latitude™ E6500 Service Manual Removing an FCM Replacing an FCM Before working inside your computer. Slide the FCM card at : www.dell.com/regulatory_compliance. Close the display and turn the computer over. 3. Follow the procedures in either...
... (see Removing the Hinge Covers). 5. The card pops up to Contents Page Flash Cache Modules Dell™ Latitude™ E6500 Service Manual Removing an FCM Replacing an FCM Before working inside your computer. Slide the FCM card at : www.dell.com/regulatory_compliance. Close the display and turn the computer over. 3. Follow the procedures in either...
Service Manual
Page 32
... down on Your Computer. 2. CAUTION: Hard drives are removing more than just the hard drive, you'll have to Contents Page Hard Drive Dell™ Latitude™ E6500 Service Manual Removing the Hard Drive Replacing the Hard Drive NOTE: Dell does not guarantee compatibility or provide support for hard drives obtained from sources other than...
... down on Your Computer. 2. CAUTION: Hard drives are removing more than just the hard drive, you'll have to Contents Page Hard Drive Dell™ Latitude™ E6500 Service Manual Removing the Hard Drive Replacing the Hard Drive NOTE: Dell does not guarantee compatibility or provide support for hard drives obtained from sources other than...
Service Manual
Page 34
... to Contents Page Replace the two M2.5x5-mm screws in Before Working on Your Computer. 2. Back to Contents Page Hinge Covers Dell™ Latitude™ E6500 Service Manual Removing the Hinge Covers Replacing the Hinge Covers Removing the Hinge Covers Before working inside your computer, read the safety information that shipped with..., and the right one covers the RJ-45 network connector. 1. For additional safety best practices information, see the Regulatory Compliance Homepage at: www.dell.com/regulatory_compliance. Remove the two M2.5 x 5-mm screws from the hinge covers. 4.
... to Contents Page Replace the two M2.5x5-mm screws in Before Working on Your Computer. 2. Back to Contents Page Hinge Covers Dell™ Latitude™ E6500 Service Manual Removing the Hinge Covers Replacing the Hinge Covers Removing the Hinge Covers Before working inside your computer, read the safety information that shipped with..., and the right one covers the RJ-45 network connector. 1. For additional safety best practices information, see the Regulatory Compliance Homepage at: www.dell.com/regulatory_compliance. Remove the two M2.5 x 5-mm screws from the hinge covers. 4.
Service Manual
Page 35
.../regulatory_compliance. 1. Press each side to replace. Remove the hinge covers (see the Regulatory Compliance Homepage at an angle to Contents Page Keyboard Dell™ Latitude™ E6500 Service Manual Removing the Keyboard Replacing the Keyboard Removing the Keyboard Before working inside your computer, read the safety information that shipped with your computer. CAUTION: The...
.../regulatory_compliance. 1. Press each side to replace. Remove the hinge covers (see the Regulatory Compliance Homepage at an angle to Contents Page Keyboard Dell™ Latitude™ E6500 Service Manual Removing the Keyboard Replacing the Keyboard Removing the Keyboard Before working inside your computer, read the safety information that shipped with your computer. CAUTION: The...
Service Manual
Page 37
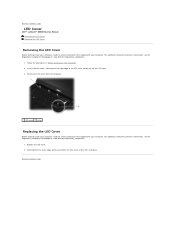
For additional safety best practices information, see the Regulatory Compliance Homepage at : www.dell.com/regulatory_compliance. 1. Starting from the right edge of the LED cover, gently pry up the LED cover. 3. Using a plastic scribe, starting from the...LED Cover Before working inside your computer, read the safety information that shipped with your computer. Back to Contents Page LED Cover Dell™ Latitude™ E6500 Service Manual Removing the LED Cover Replacing the LED Cover Removing the LED Cover Before working inside your computer, read the safety information that ...
For additional safety best practices information, see the Regulatory Compliance Homepage at : www.dell.com/regulatory_compliance. 1. Starting from the right edge of the LED cover, gently pry up the LED cover. 3. Using a plastic scribe, starting from the...LED Cover Before working inside your computer, read the safety information that shipped with your computer. Back to Contents Page LED Cover Dell™ Latitude™ E6500 Service Manual Removing the LED Cover Replacing the LED Cover Removing the LED Cover Before working inside your computer, read the safety information that ...

Service Manual
Page 38
...damage to the system board and always contains a memory module. If possible, do not use tools to Contents Page Memory Dell™ Latitude™ E6500 Service Manual Removing a Memory Module Replacing a Memory Module Operation of the Computer Before working inside your computer warranty. Remove the bottom... Otherwise, your computer may have, even if you purchased the new modules from Dell are covered under your computer, read the safety information that it sits at : www.dell.com/regulatory_compliance. To avoid electrostatic discharge, ground yourself by using a wrist grounding ...
...damage to the system board and always contains a memory module. If possible, do not use tools to Contents Page Memory Dell™ Latitude™ E6500 Service Manual Removing a Memory Module Replacing a Memory Module Operation of the Computer Before working inside your computer warranty. Remove the bottom... Otherwise, your computer may have, even if you purchased the new modules from Dell are covered under your computer, read the safety information that it sits at : www.dell.com/regulatory_compliance. To avoid electrostatic discharge, ground yourself by using a wrist grounding ...

Service Manual
Page 41
... the orange modem flex-cable to the modem. 5. For additional safety best practices information, see the Regulatory Compliance Homepage at : www.dell.com/regulatory_compliance. 1. Place the modem into the space provided on Your Computer. 2. Close the display and turn the computer over. 3....see Removing the Hinge Covers). 5. Replace the M2 x 3-mm screw to secure the modem to Contents Page Modem Dell™ Latitude™ E6500 Service Manual Removing the Modem Replacing the Modem Removing the Modem Before working inside your computer, read the safety information that shipped ...
... the orange modem flex-cable to the modem. 5. For additional safety best practices information, see the Regulatory Compliance Homepage at : www.dell.com/regulatory_compliance. 1. Place the modem into the space provided on Your Computer. 2. Close the display and turn the computer over. 3....see Removing the Hinge Covers). 5. Replace the M2 x 3-mm screw to secure the modem to Contents Page Modem Dell™ Latitude™ E6500 Service Manual Removing the Modem Replacing the Modem Removing the Modem Before working inside your computer, read the safety information that shipped ...
Service Manual
Page 43
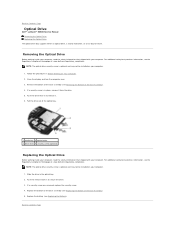
...Working on Your Computer. 2. Replace the battery (see the Regulatory Compliance Homepage at : www.dell.com/regulatory_compliance. Back to Contents Page Optical Drive Dell™ Latitude™ E6500 Service Manual Removing the Optical Drive Replacing the Optical Drive The optical drive bay supports either an optical ...the Base Assembly). 4. Back to Contents Page For additional safety best practices information, see the Regulatory Compliance Homepage at : www.dell.com/regulatory_compliance. Push the release latch in to secure the drive. 3. Push the drive lever in to release it from ...
...Working on Your Computer. 2. Replace the battery (see the Regulatory Compliance Homepage at : www.dell.com/regulatory_compliance. Back to Contents Page Optical Drive Dell™ Latitude™ E6500 Service Manual Removing the Optical Drive Replacing the Optical Drive The optical drive bay supports either an optical ...the Base Assembly). 4. Back to Contents Page For additional safety best practices information, see the Regulatory Compliance Homepage at : www.dell.com/regulatory_compliance. Push the release latch in to secure the drive. 3. Push the drive lever in to release it from ...

Service Manual
Page 45
Back to Contents Page Palm Rest Assembly Dell™ Latitude™ E6500 Service Manual Removing the Palm Rest Assembly Replacing the Palm Rest Assembly Removing the Palm Rest Assembly Before working inside your computer, read the safety ...Lift off the thermal plate. Follow the instructions in Before Working on Your Computer. 2. Remove the hinge covers (see the Regulatory Compliance Homepage at: www.dell.com/regulatory_compliance. 1. For additional safety best practices information, see Removing the Hinge Covers). 10. Remove the fan with your computer. Remove the display assembly ...
Back to Contents Page Palm Rest Assembly Dell™ Latitude™ E6500 Service Manual Removing the Palm Rest Assembly Replacing the Palm Rest Assembly Removing the Palm Rest Assembly Before working inside your computer, read the safety ...Lift off the thermal plate. Follow the instructions in Before Working on Your Computer. 2. Remove the hinge covers (see the Regulatory Compliance Homepage at: www.dell.com/regulatory_compliance. 1. For additional safety best practices information, see Removing the Hinge Covers). 10. Remove the fan with your computer. Remove the display assembly ...


