Monitor Simplified Service Manual
Page 8
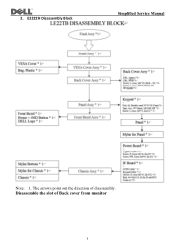
The arrows point out the direction of Back cover from monitor 8 Disassemble the slot of disassembly. E2222H Disassembly Block Simplified Service Manual Note: 1. 2.
The arrows point out the direction of Back cover from monitor 8 Disassemble the slot of disassembly. E2222H Disassembly Block Simplified Service Manual Note: 1. 2.
Users Guide
Page 3
Contents About your monitor 5 Package contents 5 Product features 6 Identifying features and controls 7 Pin assignments 15 Plug and play capability 17 LCD monitor quality and pixel policy 17 Maintenance guidelines 17 Setting up the monitor 18 Connecting the stand 18 Connecting your monitor 19 Organizing cables 20 Removing the stand 21 Operating your monitor 23 Turning on the monitor 23 Using the front panel controls 23 Using the On-Screen Display (OSD) menu 28 Setting up display resolution on your monitor 41 Using tilt 43 Contents │ 3
Contents About your monitor 5 Package contents 5 Product features 6 Identifying features and controls 7 Pin assignments 15 Plug and play capability 17 LCD monitor quality and pixel policy 17 Maintenance guidelines 17 Setting up the monitor 18 Connecting the stand 18 Connecting your monitor 19 Organizing cables 20 Removing the stand 21 Operating your monitor 23 Turning on the monitor 23 Using the front panel controls 23 Using the On-Screen Display (OSD) menu 28 Setting up display resolution on your monitor 41 Using tilt 43 Contents │ 3
Users Guide
Page 5
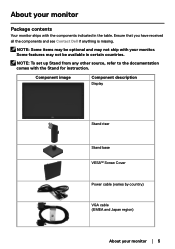
... the table. NOTE: Some items may not ship with your monitor. About your monitor │ 5 NOTE: To set up Stand from any other... source, refer to the documentation comes with the components indicated in certain countries. Component image Component description Display Stand riser Stand base VESA™ Screw Cover Power cable (varies by country) VGA cable (EMEA and Japan region) About your monitor... Package contents Your monitor ships with the Stand for instruction. Ensure that you have ...
... the table. NOTE: Some items may not ship with your monitor. About your monitor │ 5 NOTE: To set up Stand from any other... source, refer to the documentation comes with the components indicated in certain countries. Component image Component description Display Stand riser Stand base VESA™ Screw Cover Power cable (varies by country) VGA cable (EMEA and Japan region) About your monitor... Package contents Your monitor ships with the Stand for instruction. Ensure that you have ...
Users Guide
Page 6
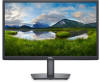
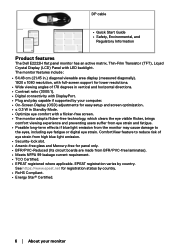
... status by country. DP cable • Quick Start Guide • Safety, Environmental, and Regulatory Information Product features The Dell E2222H flat panel monitor has an active matrix, Thin-Film Transistor (TFT), Liquid Crystal Display (LCD) Panel with a flicker-free screen. • The.... • TCO Certified. • EPEAT registered where applicable. ComfortView feature to the eyes, including eye fatigue or digital eye strain. The monitor features include : • 54.48 cm (21.45 in.) diagonal viewable area display (measured diagonally). 1920 x 1080 resolution, with full-...
... status by country. DP cable • Quick Start Guide • Safety, Environmental, and Regulatory Information Product features The Dell E2222H flat panel monitor has an active matrix, Thin-Film Transistor (TFT), Liquid Crystal Display (LCD) Panel with a flicker-free screen. • The.... • TCO Certified. • EPEAT registered where applicable. ComfortView feature to the eyes, including eye fatigue or digital eye strain. The monitor features include : • 54.48 cm (21.45 in.) diagonal viewable area display (measured diagonally). 1920 x 1080 resolution, with full-...
Users Guide
Page 7
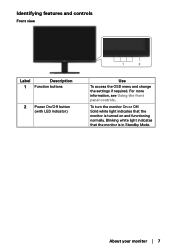
Solid white light indicates that the monitor is turned on and functioning normally. Identifying features and controls Front view Label Description 1 Function buttons 2 Power On/Off button (with LED indicator) Use To access the OSD menu and change the settings if required. Blinking white light indicates that the monitor is in Standby Mode. To turn the monitor On or Off. For more information, see Using the front panel controls. About your monitor │ 7
Solid white light indicates that the monitor is turned on and functioning normally. Identifying features and controls Front view Label Description 1 Function buttons 2 Power On/Off button (with LED indicator) Use To access the OSD menu and change the settings if required. Blinking white light indicates that the monitor is in Standby Mode. To turn the monitor On or Off. For more information, see Using the front panel controls. About your monitor │ 7

Users Guide
Page 8
The Service Tag is a enables Dell service technicians to contact service tag label Dell for technical support. Back view 5 12 3 4 Without monitor stand With monitor stand Label Description Use 1 Security-lock slot To secure the monitor using a security lock (purchased separately). 2 Barcode, serial number, and See this label if you need to identify the hardware components...
The Service Tag is a enables Dell service technicians to contact service tag label Dell for technical support. Back view 5 12 3 4 Without monitor stand With monitor stand Label Description Use 1 Security-lock slot To secure the monitor using a security lock (purchased separately). 2 Barcode, serial number, and See this label if you need to identify the hardware components...
Users Guide
Page 9
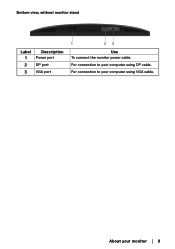
For connection to your computer using VGA cable. About your computer using DP cable. For connection to your monitor │ 9 Bottom view, without monitor stand Label 1 2 3 Description Power port DP port VGA port 1 23 Use To connect the monitor power cable.
For connection to your computer using VGA cable. About your computer using DP cable. For connection to your monitor │ 9 Bottom view, without monitor stand Label 1 2 3 Description Power port DP port VGA port 1 23 Use To connect the monitor power cable.
Users Guide
Page 10
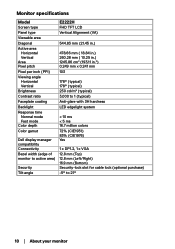
... Horizontal Vertical Brightness Contrast ratio Faceplate coating Backlight Response time Normal mode Fast mode Color depth Color gamut Dell display manager compatibility Connectivity Bezel width (edge of monitor to active area) Security Tilt angle E2222H FHD TFT LCD Vertical Alignment (VA) 544.83 mm (21.45 in.) 478.66 mm ( 18.84 in....8 mm (Top) 12.8 mm (Left/Right) 16.9 mm (Bottom) Security-lock slot for cable lock (optional purchase) -5° to 21° 10 │ About your monitor
... Horizontal Vertical Brightness Contrast ratio Faceplate coating Backlight Response time Normal mode Fast mode Color depth Color gamut Dell display manager compatibility Connectivity Bezel width (edge of monitor to active area) Security Tilt angle E2222H FHD TFT LCD Vertical Alignment (VA) 544.83 mm (21.45 in.) 478.66 mm ( 18.84 in....8 mm (Top) 12.8 mm (Left/Right) 16.9 mm (Bottom) Security-lock slot for cable lock (optional purchase) -5° to 21° 10 │ About your monitor
Users Guide
Page 12
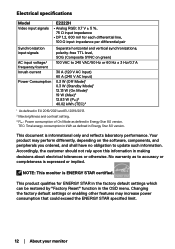
.... Your product may increase power consumption that could exceed the ENERGY STAR specified limit. 12 │ About your monitor NOTE: This monitor is informational only and reflects laboratory performance. Changing the factory default settings or enabling other features may perform differently, ..., and peripherals you ordered, and shall have no obligation to accuracy or completeness is expressed or implied. Electrical specifications Model Video input signals E2222H • Analog RGB: 0.7 V ± 5 %, 75 Ω input impedance • DP 1.2, 600 mV for ENERGY STAR ...
.... Your product may increase power consumption that could exceed the ENERGY STAR specified limit. 12 │ About your monitor NOTE: This monitor is informational only and reflects laboratory performance. Changing the factory default settings or enabling other features may perform differently, ..., and peripherals you ordered, and shall have no obligation to accuracy or completeness is expressed or implied. Electrical specifications Model Video input signals E2222H • Analog RGB: 0.7 V ± 5 %, 75 Ω input impedance • DP 1.2, 600 mV for ENERGY STAR ...
Users Guide
Page 13
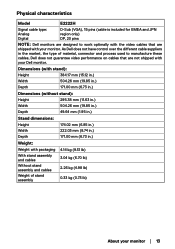
... optimally with the video cables that are shipped with your monitor. Physical characteristics Model E2222H Signal cable type: Analog Digital D-Sub (VGA), 15 pins (cable is included for EMEA and JPN region only) DP, 20 pins NOTE: Dell monitors are designed to manufacture these cables, Dell does not guarantee video performance on cables that are...
... optimally with the video cables that are shipped with your monitor. Physical characteristics Model E2222H Signal cable type: Analog Digital D-Sub (VGA), 15 pins (cable is included for EMEA and JPN region only) DP, 20 pins NOTE: Dell monitors are designed to manufacture these cables, Dell does not guarantee video performance on cables that are...

Users Guide
Page 14
Environmental characteristics Model Temperature: Operating Non-operating: Storage/Shipping Humidity: Operating Non-operating: Storage/Shipping Altitude: E2222H 0 °C to 40 °C (32 °F to 104 °F) -20 °C to 60 °C (-4 °F to 140 °F) 10% to 80% (non-condensing) 5% to 90% (non-condensing) Operating (maximum) 5,000 m (16,400 ft) Non-operating (maximum) 12,192 m (40,000 ft) Thermal dissipation 64.79 BTU/hour (maximum) 41.36 BTU/hour (typical) 14 │ About your monitor
Environmental characteristics Model Temperature: Operating Non-operating: Storage/Shipping Humidity: Operating Non-operating: Storage/Shipping Altitude: E2222H 0 °C to 40 °C (32 °F to 104 °F) -20 °C to 60 °C (-4 °F to 140 °F) 10% to 80% (non-condensing) 5% to 90% (non-condensing) Operating (maximum) 5,000 m (16,400 ft) Non-operating (maximum) 12,192 m (40,000 ft) Thermal dissipation 64.79 BTU/hour (maximum) 41.36 BTU/hour (typical) 14 │ About your monitor
Users Guide
Page 15
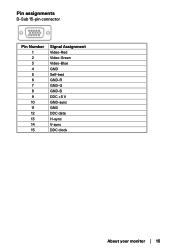
Pin assignments D-Sub 15-pin connector Pin Number 1 2 3 4 5 6 7 8 9 10 11 12 13 14 15 Signal Assignment Video-Red Video-Green Video-Blue GND Self-test GND-R GND-G GND-B DDC +5 V GND-sync GND DDC data H-sync V-sync DDC clock About your monitor │ 15
Pin assignments D-Sub 15-pin connector Pin Number 1 2 3 4 5 6 7 8 9 10 11 12 13 14 15 Signal Assignment Video-Red Video-Green Video-Blue GND Self-test GND-R GND-G GND-B DDC +5 V GND-sync GND DDC data H-sync V-sync DDC clock About your monitor │ 15

Users Guide
Page 16
Pin assignments DP 20-pin connector Pin Number 1 2 3 4 5 6 7 8 9 10 11 12 13 14 15 16 17 18 19 20 Signal Assignment ML_LANE3_N GND ML_LANE3_P ML_LANE2_N GND ML_LANE2_P ML_LANE1_N GND ML_LANE1_P ML_LANE0_N GND ML_LANE0_P GND GND AUX _CH_P GND AUX _CH_N HPD RETURN DP_PWR 16 │ About your monitor
Pin assignments DP 20-pin connector Pin Number 1 2 3 4 5 6 7 8 9 10 11 12 13 14 15 16 17 18 19 20 Signal Assignment ML_LANE3_N GND ML_LANE3_P ML_LANE2_N GND ML_LANE2_P ML_LANE1_N GND ML_LANE1_P ML_LANE0_N GND ML_LANE0_P GND GND AUX _CH_P GND AUX _CH_N HPD RETURN DP_PWR 16 │ About your monitor
Users Guide
Page 17
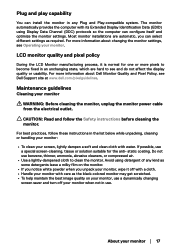
... state, which are automatic, you unpack your monitor, wipe it off your monitor with water. For more information about Dell Monitor Quality and Pixel Policy, see Dell Support site at www.dell.com/pixelguidelines. Maintenance guidelines Cleaning your monitor │ 17 About your monitor WARNING: Before cleaning the monitor, unplug the monitor power cable from the electrical outlet. If possible...
... state, which are automatic, you unpack your monitor, wipe it off your monitor with water. For more information about Dell Monitor Quality and Pixel Policy, see Dell Support site at www.dell.com/pixelguidelines. Maintenance guidelines Cleaning your monitor │ 17 About your monitor WARNING: Before cleaning the monitor, unplug the monitor power cable from the electrical outlet. If possible...
Users Guide
Page 18
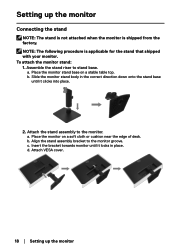
...assembly bracket to stand base. Insert the bracket towards monitor until it locks in the correct direction down onto the stand base until it clicks into place. 2. Assemble the stand riser to the monitor groove. Place the monitor stand base on a soft cloth or cushion near the... edge of desk. Attach the stand assembly to the monitor. To attach the monitor stand: 1. b. a. b. a. Place the monitor on a stable table top. c. NOTE: The following ...
...assembly bracket to stand base. Insert the bracket towards monitor until it locks in the correct direction down onto the stand base until it clicks into place. 2. Assemble the stand riser to the monitor groove. Place the monitor stand base on a soft cloth or cushion near the... edge of desk. Attach the stand assembly to the monitor. To attach the monitor stand: 1. b. a. b. a. Place the monitor on a stable table top. c. NOTE: The following ...

Users Guide
Page 19
...the computer at the same time. Connecting your computer and disconnect the power cable. 2. To connect your monitor to the computer: 1. Connecting VGA cable VGA VGA Connecting DP cable DP DP Setting up the monitor │ 19 Dell does not guarantee the video quality and performance when using non...-Dell cables. Connect VGA or DP cable from your monitor to the computer. NOTE: Do not connect all cables to the monitor. It is recommended to route the cables...
...the computer at the same time. Connecting your computer and disconnect the power cable. 2. To connect your monitor to the computer: 1. Connecting VGA cable VGA VGA Connecting DP cable DP DP Setting up the monitor │ 19 Dell does not guarantee the video quality and performance when using non...-Dell cables. Connect VGA or DP cable from your monitor to the computer. NOTE: Do not connect all cables to the monitor. It is recommended to route the cables...
Users Guide
Page 20
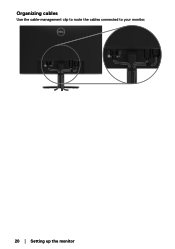
Organizing cables Use the cable-management clip to route the cables connected to your monitor. 20 │ Setting up the monitor
Organizing cables Use the cable-management clip to route the cables connected to your monitor. 20 │ Setting up the monitor
Users Guide
Page 21
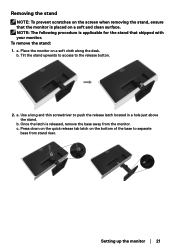
... soft and clean surface. c. To remove the stand: 1. b. Setting up the monitor │ 21 b. Press down on the quick release tab latch on the bottom of the base to separate base from the monitor. a. Place the monitor on a soft cloth along the desk. a. Removing the stand NOTE: To prevent ...scratches on the screen when removing the stand, ensure that shipped with your monitor. Tilt the stand upwards to access to push the release latch located in a hole just above the stand. NOTE: The following procedure is ...
... soft and clean surface. c. To remove the stand: 1. b. Setting up the monitor │ 21 b. Press down on the quick release tab latch on the bottom of the base to separate base from the monitor. a. Place the monitor on a soft cloth along the desk. a. Removing the stand NOTE: To prevent ...scratches on the screen when removing the stand, ensure that shipped with your monitor. Tilt the stand upwards to access to push the release latch located in a hole just above the stand. NOTE: The following procedure is ...
Users Guide
Page 22
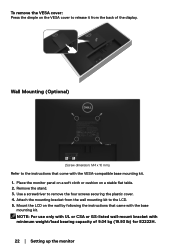
Place the monitor panel on a soft cloth or cushion on a stable flat table. 2. Mount the LCD on the wall by following the instructions that come with the VESA-compatible base mounting kit. 1. Remove the stand. 3. Attach the mounting bracket from the back of 9.04 kg (19.93 lb) for E2222H. 22 &#...9474; Setting up the monitor To remove the VESA cover: Press the dimple on the VESA cover to release it from the wall mounting kit to the LCD...
Place the monitor panel on a soft cloth or cushion on a stable flat table. 2. Mount the LCD on the wall by following the instructions that come with the VESA-compatible base mounting kit. 1. Remove the stand. 3. Attach the mounting bracket from the back of 9.04 kg (19.93 lb) for E2222H. 22 &#...9474; Setting up the monitor To remove the VESA cover: Press the dimple on the VESA cover to release it from the wall mounting kit to the LCD...
Users Guide
Page 23
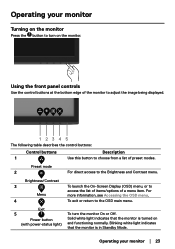
Using the front panel controls Use the control buttons at the bottom edge of the monitor to adjust the image being displayed. 1 234 5 The following table describes the control buttons: Control buttons 1 Description Use this button to choose from a list of ...For more information, see Accessing the OSD menu. 4 To exit or return to the Brightness and Contrast menu. Solid white light indicates that the monitor is turned on and functioning normally. Operating your monitor Turning on the monitor. Brightness/Contrast 3 Menu To launch the On-Screen Display (OSD) menu, or to turn the...
Using the front panel controls Use the control buttons at the bottom edge of the monitor to adjust the image being displayed. 1 234 5 The following table describes the control buttons: Control buttons 1 Description Use this button to choose from a list of ...For more information, see Accessing the OSD menu. 4 To exit or return to the Brightness and Contrast menu. Solid white light indicates that the monitor is turned on and functioning normally. Operating your monitor Turning on the monitor. Brightness/Contrast 3 Menu To launch the On-Screen Display (OSD) menu, or to turn the...


