
User's Guide
Page 4
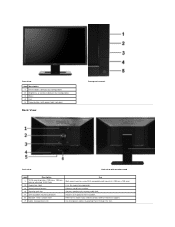
... (100 mm x 100 mm - 1 Wall mount monitor using VESA-compatible wall mount kit (100 mm x 100 mm) behind attached VESA Plate) 2 Regulatory label Lists the regulatory approvals. 3 Stand release button Release stand from monitor. 4 Security lock slot Secures monitor with security cable lock. 5 Dell Soundbar mounting brackets Attaches the optional Dell Soundbar. 6 Barcode serial number label Refer...
... (100 mm x 100 mm - 1 Wall mount monitor using VESA-compatible wall mount kit (100 mm x 100 mm) behind attached VESA Plate) 2 Regulatory label Lists the regulatory approvals. 3 Stand release button Release stand from monitor. 4 Security lock slot Secures monitor with security cable lock. 5 Dell Soundbar mounting brackets Attaches the optional Dell Soundbar. 6 Barcode serial number label Refer...

User's Guide
Page 8
... (11.68 lb) Weight with stand assembly and cables 4.24 kg (9.34 lb) Weight without stand assembly (For wall mount or VESA mount considerations - DVI- 15-pin D-subminiature, blue connector; Physical Characteristics Model Connector type E2211H E2311H 15-pin D-subminiature, blue connector; no 2.98 kg (6.56 lb) cables) Weight of stand assembly 0.97 kg...
... (11.68 lb) Weight with stand assembly and cables 4.24 kg (9.34 lb) Weight without stand assembly (For wall mount or VESA mount considerations - DVI- 15-pin D-subminiature, blue connector; Physical Characteristics Model Connector type E2211H E2311H 15-pin D-subminiature, blue connector; no 2.98 kg (6.56 lb) cables) Weight of stand assembly 0.97 kg...
User's Guide
Page 27
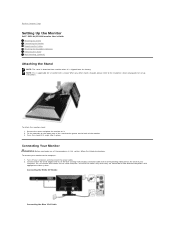
... DVI Cable Connecting the Blue VGA Cable Back to Contents Page Setting Up the Monitor Dell™ E2211H/E2311H monitor User's Guide Attaching the Stand Connecting the Monitor Organizing the Cables Attaching the Soundbar (Optional) Removing the Stand Wall Mounting (Optional) Attaching the Stand NOTE: The stand is detached from the factory. When any...
... DVI Cable Connecting the Blue VGA Cable Back to Contents Page Setting Up the Monitor Dell™ E2211H/E2311H monitor User's Guide Attaching the Stand Connecting the Monitor Organizing the Cables Attaching the Soundbar (Optional) Removing the Stand Wall Mounting (Optional) Attaching the Stand NOTE: The stand is detached from the factory. When any...

User's Guide
Page 29
...stand up and away from the wall mounting kit to Contents Page Mount the LCD on the wall by following the instructions that come with the VESA-compatible base mounting kit. 1. Place the monitor on stable flat table. 2. Wall Mounting (Optional) (Screw dimension: M4 x 10 mm). Attach the mounting bracket from the monitor. Back to...Use a screwdriver to the instructions that came with minimum weight/load bearing capacity of 3.10 kg. NOTE: For use only with UL Listed Wall Mount Bracket with the base mounting kit. To remove the stand: 1. Press and hold the Stand release button. 3.
...stand up and away from the wall mounting kit to Contents Page Mount the LCD on the wall by following the instructions that come with the VESA-compatible base mounting kit. 1. Place the monitor on stable flat table. 2. Wall Mounting (Optional) (Screw dimension: M4 x 10 mm). Attach the mounting bracket from the monitor. Back to...Use a screwdriver to the instructions that came with minimum weight/load bearing capacity of 3.10 kg. NOTE: For use only with UL Listed Wall Mount Bracket with the base mounting kit. To remove the stand: 1. Press and hold the Stand release button. 3.


