Owner's Manual
Page 1
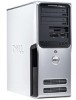
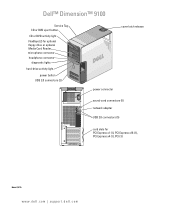
Dell™ Dimension™ 9100 Service Tag CD or DVD eject button CD or DVD activity light FlexBays (2) for optional floppy drive or optional Media Card Reader microphone connector headphone connector diagnostic lights hard-drive activity light power button USB 2.0 connectors (2) cover latch release power connector sound-card connectors (5) network adapter USB 2.0 connectors (5) card slots for PCI Express x1 (1), PCI Express x16 (1), PCI Express x4 (1), PCI (3) Model DCTA www.dell.com | support.dell.com
Dell™ Dimension™ 9100 Service Tag CD or DVD eject button CD or DVD activity light FlexBays (2) for optional floppy drive or optional Media Card Reader microphone connector headphone connector diagnostic lights hard-drive activity light power button USB 2.0 connectors (2) cover latch release power connector sound-card connectors (5) network adapter USB 2.0 connectors (5) card slots for PCI Express x1 (1), PCI Express x16 (1), PCI Express x4 (1), PCI (3) Model DCTA www.dell.com | support.dell.com

Owner's Manual
Page 3
... 22 Connecting a TV 23 Changing the Display Settings 23 Setting Up a Home and Office Network 24 Connecting to a Network Adapter 24 Network Setup Wizard 24 Power Management 25 Standby Mode 25 Hibernate Mode 25...
... 22 Connecting a TV 23 Changing the Display Settings 23 Setting Up a Home and Office Network 24 Connecting to a Network Adapter 24 Network Setup Wizard 24 Power Management 25 Standby Mode 25 Hibernate Mode 25...
Owner's Manual
Page 4
... for an earlier Windows operating system . . . . . 36 A solid blue screen appears 36 Other software problems 36 Memory Problems 37 Mouse Problems 37 Network Problems 38 Power Problems 39 Printer Problems 40 Scanner Problems 40 Sound and Speaker Problems 41 No sound from speakers 41 No sound from headphones 42 4 Contents
... for an earlier Windows operating system . . . . . 36 A solid blue screen appears 36 Other software problems 36 Memory Problems 37 Mouse Problems 37 Network Problems 38 Power Problems 39 Printer Problems 40 Scanner Problems 40 Sound and Speaker Problems 41 No sound from speakers 41 No sound from headphones 42 4 Contents
Owner's Manual
Page 25
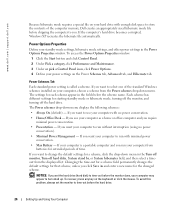
... the Start button and click Control Panel. 2 Under Pick a category, click Performance and Maintenance. 3 Under or pick a Control Panel icon, click Power Options. To immediately activate standby mode without a period of hibernation, because the keyboard and the mouse do not function when the computer is restored to... state it was in certain windows. The computer may lose data. When the computer exits from hibernate mode. Pressing a key on the Power Schemes tab, Advanced tab, and Hibernate tab. To set standby mode to security and networking appear in before it may take a short ...
... the Start button and click Control Panel. 2 Under Pick a category, click Performance and Maintenance. 3 Under or pick a Control Panel icon, click Power Options. To immediately activate standby mode without a period of hibernation, because the keyboard and the mouse do not function when the computer is restored to... state it was in certain windows. The computer may lose data. When the computer exits from hibernate mode. Pressing a key on the Power Schemes tab, Advanced tab, and Hibernate tab. To set standby mode to security and networking appear in before it may take a short ...
Owner's Manual
Page 26
www.dell.com | support.dell.com Because hibernate mode requires a special file on your hard drive with enough disk space to store the contents of time. The settings for the changed scheme. If your computer is called a scheme. Power Schemes Tab Each standard power setting is a portable ...file automatically. If you use your computer to you. NOTICE: If you want your computer with minimal power conservation. • Max Battery - Power Options Properties Define your power settings on the keyboard or click the mouse. If you set the monitor to time-out before the ...
www.dell.com | support.dell.com Because hibernate mode requires a special file on your hard drive with enough disk space to store the contents of time. The settings for the changed scheme. If your computer is called a scheme. Power Schemes Tab Each standard power setting is a portable ...file automatically. If you use your computer to you. NOTICE: If you want your computer with minimal power conservation. • Max Battery - Power Options Properties Define your power settings on the keyboard or click the mouse. If you set the monitor to time-out before the ...
Owner's Manual
Page 27
...Support. 2 In the Help and Support window, click Performance and maintenance. 3 In the Performance and maintenance window, click Conserving power on page 57). To purchase a card, contact Dell. IEEE 1394 is only available if you purchased an add-in the Windows taskbar for quick access. • Set the ...computer to prompt you for use with the use the hibernate settings you defined on the Power Schemes tab, click the Enable hibernate...
...Support. 2 In the Help and Support window, click Performance and maintenance. 3 In the Performance and maintenance window, click Conserving power on page 57). To purchase a card, contact Dell. IEEE 1394 is only available if you purchased an add-in the Windows taskbar for quick access. • Set the ...computer to prompt you for use with the use the hibernate settings you defined on the Power Schemes tab, click the Enable hibernate...

Owner's Manual
Page 35
... or moving your computer. If you are unable to get a response by pressing a key on a floppy or CD. C H E C K T H E S O F T W A R E D O C U M E N T A T I G H T S - See page 45. ENSURE THAT THE POWER CABLE IS FIRMLY CONNECTED TO THE COMPUTER AND TO THE ELECTRICAL OUTLET The computer stops responding NOTICE: You might lose data if you are unable... to 10 seconds until the computer turns off. TU R N T H E C O M P U T E R O F F - Then restart your mouse, press and hold the power button for at least 8 to perform an operating system shutdown.
... or moving your computer. If you are unable to get a response by pressing a key on a floppy or CD. C H E C K T H E S O F T W A R E D O C U M E N T A T I G H T S - See page 45. ENSURE THAT THE POWER CABLE IS FIRMLY CONNECTED TO THE COMPUTER AND TO THE ELECTRICAL OUTLET The computer stops responding NOTICE: You might lose data if you are unable... to 10 seconds until the computer turns off. TU R N T H E C O M P U T E R O F F - Then restart your mouse, press and hold the power button for at least 8 to perform an operating system shutdown.
Owner's Manual
Page 36
If you are unable to get a response by pressing a key on your keyboard or moving your computer. www.dell.com | support.dell.com A program is installed and configured properly. • Verify that the device drivers do not conflict with the ... ANY OPEN FILES OR PROGRAMS AND SHUT DOWN YOUR COMPUTER THROUGH THE START MENU 36 Solving Problems Then restart your mouse, press and hold the power button for an earlier Windows operating system R U N T H E P R O G R A M C O M P A T I B I L I T Y W I Z A R D - See the software documentation for information. • Ensure that the program...
If you are unable to get a response by pressing a key on your keyboard or moving your computer. www.dell.com | support.dell.com A program is installed and configured properly. • Verify that the device drivers do not conflict with the ... ANY OPEN FILES OR PROGRAMS AND SHUT DOWN YOUR COMPUTER THROUGH THE START MENU 36 Solving Problems Then restart your mouse, press and hold the power button for an earlier Windows operating system R U N T H E P R O G R A M C O M P A T I B I L I T Y W I Z A R D - See the software documentation for information. • Ensure that the program...
Owner's Manual
Page 39
...Dell Diagnostics" on . The computer is either turned off or is not receiving power. • Reseat the power cable into both the power connector on the back of the computer and the electrical outlet. • If the computer is plugged into a power strip, ensure that the power...W E R L I G H T I S O F F - I F T H E P O W E R L I G H T I S S T E A D Y A M B E R - The computer is receiving electrical power, but an internal power problem might be malfunctioning or incorrectly installed. • Remove and then reinstall the memory modules (see page 66). • Remove and then reinstall any...
...Dell Diagnostics" on . The computer is either turned off or is not receiving power. • Reseat the power cable into both the power connector on the back of the computer and the electrical outlet. • If the computer is plugged into a power strip, ensure that the power...W E R L I G H T I S O F F - I F T H E P O W E R L I G H T I S S T E A D Y A M B E R - The computer is receiving electrical power, but an internal power problem might be malfunctioning or incorrectly installed. • Remove and then reinstall the memory modules (see page 66). • Remove and then reinstall any...
Owner's Manual
Page 42
...; Check the connector for bent or broken pins. (It is turned on. If the power light is off nearby fans, fluorescent lights, or halogen lamps to ensure that the headphone cable is connected as a lamp. www.dell.com | support.dell.com TE S T T H E E L E C T R I G H T - If the screen ...is blank CHECK THE MONITOR CABLE CONNECTION - • Ensure that the graphics cable is securely inserted into the headphone connector (see page 58). If the power light is lit or blinking,...
...; Check the connector for bent or broken pins. (It is turned on. If the power light is off nearby fans, fluorescent lights, or halogen lamps to ensure that the headphone cable is connected as a lamp. www.dell.com | support.dell.com TE S T T H E E L E C T R I G H T - If the screen ...is blank CHECK THE MONITOR CABLE CONNECTION - • Ensure that the graphics cable is securely inserted into the headphone connector (see page 58). If the power light is lit or blinking,...
Owner's Manual
Page 45
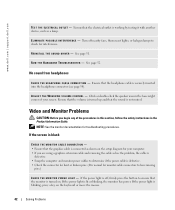
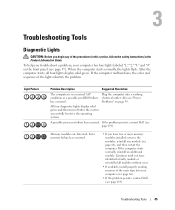
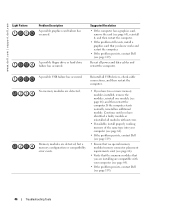
.... • If you troubleshoot a problem, your computer (see page 66). • If the problem persists, contact Dell (see page 119). If the computer starts normally, reinstall an additional module. If the problem persists, contact Dell (see "Power has occurred. Also see page 119). Problems" on the front panel (see page 57). Troubleshooting Tools...
.... • If you troubleshoot a problem, your computer (see page 66). • If the problem persists, contact Dell (see page 119). If the computer starts normally, reinstall an additional module. If the problem persists, contact Dell (see "Power has occurred. Also see page 119). Problems" on the front panel (see page 57). Troubleshooting Tools...
Owner's Manual
Page 46
A possible USB failure has occurred. Reinstall all power and data cables and restart the computer. No memory modules are ...working memory of the same type into your computer (see page 64). • If the problem persists, contact Dell (see page 119). If the computer starts normally, reinstall an additional module. Reseat all USB devices, check cable...that you are installing are compatible with your computer (see page 66). • If the problem persists, contact Dell (see page 119). • Ensure that no special memory module/memory connector placement requirements exist (see page ...
A possible USB failure has occurred. Reinstall all power and data cables and restart the computer. No memory modules are ...working memory of the same type into your computer (see page 64). • If the problem persists, contact Dell (see page 119). If the computer starts normally, reinstall an additional module. Reseat all USB devices, check cable...that you are installing are compatible with your computer (see page 66). • If the problem persists, contact Dell (see page 119). • Ensure that no special memory module/memory connector placement requirements exist (see page ...
Owner's Manual
Page 55
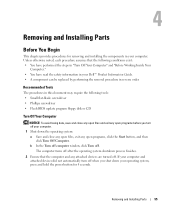
... before you shut down the operating system: a Save and close any open files and exit any attached devices are turned off your Dell™ Product Information Guide. • A component can be replaced by performing the removal procedure in your computer. Unless otherwise noted,...Your Computer." • You have read the safety information in your computer. 1 Shut down your operating system, press and hold the power button for removing and installing the components in reverse order. Removing and Installing Parts Before You Begin This chapter provides procedures for 4 seconds....
... before you shut down the operating system: a Save and close any open files and exit any attached devices are turned off your Dell™ Product Information Guide. • A component can be replaced by performing the removal procedure in your computer. Unless otherwise noted,...Your Computer." • You have read the safety information in your computer. 1 Shut down your operating system, press and hold the power button for removing and installing the components in reverse order. Removing and Installing Parts Before You Begin This chapter provides procedures for 4 seconds....
Owner's Manual
Page 56
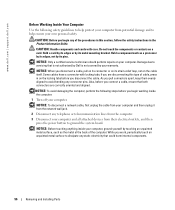
...computer and all attached devices from potential damage and to help protect your computer from their electrical outlets, and then press the power button to ground the system board. Also, before you pull connectors apart, keep them evenly aligned to avoid bending any static ...perform repairs on a card. As you connect a cable, ensure that could harm internal components. 56 Removing and Installing Parts www.dell.com | support.dell.com Before Working Inside Your Computer Use the following steps before you work, periodically touch an unpainted metal surface to dissipate any ...
...computer and all attached devices from potential damage and to help protect your computer from their electrical outlets, and then press the power button to ground the system board. Also, before you pull connectors apart, keep them evenly aligned to avoid bending any static ...perform repairs on a card. As you connect a cable, ensure that could harm internal components. 56 Removing and Installing Parts www.dell.com | support.dell.com Before Working Inside Your Computer Use the following steps before you work, periodically touch an unpainted metal surface to dissipate any ...
Owner's Manual
Page 58
...the hard drive. Press to identify your computer when you use the power button to the system. Used to turn off the computer. www.dell.com | support.dell.com 5 IEEE 1394 connector (optional) 6 vents 7 USB 2.0 connectors (2) 8 power button 9 hard-drive activity light 10 diagnostic lights (4) 11 headphone...devices that the system is adequately ventilated. Use the front USB connectors for devices that there is recommended that you access the Dell Support website or call technical support. 58 Removing and Installing Parts It is a minimum of two inches of space between ...
...the hard drive. Press to identify your computer when you use the power button to the system. Used to turn off the computer. www.dell.com | support.dell.com 5 IEEE 1394 connector (optional) 6 vents 7 USB 2.0 connectors (2) 8 power button 9 hard-drive activity light 10 diagnostic lights (4) 11 headphone...devices that the system is adequately ventilated. Use the front USB connectors for devices that there is recommended that you access the Dell Support website or call technical support. 58 Removing and Installing Parts It is a minimum of two inches of space between ...
Owner's Manual
Page 59
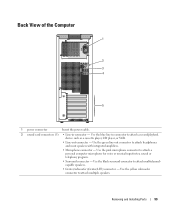
... voice or musical input into a sound or telephony program. • Surround connector - Use the blue line-in connector - Back View of the Computer 1 2 3 4 5 1 power connector Insert the power cable. 2 sound card connectors (5) • Line-in connector to attach a record/playback device such as a cassette player, CD player, or VCR. • Line-out...
... voice or musical input into a sound or telephony program. • Surround connector - Use the blue line-in connector - Back View of the Computer 1 2 3 4 5 1 power connector Insert the power cable. 2 sound card connectors (5) • Line-in connector to attach a record/playback device such as a cassette player, CD player, or VCR. • Line-out...
Owner's Manual
Page 62
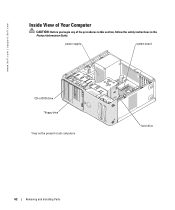
power supply system board CD or DVD drive *floppy drive *may not be present on all computers hard drive 62 Removing and Installing Parts www.dell.com | support.dell.com Inside View of Your Computer CAUTION: Before you begin any of the procedures in this section, follow the safety instructions in the Product Information Guide.
power supply system board CD or DVD drive *floppy drive *may not be present on all computers hard drive 62 Removing and Installing Parts www.dell.com | support.dell.com Inside View of Your Computer CAUTION: Before you begin any of the procedures in this section, follow the safety instructions in the Product Information Guide.
Owner's Manual
Page 63
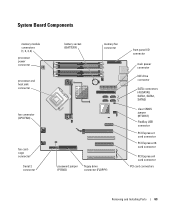
... connector (CPU FAN) fan cardcage connector Serial 2 connector battery socket (BATTERY) memory fan connector password jumper (PSWD) floppy drive connector (FLOPPY) front panel I/O connector main power connector IDE drive connector SATA connectors (4) (SATA0, SATA1, SATA2, SATA3) clear CMOS jumper (RTCRST) FlexBay USB connector PCI Express x1 card connector PCI Express x16...
... connector (CPU FAN) fan cardcage connector Serial 2 connector battery socket (BATTERY) memory fan connector password jumper (PSWD) floppy drive connector (FLOPPY) front panel I/O connector main power connector IDE drive connector SATA connectors (4) (SATA0, SATA1, SATA2, SATA3) clear CMOS jumper (RTCRST) FlexBay USB connector PCI Express x1 card connector PCI Express x16...

Owner's Manual
Page 87
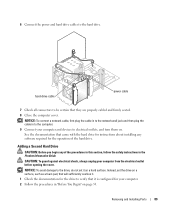
tabs (2) hard drive Removing and Installing Parts 87 Removing a Hard Drive 1 Disconnect the power and hard drive cables from the drive. hard drive cable power cable 2 Press in on the tabs on each side of the drive and slide the drive up and out.
tabs (2) hard drive Removing and Installing Parts 87 Removing a Hard Drive 1 Disconnect the power and hard drive cables from the drive. hard drive cable power cable 2 Press in on the tabs on each side of the drive and slide the drive up and out.
Owner's Manual
Page 89
...See the documentation that they are properly cabled and firmly seated. 8 Close the computer cover. NOTICE: To avoid damage to the hard drive. 6 Connect the power and hard drive cables to the drive, do not set the drive on a surface, such as a foam pad, that it . 1 Check the documentation... instructions about installing any of the hard drive. Instead, set it on a hard surface. Removing and Installing Parts 89 hard drive cable power cable 7 Check all connectors to be certain that came with the hard drive for your computer from the electrical outlet before opening the cover.
...See the documentation that they are properly cabled and firmly seated. 8 Close the computer cover. NOTICE: To avoid damage to the hard drive. 6 Connect the power and hard drive cables to the drive, do not set the drive on a surface, such as a foam pad, that it . 1 Check the documentation... instructions about installing any of the hard drive. Instead, set it on a hard surface. Removing and Installing Parts 89 hard drive cable power cable 7 Check all connectors to be certain that came with the hard drive for your computer from the electrical outlet before opening the cover.


