Owner's Manual
Page 6
... Cards 69 PCI Express Cards 73 Drive Panels 82 Removing the Drive Panel 82 Removing the Drive-Panel Insert 83 Replacing the Drive-Panel Insert 84 Replacing the Drive Panel 84 Drives 85 General Installation Guidelines 85 Hard Drive 86 Removing a Hard Drive 87 Installing a Hard Drive 88 Adding a Second Hard Drive 89 Floppy Drive 91 Removing a Floppy Drive 91 Installing a Floppy Drive 93 Media Card Reader 93 Removing...
... Cards 69 PCI Express Cards 73 Drive Panels 82 Removing the Drive Panel 82 Removing the Drive-Panel Insert 83 Replacing the Drive-Panel Insert 84 Replacing the Drive Panel 84 Drives 85 General Installation Guidelines 85 Hard Drive 86 Removing a Hard Drive 87 Installing a Hard Drive 88 Adding a Second Hard Drive 89 Floppy Drive 91 Removing a Floppy Drive 91 Installing a Floppy Drive 93 Media Card Reader 93 Removing...
Owner's Manual
Page 86
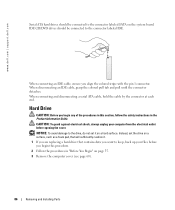
... detaches. CAUTION: To guard against electrical shock, always unplug your files before opening the cover. Instead, set it . 1 If you are replacing a hard drive that will sufficiently cushion it on a hard surface. Hard Drive CAUTION: Before you align the colored stripe with the pin 1 connector. NOTICE: To avoid damage to the...safety instructions in "Before You Begin" on page 55. 3 Remove the computer cover (see page 60). 86 Removing and Installing Parts www.dell.com | support.dell.com Serial ATA hard drives should be connected to the connector labeled SATA on the system board.
... detaches. CAUTION: To guard against electrical shock, always unplug your files before opening the cover. Instead, set it . 1 If you are replacing a hard drive that will sufficiently cushion it on a hard surface. Hard Drive CAUTION: Before you align the colored stripe with the pin 1 connector. NOTICE: To avoid damage to the...safety instructions in "Before You Begin" on page 55. 3 Remove the computer cover (see page 60). 86 Removing and Installing Parts www.dell.com | support.dell.com Serial ATA hard drives should be connected to the connector labeled SATA on the system board.
Owner's Manual
Page 88
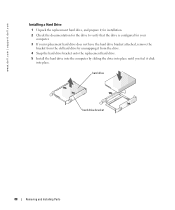
....dell.com Installing a Hard Drive 1 Unpack the replacement hard drive, and prepare it for installation. 2 Check the documentation for the drive to verify that the drive is configured for your computer. 3 If your replacement hard drive does not have the hard drive bracket attached, remove the bracket from the old hard drive by unsnapping it from the drive. 4 Snap the hard drive bracket onto the replacement hard drive. 5 Install the hard drive into...
....dell.com Installing a Hard Drive 1 Unpack the replacement hard drive, and prepare it for installation. 2 Check the documentation for the drive to verify that the drive is configured for your computer. 3 If your replacement hard drive does not have the hard drive bracket attached, remove the bracket from the old hard drive by unsnapping it from the drive. 4 Snap the hard drive bracket onto the replacement hard drive. 5 Install the hard drive into...

Owner's Manual
Page 90
... the hard drive bracket in on the tabs on each side of the hard drive bay. 5 Slide the new hard drive into empty bay until you feel the drive securely installed. 90 Removing and Installing Parts NOTE: If your replacement hard drive does not have removed the hard drive bracket from the drive. Snap the bracket onto the new hard drive. www.dell.com | support.dell.com...
... the hard drive bracket in on the tabs on each side of the hard drive bay. 5 Slide the new hard drive into empty bay until you feel the drive securely installed. 90 Removing and Installing Parts NOTE: If your replacement hard drive does not have removed the hard drive bracket from the drive. Snap the bracket onto the new hard drive. www.dell.com | support.dell.com...

Owner's Manual
Page 91
...see page 60). Removing and Installing Parts 91 7 Connect the power and hard drive cables to the drive. 8 Check all connectors to electrical outlets, and turn them on. Floppy Drive CAUTION: Before you are properly cabled and firmly seated. 9 Replace the computer cover (page 102). NOTICE: To connect a network cable, ...cover. CAUTION: To guard against electrical shock, always unplug your computer and devices to be certain that came with the drive for instructions on installing any of the procedures in this section, follow the safety instructions in "Before You Begin" on page 93."...
...see page 60). Removing and Installing Parts 91 7 Connect the power and hard drive cables to the drive. 8 Check all connectors to electrical outlets, and turn them on. Floppy Drive CAUTION: Before you are properly cabled and firmly seated. 9 Replace the computer cover (page 102). NOTICE: To connect a network cable, ...cover. CAUTION: To guard against electrical shock, always unplug your computer and devices to be certain that came with the drive for instructions on installing any of the procedures in this section, follow the safety instructions in "Before You Begin" on page 93."...


