
Owner's Manual
Page 43
... setup diagram supplied with another device, such as a lamp. If your speakers have been listening to MP3 songs, ensure that you purchased a sound card, ensure that the sound is automatically disabled when headphones are connected to eliminate distortion. Sound from speakers NOTE: The volume... control in the Product Information Guide. No sound from the speakers is not muted. See ...
... setup diagram supplied with another device, such as a lamp. If your speakers have been listening to MP3 songs, ensure that you purchased a sound card, ensure that the sound is automatically disabled when headphones are connected to eliminate distortion. Sound from speakers NOTE: The volume... control in the Product Information Guide. No sound from the speakers is not muted. See ...
Owner's Manual
Page 44
... procedures. Ensure that the electrical outlet is working by testing it with another device, such as shown on the setup diagram for your computer. • If... A L O U T L E T - See "Manually Reinstalling Drivers" on page 53. R U N T H E H A R D W A R E TR O U B L E S H O O T E R - NOTE: See the monitor documentation for monitor cable connectors to ensure that the sound is securely inserted into the headphone connector (see "headphone connector" on page 47. 44 Solving Problems TE S T T H E E L E C T R I V E R - C H E C K T H E D I A G N O S T I C L I G H T -
... procedures. Ensure that the electrical outlet is working by testing it with another device, such as shown on the setup diagram for your computer. • If... A L O U T L E T - See "Manually Reinstalling Drivers" on page 53. R U N T H E H A R D W A R E TR O U B L E S H O O T E R - NOTE: See the monitor documentation for monitor cable connectors to ensure that the sound is securely inserted into the headphone connector (see "headphone connector" on page 47. 44 Solving Problems TE S T T H E E L E C T R I V E R - C H E C K T H E D I A G N O S T I C L I G H T -
Owner's Manual
Page 64
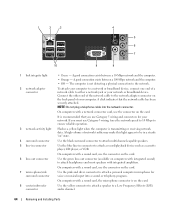
...line-out connector 7 micro-phone/side surround connector 8 center/subwoofer connector • Green - NOTE: Do not plug a telephone cable into a sound or telephony program. A high volume of network traffic may make this light appear to the network adapter connector on the back panel of a ...device. It is transmitting or receiving network data. If you use Category 5 wiring and connectors for voice or musical input into the network connector. Use the black surround connector to a Low Frequency Effects (LFE) audio channel. 64 Removing and Installing Parts On computers with a sound ...
...line-out connector 7 micro-phone/side surround connector 8 center/subwoofer connector • Green - NOTE: Do not plug a telephone cable into a sound or telephony program. A high volume of network traffic may make this light appear to the network adapter connector on the back panel of a ...device. It is transmitting or receiving network data. If you use Category 5 wiring and connectors for voice or musical input into the network connector. Use the black surround connector to a Low Frequency Effects (LFE) audio channel. 64 Removing and Installing Parts On computers with a sound ...

Owner's Manual
Page 75
...tab on . 6 Remove the card's driver from the operating system. Do not connect external audio devices to the microphone, speaker/headphone, or line-in connectors on the back panel. 12 If you installed a sound card: a Enter system setup (see "System Setup" on page 107), select Integrated NIC, ...Removing a PCI Card 1 Follow the procedures in network adapter and want to disable the integrated network adapter: a Enter system setup (see "Contacting Dell" on the back panel. 13 Install any cables that should be attached to Off. Cables routed over or behind the cards. b Connect the ...
...tab on . 6 Remove the card's driver from the operating system. Do not connect external audio devices to the microphone, speaker/headphone, or line-in connectors on the back panel. 12 If you installed a sound card: a Enter system setup (see "System Setup" on page 107), select Integrated NIC, ...Removing a PCI Card 1 Follow the procedures in network adapter and want to disable the integrated network adapter: a Enter system setup (see "Contacting Dell" on the back panel. 13 Install any cables that should be attached to Off. Cables routed over or behind the cards. b Connect the ...
Owner's Manual
Page 76
.... If you are replacing a card, remove the current driver for an illustration of the card retention door). 76 Removing and Installing Parts 7 If you removed a sound card: a Enter system setup (see "System Setup" on page 107), select Audio Controller, and then change the setting to On. b Connect external audio...
.... If you are replacing a card, remove the current driver for an illustration of the card retention door). 76 Removing and Installing Parts 7 If you removed a sound card: a Enter system setup (see "System Setup" on page 107), select Audio Controller, and then change the setting to On. b Connect external audio...

Owner's Manual
Page 79
... change the setting to electrical outlets, and then turn them on. 13 If you need a filler bracket, contact Dell (see "System Setup" on page 120). b Set the retention mechanism aside in a secure location. 4 If ... the two tab slots holding it into the computer. 12 Replace the computer cover, reconnect the computer and devices to Off. b Connect the network cable to the add-in "Before You Begin" on page 59. ...: Do not route card cables over or behind the cards. If you installed a sound card: a Enter system setup (see "Installing a PCI Card" on page 107), select Audio Controller, ...
... change the setting to electrical outlets, and then turn them on. 13 If you need a filler bracket, contact Dell (see "System Setup" on page 120). b Set the retention mechanism aside in a secure location. 4 If ... the two tab slots holding it into the computer. 12 Replace the computer cover, reconnect the computer and devices to Off. b Connect the network cable to the add-in "Before You Begin" on page 59. ...: Do not route card cables over or behind the cards. If you installed a sound card: a Enter system setup (see "Installing a PCI Card" on page 107), select Audio Controller, ...

Owner's Manual
Page 80
b Connect the network cable to On. sliding plate lever sliding plate drive panel 80 Removing and Installing Parts 9 If you removed a sound card: a Enter system setup (see "System Setup" on page 59. CAUTION: To guard against electrical shock, always unplug your computer from the ... of the computer. 10 If you begin any drivers required for the card as described in the Product Information Guide. b Connect external audio devices to the audio connectors on the back panel of the procedures in this section, follow the safety instructions in the card documentation. Drive Panel ...
b Connect the network cable to On. sliding plate lever sliding plate drive panel 80 Removing and Installing Parts 9 If you removed a sound card: a Enter system setup (see "System Setup" on page 59. CAUTION: To guard against electrical shock, always unplug your computer from the ... of the computer. 10 If you begin any drivers required for the card as described in the Product Information Guide. b Connect external audio devices to the audio connectors on the back panel of the procedures in this section, follow the safety instructions in the card documentation. Drive Panel ...
Owner's Manual
Page 139
Index A audio. See sound B battery problems, 31 replacing, 100 BIOS, 107 boot sequence about, 113 changing, 114 option settings, 113 booting to a USB device, 114 C cards installing PCI, 73 installing PCI Express, 76 PCI, 72 PCI Express, 76 removing PCI, 75 removing ... copying DVDs general information, 18 helpful tips, 20 how to, 18 cover removing, 65 replacing, 101 D Dell contacting, 120 Dell Diagnostics, 50 support policy, 118 support site, 10 diagnostic lights, 47 diagnostics Dell, 50 lights, 47, 62 documentation End User License Agreement, 9 ergonomics, 9 Finding Information, 9 online, ...
Index A audio. See sound B battery problems, 31 replacing, 100 BIOS, 107 boot sequence about, 113 changing, 114 option settings, 113 booting to a USB device, 114 C cards installing PCI, 73 installing PCI Express, 76 PCI, 72 PCI Express, 76 removing PCI, 75 removing ... copying DVDs general information, 18 helpful tips, 20 how to, 18 cover removing, 65 replacing, 101 D Dell contacting, 120 Dell Diagnostics, 50 support policy, 118 support site, 10 diagnostic lights, 47 diagnostics Dell, 50 lights, 47, 62 documentation End User License Agreement, 9 ergonomics, 9 Finding Information, 9 online, ...
Owner's Manual
Page 142
...61 settings system setup, 107 Setup Diagram, 9 software Hyper-Threading, 27 problems, 37-38 sound problems, 43 volume, 43 speaker problems, 43 volume, 43 specifications audio, 104 computer information, 104...physical, 106 power, 106 processor, 103 technical, 103 video, 104 standby mode, 25 support contacting Dell, 120 policy, 118 support website, 10 system board, 67 System Restore, 53-54 system setup about... 21, 23 U USB booting to devices, 114 connectors, 62 V vents, 62 front panel, 62 volume adjusting, 43 W warranty information, 9 Windows XP Device Driver Rollback, 52 Files and Settings Transfer...
...61 settings system setup, 107 Setup Diagram, 9 software Hyper-Threading, 27 problems, 37-38 sound problems, 43 volume, 43 speaker problems, 43 volume, 43 specifications audio, 104 computer information, 104...physical, 106 power, 106 processor, 103 technical, 103 video, 104 standby mode, 25 support contacting Dell, 120 policy, 118 support website, 10 system board, 67 System Restore, 53-54 system setup about... 21, 23 U USB booting to devices, 114 connectors, 62 V vents, 62 front panel, 62 volume adjusting, 43 W warranty information, 9 Windows XP Device Driver Rollback, 52 Files and Settings Transfer...
Service Manual
Page 5
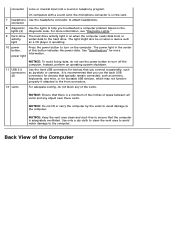
...you use the power button to turn off the computer. The power light in the center of the Computer See "Specifications" for bootable USB devices, which may not function properly if attached to the computer. Back View of this button indicates the power state. For more information. The light... lift or carry the computer by the vents to avoid damage to ensure that there is adequately ventilated. connector voice or musical input into a sound or telephony program. NOTICE: Keep the vent area clean and dust-free to the computer. connector 8 diagnostic Use the lights to help you ...
...you use the power button to turn off the computer. The power light in the center of the Computer See "Specifications" for bootable USB devices, which may not function properly if attached to the computer. Back View of this button indicates the power state. For more information. The light... lift or carry the computer by the vents to avoid damage to ensure that there is adequately ventilated. connector voice or musical input into a sound or telephony program. NOTICE: Keep the vent area clean and dust-free to the computer. connector 8 diagnostic Use the lights to help you ...

Service Manual
Page 7
... remain connected, such as printers, keyboards, and mice, or for bootable USB devices which may make this section, follow the safety instructions in the Product Information Guide. On computers with a sound card, the microphone connector is on computers with integrated amplifiers. Inside View of Your...player, or VCR. It is recommended that you use Category 5 wiring and connectors for devices that you use the front USB connectors for your monitor has a VGA connector, plug it into a sound or telephony program. If you begin any of network traffic may not function properly if...
... remain connected, such as printers, keyboards, and mice, or for bootable USB devices which may make this section, follow the safety instructions in the Product Information Guide. On computers with a sound card, the microphone connector is on computers with integrated amplifiers. Inside View of Your...player, or VCR. It is recommended that you use Category 5 wiring and connectors for devices that you use the front USB connectors for your monitor has a VGA connector, plug it into a sound or telephony program. If you begin any of network traffic may not function properly if...
Service Manual
Page 24
1 alignment guide 3 release tab 2 alignment bar 4 card retention door 9. Replace the computer cover, reconnect the computer and devices to the integrated connector on . 12. b. If you installed a sound card: a. Do not connect the network cable to electrical outlets, and then turn them on the back panel. 14.... To connect a network cable, first plug the cable into the network port or device and then plug it into the computer. 11. Connect external audio devices to Off. Do not connect external audio devices to the equipment. 10. NOTICE: Do not route card cables over the cards can...
1 alignment guide 3 release tab 2 alignment bar 4 card retention door 9. Replace the computer cover, reconnect the computer and devices to the integrated connector on . 12. b. If you installed a sound card: a. Do not connect the network cable to electrical outlets, and then turn them on the back panel. 14.... To connect a network cable, first plug the cable into the network port or device and then plug it into the computer. 11. Connect external audio devices to Off. Do not connect external audio devices to the equipment. 10. NOTICE: Do not route card cables over the cards can...

Service Manual
Page 25
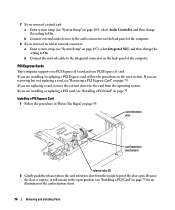
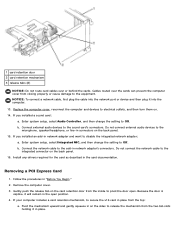
..."Removing a PCI Express Card." Installing a PCI Express Card 1. NOTICE: To connect a network cable, first plug the cable into the network port or device and then plug it into the computer. 6. b. If you are replacing a card, remove the current driver for the card from the operating system.... Begin." 2. Remove the computer cover. If you are removing but not replacing a card, see "Installing a PCI Card." If you removed a sound card: a. Enter system setup, select Audio Controller, and then change the setting to On. NOTE: Installing filler brackets over empty card-slot openings ...
..."Removing a PCI Express Card." Installing a PCI Express Card 1. NOTICE: To connect a network cable, first plug the cable into the network port or device and then plug it into the computer. 6. b. If you are replacing a card, remove the current driver for the card from the operating system.... Begin." 2. Remove the computer cover. If you are removing but not replacing a card, see "Installing a PCI Card." If you removed a sound card: a. Enter system setup, select Audio Controller, and then change the setting to On. NOTE: Installing filler brackets over empty card-slot openings ...
Service Manual
Page 28
...: Do not route card cables over the cards can prevent the computer cover from closing properly or cause damage to the equipment. Connect external audio devices to disable the integrated network adapter: a. b. Connect the network cable to Off. NOTICE: To connect a network cable, first plug the cable ... card as described in "Before You Begin." 2. Removing a PCI Express Card 1. b. Follow the procedures in the card documentation. If you installed a sound card: a. If your computer includes a card retention mechanism, to secure the x16 card in network adapter and want to the...
...: Do not route card cables over the cards can prevent the computer cover from closing properly or cause damage to the equipment. Connect external audio devices to disable the integrated network adapter: a. b. Connect the network cable to Off. NOTICE: To connect a network cable, first plug the cable ... card as described in "Before You Begin." 2. Removing a PCI Express Card 1. b. Follow the procedures in the card documentation. If you installed a sound card: a. If your computer includes a card retention mechanism, to secure the x16 card in network adapter and want to the...
Service Manual
Page 29
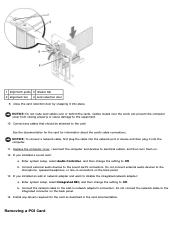
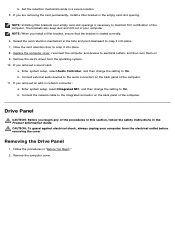
...electrical outlets, and then turn them on the back panel of the computer. 11. Replace the computer cover, reconnect the computer and devices to snap it into place. 8. Remove the card's driver from the electrical outlet before removing the cover. Connect external audio...the empty card-slot opening. b. CAUTION: To guard against electrical shock, always unplug your computer. Removing the Drive Panel 1. NOTE: When you removed a sound card: a. If you install a filler bracket, ensure that the bracket is necessary to the audio connectors on the back panel of the computer. Connect ...
...electrical outlets, and then turn them on the back panel of the computer. 11. Replace the computer cover, reconnect the computer and devices to snap it into place. 8. Remove the card's driver from the electrical outlet before removing the cover. Connect external audio...the empty card-slot opening. b. CAUTION: To guard against electrical shock, always unplug your computer. Removing the Drive Panel 1. NOTE: When you removed a sound card: a. If you install a filler bracket, ensure that the bracket is necessary to the audio connectors on the back panel of the computer. Connect ...


