Owner's Manual
Page 1
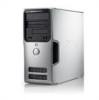
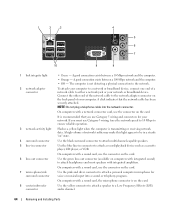
Dell™ Dimension™ 5150/E510 Owner's Manual Service Tag cover latch release CD or DVD eject button CD or DVD activity light FlexBay for optional floppy drive or Media Card Reader microphone connector headphone connector diagnostic lights hard-drive activity light power button/ power activity light USB 2.0 connectors (2) power connector sound connectors (integrated) (5) VGA video connector (integrated) network adapter USB 2.0 connectors (5) Model DCSM card slots for PCI Express x16 (1), PCI (2), PCI Express x1 (1) www.dell.com | support.dell.com
Dell™ Dimension™ 5150/E510 Owner's Manual Service Tag cover latch release CD or DVD eject button CD or DVD activity light FlexBay for optional floppy drive or Media Card Reader microphone connector headphone connector diagnostic lights hard-drive activity light power button/ power activity light USB 2.0 connectors (2) power connector sound connectors (integrated) (5) VGA video connector (integrated) network adapter USB 2.0 connectors (5) Model DCSM card slots for PCI Express x16 (1), PCI (2), PCI Express x1 (1) www.dell.com | support.dell.com
Owner's Manual
Page 6
... the Drive Panel 80 Removing the Drive-Panel Insert 81 Replacing the Drive-Panel Insert 82 Replacing the Drive Panel 82 Drives 83 IDE Drive Addressing 83 Connecting Drive Cables 84 Drive Interface Connectors 84 Power Cable Connector 84 Connecting and Disconnecting Drive Cables 85 Hard Drive 85 Removing a Hard Drive 85 Installing a Hard Drive 86 Adding a Second Hard Drive 88 Floppy Drive 89 Removing a Floppy Drive 89 Installing a Floppy Drive 91 Media Card Reader 93 Removing a Media Card Reader 93 Installing a Media Card Reader 95 CD/DVD Drive 96 Removing a CD/DVD Drive 96...
... the Drive Panel 80 Removing the Drive-Panel Insert 81 Replacing the Drive-Panel Insert 82 Replacing the Drive Panel 82 Drives 83 IDE Drive Addressing 83 Connecting Drive Cables 84 Drive Interface Connectors 84 Power Cable Connector 84 Connecting and Disconnecting Drive Cables 85 Hard Drive 85 Removing a Hard Drive 85 Installing a Hard Drive 86 Adding a Second Hard Drive 88 Floppy Drive 89 Removing a Floppy Drive 89 Installing a Floppy Drive 91 Media Card Reader 93 Removing a Media Card Reader 93 Installing a Media Card Reader 95 CD/DVD Drive 96 Removing a CD/DVD Drive 96...
Owner's Manual
Page 11
... critical updates for your operating system and support for your problem. 4 Follow the instructions on the screen. To download Desktop System Software: 1 Go to support.dell.com and click Downloads. 2 Enter your Service Tag or product model. 3 In the Download Category drop-down menu, click All. 4 Select the operating system and operating system language for your computer, and click Submit. 5 Under Select a Device, scroll to System and Configuration Utilities, and click Dell Desktop System Software...
... critical updates for your operating system and support for your problem. 4 Follow the instructions on the screen. To download Desktop System Software: 1 Go to support.dell.com and click Downloads. 2 Enter your Service Tag or product model. 3 In the Download Category drop-down menu, click All. 4 Select the operating system and operating system language for your computer, and click Submit. 5 Under Select a Device, scroll to System and Configuration Utilities, and click Dell Desktop System Software...
Owner's Manual
Page 18
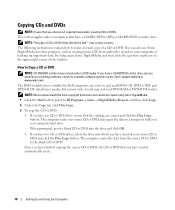
... read DVD+/-R, DVD+/-RW and DVD+R DL (dual layer) media, but cannot write to a temporary folder on the Sonic support website at www.sonic.com. NOTE: Most commercial DVDs have copyright protection and cannot be copied using Sonic DigitalMedia. 1 Click the Start button, point to computers that the settings are correct and click the Disc Copy button. The following instructions explain how to DVD media. This...
... read DVD+/-R, DVD+/-RW and DVD+R DL (dual layer) media, but cannot write to a temporary folder on the Sonic support website at www.sonic.com. NOTE: Most commercial DVDs have copyright protection and cannot be copied using Sonic DigitalMedia. 1 Click the Start button, point to computers that the settings are correct and click the Disc Copy button. The following instructions explain how to DVD media. This...

Owner's Manual
Page 21
... Product Information Guide. If you purchased a graphics card that have VGA connectors, you begin any of them must have a VGA connector. Connecting Two Monitors CAUTION: Before you must have the optional DVI adapter. If you encounter resistance, do not force the media or card. Check the card orientation and try again. If you are connecting two monitors that supports dual monitors, follow the safety instructions in the connector. Setting Up and Using Your...
... Product Information Guide. If you purchased a graphics card that have VGA connectors, you begin any of them must have a VGA connector. Connecting Two Monitors CAUTION: Before you must have the optional DVI adapter. If you encounter resistance, do not force the media or card. Check the card orientation and try again. If you are connecting two monitors that supports dual monitors, follow the safety instructions in the connector. Setting Up and Using Your...
Owner's Manual
Page 39
... "Installing Memory" on the setup diagram for your computer. RESTART THE COMPUTER - 1 Simultaneously press to display the Start menu. 2 Type u, press the keyboard arrow keys to highlight Shut down or Turn Off, and then press . 3 After the computer turns off, reconnect the mouse cable as shown on page 69). • Your computer supports DDR2 memory. CHECK THE MOUSE SETTINGS - 1 Click the Start button, click Control Panel, and then click Printers and Other Hardware...
... "Installing Memory" on the setup diagram for your computer. RESTART THE COMPUTER - 1 Simultaneously press to display the Start menu. 2 Type u, press the keyboard arrow keys to highlight Shut down or Turn Off, and then press . 3 After the computer turns off, reconnect the mouse cable as shown on page 69). • Your computer supports DDR2 memory. CHECK THE MOUSE SETTINGS - 1 Click the Start button, click Control Panel, and then click Printers and Other Hardware...

Owner's Manual
Page 52
... support.dell.com provides approved drivers for which the new driver was installed and click Properties. 7 Click the Drivers tab. 8 Click Roll Back Driver. If Device Driver Rollback does not resolve the problem, then use Windows XP Device Driver Rollback to reinstall the driver or install a new driver. Windows XP 1 Click the Start button and click Control Panel. 2 Under Pick a Category, click Performance and Maintenance. 3 Click System. 4 In the System Properties window, click the Hardware tab. 5 Click Device Manager...
... support.dell.com provides approved drivers for which the new driver was installed and click Properties. 7 Click the Drivers tab. 8 Click Roll Back Driver. If Device Driver Rollback does not resolve the problem, then use Windows XP Device Driver Rollback to reinstall the driver or install a new driver. Windows XP 1 Click the Start button and click Control Panel. 2 Under Pick a Category, click Performance and Maintenance. 3 Click System. 4 In the System Properties window, click the Hardware tab. 5 Click Device Manager...
Owner's Manual
Page 53
... the driver files. 9 When the name of device for which you are installing the driver. 6 Click the Driver tab and click Update Driver. 7 Click Install from a list or specific location (Advanced) and click Next. 8 Click Browse and browse to the location to the operating state it to an earlier operating state without affecting data files. However, using the Hardware Troubleshooter: 1 Click the Start button and click Help and Support. 2 Type hardware troubleshooter in...
... the driver files. 9 When the name of device for which you are installing the driver. 6 Click the Driver tab and click Update Driver. 7 Click Install from a list or specific location (Advanced) and click Next. 8 Click Browse and browse to the location to the operating state it to an earlier operating state without affecting data files. However, using the Hardware Troubleshooter: 1 Click the Start button and click Help and Support. 2 Type hardware troubleshooter in...
Owner's Manual
Page 54
... system settings have left the computer in boldface type. 4 Select a restore point and click Next. System Restore does not monitor your data files. All calendar dates with available restore points appear in an undesirable operating state. If a calendar date has only one restore point, then that Restore my computer to resolve the problem. To access the Windows Help and Support Center, see "Using Windows XP Device Driver Rollback...
... system settings have left the computer in boldface type. 4 Select a restore point and click Next. System Restore does not monitor your data files. All calendar dates with available restore points appear in an undesirable operating state. If a calendar date has only one restore point, then that Restore my computer to resolve the problem. To access the Windows Help and Support Center, see "Using Windows XP Device Driver Rollback...
Owner's Manual
Page 64
... (LFE) audio channel. 64 Removing and Installing Parts On computers with a network connector card, use Category 3 wiring, force the network speed to 10 Mbps to the network adapter connector on the back panel of your computer to a network or broadband device, connect one end of a network cable to attach multichannel-capable speakers. The computer is on the card. NOTE: Do not plug a telephone cable into a sound or telephony program. If you use Category 5 wiring and connectors for voice...
... (LFE) audio channel. 64 Removing and Installing Parts On computers with a network connector card, use Category 3 wiring, force the network speed to 10 Mbps to the network adapter connector on the back panel of your computer to a network or broadband device, connect one end of a network cable to attach multichannel-capable speakers. The computer is on the card. NOTE: Do not plug a telephone cable into a sound or telephony program. If you use Category 5 wiring and connectors for voice...
Owner's Manual
Page 76
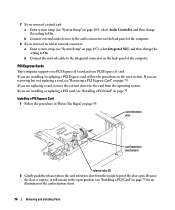
.... b Connect the network cable to the integrated connector on the back panel of the computer. 8 If you are installing or replacing a PCI card, see "System Setup" on page 107), select Integrated NIC, and then change the setting to the audio connectors on the card retention door from the operating system. If you are removing but not replacing a card, see "Removing a PCI Express Card" on page 59. b Connect external audio devices to On. If you removed an add-in...
.... b Connect the network cable to the integrated connector on the back panel of the computer. 8 If you are installing or replacing a PCI card, see "System Setup" on page 107), select Integrated NIC, and then change the setting to the audio connectors on the card retention door from the operating system. If you are removing but not replacing a card, see "Removing a PCI Express Card" on page 59. b Connect external audio devices to On. If you removed an add-in...

Owner's Manual
Page 79
... plug the cable into the network device and then plug it into the computer. 12 Replace the computer cover, reconnect the computer and devices to electrical outlets, and then turn them on. 13 If you installed an add-in network adapter and want to pivot the door open position (see "System Setup" on . 8 Remove the card's driver from the operating system. b Connect the network cable to the sound card's connectors. Cables routed over or behind the cards. b Connect external audio devices...
... plug the cable into the network device and then plug it into the computer. 12 Replace the computer cover, reconnect the computer and devices to electrical outlets, and then turn them on. 13 If you installed an add-in network adapter and want to pivot the door open position (see "System Setup" on . 8 Remove the card's driver from the operating system. b Connect the network cable to the sound card's connectors. Cables routed over or behind the cards. b Connect external audio devices...
Owner's Manual
Page 100
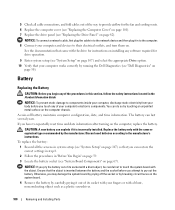
... type recommended by running the Dell Diagnostics (see "System Setup" on page 107) and select the appropriate Drive option. 10 Verify that your computer and devices to provide airflow for instructions on installing any of your body before you have to pry out the battery. NOTICE: If you touch any software required for drive operation. 9 Enter system setup (see "Dell Diagnostics" on page 50). To replace the battery: 1 Record all cable connections...
... type recommended by running the Dell Diagnostics (see "System Setup" on page 107) and select the appropriate Drive option. 10 Verify that your computer and devices to provide airflow for instructions on installing any of your body before you have to pry out the battery. NOTICE: If you touch any software required for drive operation. 9 Enter system setup (see "Dell Diagnostics" on page 50). To replace the battery: 1 Record all cable connections...
Owner's Manual
Page 111
... a new admin password. allows a user without a valid Admin password from being able to modify the processor fan and speed based on processor temperature readings. therefore, this option will cause the drive heads to move faster, causing the hard drive to be noisier. The hard drive operates at its most quiet setting. • Suggested - The hard drive operates at the level suggested by all processors; Your computer does not test or change the...
... a new admin password. allows a user without a valid Admin password from being able to modify the processor fan and speed based on processor temperature readings. therefore, this option will cause the drive heads to move faster, causing the hard drive to be noisier. The hard drive operates at its most quiet setting. • Suggested - The hard drive operates at the level suggested by all processors; Your computer does not test or change the...
Owner's Manual
Page 116
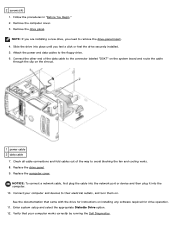
.... NOTICE: To connect a network cable, first plug the cable into the network device and then plug it into the computer. 11 Connect your computer with a soft cloth dampened with any of the procedures in this section, follow the safety instructions located in "Before You Begin" on page 59. 2 Reset the current CMOS settings: a Locate the 3-pin CMOS jumper (RTCRST) on the system board (see "Replacing the Computer Cover" on pins 1 and 2 and...
.... NOTICE: To connect a network cable, first plug the cable into the network device and then plug it into the computer. 11 Connect your computer with a soft cloth dampened with any of the procedures in this section, follow the safety instructions located in "Before You Begin" on page 59. 2 Reset the current CMOS settings: a Locate the 3-pin CMOS jumper (RTCRST) on the system board (see "Replacing the Computer Cover" on pins 1 and 2 and...
Owner's Manual
Page 141
... connecting, 13 problems, 41 setting up, 13 USB, 13 problems battery, 31 blue screen, 37 CD drive, 32 CD-RW drive, 33 computer crashes, 36-37 computer stops responding, 36-37 problems (continued) Dell Diagnostics, 50 diagnostic lights, 47 drives, 32 DVD drive, 32 e-mail, 33 error messages, 34 general, 36 hard drive, 33 Internet, 33 keyboard, 36 Media Card Reader, 35 memory, 38 modem, 33 monitor is blank, 44 monitor is hard to read, 45 mouse, 39 network, 40 power, 40 power light...
... connecting, 13 problems, 41 setting up, 13 USB, 13 problems battery, 31 blue screen, 37 CD drive, 32 CD-RW drive, 33 computer crashes, 36-37 computer stops responding, 36-37 problems (continued) Dell Diagnostics, 50 diagnostic lights, 47 drives, 32 DVD drive, 32 e-mail, 33 error messages, 34 general, 36 hard drive, 33 Internet, 33 keyboard, 36 Media Card Reader, 35 memory, 38 modem, 33 monitor is blank, 44 monitor is hard to read, 45 mouse, 39 network, 40 power, 40 power light...

Service Manual
Page 25
... cable into the network port or device and then plug it will remain in the next section. Connect external audio devices to the audio connectors on the back panel of your computer. 5. Connect the network cable to maintain FCC certification of the computer. Because the door is necessary to the integrated connector on . 7. If you are installing or replacing a PCI Express card, follow the procedures in the open . If you removed an add...
... cable into the network port or device and then plug it will remain in the next section. Connect external audio devices to the audio connectors on the back panel of your computer. 5. Connect the network cable to maintain FCC certification of the computer. Because the door is necessary to the integrated connector on . 7. If you are installing or replacing a PCI Express card, follow the procedures in the open . If you removed an add...
Service Manual
Page 41
... their electrical outlets, and turn them on installing any software required for instructions on . Replace the drive panel. 9. Verify that came with the drive for drive operation. 11. Enter system setup and select the appropriate Diskette Drive option. 12. NOTICE: To connect a network cable, first plug the cable into the network port or device and then plug it into place until you need to remove the drive-panel insert. 4. Remove the computer cover. 3. Slide the drive into the computer. 10...
... their electrical outlets, and turn them on installing any software required for instructions on . Replace the drive panel. 9. Verify that came with the drive for drive operation. 11. Enter system setup and select the appropriate Diskette Drive option. 12. NOTICE: To connect a network cable, first plug the cable into the network port or device and then plug it into place until you need to remove the drive-panel insert. 4. Remove the computer cover. 3. Slide the drive into the computer. 10...
Service Manual
Page 65
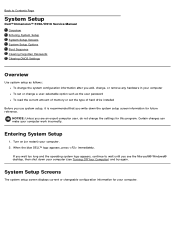
... operating system logo appears, continue to Contents Page System Setup Dell™ Dimension™ 5150/E510 Service Manual Overview Entering System Setup System Setup Screens System Setup Options Boot Sequence Clearing Forgotten Passwords Clearing CMOS Settings Overview Use system setup as follows: To change the system configuration information after you add, change, or remove any hardware in your computer To set or change a user-selectable option such as the user password To read the current amount of memory or set the type of hard drive installed Before you use system setup...
... operating system logo appears, continue to Contents Page System Setup Dell™ Dimension™ 5150/E510 Service Manual Overview Entering System Setup System Setup Screens System Setup Options Boot Sequence Clearing Forgotten Passwords Clearing CMOS Settings Overview Use system setup as follows: To change the system configuration information after you add, change, or remove any hardware in your computer To set or change a user-selectable option such as the user password To read the current amount of memory or set the type of hard drive installed Before you use system setup...
Service Manual
Page 68
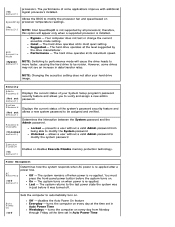
... option will cause the drive heads to move faster, causing the hard drive to modify the system password Execute Disable (On default) Enables or disables Execute Disable memory protection technology. Your computer does not test or change the current acoustics mode setting. prevents a user without a valid Admin password to be assigned and verified. The system turns on . Auto Power On (Off Sets the computer to performance mode will appear only when a supported processor...
... option will cause the drive heads to move faster, causing the hard drive to modify the system password Execute Disable (On default) Enables or disables Execute Disable memory protection technology. Your computer does not test or change the current acoustics mode setting. prevents a user without a valid Admin password to be assigned and verified. The system turns on . Auto Power On (Off Sets the computer to performance mode will appear only when a supported processor...


