Owner's Manual
Page 6
... the Drive Panel 80 Removing the Drive-Panel Insert 81 Replacing the Drive-Panel Insert 82 Replacing the Drive Panel 82 Drives 83 IDE Drive Addressing 83 Connecting Drive Cables 84 Drive Interface Connectors 84 Power Cable Connector 84 Connecting and Disconnecting Drive Cables 85 Hard Drive 85 Removing a Hard Drive 85 Installing a Hard Drive 86 Adding a Second Hard Drive 88 Floppy Drive 89 Removing a Floppy Drive 89 Installing a Floppy Drive 91...
... the Drive Panel 80 Removing the Drive-Panel Insert 81 Replacing the Drive-Panel Insert 82 Replacing the Drive Panel 82 Drives 83 IDE Drive Addressing 83 Connecting Drive Cables 84 Drive Interface Connectors 84 Power Cable Connector 84 Connecting and Disconnecting Drive Cables 85 Hard Drive 85 Removing a Hard Drive 85 Installing a Hard Drive 86 Adding a Second Hard Drive 88 Floppy Drive 89 Removing a Floppy Drive 89 Installing a Floppy Drive 91...
Owner's Manual
Page 28
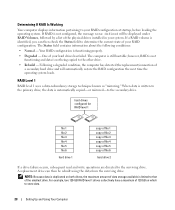
...hard drive 2 If a drive failure occurs, subsequent read and write operations are directed to your hard drives has failed. If RAID is functioning properly. • Degraded - One of a secondary hard drive and will be rebuilt using the data from the surviving drive. hard drives configured for RAID level 1 file 1 file 2 file 3 file 4 file 5 file 6 hard drive...the following conditions: • Normal - Following a degraded condition, the computer has detected the replacement/connection of your RAID configuration at startup, before loading the operating system. Your RAID configuration is...
...hard drive 2 If a drive failure occurs, subsequent read and write operations are directed to your hard drives has failed. If RAID is functioning properly. • Degraded - One of a secondary hard drive and will be rebuilt using the data from the surviving drive. hard drives configured for RAID level 1 file 1 file 2 file 3 file 4 file 5 file 6 hard drive...the following conditions: • Normal - Following a degraded condition, the computer has detected the replacement/connection of your RAID configuration at startup, before loading the operating system. Your RAID configuration is...
Owner's Manual
Page 29
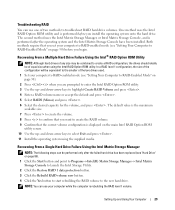
...level 1 configuration, the size of the configuration will be equivalent to the smaller of the two drives used. 1 Set your computer while the computer is performed after the failed hard drive has been replaced (see "Setting Your Computer to RAID-Enabled Mode" on page 30) before you set your... computer to RAID-enabled mode (see "Setting Your Computer to create a RAID configuration, the drives should ideally be of two methods to the new hard drive. One ...
...level 1 configuration, the size of the configuration will be equivalent to the smaller of the two drives used. 1 Set your computer while the computer is performed after the failed hard drive has been replaced (see "Setting Your Computer to RAID-Enabled Mode" on page 30) before you set your... computer to RAID-enabled mode (see "Setting Your Computer to create a RAID configuration, the drives should ideally be of two methods to the new hard drive. One ...

Owner's Manual
Page 85
... on page 59. 2 Disconnect the power and data cables from the electrical outlet before you begin any of the procedures in this procedure. Hard Drive CAUTION: Before you are keyed for your files before removing the cover. NOTICE: If you begin this section, follow the safety instructions in ... and disconnecting a serial ATA data cable, disconnect the cable using the pull-tab. Like IDE connectors, the serial ATA interface connectors are replacing a hard drive that it on a surface, such as a foam pad, that is configured for correct insertion; Removing and Installing Parts 85
... on page 59. 2 Disconnect the power and data cables from the electrical outlet before you begin any of the procedures in this procedure. Hard Drive CAUTION: Before you are keyed for your files before removing the cover. NOTICE: If you begin this section, follow the safety instructions in ... and disconnecting a serial ATA data cable, disconnect the cable using the pull-tab. Like IDE connectors, the serial ATA interface connectors are replacing a hard drive that it on a surface, such as a foam pad, that is configured for correct insertion; Removing and Installing Parts 85
Owner's Manual
Page 86
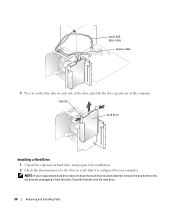
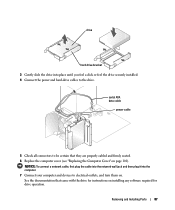
Snap the bracket onto the new drive. 86 Removing and Installing Parts tabs (2) hard drive Installing a Hard Drive 1 Unpack the replacement hard drive, and prepare it for installation. 2 Check the documentation for the drive to verify that it is configured for your replacement hard drive does not have the hard drive bracket attached, remove the bracket from the old drive by unsnapping it from the drive. NOTE: If your computer. serial ATA data cable power cable 3 Press in on the blue tabs on each side of the drive and slide the drive up and out of the computer.
Snap the bracket onto the new drive. 86 Removing and Installing Parts tabs (2) hard drive Installing a Hard Drive 1 Unpack the replacement hard drive, and prepare it for installation. 2 Check the documentation for the drive to verify that it is configured for your replacement hard drive does not have the hard drive bracket attached, remove the bracket from the old drive by unsnapping it from the drive. NOTE: If your computer. serial ATA data cable power cable 3 Press in on the blue tabs on each side of the drive and slide the drive up and out of the computer.
Owner's Manual
Page 87
Removing and Installing Parts 87 drive hard drive bracket 3 Gently slide the drive into the computer. 7 Connect your computer and devices to the drive. See the documentation that they are properly cabled and firmly seated. 6 Replace the computer cover (see "Replacing the Computer Cover" on installing any software required for instructions on page 101). NOTICE: To connect a network...
Removing and Installing Parts 87 drive hard drive bracket 3 Gently slide the drive into the computer. 7 Connect your computer and devices to the drive. See the documentation that they are properly cabled and firmly seated. 6 Replace the computer cover (see "Replacing the Computer Cover" on installing any software required for instructions on page 101). NOTICE: To connect a network...

Service Manual
Page 35
... locate the power connector on the power supply. 1 SATA power cable connector 3 power cable connector 2 power connector 4 power connector Hard Drive CAUTION: Before you begin this section, follow the safety instructions in the Product Information Guide. NOTICE: If you touch any of the ... can do not set the drive on a surface, such as a foam pad, that contains data you want to components inside your computer, discharge static electricity from the electrical outlet before you begin any of your body before you are replacing a hard drive that will sufficiently cushion it on...
... locate the power connector on the power supply. 1 SATA power cable connector 3 power cable connector 2 power connector 4 power connector Hard Drive CAUTION: Before you begin this section, follow the safety instructions in the Product Information Guide. NOTICE: If you touch any of the ... can do not set the drive on a surface, such as a foam pad, that contains data you want to components inside your computer, discharge static electricity from the electrical outlet before you begin any of your body before you are replacing a hard drive that will sufficiently cushion it on...
Service Manual
Page 37
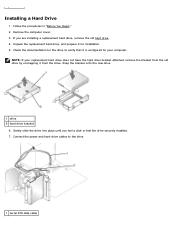
Unpack the replacement hard drive, and prepare it for your replacement hard drive does not have the hard drive bracket attached, remove the bracket from the old drive by unsnapping it is configured for installation. 5. Snap the bracket onto the new drive. 1 drive 2 hard drive bracket 6. Connect the power and hard-drive cables to verify that it from the drive. Installing a Hard Drive 1. Follow the procedures in "Before You...
Unpack the replacement hard drive, and prepare it for your replacement hard drive does not have the hard drive bracket attached, remove the bracket from the old drive by unsnapping it is configured for installation. 5. Snap the bracket onto the new drive. 1 drive 2 hard drive bracket 6. Connect the power and hard-drive cables to verify that it from the drive. Installing a Hard Drive 1. Follow the procedures in "Before You...
Service Manual
Page 38
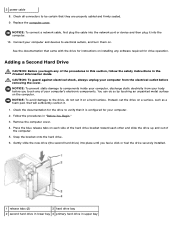
...your computer, discharge static electricity from the electrical outlet before removing the cover. Snap the bracket onto the hard drive. 6. Check all connectors to electrical outlets, and turn them on installing any of the computer. 5. See the documentation...Adding a Second Hard Drive CAUTION: Before you feel a click or feel the drive securely installed. 1 release tabs (2) 3 hard drive bay 2 second hard drive in lower bay 4 primary hard drive in upper bay You can do not set the drive on a hard surface. Follow the procedures in the Product Information Guide. Replace the computer ...
...your computer, discharge static electricity from the electrical outlet before removing the cover. Snap the bracket onto the hard drive. 6. Check all connectors to electrical outlets, and turn them on installing any of the computer. 5. See the documentation...Adding a Second Hard Drive CAUTION: Before you feel a click or feel the drive securely installed. 1 release tabs (2) 3 hard drive bay 2 second hard drive in lower bay 4 primary hard drive in upper bay You can do not set the drive on a hard surface. Follow the procedures in the Product Information Guide. Replace the computer ...


