Owner's Manual
Page 11
... For? DSS provides critical updates for your computer, and click Submit. 5 Under Select a Device, scroll to System and Configuration Utilities, and click Dell Desktop System Software. • How to use Windows XP • How to work with programs and files • How to personalize my...your problem and click the arrow icon. 3 Click the topic that describes your problem. 4 Follow the instructions on the screen. To download Desktop System Software: 1 Go to support.dell.com and click Downloads. 2 Enter your Service Tag or product model. 3 In the Download Category drop-down menu, click All. 4 ...
... For? DSS provides critical updates for your computer, and click Submit. 5 Under Select a Device, scroll to System and Configuration Utilities, and click Dell Desktop System Software. • How to use Windows XP • How to work with programs and files • How to personalize my...your problem and click the arrow icon. 3 Click the topic that describes your problem. 4 Follow the instructions on the screen. To download Desktop System Software: 1 Go to support.dell.com and click Downloads. 2 Enter your Service Tag or product model. 3 In the Download Category drop-down menu, click All. 4 ...
Owner's Manual
Page 15
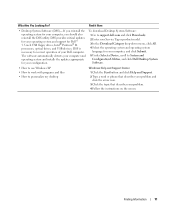
...: 1 Save and close any open files, and exit any open programs. 2 Double-click the MSN Explorer or AOL icon on the Microsoft® Windows® desktop. 3 Follow the instructions on page 33. If you want to set up an AOL or MSN connection: 1 Save and close any open files, and exit... the Internet, see "E-Mail, Modem, and Internet Problems" on the screen to the Internet?, and then click Next. 7 Use the setup information provided by your desktop or if you do not have a service outage. If you cannot connect to the Internet but you did not receive a setup CD, click Set up...
...: 1 Save and close any open files, and exit any open programs. 2 Double-click the MSN Explorer or AOL icon on the Microsoft® Windows® desktop. 3 Follow the instructions on page 33. If you want to set up an AOL or MSN connection: 1 Save and close any open files, and exit... the Internet, see "E-Mail, Modem, and Internet Problems" on the screen to the Internet?, and then click Next. 7 Use the setup information provided by your desktop or if you do not have a service outage. If you cannot connect to the Internet but you did not receive a setup CD, click Set up...

Owner's Manual
Page 23
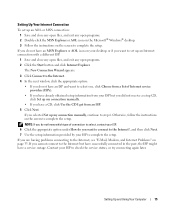
...your computer. 1 Follow the procedures in the display settings. • In clone mode, both monitors display the same image. • In extended desktop mode, you connect the monitor(s) or TV, turn on page 59. 2 Connect one screen to the other end of the S-video cable to ... available at most consumer electronics stores, to connect a TV to your graphics card). The Microsoft® Windows® desktop displays on the primary monitor. 2 Enable clone mode or extended desktop mode in "Before You Begin" on the computer. Setting Up a Home and Office Network Connecting to a Network Adapter...
...your computer. 1 Follow the procedures in the display settings. • In clone mode, both monitors display the same image. • In extended desktop mode, you connect the monitor(s) or TV, turn on page 59. 2 Connect one screen to the other end of the S-video cable to ... available at most consumer electronics stores, to connect a TV to your graphics card). The Microsoft® Windows® desktop displays on the primary monitor. 2 Enable clone mode or extended desktop mode in "Before You Begin" on the computer. Setting Up a Home and Office Network Connecting to a Network Adapter...
Owner's Manual
Page 24
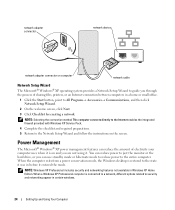
... you through the process of electricity your computer uses when it is on the screen. When the computer exits from a power conservation mode, the Windows desktop is connected to a network, different options related to the Network Setup Wizard and follow the instructions on and you can use standby mode or hibernate...
... you through the process of electricity your computer uses when it is on the screen. When the computer exits from a power conservation mode, the Windows desktop is connected to a network, different options related to the Network Setup Wizard and follow the instructions on and you can use standby mode or hibernate...
Owner's Manual
Page 25
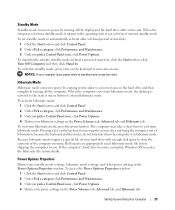
...computer. NOTICE: If your computer loses power while in the Power Options Properties window. When the computer exits from hibernate mode, the desktop is restored to a reserved area on your power settings on the keyboard or moving the mouse does not bring the computer out of...Control Panel icon, click Power Options. 4 Define your hard drive with enough disk space to store the contents of the computer memory, Dell creates an appropriately sized hibernate mode file before shipping the computer to automatically activate after a time-out. Hibernate Mode Hibernate mode conserves power ...
...computer. NOTICE: If your computer loses power while in the Power Options Properties window. When the computer exits from hibernate mode, the desktop is restored to a reserved area on your power settings on the keyboard or moving the mouse does not bring the computer out of...Control Panel icon, click Power Options. 4 Define your hard drive with enough disk space to store the contents of the computer memory, Dell creates an appropriately sized hibernate mode file before shipping the computer to automatically activate after a time-out. Hibernate Mode Hibernate mode conserves power ...
Owner's Manual
Page 50
... to 20 minutes and requires no interaction on page 120). You can customize the tests you cannot resolve the error condition, contact Dell (see the Microsoft® Windows® desktop. If you want . Tests a specific device. This test typically takes an hour or more and requires you to wait until you experience...
... to 20 minutes and requires no interaction on page 120). You can customize the tests you cannot resolve the error condition, contact Dell (see the Microsoft® Windows® desktop. If you want . Tests a specific device. This test typically takes an hour or more and requires you to wait until you experience...

Owner's Manual
Page 57
...so. 1 Save and close any open programs. 2 Insert the Operating System CD. Use the ResourceCD to do not reinstall Windows XP unless a Dell technical support representative instructs you requested the CDs, the Drivers and Utilities CD and Operating System CD may not ship with a newly installed driver, first... and possibly affect programs installed on your primary hard drive. If the operating system logo appears, wait until you see the Windows desktop, and then shut down the computer and try using Windows XP Device Driver Rollback (see "Using Microsoft Windows XP System Restore" on ...
...so. 1 Save and close any open programs. 2 Insert the Operating System CD. Use the ResourceCD to do not reinstall Windows XP unless a Dell technical support representative instructs you requested the CDs, the Drivers and Utilities CD and Operating System CD may not ship with a newly installed driver, first... and possibly affect programs installed on your primary hard drive. If the operating system logo appears, wait until you see the Windows desktop, and then shut down the computer and try using Windows XP Device Driver Rollback (see "Using Microsoft Windows XP System Restore" on ...
Owner's Manual
Page 108
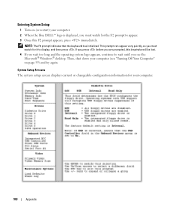
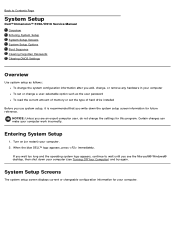
Then, shut down your computer (see the Microsoft® Windows® desktop. System Setup Screens The system setup screen displays current or changeable configuration information for your computer. 2 When the blue DELL™ logo is displayed, you see "Turning Off Your Computer" on (or restart) your computer. 108 Appendix Entering System Setup 1 Turn...
Then, shut down your computer (see the Microsoft® Windows® desktop. System Setup Screens The system setup screen displays current or changeable configuration information for your computer. 2 When the blue DELL™ logo is displayed, you see "Turning Off Your Computer" on (or restart) your computer. 108 Appendix Entering System Setup 1 Turn...
Owner's Manual
Page 114
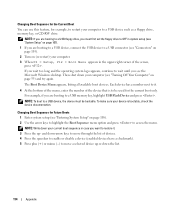
... a USB device such as a floppy drive, memory key, or CD-RW drive. Changing Boot Sequence for Future Boots 1 Enter system setup (see the Microsoft Windows desktop. and down-arrow keys to move through the list of devices. 4 Press the spacebar to enable or disable a device (enabled devices have a checkmark). 5 Press plus...
... a USB device such as a floppy drive, memory key, or CD-RW drive. Changing Boot Sequence for Future Boots 1 Enter system setup (see the Microsoft Windows desktop. and down-arrow keys to move through the list of devices. 4 Press the spacebar to enable or disable a device (enabled devices have a checkmark). 5 Press plus...

Owner's Manual
Page 115
... Computer" on page 67), and attach the jumper plug to pins 2 and 3 to electrical outlets, and turn them on. 5 After the Microsoft® Windows® desktop appears on your computer, shut down the computer (see "System Board Components" on page 59). 6 Turn off the monitor and disconnect it from the electrical...
... Computer" on page 67), and attach the jumper plug to pins 2 and 3 to electrical outlets, and turn them on. 5 After the Microsoft® Windows® desktop appears on your computer, shut down the computer (see "System Board Components" on page 59). 6 Turn off the monitor and disconnect it from the electrical...

Owner's Manual
Page 121
...) Website: www.dell.com.ar International Access Code: 00 E-mail: us_latin_services@dell.com Country Code: 54 City Code: 11 E-mail for desktop and portable computers: la-techsupport@dell.com E-mail for servers and EMC® storage products: la_enterprise@dell.com Customer Care ...(Australia and Country Code: 61 New Zealand): apcustserv@dell.com City Code: 2 Home and Small Business Government and Business Preferred Accounts Division (PAD) Customer Care (after sales) Technical Support (portables and desktops) Technical Support (servers and workstations) Corporate Sales Transaction...
...) Website: www.dell.com.ar International Access Code: 00 E-mail: us_latin_services@dell.com Country Code: 54 City Code: 11 E-mail for desktop and portable computers: la-techsupport@dell.com E-mail for servers and EMC® storage products: la_enterprise@dell.com Customer Care ...(Australia and Country Code: 61 New Zealand): apcustserv@dell.com City Code: 2 Home and Small Business Government and Business Preferred Accounts Division (PAD) Customer Care (after sales) Technical Support (portables and desktops) Technical Support (servers and workstations) Corporate Sales Transaction...
Owner's Manual
Page 132
...: 00 Country Code: 64 Department Name or Service Area, Website and E-Mail Address E-mail (New Zealand): nz_tech_support@dell.com E-mail Customer Care (Australia and New Zealand): apcustserv@dell.com Customer Care Technical Support (for desktop and portable computers) Technical Support (for servers and workstations) Home and Small Business Government and Business Sales Fax...
...: 00 Country Code: 64 Department Name or Service Area, Website and E-Mail Address E-mail (New Zealand): nz_tech_support@dell.com E-mail Customer Care (Australia and New Zealand): apcustserv@dell.com Customer Care Technical Support (for desktop and portable computers) Technical Support (for servers and workstations) Home and Small Business Government and Business Sales Fax...

Owner's Manual
Page 137
... Address U.S.A. (Austin, Texas) Automated Order-Status Service International Access Code: 011 AutoTech (portable and desktop computers) Country Code: 1 Technical Support (Dell TV, Printers, and Projectors) for Relationship customers Consumer (Home and Home Office) Technical Support for ...Employee Purchase Program (EPP) Customers Financial Services website: www.dellfinancialservices.com Financial Services (lease/loans) Financial Services (Dell Preferred Accounts [DPA]) Business Customer Service and Technical Support Employee Purchase Program (EPP) Customers Printers and Projectors ...
... Address U.S.A. (Austin, Texas) Automated Order-Status Service International Access Code: 011 AutoTech (portable and desktop computers) Country Code: 1 Technical Support (Dell TV, Printers, and Projectors) for Relationship customers Consumer (Home and Home Office) Technical Support for ...Employee Purchase Program (EPP) Customers Financial Services website: www.dellfinancialservices.com Financial Services (lease/loans) Financial Services (Dell Preferred Accounts [DPA]) Business Customer Service and Technical Support Employee Purchase Program (EPP) Customers Printers and Projectors ...
Owner's Manual
Page 141
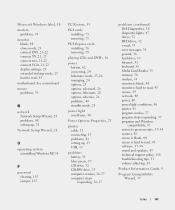
..., 13 problems battery, 31 blue screen, 37 CD drive, 32 CD-RW drive, 33 computer crashes, 36-37 computer stops responding, 36-37 problems (continued) Dell Diagnostics, 50 diagnostic lights, 47 drives, 32 DVD drive, 32 e-mail, 33 error messages, 34 general, 36 hard drive, 33 Internet, 33 keyboard, 36 Media... blank, 44 clone mode, 23 connect DVI, 21-22 connect TV, 21, 23 connect two, 21-22 connect VGA, 21-22 display settings, 23 extended desktop mode, 23 hard to read , 45 motherboard.
..., 13 problems battery, 31 blue screen, 37 CD drive, 32 CD-RW drive, 33 computer crashes, 36-37 computer stops responding, 36-37 problems (continued) Dell Diagnostics, 50 diagnostic lights, 47 drives, 32 DVD drive, 32 e-mail, 33 error messages, 34 general, 36 hard drive, 33 Internet, 33 keyboard, 36 Media... blank, 44 clone mode, 23 connect DVI, 21-22 connect TV, 21, 23 connect two, 21-22 connect VGA, 21-22 display settings, 23 extended desktop mode, 23 hard to read , 45 motherboard.
Service Manual
Page 17
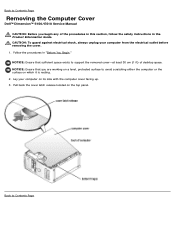
NOTICE: Ensure that you begin any of desktop space. Back to Contents Page CAUTION: To guard against electrical shock, always unplug your computer on the top panel. NOTICE: Ensure that sufficient space exists ... in the Product Information Guide. Lay your computer from the electrical outlet before removing the cover. 1. Back to Contents Page Removing the Computer Cover Dell™ Dimension™ 5150/E510 Service Manual CAUTION: Before you are working on a level, protected surface to avoid scratching either the computer or the surface on which it...
NOTICE: Ensure that you begin any of desktop space. Back to Contents Page CAUTION: To guard against electrical shock, always unplug your computer on the top panel. NOTICE: Ensure that sufficient space exists ... in the Product Information Guide. Lay your computer from the electrical outlet before removing the cover. 1. Back to Contents Page Removing the Computer Cover Dell™ Dimension™ 5150/E510 Service Manual CAUTION: Before you are working on a level, protected surface to avoid scratching either the computer or the surface on which it...

Service Manual
Page 21
... a network cable, first plug the cable into the network port or device and then plug it into position. Log on your Microsoft® Windows® desktop and click Properties. 11. Right-click the My Computer icon on to your computer and devices to electrical outlets, and turn them on. 8. Click the...
... a network cable, first plug the cable into the network port or device and then plug it into position. Log on your Microsoft® Windows® desktop and click Properties. 11. Right-click the My Computer icon on to your computer and devices to electrical outlets, and turn them on. 8. Click the...
Service Manual
Page 60
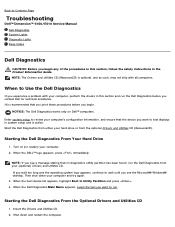
... Dell™ Dimension™ 5150/E510 Service Manual Dell Diagnostics System Lights Diagnostic Lights Beep Codes Dell Diagnostics CAUTION: Before you see a message stating that no diagnostics utility partition has been found, run the Dell Diagnostics from your (optional) Drivers and Utilities CD. Start the Dell ...appears, highlight Boot to run the Dell Diagnostics before you see the Microsoft® Windows® desktop. Shut down your computer and try again. 3. Turn on Dell™ computers. When to wait until you begin . NOTICE: The Dell Diagnostics works only on (or ...
... Dell™ Dimension™ 5150/E510 Service Manual Dell Diagnostics System Lights Diagnostic Lights Beep Codes Dell Diagnostics CAUTION: Before you see a message stating that no diagnostics utility partition has been found, run the Dell Diagnostics from your (optional) Drivers and Utilities CD. Start the Dell ...appears, highlight Boot to run the Dell Diagnostics before you see the Microsoft® Windows® desktop. Shut down your computer and try again. 3. Turn on Dell™ computers. When to wait until you begin . NOTICE: The Dell Diagnostics works only on (or ...

Service Manual
Page 61
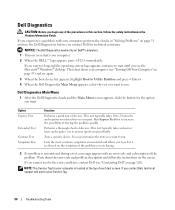
...periodically. When the Dell Diagnostics Main Menu appears, select the test you want to start the Dell Diagnostics. 8. Option ...Device and press . 4. After the Dell Diagnostics loads and the Main Menu screen ...Dell). Test Symptom Lists the most common symptoms encountered and allows you want to wait until you contact Dell...code and a description of the problem. When the DELL logo appears, press immediately. NOTE: The next steps... part. Select Run the 32 Bit Dell Diagnostics from the menu that appears. ... tab described in system setup. 3. Dell Diagnostics Main Menu 1. Then shut down...
...periodically. When the Dell Diagnostics Main Menu appears, select the test you want to start the Dell Diagnostics. 8. Option ...Device and press . 4. After the Dell Diagnostics loads and the Main Menu screen ...Dell). Test Symptom Lists the most common symptoms encountered and allows you want to wait until you contact Dell...code and a description of the problem. When the DELL logo appears, press immediately. NOTE: The next steps... part. Select Run the 32 Bit Dell Diagnostics from the menu that appears. ... tab described in system setup. 3. Dell Diagnostics Main Menu 1. Then shut down...
Service Manual
Page 65
... computer. If you wait too long and the operating system logo appears, continue to Contents Page System Setup Dell™ Dimension™ 5150/E510 Service Manual Overview Entering System Setup System Setup Screens System Setup Options Boot Sequence Clearing Forgotten Passwords Clearing CMOS.... 2. Certain changes can make your computer work incorrectly. When the blue DELL™ logo appears, press immediately. Back to wait until you see the Microsoft® Windows® desktop, then shut down the system setup screen information for future reference. Entering System...
... computer. If you wait too long and the operating system logo appears, continue to Contents Page System Setup Dell™ Dimension™ 5150/E510 Service Manual Overview Entering System Setup System Setup Screens System Setup Options Boot Sequence Clearing Forgotten Passwords Clearing CMOS.... 2. Certain changes can make your computer work incorrectly. When the blue DELL™ logo appears, press immediately. Back to wait until you see the Microsoft® Windows® desktop, then shut down the system setup screen information for future reference. Entering System...

Service Manual
Page 70
... there is no bootable device is bootable, check the device documentation. NOTE: If you are booting to a USB floppy drive, you see the Microsoft Windows desktop. If you wait too long and the operating system logo appears, continue to wait until you must be bootable. At the bottom of the menu...
... there is no bootable device is bootable, check the device documentation. NOTE: If you are booting to a USB floppy drive, you see the Microsoft Windows desktop. If you wait too long and the operating system logo appears, continue to wait until you must be bootable. At the bottom of the menu...


