
Owner's Manual
Page 6
... Peripherals 103 6 Contents Drives 72 General Installation Guidelines 73 Connecting Drive Cables 73 Hard Drive 74 Removing a Hard Drive 75 Installing a Hard Drive 77 Adding a Second Hard Drive 78 Floppy Drive 81 Removing a Floppy Drive 81 Installing a Floppy Drive 82 CD/DVD Drive 83 Removing a CD/DVD Drive 84 Installing a CD/DVD Drive 85 Adding a Second CD or DVD Drive 85 Battery 88 Replacing the Computer Cover 89...
... Peripherals 103 6 Contents Drives 72 General Installation Guidelines 73 Connecting Drive Cables 73 Hard Drive 74 Removing a Hard Drive 75 Installing a Hard Drive 77 Adding a Second Hard Drive 78 Floppy Drive 81 Removing a Floppy Drive 81 Installing a Floppy Drive 82 CD/DVD Drive 83 Removing a CD/DVD Drive 84 Installing a CD/DVD Drive 85 Adding a Second CD or DVD Drive 85 Battery 88 Replacing the Computer Cover 89...
Owner's Manual
Page 43
... the operating state it was installed and click Properties. 7 Click the Drivers tab. 8 Click Roll Back Driver. Dell PC Restore permanently deletes all data on the hard drive and removes any device has an exclamation point (a yellow circle with the previously installed version. 1 Click the Start button and click ... for information on the device icon. If Device Driver Rollback does not resolve the problem, then use Windows XP Device Driver Rollback to replace the driver with a [!]) on using System Restore. If an exclamation point is next to the device name, you install drivers obtained ...
... the operating state it was installed and click Properties. 7 Click the Drivers tab. 8 Click Roll Back Driver. Dell PC Restore permanently deletes all data on the hard drive and removes any device has an exclamation point (a yellow circle with the previously installed version. 1 Click the Start button and click ... for information on the device icon. If Device Driver Rollback does not resolve the problem, then use Windows XP Device Driver Rollback to replace the driver with a [!]) on using System Restore. If an exclamation point is next to the device name, you install drivers obtained ...
Owner's Manual
Page 74
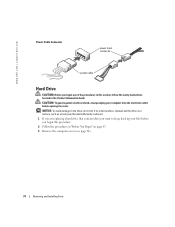
... cover. www.dell.com | support.dell.com Power Cable Connector power input connector power cable Hard Drive CAUTION: Before you begin this section, follow the safety instructions located in "Before You Begin" on a hard surface. Instead, set the drive on a surface, such as a foam pad, that will sufficiently cushion it. 1 If you are replacing a hard drive that contains data...
... cover. www.dell.com | support.dell.com Power Cable Connector power input connector power cable Hard Drive CAUTION: Before you begin this section, follow the safety instructions located in "Before You Begin" on a hard surface. Instead, set the drive on a surface, such as a foam pad, that will sufficiently cushion it. 1 If you are replacing a hard drive that contains data...

Owner's Manual
Page 76
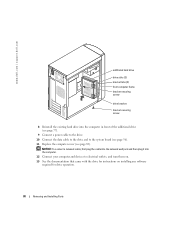
www.dell.com | support.dell.com hard drive bracket-securing screw hard drive-securing screws (3) drive bracket bracket-securing screw 3 If you are replacing the hard drive, remove the drive from the bracket. 76 Removing and Installing Parts b Remove the hard drive from the bracket: a Remove the hard drive-securing screws.
www.dell.com | support.dell.com hard drive bracket-securing screw hard drive-securing screws (3) drive bracket bracket-securing screw 3 If you are replacing the hard drive, remove the drive from the bracket. 76 Removing and Installing Parts b Remove the hard drive from the bracket: a Remove the hard drive-securing screws.

Owner's Manual
Page 77
... system board (see page 56). 8 Close the computer cover (see page 75). 4 Attach the hard drive to the hard drive bracket: a Place the small bracket tabs into the drive slots inside the bracket for the additional hard drive. small bracket tabs (2) drive bracket drive securing screws (3) Installing a Hard Drive 1 Unpack the replacement hard drive, and prepare it for installation. 2 Check the documentation for the...
... system board (see page 56). 8 Close the computer cover (see page 75). 4 Attach the hard drive to the hard drive bracket: a Place the small bracket tabs into the drive slots inside the bracket for the additional hard drive. small bracket tabs (2) drive bracket drive securing screws (3) Installing a Hard Drive 1 Unpack the replacement hard drive, and prepare it for installation. 2 Check the documentation for the...

Owner's Manual
Page 79
... NOTICE: Ground yourself by touching an unpainted metal surface on the back of the computer. NOTICE: When you are replacing the additional hard drive, remove the drive from the bracket. 6 If you unpack the drive, do not set the drive on a soft surface, such as a foam pad, that it is flush with the computer's front panel.
... NOTICE: Ground yourself by touching an unpainted metal surface on the back of the computer. NOTICE: When you are replacing the additional hard drive, remove the drive from the bracket. 6 If you unpack the drive, do not set the drive on a soft surface, such as a foam pad, that it is flush with the computer's front panel.
Owner's Manual
Page 80
... software required for drive operation. 80 Removing and Installing Parts www.dell.com | support.dell.com additional hard drive drive slots (2) bracket tabs (2) front computer frame bracket-securing screw drive bracket bracket-securing screw 8 Reinstall the existing hard drive into the computer. 12 Connect your computer and devices to the system board (see page 56). 11 Replace the computer cover...
... software required for drive operation. 80 Removing and Installing Parts www.dell.com | support.dell.com additional hard drive drive slots (2) bracket tabs (2) front computer frame bracket-securing screw drive bracket bracket-securing screw 8 Reinstall the existing hard drive into the computer. 12 Connect your computer and devices to the system board (see page 56). 11 Replace the computer cover...


