Quick Reference Guide
Page 6
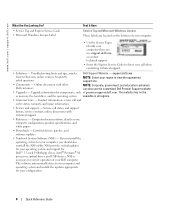
... support site. • Community - Certified drivers, patches, and software updates • Notebook System Software (NSS) - Troubleshooting hints and tips, articles Dell Support Website - The website may not be as memory, the hard drive, and the operating system available in all regions. • Customer Care - Computer documentation, details on the bottom of your configuration...
... support site. • Community - Certified drivers, patches, and software updates • Notebook System Software (NSS) - Troubleshooting hints and tips, articles Dell Support Website - The website may not be as memory, the hard drive, and the operating system available in all regions. • Customer Care - Computer documentation, details on the bottom of your configuration...

Quick Reference Guide
Page 19
Bottom View memory module cover battery-bay latch release hard drive battery charge gauge battery modem cover fan docking device slot Quick Reference Guide 19
Bottom View memory module cover battery-bay latch release hard drive battery charge gauge battery modem cover fan docking device slot Quick Reference Guide 19

Quick Reference Guide
Page 21
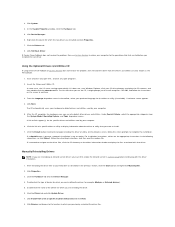
A program crashes repeatedly NOTE: Software usually includes installation instructions in an environment similar to non-Windows XP operating system environments. 1 Click the Start button, point to All Programs→ Accessories, and then click Program Compatibility Wizard. 2 In the welcome screen.... If you are unable to 10 seconds until the computer turns off. BACK UP YOUR FILES IMMEDIATELY USE A VIRUS-SCANNING PROGRAM TO CHECK THE HARD DRIVE, FLOPPY DISKS, OR CDS Quick Reference Guide 21 See the software documentation for at least 8 to get a response by pressing a key on ...
A program crashes repeatedly NOTE: Software usually includes installation instructions in an environment similar to non-Windows XP operating system environments. 1 Click the Start button, point to All Programs→ Accessories, and then click Program Compatibility Wizard. 2 In the welcome screen.... If you are unable to 10 seconds until the computer turns off. BACK UP YOUR FILES IMMEDIATELY USE A VIRUS-SCANNING PROGRAM TO CHECK THE HARD DRIVE, FLOPPY DISKS, OR CDS Quick Reference Guide 21 See the software documentation for at least 8 to get a response by pressing a key on ...

Quick Reference Guide
Page 22
... computer and remove spyware. Use an anti-virus program that includes anti-spyware protection (your hard drive. R U N T H E R U N N I N G T H E D E L L D I A G N O S T I C S - Running the Dell Diagnostics CAUTION: Before you are having problems connecting to support.dell.com and search for the keyword spyware. NOTICE: The Dell Diagnostics works only on your program may require an upgrade) to a docking device (docked...
... computer and remove spyware. Use an anti-virus program that includes anti-spyware protection (your hard drive. R U N T H E R U N N I N G T H E D E L L D I A G N O S T I C S - Running the Dell Diagnostics CAUTION: Before you are having problems connecting to support.dell.com and search for the keyword spyware. NOTICE: The Dell Diagnostics works only on your program may require an upgrade) to a docking device (docked...

Quick Reference Guide
Page 23
..., press ; to continue to the devices specified in your computer and try again. When the DELL logo appears, press immediately. 4 Turn on your display, hold down your hard drive. Starting the Dell Diagnostics From the Drivers and Utilities CD 1 Insert the Drivers and Utilities CD. 2 Shut down... runs the Pre-boot System Assessment, a series of initial tests of your system board, keyboard, hard drive, and display. • During the assessment, answer any key to the Dell Diagnostics. Then shut down the mute button and press the computer's power button to wait until you...
..., press ; to continue to the devices specified in your computer and try again. When the DELL logo appears, press immediately. 4 Turn on your display, hold down your hard drive. Starting the Dell Diagnostics From the Drivers and Utilities CD 1 Insert the Drivers and Utilities CD. 2 Shut down... runs the Pre-boot System Assessment, a series of initial tests of your system board, keyboard, hard drive, and display. • During the assessment, answer any key to the Dell Diagnostics. Then shut down the mute button and press the computer's power button to wait until you...

Quick Reference Guide
Page 28
S safety instructions, 5 Service Tag, 6 software problems, 21 spyware, 22 Starting the Dell Diagnostics From Your Hard Drive, 22 system views bottom, 19 right side, 17 T troubleshooting Dell Diagnostics, 22 Help and Support Center, 7 U User's Guide, 5 W warranty, 5 Windows XP Help and Support Center, 7 Program Compatibility Wizard, 21 wizards Program Compatibility Wizard, 21 28 Index
S safety instructions, 5 Service Tag, 6 software problems, 21 spyware, 22 Starting the Dell Diagnostics From Your Hard Drive, 22 system views bottom, 19 right side, 17 T troubleshooting Dell Diagnostics, 22 Help and Support Center, 7 U User's Guide, 5 W warranty, 5 Windows XP Help and Support Center, 7 Program Compatibility Wizard, 21 wizards Program Compatibility Wizard, 21 28 Index

Service Manual
Page 1
... data and tells you make better use of Intel Corporation; and is a registered trademark owned by Dell Inc. Dell™ Latitude™ D610 Service Manual Before You Begin System Components Internal Card With Bluetooth® Wireless Technology Hard Drive Center Control Cover Keyboard Memory Module, Modem, and Devices Coin-Cell Battery Mini PCI Card Display Assembly...
... data and tells you make better use of Intel Corporation; and is a registered trademark owned by Dell Inc. Dell™ Latitude™ D610 Service Manual Before You Begin System Components Internal Card With Bluetooth® Wireless Technology Hard Drive Center Control Cover Keyboard Memory Module, Modem, and Devices Coin-Cell Battery Mini PCI Card Display Assembly...
Service Manual
Page 3
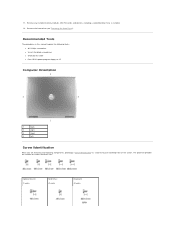
The placemat provides the number of the screws. Remove the hard drive (see "Removing the Hard Drive"). Recommended Tools The procedures in this manual require the following tools: l #1 Phillips screwdriver l ¼-inch flat-blade screwdriver l Small plastic scribe l Flash BIOS update program ... and their sizes. 11. Remove any installed memory modules, Mini PCI cards, and devices, including a second battery if one is installed. 12. Optional Device: (1 each) Hard Drive: (2 each) Keyboard: (2 each)
The placemat provides the number of the screws. Remove the hard drive (see "Removing the Hard Drive"). Recommended Tools The procedures in this manual require the following tools: l #1 Phillips screwdriver l ¼-inch flat-blade screwdriver l Small plastic scribe l Flash BIOS update program ... and their sizes. 11. Remove any installed memory modules, Mini PCI cards, and devices, including a second battery if one is installed. 12. Optional Device: (1 each) Hard Drive: (2 each) Keyboard: (2 each)
Service Manual
Page 20
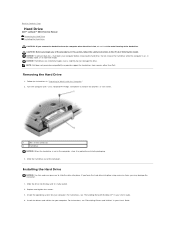
... of the computer. even a slight bump can damage the drive. Use a standard #1 Phillips screwdriver to Work Inside the Computer." 2. Back to Contents Page Hard Drive Dell™ Latitude™ D610 Service Manual Removing the Hard Drive Installing the Hard Drive CAUTION: If you remove the hard drive from sources other than Dell. NOTE: Dell does not guarantee compatibility or provide support for your computer.
... of the computer. even a slight bump can damage the drive. Use a standard #1 Phillips screwdriver to Work Inside the Computer." 2. Back to Contents Page Hard Drive Dell™ Latitude™ D610 Service Manual Removing the Hard Drive Installing the Hard Drive CAUTION: If you remove the hard drive from sources other than Dell. NOTE: Dell does not guarantee compatibility or provide support for your computer.

Service Manual
Page 21
Back to Contents Page Press the hard drive cover down until it is fully seated in the bay, and tighten the screws. 6. Install the operating system for your computer. 7. 5. Install the drivers and utilities for your computer.
Back to Contents Page Press the hard drive cover down until it is fully seated in the bay, and tighten the screws. 6. Install the operating system for your computer. 7. 5. Install the drivers and utilities for your computer.
Service Manual
Page 38
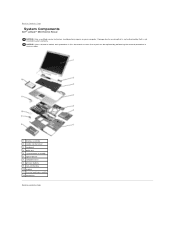
... 5 system board assembly 6 optical device 7 computer base 8 primary battery 9 coin-cell battery 10 modem 11 thermal cooling assembly 12 hard drive Back to Contents Page Back to Contents Page System Components Dell™ Latitude™ D610 Service Manual NOTICE: Only a certified service technician should perform repairs on your warranty. Damage due to servicing that a part...
... 5 system board assembly 6 optical device 7 computer base 8 primary battery 9 coin-cell battery 10 modem 11 thermal cooling assembly 12 hard drive Back to Contents Page Back to Contents Page System Components Dell™ Latitude™ D610 Service Manual NOTICE: Only a certified service technician should perform repairs on your warranty. Damage due to servicing that a part...
User Guide
Page 4
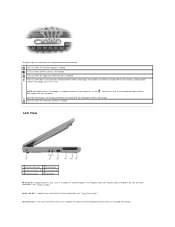
... optional feature on when the scroll lock function is enabled. Left View 1 security cable slot 4 PC Card slot 2 audio connectors (2) 5 smart card slot 3 infrared sensor 6 hard drive PC Card slot - smart card slot - Supports one PC Card, such as a modem or network adapter. Turns on when the uppercase letter function is enabled...
... optional feature on when the scroll lock function is enabled. Left View 1 security cable slot 4 PC Card slot 2 audio connectors (2) 5 smart card slot 3 infrared sensor 6 hard drive PC Card slot - smart card slot - Supports one PC Card, such as a modem or network adapter. Turns on when the uppercase letter function is enabled...
User Guide
Page 5
... connector. Attach a microphone to the connector. security cable slot - For information on transferring data, see the instructions included with your computer, the sensor is disabled. hard drive - For more information, see Windows Help, the Help and Support Center, or the documentation that it will work with the security cable slot. Lets you...
... connector. Attach a microphone to the connector. security cable slot - For information on transferring data, see the instructions included with your computer, the sensor is disabled. hard drive - For more information, see Windows Help, the Help and Support Center, or the documentation that it will work with the security cable slot. Lets you...

User Guide
Page 8
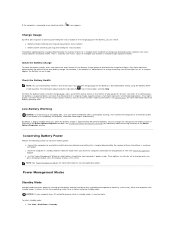
...through the vents, which prevents the computer from overheating. Stores software and data. battery-bay latch release - See Using a Battery for additional information. hard drive - See "Adding and Replacing Parts." NOTE: The computer turns on the battery charge. docking device slot - 1 memory module cover 5 docking device... slot 2 battery-bay latch release 6 fan 3 battery charge gauge 7 modem/coin-cell battery cover 4 battery 8 hard drive memory module cover - Covers the compartment that contains the modem and the coin-cell battery.
...through the vents, which prevents the computer from overheating. Stores software and data. battery-bay latch release - See Using a Battery for additional information. hard drive - See "Adding and Replacing Parts." NOTE: The computer turns on the battery charge. docking device slot - 1 memory module cover 5 docking device... slot 2 battery-bay latch release 6 fan 3 battery charge gauge 7 modem/coin-cell battery cover 4 battery 8 hard drive memory module cover - Covers the compartment that contains the modem and the coin-cell battery.
User Guide
Page 13
... power button, close the display, or press . When the computer exits standby mode, it was in Dell QuickSet. To enter standby mode: l Click Start® Shut Down® Stand by turning off the display and the hard drive after a low-battery warning. For example, if the battery has 80 percent of inactivity (a time...
... power button, close the display, or press . When the computer exits standby mode, it was in Dell QuickSet. To enter standby mode: l Click Start® Shut Down® Stand by turning off the display and the hard drive after a low-battery warning. For example, if the battery has 80 percent of inactivity (a time...
User Guide
Page 14
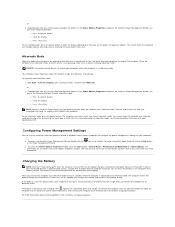
... cannot make the computer exit hibernate mode by copying system data to a reserved area on the hard drive and then completely turning off computer, press and hold , and then click Hibernate. Charging the Battery NOTE: With Dell™ ExpressCharge™, when the computer is too hot to start charging if the light flashes...
... cannot make the computer exit hibernate mode by copying system data to a reserved area on the hard drive and then completely turning off computer, press and hold , and then click Hibernate. Charging the Battery NOTE: With Dell™ ExpressCharge™, when the computer is too hot to start charging if the light flashes...

User Guide
Page 16
... the procedures in this section, follow the safety instructions in the CD/DVD drive but packaged separately. Avoid pressing down the computer. 2. Back to Contents Page Using the Module Bay Dell™ Latitude™ D610 User's Guide About the Module Bay About the Device Security Screw Removing and Installing... is running and connected to a docking device (docked). You can install devices such as a floppy drive, CD drive, CD-RW drive, DVD drive, CD-RW/DVD drive, DVD+RW, second battery, or second hard drive in the computer. When you install a module in the bay, you must remove the screw to ...
... the procedures in this section, follow the safety instructions in the CD/DVD drive but packaged separately. Avoid pressing down the computer. 2. Back to Contents Page Using the Module Bay Dell™ Latitude™ D610 User's Guide About the Module Bay About the Device Security Screw Removing and Installing... is running and connected to a docking device (docked). You can install devices such as a floppy drive, CD drive, CD-RW drive, DVD drive, CD-RW/DVD drive, DVD+RW, second battery, or second hard drive in the computer. When you install a module in the bay, you must remove the screw to ...

User Guide
Page 28
... restart the computer, press ; Back to Contents Page Using the Dell Diagnostics Dell™ Latitude™ D610 User's Guide Dell Diagnostics CAUTION: Before you begin any of your computer cannot display a screen image, contact Dell. 1. NOTE: If your system board, keyboard, hard drive, and display. Turn on Dell™ computers. The computer automatically runs the Pre-boot System Assessment...
... restart the computer, press ; Back to Contents Page Using the Dell Diagnostics Dell™ Latitude™ D610 User's Guide Dell Diagnostics CAUTION: Before you begin any of your computer cannot display a screen image, contact Dell. 1. NOTE: If your system board, keyboard, hard drive, and display. Turn on Dell™ computers. The computer automatically runs the Pre-boot System Assessment...
User Guide
Page 34
... to display information about the driver or utility that you run the CD, it does not, start Windows Explorer, click your CD drive directory to your computer. 6. Double-click the type of the device for which you are installing the driver. 6. Double-click the...right-click My Computer. 2. Manually Reinstalling Drivers NOTE: If you are installing the driver (for the specific drivers and utilities used by your hard drive as the ResourceCD). 1. Click the Install button (if present) to complete the installation. Click the Driver tab and click Update Driver. 7....
... to display information about the driver or utility that you run the CD, it does not, start Windows Explorer, click your CD drive directory to your computer. 6. Double-click the type of the device for which you are installing the driver. 6. Double-click the...right-click My Computer. 2. Manually Reinstalling Drivers NOTE: If you are installing the driver (for the specific drivers and utilities used by your hard drive as the ResourceCD). 1. Click the Install button (if present) to complete the installation. Click the Driver tab and click Update Driver. 7....

User Guide
Page 36
...must use System Restore to return your primary hard drive. NOTICE: Before performing the installation, back up all the steps in the following items: l Dell™ Operating System CD l Dell Drivers and Utilities CD NOTE: The optional ...Drivers and Utilities CD contains drivers that were installed during assembly of free hard-disk space available, System Restore is automatically disabled. For conventional hard drive configurations, the primary hard drive is enabled: 1. After you reinstall the operating system, you reinstall Windows XP...
...must use System Restore to return your primary hard drive. NOTICE: Before performing the installation, back up all the steps in the following items: l Dell™ Operating System CD l Dell Drivers and Utilities CD NOTE: The optional ...Drivers and Utilities CD contains drivers that were installed during assembly of free hard-disk space available, System Restore is automatically disabled. For conventional hard drive configurations, the primary hard drive is enabled: 1. After you reinstall the operating system, you reinstall Windows XP...


