
User's Guide
Page 8
... door. • Check the instructions on removing jammed paper in this manual and troubleshoot accordingly (see "Clearing paper jams" on page 82). Select your Windows. Shake the toner cartridge. • Try a different print resolution setting. • Replace the toner cartridge. Printouts are blurry. • The toner level might be low or uneven. Useful to know The machine does not print. • Open the print queue list and remove the document from the list (see "Canceling a print job" on page 47). • Remove the driver and install...
... door. • Check the instructions on removing jammed paper in this manual and troubleshoot accordingly (see "Clearing paper jams" on page 82). Select your Windows. Shake the toner cartridge. • Try a different print resolution setting. • Replace the toner cartridge. Printouts are blurry. • The toner level might be low or uneven. Useful to know The machine does not print. • Open the print queue list and remove the document from the list (see "Canceling a print job" on page 47). • Remove the driver and install...
User's Guide
Page 16
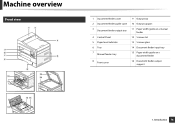
Introduction 16 Machine overview 10 Front view 1 Document feeder cover 2 Document feeder guide cover 3 Document feeder output tray 4 Control Panel 5 Paper level indicator 6 Tray 7 Manual feeder tray 8 Front cover 9 Output tray 10 Output support 11 Paper width guide on a manual feeder 12 Scanner lid 13 Scanner glass 14 Document feeder input tray 15 Paper width guide on a document feeder 16 Document feeder output support 1.
Introduction 16 Machine overview 10 Front view 1 Document feeder cover 2 Document feeder guide cover 3 Document feeder output tray 4 Control Panel 5 Paper level indicator 6 Tray 7 Manual feeder tray 8 Front cover 9 Output tray 10 Output support 11 Paper width guide on a manual feeder 12 Scanner lid 13 Scanner glass 14 Document feeder input tray 15 Paper width guide on a document feeder 16 Document feeder output support 1.

User's Guide
Page 86
..., toner save mode. Eco button Green On Eco mode is designed pursuant to ISO/IEC 19752. Off The machine is in the cartridge even when red LED is on and the printer stops printing. 4. a. Troubleshooting 88 Understanding the status LED Status Description Power LED Blue On The machine is in power save on, skip blank page feature will automatically be affected by operating environment, percentage of image...
..., toner save mode. Eco button Green On Eco mode is designed pursuant to ISO/IEC 19752. Off The machine is in the cartridge even when red LED is on and the printer stops printing. 4. a. Troubleshooting 88 Understanding the status LED Status Description Power LED Blue On The machine is in power save on, skip blank page feature will automatically be affected by operating environment, percentage of image...

User's Guide
Page 90
... the power. Remove papers from the output tray, the printer resumes printing. Error [error number] Turn off then on page 34). Advanced Guide). 4. Load the required size paper. 12 Network-related messages Message Meaning Suggested solutions Door of scanner is open The document feeder cover is locked. messages Message Output bin full Remove paper Paper Empty in [tray type] • Tray Paper mismatch • Manual Paper mismatch Meaning Suggested solutions The output tray is no paper in the tray" on The machine unit cannot be controlled. There is full. Job Print or remove the...
... the power. Remove papers from the output tray, the printer resumes printing. Error [error number] Turn off then on page 34). Advanced Guide). 4. Load the required size paper. 12 Network-related messages Message Meaning Suggested solutions Door of scanner is open The document feeder cover is locked. messages Message Output bin full Remove paper Paper Empty in [tray type] • Tray Paper mismatch • Manual Paper mismatch Meaning Suggested solutions The output tray is no paper in the tray" on The machine unit cannot be controlled. There is full. Job Print or remove the...
User's Guide
Page 109
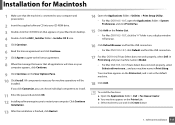
... Create button 1. a display window will be installed. If you click Customize, you can choose individual components to install. 11 Enter the password and click OK. 12 Installing software requires you to use ... To install the fax driver: a Open the Applications folder > Dell > Fax Queue Creator. Installation for machine operations will pop up. 16 Click Default Browser and find the USB connection. • For Mac OS X 10.5-10.7, click Default and...
... Create button 1. a display window will be installed. If you click Customize, you can choose individual components to install. 11 Enter the password and click OK. 12 Installing software requires you to use ... To install the fax driver: a Open the Applications folder > Dell > Fax Queue Creator. Installation for machine operations will pop up. 16 Click Default Browser and find the USB connection. • For Mac OS X 10.5-10.7, click Default and...
User's Guide
Page 114
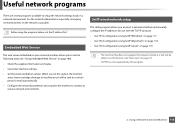
...; Check the supplies information and status. • Customize machine settings. • Set the email notification option. Using a Network-Connected Machine 116 When you set the IP address first. 1 Embedded Web Service 2 SetIP wired network setup This utility program allows you to use this program. 2. The web server embedded on your network machine allows you to select a network interface and manually configure the IP addresses for use with the TCP/IP protocol. • See "IPv4 configuration using SetIP (Windows)" on page...
...; Check the supplies information and status. • Customize machine settings. • Set the email notification option. Using a Network-Connected Machine 116 When you set the IP address first. 1 Embedded Web Service 2 SetIP wired network setup This utility program allows you to use this program. 2. The web server embedded on your network machine allows you to select a network interface and manually configure the IP addresses for use with the TCP/IP protocol. • See "IPv4 configuration using SetIP (Windows)" on page...

User's Guide
Page 115
... help you to set up a network. Press the (Menu) button on the control panel and select Network > Network Config.. IPv4 configuration using SetIP (Windows) Before using the SetIP program, disable the computer firewall from Control Panel > Security Center > Windows Firewall. 1 Install this program from the supplied CD-ROM by double-click Application > SetIP > Setup.exe. 2 Follow the instructions in the SetIP window to open the TCP/ IP configuration window. 2. In most cases a new IP address will be able...
... help you to set up a network. Press the (Menu) button on the control panel and select Network > Network Config.. IPv4 configuration using SetIP (Windows) Before using the SetIP program, disable the computer firewall from Control Panel > Security Center > Windows Firewall. 1 Install this program from the supplied CD-ROM by double-click Application > SetIP > Setup.exe. 2 Follow the instructions in the SetIP window to open the TCP/ IP configuration window. 2. In most cases a new IP address will be able...
User's Guide
Page 121
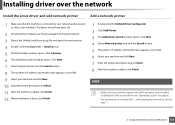
...address and model name appears on . Click Continue. 6 The add printer wizard window opens. Using a Network-Connected Machine 123 Also, your machine's IP address should have been set. 2 Download the Unified Linux Driver package from the Dell website. 3 Extract the UnifiedLinuxDriver.tar.gz file and open the new directory. 4 Double-click the Linux folder > install.sh icon. 5 The Dell installer window opens. Installing driver over the network Install the Linux driver and add network printer Add a network printer 1 Make sure that the machine is connected to your network and powered on list...
...address and model name appears on . Click Continue. 6 The add printer wizard window opens. Using a Network-Connected Machine 123 Also, your machine's IP address should have been set. 2 Download the Unified Linux Driver package from the Dell website. 3 Extract the UnifiedLinuxDriver.tar.gz file and open the new directory. 4 Double-click the Linux folder > install.sh icon. 5 The Dell installer window opens. Installing driver over the network Install the Linux driver and add network printer Add a network printer 1 Make sure that the machine is connected to your network and powered on list...

User's Guide
Page 124
... factory defaults and try again. If the machine does not work in Windows Vista or higher. 7 The Add Printer Wizard window appears. Using a Network-Connected Machine 126 In the IPv6 network environment, follow the next procedure to use the IPv6 address. 9 From the control panel 1 Connect your machine to the network with a network cable. 2 Turn on the machine. 3 Print a Network Configuration Report that will check IPv6 addresses (see "Printing a network configuration report" on again. 5 Reinstall your printer driver. 4 Select Start > Control Panel > Printers...
... factory defaults and try again. If the machine does not work in Windows Vista or higher. 7 The Add Printer Wizard window appears. Using a Network-Connected Machine 126 In the IPv6 network environment, follow the next procedure to use the IPv6 address. 9 From the control panel 1 Connect your machine to the network with a network cable. 2 Turn on the machine. 3 Print a Network Configuration Report that will check IPv6 addresses (see "Printing a network configuration report" on again. 5 Reinstall your printer driver. 4 Select Start > Control Panel > Printers...

User's Guide
Page 138
... the power save mode. Sets the time that does not end with a command to wake up from power-save mode. • Printer: When you send. Description Sets how long the machine waits before printing the last page of the text that appears on page 26). Optimize print quality according to your machine (see "Menu overview" on the control panel display. Sets the language of a print job that the machine remembers previously used copy settings...
... the power save mode. Sets the time that does not end with a command to wake up from power-save mode. • Printer: When you send. Description Sets how long the machine waits before printing the last page of the text that appears on page 26). Optimize print quality according to your machine (see "Menu overview" on the control panel display. Sets the language of a print job that the machine remembers previously used copy settings...

User's Guide
Page 142
... Description When toner cartridge is not applicable to your settings to the factory default. Restores all of the fax options to the factory default. (Reboot required.) 3. System setup 10 Maintenance 11 Clear setting Some menus may not appear in the display depending on options or models. To change the menu options: • Press (Menu) > System Setup > Clear Setting on the control panel. Item All Setting Printer Setup Fax Setup Copy Setup System Setup Network Setup Description Clears all of the data stored in memory and resets all...
... Description When toner cartridge is not applicable to your settings to the factory default. Restores all of the fax options to the factory default. (Reboot required.) 3. System setup 10 Maintenance 11 Clear setting Some menus may not appear in the display depending on options or models. To change the menu options: • Press (Menu) > System Setup > Clear Setting on the control panel. Item All Setting Printer Setup Fax Setup Copy Setup System Setup Network Setup Description Clears all of the data stored in memory and resets all...

User's Guide
Page 150
... of authorized users to your machine to a network and set up the network parameters correctly, you can easily add individual address if you have connected your local machine using Embedded Web Service. 1 Access the Embedded Web Service (see "Using Embedded Web Service" on page 184). 2 Click Login on the upper right of the Embedded Web Service website. 3 Type in the ID and Password then click Login. • ID: admin • Password: dell00000 4 Click Security > User Access Control > Authentication...
... of authorized users to your machine to a network and set up the network parameters correctly, you can easily add individual address if you have connected your local machine using Embedded Web Service. 1 Access the Embedded Web Service (see "Using Embedded Web Service" on page 184). 2 Click Login on the upper right of the Embedded Web Service website. 3 Type in the ID and Password then click Login. • ID: admin • Password: dell00000 4 Click Security > User Access Control > Authentication...

User's Guide
Page 151
... your machine and select Set as Default Printer. Printing features For basic printing features, refer to the Basic Guide (see "Basic printing" on page 46). 10 Changing the default print settings 1 Click the Windows Start menu. 2 Select Control Panel > Devices and Printers. 3 Right-click on your CD-ROM drive. If Printing preferences has a ▶, you install the Dell sofrware, the XPS priner driver is automatically installed. 4. If you insert the software CD into your machine...
... your machine and select Set as Default Printer. Printing features For basic printing features, refer to the Basic Guide (see "Basic printing" on page 46). 10 Changing the default print settings 1 Click the Windows Start menu. 2 Select Control Panel > Devices and Printers. 3 Right-click on your CD-ROM drive. If Printing preferences has a ▶, you install the Dell sofrware, the XPS priner driver is automatically installed. 4. If you insert the software CD into your machine...

User's Guide
Page 175
... when complete: Set to show the popup window to notify receiving a fax. • Open with default application: After receiving the fax, open it with default application. • None: After receiving a fax, the machine does not notify the user or opens the application. 5 Press OK. 34 Changing the receive modes 1 Press (fax) > (Menu) > Fax Setup > Receiving > Receive Mode on the control panel. 2 Select the option you want...
... when complete: Set to show the popup window to notify receiving a fax. • Open with default application: After receiving the fax, open it with default application. • None: After receiving a fax, the machine does not notify the user or opens the application. 5 Press OK. 34 Changing the receive modes 1 Press (fax) > (Menu) > Fax Setup > Receiving > Receive Mode on the control panel. 2 Select the option you want...

User's Guide
Page 177
... company service which number someone is calling in memory. 4. If the DRPD setup fails, Error DRPD Ring appears. 4 Press OK when DRPD appears and start over from step 2. • DRPD must be set up, call your machine begins to verify that same line to be available depending on model or optional goods (see "Features" on the control panel. 2 Enter a four-digit password...
... company service which number someone is calling in memory. 4. If the DRPD setup fails, Error DRPD Ring appears. 4 Press OK when DRPD appears and start over from step 2. • DRPD must be set up, call your machine begins to verify that same line to be available depending on model or optional goods (see "Features" on the control panel. 2 Enter a four-digit password...
User's Guide
Page 183
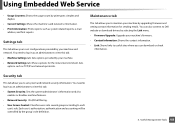
... can download or check information. Each user's authorization, authentication and accounting will be controlled by selecting the Link menu. • Firmware Upgrade: Upgrade your machine's firmware. • Contact Information: Shows the contact information. • Link: Shows links to useful sites where you to Dell website or download drivers by the group's role definition. 5. Using Embedded Web Service • Usage Counters: Shows the usage count by your machine and network. Settings...
... can download or check information. Each user's authorization, authentication and accounting will be controlled by selecting the Link menu. • Firmware Upgrade: Upgrade your machine's firmware. • Contact Information: Shows the contact information. • Link: Shows links to useful sites where you to Dell website or download drivers by the group's role definition. 5. Using Embedded Web Service • Usage Counters: Shows the usage count by your machine and network. Settings...
User's Guide
Page 194
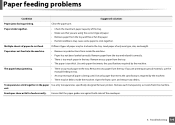
... tray. • Make sure that meets the specifications required by the machine. Paper does not feed into the machine. • Remove any debris. The paper keeps jamming. • There is being used. If you are against both sides of paper is too much paper in the tray. Use only paper that you are printing on special materials, use the manual feeding in tray. • An incorrect type of the envelopes. 6. Open the front cover and remove...
... tray. • Make sure that meets the specifications required by the machine. Paper does not feed into the machine. • Remove any debris. The paper keeps jamming. • There is being used. If you are against both sides of paper is too much paper in the tray. Use only paper that you are printing on special materials, use the manual feeding in tray. • An incorrect type of the envelopes. 6. Open the front cover and remove...

User's Guide
Page 230
... network connected 182 122 121 17 driver installation for USB cable connected 113 driver installation for USB cable connected 111 driver reinstallation for USB cable connected driver reinstallation for USB cable connected 10 114 112 printer properties 140 162 printing 159 printing 220 161 scanning 169 scanning 170 system requirements 100 system requirements 101 using SetIP 118 unifled driver configurator 54 using SetIP 19 linux scanning 191 macintosh scanning 169 119 manual feeder/multi-purpose tray 170 loading 35 loading menu overview 26 paper in manual...
... network connected 182 122 121 17 driver installation for USB cable connected 113 driver installation for USB cable connected 111 driver reinstallation for USB cable connected driver reinstallation for USB cable connected 10 114 112 printer properties 140 162 printing 159 printing 220 161 scanning 169 scanning 170 system requirements 100 system requirements 101 using SetIP 118 unifled driver configurator 54 using SetIP 19 linux scanning 191 macintosh scanning 169 119 manual feeder/multi-purpose tray 170 loading 35 loading menu overview 26 paper in manual...

User's Guide
Page 232
... the supplies life 68 ordering 63 replacing toner cartridge 67 Supplies Ordering Utility 183 T toner cartridge estimated life 65 handling instructions 64 non-Dell and refilled 64 redistributing toner 66 replacing the cartridge 67 storing 64 tray adjusting the width and length 32 changing the tray size 32 loading paper in manual feeder/multi-purpose tray 35 setting the paper size and type 42 U understanding the status LED 87 UNIX driver installation for network connected 123 printing 163 Unix system requirements 100 USB cable driver installation 22...
... the supplies life 68 ordering 63 replacing toner cartridge 67 Supplies Ordering Utility 183 T toner cartridge estimated life 65 handling instructions 64 non-Dell and refilled 64 redistributing toner 66 replacing the cartridge 67 storing 64 tray adjusting the width and length 32 changing the tray size 32 loading paper in manual feeder/multi-purpose tray 35 setting the paper size and type 42 U understanding the status LED 87 UNIX driver installation for network connected 123 printing 163 Unix system requirements 100 USB cable driver installation 22...

User's Guide
Page 233
W watermark create 157 delete 157 edit 157 Windows common Windows problems 215 driver installation for network connected 120 driver installation for USB cable connected 22, 24 system requirements 99 using SetIP 117 201
W watermark create 157 delete 157 edit 157 Windows common Windows problems 215 driver installation for network connected 120 driver installation for USB cable connected 22, 24 system requirements 99 using SetIP 117 201


