Owner's Manual
Page 1
Dell™ Photo All-In-One Printer 922 Owner's Manual Look Inside For: • Ordering Supplies • Getting Started • Using Your Printer • Understanding the Software • Maintenance and Troubleshooting www.dell.com/supplies | support.dell.com
Dell™ Photo All-In-One Printer 922 Owner's Manual Look Inside For: • Ordering Supplies • Getting Started • Using Your Printer • Understanding the Software • Maintenance and Troubleshooting www.dell.com/supplies | support.dell.com
Owner's Manual
Page 2
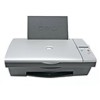
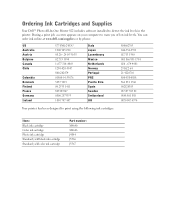
...851 1760 902120385 08 587 705 81 0848 801 888 0870 907 4574 Your printer has been designed to warn you of low ink levels. Item: Black ink cartridge Color ink cartridge Photo ink cartridge Standard yield black ink cartridge Standard yield color ink cartridge Part number:... M4640 M4646 J4844 J5566 J5567 You can order ink online at www.dell.com/supplies or by phone. Ordering Ink Cartridges and Supplies Your Dell™ Photo All-In-One Printer 922 includes software ...
...851 1760 902120385 08 587 705 81 0848 801 888 0870 907 4574 Your printer has been designed to warn you of low ink levels. Item: Black ink cartridge Color ink cartridge Photo ink cartridge Standard yield black ink cartridge Standard yield color ink cartridge Part number:... M4640 M4646 J4844 J5566 J5567 You can order ink online at www.dell.com/supplies or by phone. Ordering Ink Cartridges and Supplies Your Dell™ Photo All-In-One Printer 922 includes software ...
Owner's Manual
Page 14
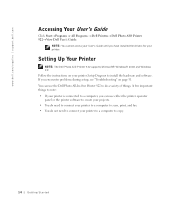
... do need to connect your printer Setup Diagram to copy. 14 Getting Started Follow the instructions on page 51. You can use the Dell Photo All-In-One Printer 922 to do not need to scan, print, and fax. • You do a variety of things. Setting Up Your Printer NOTE: The Dell Photo AIO Printer 922 supports Microsoft® Windows®...
... do need to connect your printer Setup Diagram to copy. 14 Getting Started Follow the instructions on page 51. You can use the Dell Photo All-In-One Printer 922 to do not need to scan, print, and fax. • You do a variety of things. Setting Up Your Printer NOTE: The Dell Photo AIO Printer 922 supports Microsoft® Windows®...

Owner's Manual
Page 27
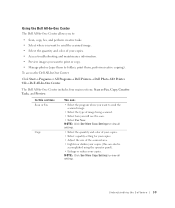
... Lighten or darken your computer and printer, and make sure they are connected. 2 Load photo paper with the arrow on page 21. 4 Click Start→ Programs or All Programs → Dell Printers→ Dell Photo AIO Printer 922→ Dell All-In-One Center. Make sure the upper left...or All Programs → Dell Printers→ Dell Photo AIO Printer 922→ Dell All-In-One Center. For more information, see "Placing Your Document on the Scanner Glass" on the printer. Copying appears on your document face down on the scanner glass. The Dell All-In-One Center appears. 7 Select...
... Lighten or darken your computer and printer, and make sure they are connected. 2 Load photo paper with the arrow on page 21. 4 Click Start→ Programs or All Programs → Dell Printers→ Dell Photo AIO Printer 922→ Dell All-In-One Center. Make sure the upper left...or All Programs → Dell Printers→ Dell Photo AIO Printer 922→ Dell All-In-One Center. For more information, see "Placing Your Document on the Scanner Glass" on the printer. Copying appears on your document face down on the scanner glass. The Dell All-In-One Center appears. 7 Select...
Owner's Manual
Page 28
... or enlarge your document. 4 Click the Advanced button to : - Changing Copy Settings 1 Click Start→ Programs or All Programs→ Dell Printers→ Dell Photo AIO Printer 922→ Dell All-In-One Center. www.dell.com/supplies | support.dell.com 5 Click Preview Now. 6 Adjust the dotted lines to fit around the portion of the image you want to print...
... or enlarge your document. 4 Click the Advanced button to : - Changing Copy Settings 1 Click Start→ Programs or All Programs→ Dell Printers→ Dell Photo AIO Printer 922→ Dell All-In-One Center. www.dell.com/supplies | support.dell.com 5 Click Preview Now. 6 Adjust the dotted lines to fit around the portion of the image you want to print...

Owner's Manual
Page 31
... appears requesting the next page. 10 Place the next sheet on page 21. 2 Click Start→ Programs or All Programs→ Dell Printers→ Dell Photo AIO Printer 922→ Dell All-In-One Center. The Dell All-In-One Center appears. 3 In the Send scanned image to use E-Typist OCR software. For example, you might want to fax or...
... appears requesting the next page. 10 Place the next sheet on page 21. 2 Click Start→ Programs or All Programs→ Dell Printers→ Dell Photo AIO Printer 922→ Dell All-In-One Center. The Dell All-In-One Center appears. 3 In the Send scanned image to use E-Typist OCR software. For example, you might want to fax or...
Owner's Manual
Page 32
... the top cover. 4 Click Start→ Programs or All Programs→ Dell Printers→ Dell Photo AIO Printer 922→ Dell All-In-One Center. menu, make a selection. 8 Follow the instructions on the scanner glass. Saving an Image on the printer. The scanned text appears. The Dell All-In-One Center appears. 5 Click Preview Now. 6 In the Creative Tasks section, ... corner of the front of the photograph or document aligns with the arrow on Your Computer 1 Click Start→ Programs or All Programs→ Dell Printers→ Dell Photo AIO Printer 922→ Dell All-In-One Center.
... the top cover. 4 Click Start→ Programs or All Programs→ Dell Printers→ Dell Photo AIO Printer 922→ Dell All-In-One Center. menu, make a selection. 8 Follow the instructions on the scanner glass. Saving an Image on the printer. The scanned text appears. The Dell All-In-One Center appears. 5 Click Preview Now. 6 In the Creative Tasks section, ... corner of the front of the photograph or document aligns with the arrow on Your Computer 1 Click Start→ Programs or All Programs→ Dell Printers→ Dell Photo AIO Printer 922→ Dell All-In-One Center.
Owner's Manual
Page 33
If you are using the operator panel. 1 Load the paper. The Dell All-In-One Center appears. 4 Click Preview Now. 5 In the Creative Tasks section, select Enlarge or reduce an image.... U si n g Yo u r Pri n te r 33 Enlarging or Reducing Images or Documents If you are using the Dell All-In-One Center. Make sure the upper left corner of the front of your new image. 7 When you can enlarge or reduce your document...not see Fax in Windows XP" on page 21. 3 Click Start→ Programs or All Programs→ Dell Printers→ Dell Photo AIO Printer 922→ Dell All-In-One Center.
If you are using the operator panel. 1 Load the paper. The Dell All-In-One Center appears. 4 Click Preview Now. 5 In the Creative Tasks section, select Enlarge or reduce an image.... U si n g Yo u r Pri n te r 33 Enlarging or Reducing Images or Documents If you are using the Dell All-In-One Center. Make sure the upper left corner of the front of your new image. 7 When you can enlarge or reduce your document...not see Fax in Windows XP" on page 21. 3 Click Start→ Programs or All Programs→ Dell Printers→ Dell Photo AIO Printer 922→ Dell All-In-One Center.

Owner's Manual
Page 34
... a Fax You can either: • Click Fax an image and follow the instructions on your printer and computer, and make sure the upper left corner aligns with the arrow. NOTE: One of the Dell All-In-One Center you should choose Yes, prompt me for each page. • In the Scan or Fax..., click Close. 3 4 Us ing Yo ur Pri n te r Make sure your document on page 21. 3 Click Start→ Programs or All Programs→ Dell Printers→ Dell Photo AIO Printer 922→ Dell All-In-One Center. If you have a DSL filter installed. 2 Place your computer modem is automatically installed.
... a Fax You can either: • Click Fax an image and follow the instructions on your printer and computer, and make sure the upper left corner aligns with the arrow. NOTE: One of the Dell All-In-One Center you should choose Yes, prompt me for each page. • In the Scan or Fax..., click Close. 3 4 Us ing Yo ur Pri n te r Make sure your document on page 21. 3 Click Start→ Programs or All Programs→ Dell Printers→ Dell Photo AIO Printer 922→ Dell All-In-One Center. If you have a DSL filter installed. 2 Place your computer modem is automatically installed.
Owner's Manual
Page 35
... TSID is being sent to the correct recipient) that the fax is mandatory in the TSID box. When you select this check box, select the Dell Photo AIO Printer 922 to print the received fax. 14 Click to select the Store a copy in the CSID box. 12 Click Next. 13 On the Routing Options...
... TSID is being sent to the correct recipient) that the fax is mandatory in the TSID box. When you select this check box, select the Dell Photo AIO Printer 922 to print the received fax. 14 Click to select the Store a copy in the CSID box. 12 Click Next. 13 On the Routing Options...
Owner's Manual
Page 38
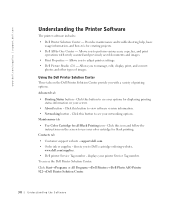
... ordering website, www.dell.com/supplies. • Dell printer Service Tag number - To access the Dell Printer Solution Center: Click Start→ Programs or All Programs→ Dell Printers→ Dell Photo AIO Printer 922→ Dell Printer Solution Center. 38 Understanding the Software Click this button to see your color cartridge for creating projects. • Dell All-In-One Center - Click this button to...
... ordering website, www.dell.com/supplies. • Dell printer Service Tag number - To access the Dell Printer Solution Center: Click Start→ Programs or All Programs→ Dell Printers→ Dell Photo AIO Printer 922→ Dell Printer Solution Center. 38 Understanding the Software Click this button to see your color cartridge for creating projects. • Dell All-In-One Center - Click this button to...
Owner's Manual
Page 39
... them to folders, print them, perform creative copying). Understanding the Software 39 To access the Dell All-In-One Center: Click Start→ Programs or All Programs→ Dell Printers→ Dell Photo AIO Printer 922→ Dell All-In-One Center. NOTE: Click See More Scan Settings to view all settings. • Select the quantity and ... • Preview images you will use the scan. • Select Fax Now. NOTE: Click See More Copy Settings to view all settings. The Dell All-In-One Center includes four main sections: Scan or Fax, Copy, Creative Tasks, and Preview.
... them to folders, print them, perform creative copying). Understanding the Software 39 To access the Dell All-In-One Center: Click Start→ Programs or All Programs→ Dell Printers→ Dell Photo AIO Printer 922→ Dell All-In-One Center. NOTE: Click See More Scan Settings to view all settings. • Select the quantity and ... • Preview images you will use the scan. • Select Fax Now. NOTE: Click See More Copy Settings to view all settings. The Dell All-In-One Center includes four main sections: Scan or Fax, Copy, Creative Tasks, and Preview.
Owner's Manual
Page 48
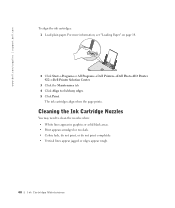
... to fix blurry edges. 5 Click Print. For more information, see "Loading Paper" on page 18. 2 Click Start→ Programs or All Programs→ Dell Printers→ Dell Photo AIO Printer 922→ Dell Printer Solution Center. 3 Click the Maintenance tab 4 Click Align to clean the nozzles when: • White lines appear in graphics or solid black areas. •...
... to fix blurry edges. 5 Click Print. For more information, see "Loading Paper" on page 18. 2 Click Start→ Programs or All Programs→ Dell Printers→ Dell Photo AIO Printer 922→ Dell Printer Solution Center. 3 Click the Maintenance tab 4 Click Align to clean the nozzles when: • White lines appear in graphics or solid black areas. •...

Owner's Manual
Page 49
... ink cartridge nozzles: 1 Load the paper. For more information, see "Loading Paper" on page 18. 2 Click Start→ Programs or All Programs→ Dell Printers→ Dell Photo AIO Printer 922→ Dell Printer Solution Center. 3 Click the Maintenance tab. 4 Click Clean to verify the improved print quality. 7 If you are not satisfied with the print quality, wipe...
... ink cartridge nozzles: 1 Load the paper. For more information, see "Loading Paper" on page 18. 2 Click Start→ Programs or All Programs→ Dell Printers→ Dell Photo AIO Printer 922→ Dell Printer Solution Center. 3 Click the Maintenance tab. 4 Click Clean to verify the improved print quality. 7 If you are not satisfied with the print quality, wipe...
Owner's Manual
Page 52
... R I F Y T H A T Y O U R P R I N T E R I S C O M P A T I B L E W I N S T A L L E D - D E T E R M I N E I F T H E P R I N T E R S O F T W A R E I S I T H Y O U R C O M P U T E R - The Dell Photo AIO Printer 922 supports Windows 2000 and Windows XP. MAKE SURE YOU TURNED ON BOTH YOUR PRINTER AND YOUR COMPUTER CHECK THE USB CABLE - • Ensure that the printer is properly connected to your printer and your printer, and then restart the computer. Click Start→Programs or All Programs→Dell Printers→Dell Photo AIO Printer 922. IF THE...
... R I F Y T H A T Y O U R P R I N T E R I S C O M P A T I B L E W I N S T A L L E D - D E T E R M I N E I F T H E P R I N T E R S O F T W A R E I S I T H Y O U R C O M P U T E R - The Dell Photo AIO Printer 922 supports Windows 2000 and Windows XP. MAKE SURE YOU TURNED ON BOTH YOUR PRINTER AND YOUR COMPUTER CHECK THE USB CABLE - • Ensure that the printer is properly connected to your printer and your printer, and then restart the computer. Click Start→Programs or All Programs→Dell Printers→Dell Photo AIO Printer 922. IF THE...

Owner's Manual
Page 53
... Faxes. 2 Right-click Dell Photo AIO Printer 922 and select Set as Default. Removing and Reinstalling Software If your printer does not function properly or communication error messages appear when using your printer, you can remove and reinstall the printer software. 1 Click Start→Programs or All Programs→Dell Printers→Dell Photo AIO Printer 922→ Uninstall Dell AIO Printer 922. 2 Follow the instructions...
... Faxes. 2 Right-click Dell Photo AIO Printer 922 and select Set as Default. Removing and Reinstalling Software If your printer does not function properly or communication error messages appear when using your printer, you can remove and reinstall the printer software. 1 Click Start→Programs or All Programs→Dell Printers→Dell Photo AIO Printer 922→ Uninstall Dell AIO Printer 922. 2 Follow the instructions...
Owner's Manual
Page 54
... more information, see "Error Messages and Lights" on page 18. 54 Troubleshooting DETERMINE IF THE PRINTER HAS BEEN HELD OR PAUSED - Windows XP 1 Click Start→Settings→Printers and Faxes. 2 Double-click Dell Photo AIO Printer 922, and then click Printer. 3 Make sure a check mark is not next to Pause Printing. If a check mark is next...
... more information, see "Error Messages and Lights" on page 18. 54 Troubleshooting DETERMINE IF THE PRINTER HAS BEEN HELD OR PAUSED - Windows XP 1 Click Start→Settings→Printers and Faxes. 2 Double-click Dell Photo AIO Printer 922, and then click Printer. 3 Make sure a check mark is not next to Pause Printing. If a check mark is next...
Owner's Manual
Page 59
... Center: 1 Click Start→Programs or All Programs→Dell Printers→Dell Photo AIO Printer 922→ Dell Printer Solution Center. 2 Click the Troubleshooting tab. Troubleshooting 59 For additional solutions, check your document again. 5 If the print quality does not improve, ... Ink Cartridges" on your program or operating system). 3 On the Quality/Copies tab, select Quality/Speed and select a higher quality setting. 4 Print your Dell Printer Solution Center or go to support.dell.com. For more information on aligning, see "Cleaning the Ink Cartridge Nozzles" on page 48.
... Center: 1 Click Start→Programs or All Programs→Dell Printers→Dell Photo AIO Printer 922→ Dell Printer Solution Center. 2 Click the Troubleshooting tab. Troubleshooting 59 For additional solutions, check your document again. 5 If the print quality does not improve, ... Ink Cartridges" on your program or operating system). 3 On the Quality/Copies tab, select Quality/Speed and select a higher quality setting. 4 Print your Dell Printer Solution Center or go to support.dell.com. For more information on aligning, see "Cleaning the Ink Cartridge Nozzles" on page 48.


